Thursday, September 10th, 2009

Outlook 2007 – Create a Custom e-mail merge

When you need to email lots of people at a time, such as your business contact list you can do this from inside Outlook.

To do this, first open your Contacts area and select the Contacts to email as a group. You can do this by Control + Clicking on each contact to select them.

Then select Tools > Mail Merge to create the message. Choose Only Selected Contacts and then select whether to create a printed document or to email it and then click Ok to switch to Word to finish the process there.

Helen Bradley

Tuesday, September 8th, 2009

Smart scaling with Content-Aware Scale


New to Photoshop CS4 is its Content-Aware Scale tool which allows you to transform an image in a way that you’ve never been able to do before in Photoshop. The technology itself has been around for some time and you may have been familiar with the website rsizr.com which offers content aware scaling as an online service. However, the feature is now built into Photoshop making it a readily accessible tool for images large and small.

In this post, I’ll explain how to use content aware scaling and how to protect areas of your image from being distorted in the process.

Step 1
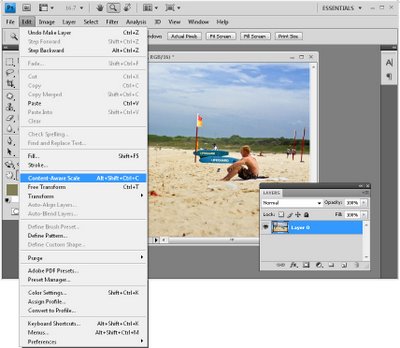
To see the tool at work open an image in Photoshop CS4 (this feature is not in other versions of Photoshop), double-click the background layer to turn it into a regular layer and choose Edit > Content-Aware Scale.

Step 2
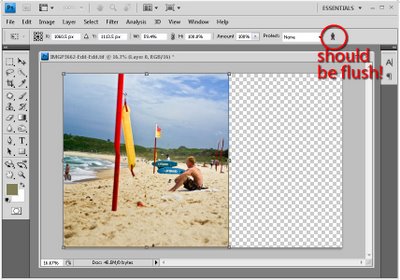
Notice the sizing handles on the image. Drag from one side inwards and watch what happens as you do so. You’ll find that the image shrinks in size, but most of the information in the image is still there – the image is made narrower but key elements in it are not squashed up.

If your image includes people, click the person indicator on the toolbar so that it is not pressed in – when the indicator is flush with the toolbar the option is selected. This protects people by recognizing skin tones and ensuring that they are not distorted by the effect.

Step 3
You can also protect elements in the image using an alpha channel mask. This technique is handy if you have areas of the image that you want to retain at the expense of other areas and it can also be used to protect people in the image.

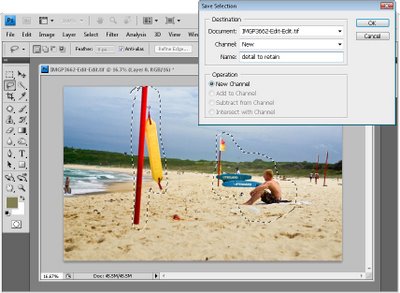
Make a rough selection around the area that you do not want to be affected by the scale effect. A good tool to use is the Lasso tool – select an area and hold the Shift key to make a second selection over another area, if necessary.

Choose Select > Save Selection, type a name for the selection, such as detail mask, make sure that the Channel is set to New and the operation is set to New Channel and click Ok. Press Ctrl + D (Command + D on the Mac) to deselect your selection.

Step 4
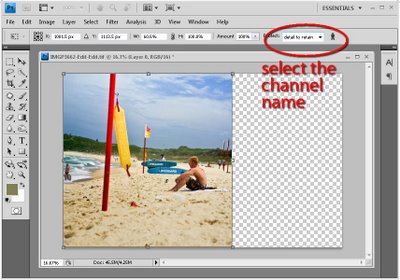
Now choose Edit > Content-Aware Scale and from the Protect dropdown list on the toolbar, select the mask you just created. Scale the image and notice that the masked areas are protected from being damaged as the image shrinks in size.

Content-Aware Scaling is a handy way to change the aspect ratio of an image. For example, you can turn a landscape image into a square image and close up the space between people in a photo if they are a long way apart. It also works in reverse and you can use it to make an image larger. You may need to do some work with the clone tool to repair small areas of the image damaged as the result of the scaling but typically the tool does a very good job.

If you don’t have Photoshop CS4 then head, image in hand, over to rsizr.com and give the online tool a try. Here is an earlier post I wrote on the Rsizr tool.

Helen Bradley

Tuesday, September 8th, 2009

Is your camera manual a door stop or a useful reference?


In the first flush of excitement of owning a new digital camera you’re probably like the rest of us and you read the camera manual. Well, you don’t actually read it but you sift through it far enough to find the ‘important bits’ like how to turn it on and how to view your images. You might also learn how to use a few of its settings and then you put it away. As long as you’re taking pretty good photos, is there any reason the manual shouldn’t stay on the shelf? Yes, there are. Your camera manual is chock full of good reasons for getting it down off the shelf. Reading it will show you more about the features it has for improving the quality of your images and for shooting special effects.

Improve image quality
Not all cameras come configured for shooting in the highest quality mode or for saving images with the lowest loss of data. This is because the memory cards which come with most cameras are so small they don’t hold many high quality/low compression images. If you’ve replaced your camera’s card with a better one (and chances are that you have), you will want to take images at the best possible quality. So, check your manual so you understand what quality settings are available and how to configure your camera to use these. Also ensure you’re using the lowest compression mode so that more data is not lost than is absolutely necessary when your photos are saved to the memory card. This is particularly important if you’re using an older camera with a low number of mega pixels – you want to retain as much image data as possible.

Changing ISO
If your camera is capable of some manual operation one of these features might be the ability to alter its ISO equivalency. ISO is a method of rating film’s sensitivity to light. The lower the ISO number the less sensitive the film is and it’s said to be slower film because the shutter must be open longer to make up for this lack of light sensitivity.

At the other end, high numbers indicate a high sensitivity to light and the film is said to be faster. Typically the film (or camera ISO equivalency), you’re most likely to use is in the range 100-400. So why wouldn’t you use ISO 400 all the time? While 400 film is fast and while it can freeze action and is handy where the light is poor, the downside is that the images it produces are grainy. In fact, the higher the ISO number, the more grainy the images are and this is true of film and digital images.

If your camera supports different ISO values – use higher numbers (400), on cloudy days or indoors – you might even find you can do without a flash with this setting. On a bright day, use 100 or 200 to get better results in the bright light.

This photo can be captured with a low ISO as the background is very light. You can also step up the exposure to ensure the subject is well lit even though the sky will be blown out.

White balance
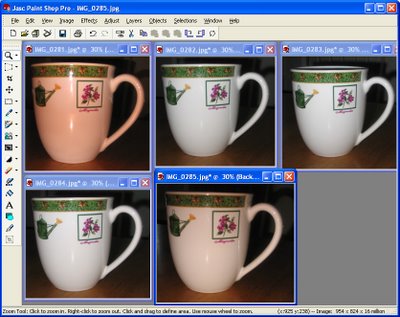
Most cameras have a white balance adjustment which lets you adjust the image for the kind of light you’re shooting in. Sunlight has a different colour to the colour of the light you use when shooting indoors. If you don’t adjust white balance you will find images which you take indoors will have a yellow or a blue cast depending on what type of light source (incandescent or fluorescent) is used. You can adjust for this colour cast by setting your camera’s white balance setting to match the type of light you’re using.

This is one object photographed with a range of white balance settings – choose the one which gives the most desired effect.

Exposure controls
When shooting objects on light backgrounds or people standing in front of very light or back lit backgrounds you may find the object or person is too dark. This is because the camera is taking into account the light background when it’s setting its exposure. Even if your camera has no manual exposure control, you can generally increase or decrease exposure by one or two stops using an Exposure Value adjustment. Increase exposure to lighten the subject (even at the expense of ‘blowing out’ the background) or decrease it to darken the subject if there’s too much light.

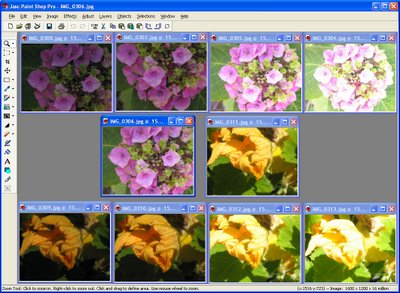
From left to right are the central image shot using -2, -1, +1 and +2 exposure value settings.

Other features
There are numerous other features your camera has available and which you may not have realised were there when you purchased it. Look for options such as shooting in black and white or in sepia. In many cases a simple snapshot can take on the look of a work of art when shot in black and white. Look out too for opportunities to shoot in black and white in the early morning (just after sunrise) or when shooting close ups of children or animals.

By selecting the macro setting on your camera you can capture items close up and they will still be crisply in focus with a sophisticated depth of field effect.

Your camera may also offer a slower than usual shutter speed setting. This will require you to use a tripod to ensure the camera is kept steady while you’re shooting. Using a slow shutter speed gives great results at night or in low light situations where a flash doesn’t have the required range. For example use a slow shutter speed for fireworks to get the benefit of the shower of lights coming after the firework has exploded or to capture tail lights from moving vehicles.

Your camera will have a setting for saturation which you can boost to get wonderfully saturated photos like this.

Information on all these options can be gleaned from reading your camera’s manual. At the same time, look out for other options such as the ability to use PAL output format so you can plug your camera into a TV to replay your images on the TV screen. You can also purchase a power adapter for most digital cameras which lets you use mains power to save batteries in some indoor situations.

So, when should you read your camera’s manual? I suggest you read it when you first buy your camera so you’re able to get started using it. A week or two later, revisit the manual – you’ll be ready to learn more about other features at this time. Then, look at it again in about six months, by then you’ll have taken some shots you’re not happy with for one reason or another. You’ll be ready to look at more advanced tools such as white balance or exposure control to see if these would help avoid repeated problems in future.

Helen Bradley

Monday, September 7th, 2009

Centering a layer in Photoshop

Often you will have a layer in a Photoshop image that needs to be centered in the document.

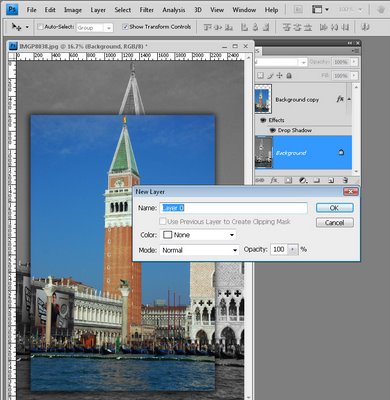
To do this, first make sure that you have a full size layer that is a regular layer, not the background layer. If necessary, convert the background layer to a regular layer by double clicking on the background layer and click Ok.

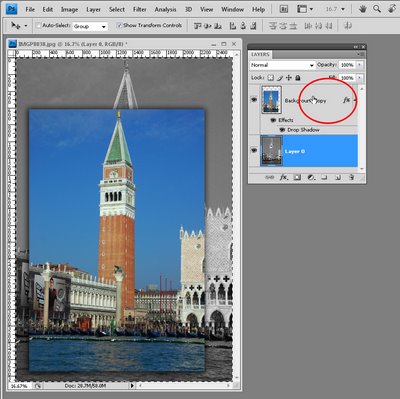
Now Ctrl + Click on the background layer which is the full size of the image. It should have marching ants around it. With this layer selected, click the layer that you want to center. The marching ants should be around the entire image but the selected layer should be the one you want to center.

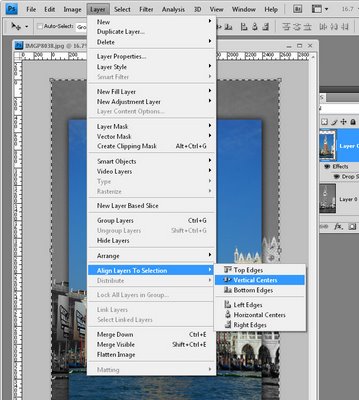
Select Layer > Align Layers to Selection > Vertical Centers to center the smaller layer within the edges of the large one.

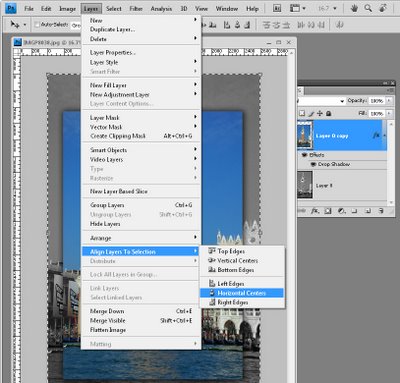
Repeat and choose Layer > Align Layers to Selection > Horizontal Centers to center them horizontally. The second layer is now centered in the middle of the main ima

Helen Bradley

Saturday, September 5th, 2009

Working with Virtual copies in Lightroom


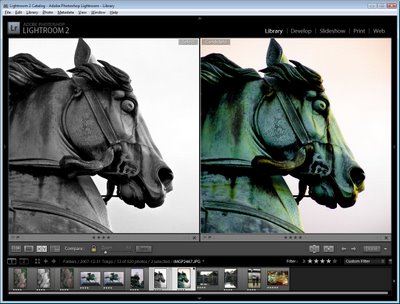
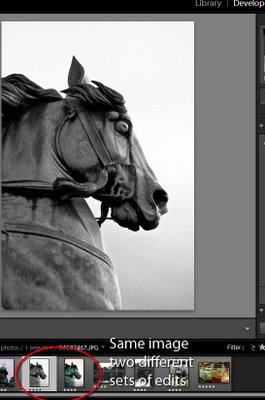
The Virtual copy feature of Adobe Photoshop Lightroom lets you experiment with multiple editing options for an image without duplicating the original image. So, for example, if you have an image that you think would look good either with its color enhanced or rendered in black and white you can apply both fixes to the same image to see which you like best using virtual copies. No only will you see both versions in Lightroom, you can export each as a different image and you can work with them independently of each other.

Follow these steps to see virtual copies at work:

Step 1
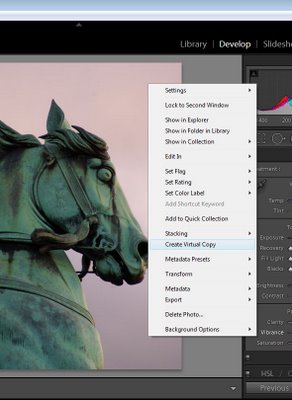
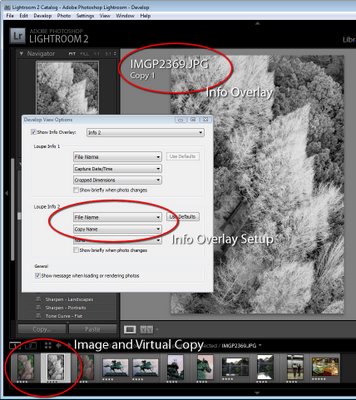
Inside Lightroom locate the photo to adjust in the film strip, right click it and choose Create Virtual Copy. In the film strip you will see both images and, when you select them, you will see they have the same file name. If you have the Info Overlay displayed it too shows the same data for both images.

Step 2
Once you have created the virtual copy you can edit it independently of the original and compare the results. You can also make additional virtual copies and each behaves independently of the original but is, in reality, the same image.

step 3
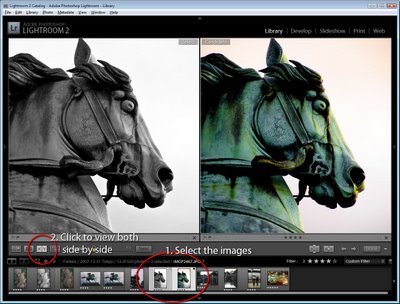
To view the two images side by side, return to Library view, select both the image and the Virtual copy and click the XY button above the filmstrip. This shows the two images side by side.

Tip
One problem with virtual copies is determining which is the original and which is the copy. You will need to do this, for example, if you want to delete the virtual copy leaving the original in place.

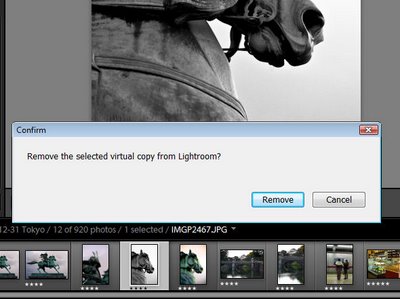
To delete a virtual copy, right-click the version of the image that you think is the virtual copy and choose Delete Photo. If it is the virtual copy you will see the dialog prompt “Remove the selected virtual copy from Lightroom?” – click Remove to delete it.

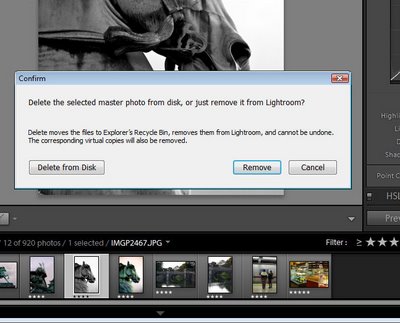
If the selected version was not the virtual copy you will see the prompt “Delete the selected master photo from disk, or just remove it from Lightroom?”. This tells you that the selected image is not the virtual copy but the original. Click Cancel if you do not intend removing both the original and the Virtual copy(ies) from Lightroom or from your disk.

If you use Virtual copies a lot you can configure the Info Overlay to show you which image is a copy. To do this, choose View > View Options and click Show Info Overlay. Reconfigure one of the info sets to include not only the File Name but also the Copy Name. The original image will display the filename only and virtual copies will display the filename and Copy 1 (or Copy 2).

Helen Bradley

Friday, September 4th, 2009

Better Travel Photography #4 – Find a new angle to look from

Do your travel photographs look just like everyone else’s?

If you wonder why you lug your digital SLR half way around the world and still come home with postcard images, it’s time to revisit the way you photograph your travels. Here is part 4 in my new series of Better Travel Photography – a guide to getting great travel photos that don’t look like everyone else’s..

Here’s today’s tip – Find a new angle to shoot from
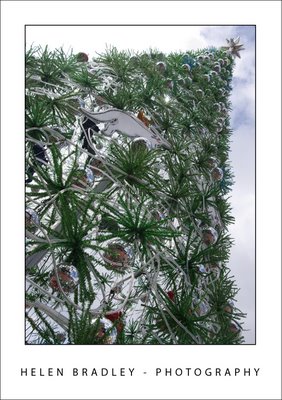
A great way to enhance your travel photography is to turn the camera forty five degrees and capture the objects at an angle.

So, for example, capture tall buildings and lighthouses at just the right angle and you’ll have an image seldom seen before.

Even rows of buildings shot on an angle give you a double bonus, repeated elements and a new angle on capturing them – the result is something very special.

Helen Bradley

Thursday, September 3rd, 2009

Create a Distribution List in Outlook


When you regularly email a lot of people at once, it makes sense to assemble a distribution list to simplify the task. Then you can send the email to all the people in the list in one step, rather than having to select each member individually.

To create a distribution list in Outlook, select Tools > Address Book and choose File > New Entry.
From the “Select the entry type” list select New Distribution List.In the “Put this entry” area, select Contacts and click OK.

Give your list a name and, to add members to it from your existing Contacts, click the Select Members button. Double click the members in the dialog to add them to the Members area at the foot of the dialog. When you’re done, click Ok.

To add the details of someone who isn’t in your existing Contacts, click the Add New button, then type their details into the dialog.

When you’re done, click Save & Close to finish.

In future you can add the list name to the To area in an outgoing email to send the email to the list members, or better still, include it in the BCC line to keep the members secret from each other.

Helen Bradley

Wednesday, September 2nd, 2009

Sunbursts in Photoshop

Following on from the post on creating silhouettes in Photoshop, here is how to create fun sunburst images to put behind them.
Step 1
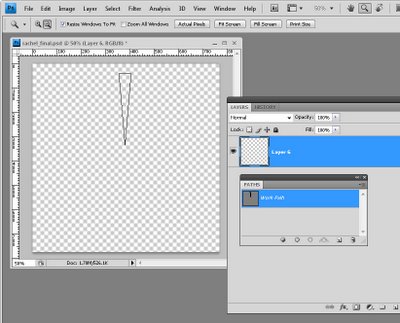
Start by adding a new layer to your image by choosing Layer > New > Layer.

Click the Pen tool, ensure the Paths option is selected on the options bar and draw a single triangle.

Do this by clicking where the point will be at around the middle of the image, then click above this and slightly to the left to create the first of the sides, hold the Shift key and then click to the right to create the base and then click again over the original point to finish. You now have a triangle path.

Step 2
View the Paths palette; click the Load Path as a Selection button at the foot of the palette.

Set the foreground colour to your choice of fill colour and press Alt + Backspace to fill the shape with this colour.

Press Ctrl + D to turn the selection off.
Step 3
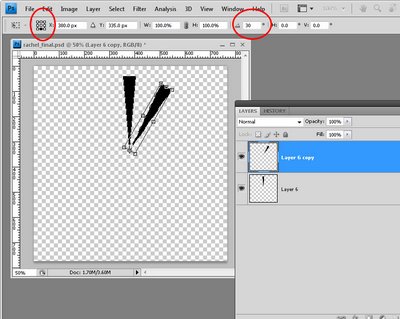
Click on the layer itself, choose Layer > New > Layer Via Copy then choose Edit > Transform > Rotate to display the rotation tool options.

In the Reference Point Location block select the bottom middle of the nine boxes. Set the angle to 15 degrees or some value that divides evenly into 360 and click the Commit Transform button.
Step 4
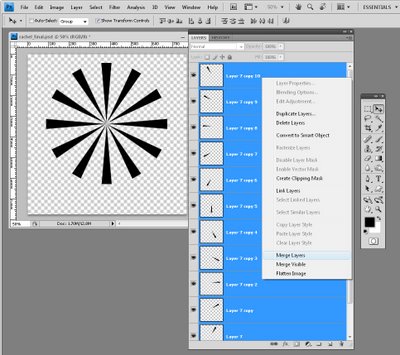
Select Layer > New > Layer Via Copy and then Edit > Transform > Again.

Repeating these two commands or pressing the shortcut keystrokes Ctrl + J and Ctrl + Shift + T lets you repeat the copy and transform task and, in a few keystrokes, you will have a piece of custom art. When you’re done, merge all the layers except the background layer.

Here is how I created my silhouette background:
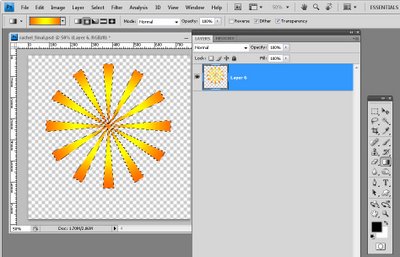
Control + Click on the flattened sunburst layer and select the Gradient tool. Select a yellow/orange radial gradient and fill the shape with it by dragging from the middle of the shape outwards.
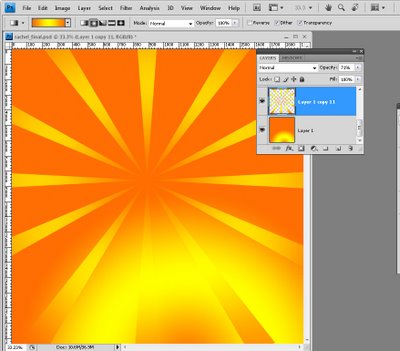
Add a second new layer and drag it to the bottom of the layer stack. Fill it with the same gradient but this time drag from outside the image to the middle to reverse the gradient.
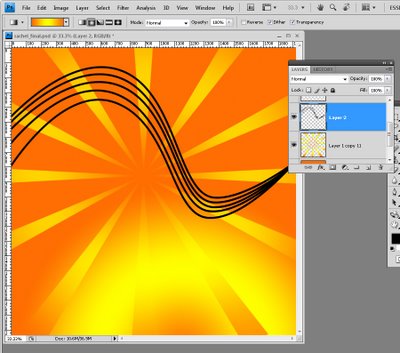
The music staff is created using a pen line – I drew a single wavy line using the pen tool with the Paths option selected.

Display the Paths palette and click on the Work Path layer.

Click the Brush tool, set it to a small hard brush, set the foreground colour to black and click the Stroke path with brush icon at the foot of the palette to add a brush stroke to the pen line.

Move the line using the Path Selection Tool and repeat the process to add a stroke to this path. Repeat until you have five lines in total.
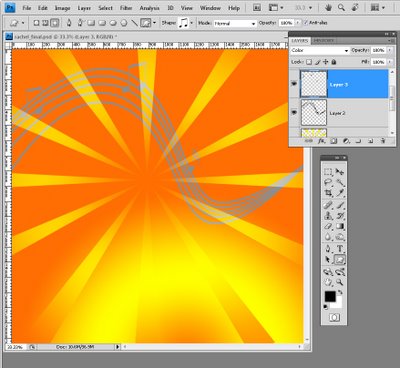
I finished by adding a few musical notes using shapes from my Photoshop shapes collection.

You can download free music shapes from http://myphotoshopbrushes.com/custom_shapes/id/2033 if desired.
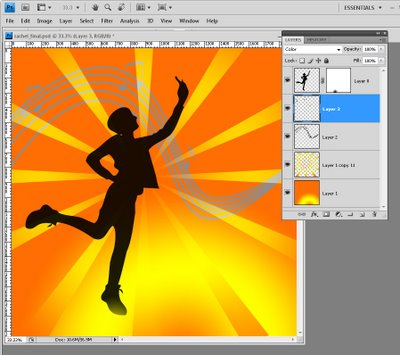
This time use the filled pixels option to fill the shapes as you draw them. I blended both drawing layers using the Color blend mode and then added the silhouette.

Helen Bradley

Tuesday, September 1st, 2009

Capturing Autumn Colours


With cool autumn days comes a change in colour in many of the trees around us. While here in California we don’t have the great swashes of autumn colour that they enjoy on the east coast there are still patches of colour to capture that you won’t encounter any other time of the year.
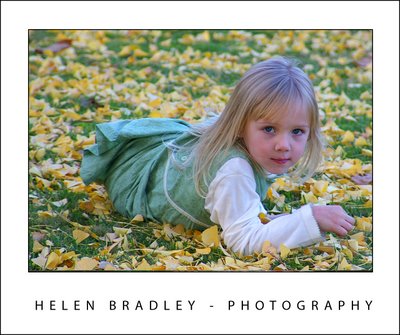
So, it’s time to grab your camera and head out to make the most of the season. If you’ve got little people in your life (or you’re just a big kid yourself), you’ll find piles of golden leaves that just beg to be rolled in or thrown high in the air!

The best time to capture the colours of autumn is when the colours start appearing. The time frame between the best of the autumn colour and bare branches can be very short. A brief thunderstorm or burst of strong wind is all that separates a beautiful tree laden with autumn colour from being a pile of leaves on the ground. It’s all too easy to wait too long for the perfect day that never comes and, along the way, miss out on some great shots.


When capturing autumn colour look for contrasts such as the play of a golden tree against a bright blue sky. While banks of yellow and gold make great photos, a sharp contrast between two colours can make for a great image.

If you miss the best of the colour, and if there aren’t a lot of leaves around – get up close and shoot those leaves that you can find. Even a few splashes of colour can capture the feel of the season.

Use a filter
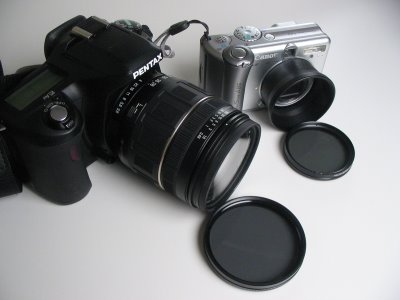
If you’re using a SLR (single lens reflex) camera with removable lenses you will be able to purchase and use filters with your camera. In addition, some point and shoot cameras can also take these filters. If yours can, then consider investing in a Polarizing filter. There are two types of polarizing filters, for a film SLR camera you will use a linear polarizer and for a digital SLR or point and shoot, you use a circular polarizer. These filters screw into the front of the lens and they work in a similar way to your polarized sunglasses by cutting the glare and giving you better and more intense colours particularly when the sun is very bright.

Don’t forget to remove the polarizer when you have finished shooting – you won’t want to use it indoors, for example or in low light conditions. Of all the filters you can purchase, a polarizing filter will give you results you can’t duplicate using software fixes.


The Digital SLR on the left has lenses that take filters like the polarizing filter shown. You can buy the special adapter shown for some point and shoot digital cameras such as the one on the right – you simply screw the filters on to the adapter.

Finding good shots
The sun in autumn is lower in the sky than it is in summer when it is almost overhead. This low angle of light makes for long shadows which give you great photo opportunities.

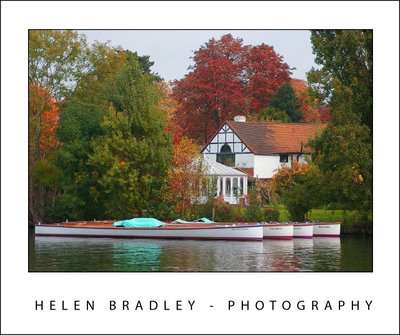
Also look out for autumn colours reflected in still water or buildings. The contrast between the autumn colours and other objects in the water or the angular shapes of a building are an interesting contrast.

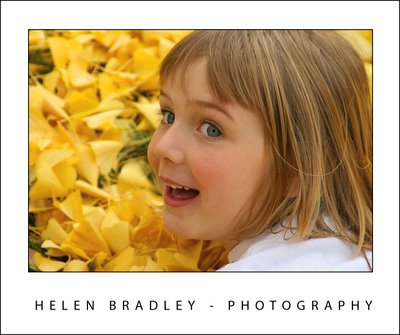
If you live in the city, chances are that your local park has trees that will change colour with the season so look for opportunities to capture the colours there. If you’re shooting the kids as they play among the leaves, get down to their level so you’re looking directly at them and not at the top of their heads. Alternately, capture them as they gather up leaves and throw them into the air. To get best results with action shots like this, use your camera’s sports mode so the action is frozen. If your camera has a burst shooting mode this is handy too as it will fire off a series of shots in quick succession so you capture all the action. You can also simply use the autumn colours to provide a background to your portraits. If you use a large aperture setting of around f2 the background will be blurred and the subject will be in sharp focus. Smaller aperture settings will give you more of the photo in focus.


When you’re shooting in autumn, remember that all the standard techniques for taking great photos apply. You should compose your images carefully so it’s clear what the subject of the photo is. Avoid placing the horizon directly across the middle of the photo and, instead move it up or down to create a more interesting shot. Make sure to check the background of your photos so you don’t capture light poles and other distractions that will ruin the shot.

Autumn is all about looking for the opportunities that the season provides and taking advantage of them.

Helen Bradley

Page 2 of 212