Tuesday, January 18th, 2011

Use Lightroom to Remove Sensor Dust

One of the annoyances most photographers encounter from time to time is sensor dust. This is dust that you get on the camera’s sensor and which shows up in your images as dark marks or flaws on your photos. Most often you’ll see this in the sky but it can appear anywhere in an image and it will appear in the same place in all your images – the tell tale sign that you have problems.

Of course, the only way to get rid of the dust is to clean your camera either using its dust removal option or by physically cleaning it. However, chances are that the reason you know you have a dust problem is that you see it on your photos. For these images, at least, cleaning the camera won’t help. Instead, digital removal is required.

If you’re faced with a series of photos that have dust problems, Lightroom can simplify the process of fixing them. Its Spot Removal tool can be used to fix sensor dust and, the benefit of doing the work in Lightroom rather than Photoshop, for example, is that once you have one image fixed, you can automatically fix most of the others.

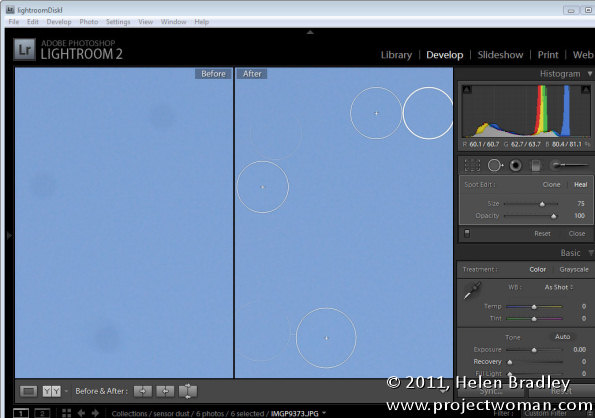
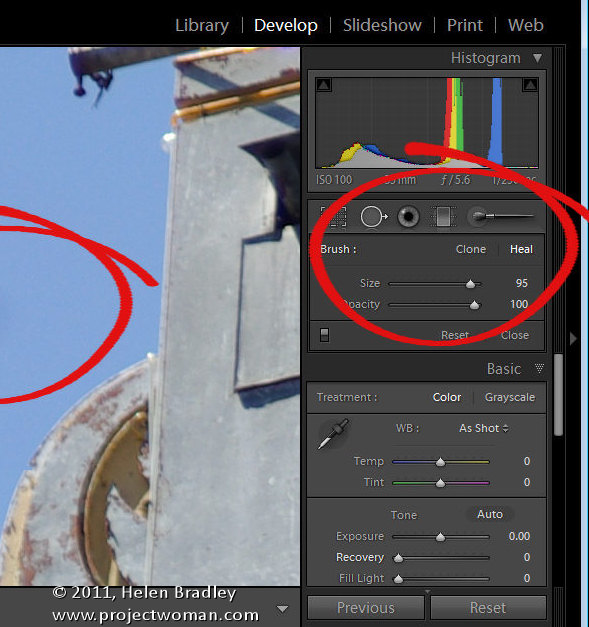
To get started, locate one image in the sequence that has sensor dust issues. Switch to Develop move and select the Spot Removal tool. Set it to Heal (the other option is Clone). Set the brush size to something large enough to cover the problem area and set its Opacity to 100 percent.

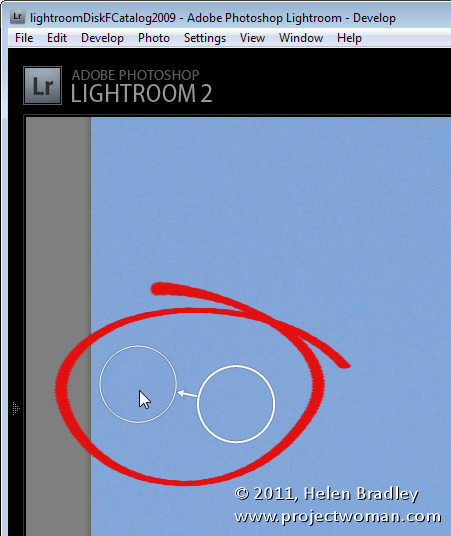
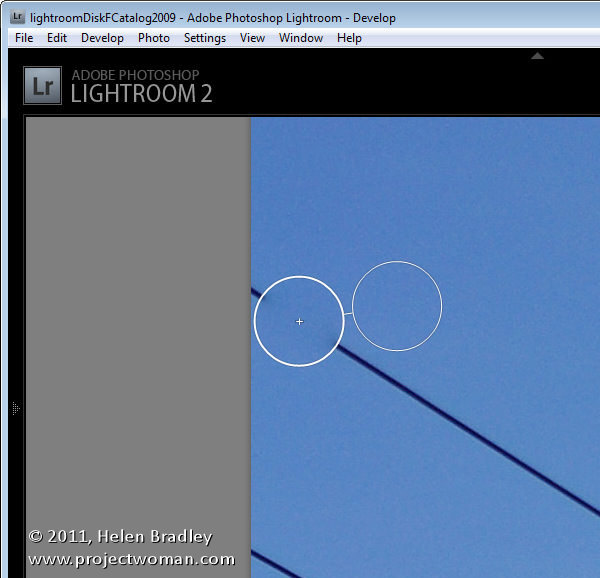
Click on the dust to set the location for the fix. You’ll see two circles appear on the image; one over the problem area (the spot circle) and the second over the area used to fix it (the sample circle). You can tell which circle is which as the arrow between them points from the sample circle towards the spot circle.

You can drag to reposition either circle and you can drag on one circle when the mouse pointer shows as a double headed arrow to resize the pair.

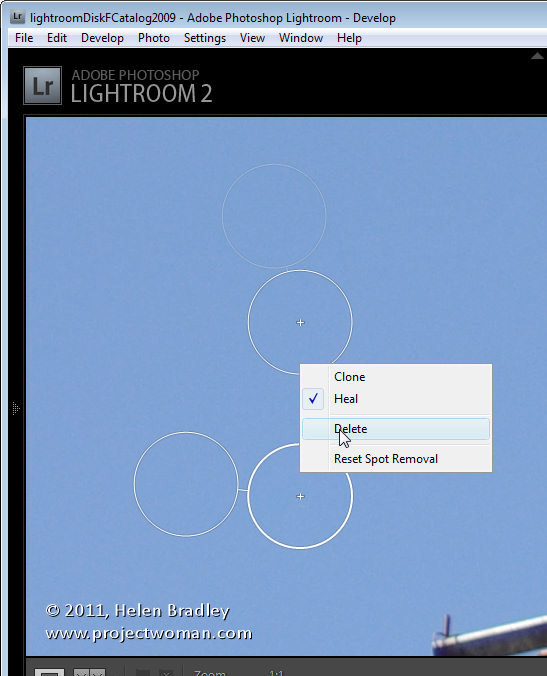
You can add multiple fixes to one image and, if you make too many, right click on the one to delete and choose Delete from the menu.

You can also use the right click menu to change from Heal to Clone to see if you get a better fix with this setting.

Once you have fixed the spots on the current image, you can copy these to other images. To do this, click the Close button to close the Spot Removal Tool drawer.

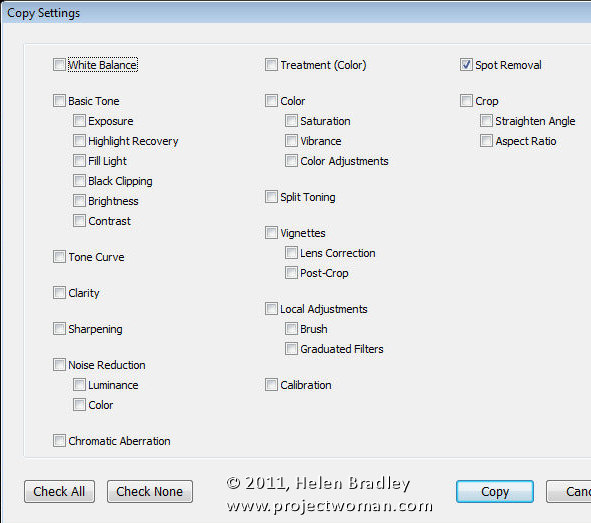
Right click the image and choose Settings > Copy Settings and when the dialog appears, select Spot Removal, disable all other options and click Copy.

Select one or more images in the sequence that you shot and that need the fix applied to them. These do not have to share the same aspect ratio as Lightroom can fix portrait and landscape images at the one time.

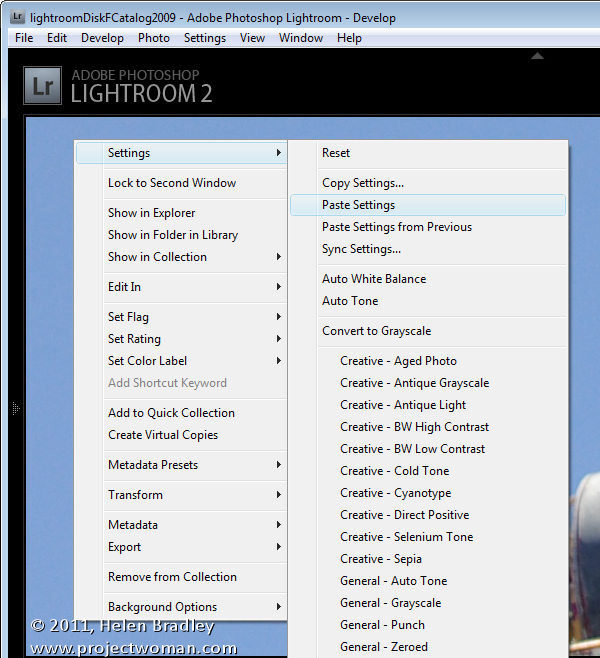
Right click and choose Settings > Paste Settings. This will paste the fix onto the other images. Alternately you can select the fixed image and one or more other images, click Sync and select Spot Removal.

Check each fixed image in turn. Some images may have image content under the sample circle that doesn’t provide a suitable match for the problem area so you will need to move the sample circle to adjust the fix.

However, the entire process should be quicker than performing the fix to each image individually in Photoshop, for example.

Helen Bradley

Monday, January 17th, 2011

Step 12 Simple Photo-editing workflow – Performing major surgery

Quite often you will find that an otherwise pleasant image has been ruined by some distracting background element.

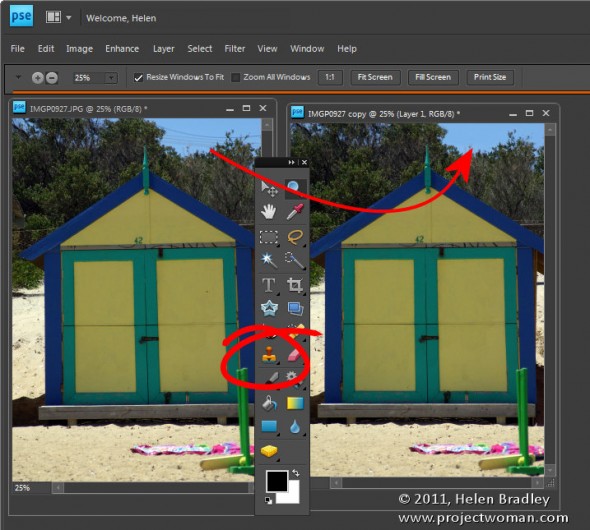
To remove this, use the Clone Stamp tool. Start by sampling an area of the image to use as the source data to fix the problem – you do this by Alt + Clicking on the portion of the image to use.

Then “paint over” the problem area. The results will be less obvious if you click with the brush rather than drag in a painting motion.

You may need to resample the source area from time to time as you work to find a good match for the area you are painting onto.

It is best to use a brush that is an appropriate size for the task – for detail work it should be quite small, for example, and it should have a low hardness value so you don’t get harsh edges on the fixed area.

If you are familiar with using layers, apply the fix to a new empty layer so that you can adjust and blend the layer later on if need be.

If you are cloning onto a new layer, make sure to have the All layers checkbox selected on the tool options bar so you sample from all the layers – the layer you’re working on won’t have any data so you can’t sample from it alone.

Other stories in this Simple Photo- Editing Workflow series:

Step 11 – Getting to black and white

Step 10 – Fixing Redeye

Step 9 – Fixing Imperfections

Step 8 – Fix Skin tones

Step 7 – Fix Color problems

Step 6 – Fix muddy images

Step 5 – Fixing under and overexposed images

Step 4 – Straighten

Step 3 – Crop an image

Step 2 – Make a duplicate

Step 1 – Assess the image

Helen Bradley

Saturday, January 15th, 2011

Create and Undo Columns in Word

Create two columns in Word and remove columns

Continuing the short series on working with columns in Word, here’s how to create a column layout in Word.

Create two columns

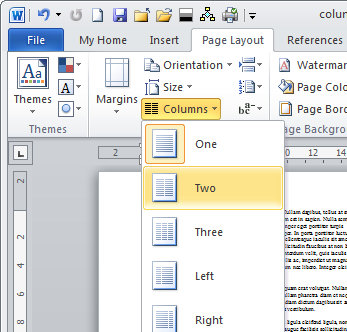
To turn an entire document into columns in Word 2007 and 2010 click the Page Layout tab and select Columns > Two. This immediately formats all the text in your document into two columns.

In Word 2003 you’ll choose Format > Columns, select Two (or Three etc.,) and click Ok.

Remove two columns

To undo the change and set your document back to one column in effectively undoing the two columns, repeat the process. In Word 2007 or Word 2010, choose Page Layout > Columns > One. The default for any document is one column so all you’re doing is going back to the default. In Word 2003 choose Format > Columns > One.

Make only part of the document into columns

If you want only part of a document to be in columns then select that part of the document first. For example, you may select all the content after the heading, leaving the heading unselected so it will be full width of the page. With that content selected, choose Page Layout > Columns and then select the number of columns.

This will make just the selected text into columns, leaving everything else full width of the page.

Again, if that piece of text ever needs to be returned to a single column just click inside it, choose Page Layout > Columns > One and it will be restore to the way it used to look.

So, that’s how to make text in columns in Word, how to delete columns and how to make only part of a document into columns.

Helen Bradley

Thursday, January 13th, 2011

Unlocking layers in Photoshop

Unlock the Background layer in Photoshop

When you first start working with layers in Photoshop, you’ll discover something about the background layer. The layer is locked which means a few things. Firstly, you can’t move the layer anywhere else in the layer stack because it’s locked. Secondly, while you can use the eraser on the bottom layer – because it is the bottom layer the eraser doesn’t erase to transparent and instead it erases to the background color. You also can’t add a layer mask to the background layer again, because it is locked and it cannot have any transparency applied to it.

When used on a Background layer the Background Eraser and Magic Eraser might look like they are making the background layer transparent but they are, in fact, first converting the background layer into a regular layer unlocking it in the process and then they perform the erase.

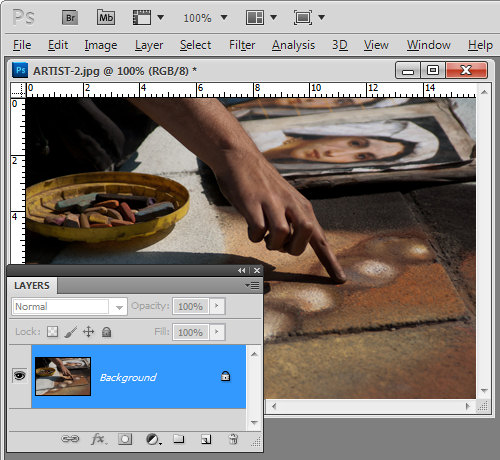
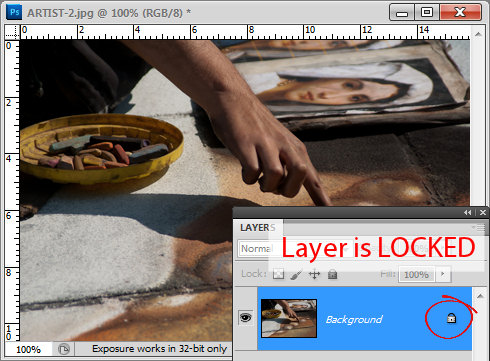
You will see that the background layer of a document is locked if you open the layers palette by choosing Window > Layers. There is a lock icon opposite the layer.

How to unlock a layer in Photoshop and Photoshop Elements

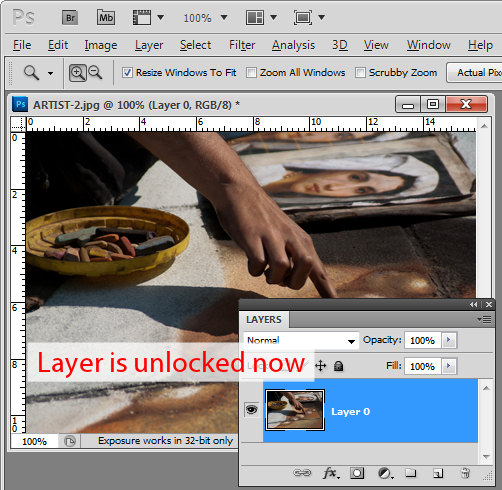
There are a few ways to unlock the layer in Photoshop (these also work in Photoshop Elements). The first one is to double click on the background layer and a New Layer dialog will appear. If you want to rename the background layer, type a name for it, otherwise just click Ok and the background layer will be converted to Layer 0. You’ll see that the lock icon is now removed allowing you to add a layer mask to the layer and delete content from it as well as move it elsewhere in the layer stack.

Another way to unlock a locked layer is to drag the lock icon onto the trashcan. You can also right click the background layer and choose Layer from background and click Ok.

Photoshop - how to unlock a layer in Photoshop and Photoshop Elements

Helen Bradley

Thursday, January 13th, 2011

Moving between columns in Word

jump move and switch between columns in Word
One of the most difficult things that people find with working with columns in Word is moving between the columns.

The reason is that the process itself is anything but easy.

The Tab key, which will move you between cells in columns in a table, doesn’t work inside newspaper style columns in Word so that key is out.

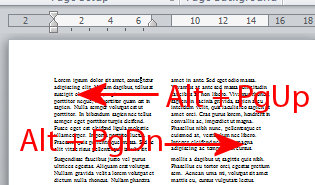
Instead, to move or jump from one column to the next you’ll press Alt + Page Down to go to the column on the right (the second column) or Alt + Page Up to move to the first column.

When you click Alt + Page Down, if you are in column 1 you’ll go to the very top of column 2. If you keep pressing the key you’ll flip between the top character in each column.

If you’re somewhere in column 2, when you press Alt + Page Up you’ll go to the top of column 1.

These are the only specialist keys for moving or switching between columns – we could use more – like jumping from a line in one column to the same line in the one next to it – but nada! Sorry!

Helen Bradley

Tuesday, January 11th, 2011

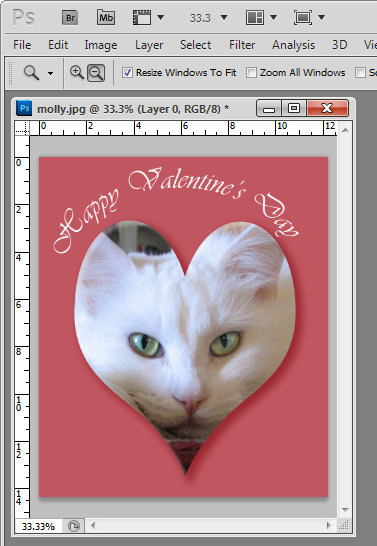
Crop to a Valentine heart shape in Photoshop

With Valentine’s Day coming up shortly you might be wondering how you create heart shape images in Photoshop. Well, here’s how:

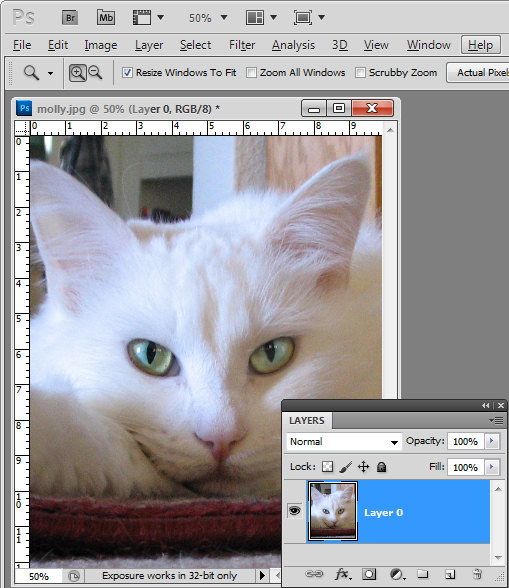
Start by opening an image that you want to use and convert the background layer to a regular layer by double clicking the background layer in the layers palette and click Enter.

Crop image to Valentine's heart shape in Photoshop

From the tool palette, select the Custom Shape tool, which sits below the Rectangle tool.

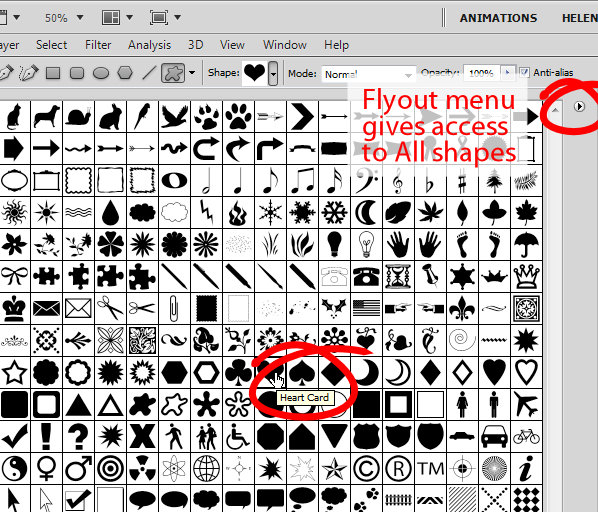
From the Shapes dropdown list on the Tool Options bar, select a heart shape.

If you don’t have a heart shape in your list, click the flyout menu and select All. Click Append to append all the shapes available which will give you access to at least one heart shape. In fact you probably have a Heart Card shape, a Heart shape and a Heart Frame shape.

To cut a heart shape out of your image you’ll want the Heart shape or the Heart Card shape.

Crop an image to a heart shape in Photoshop

Click the New Layer icon at the foot of the layers palette or choose Layer > New > Layer.

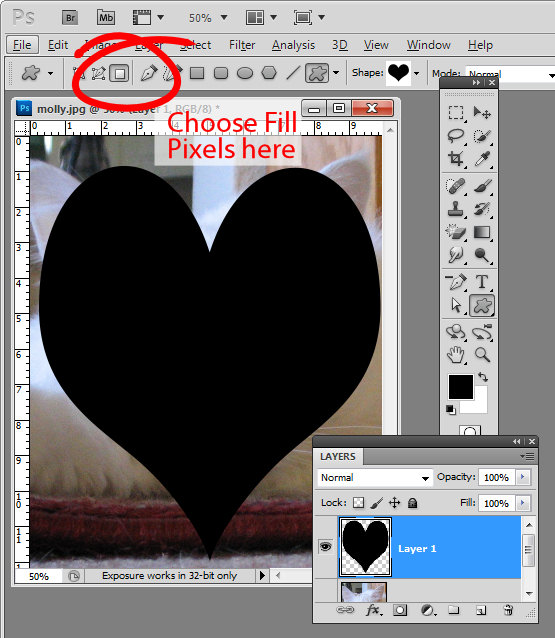
From the toolbar, select the option that says Fill pixels. Drag a heart shape over your image. Don’t worry that there is a fill color associated with the heart and that it is covering up your image. Size the shape using the move tool until it’s positioned pretty much where you want it to be.

Crop image to valentine heart shape

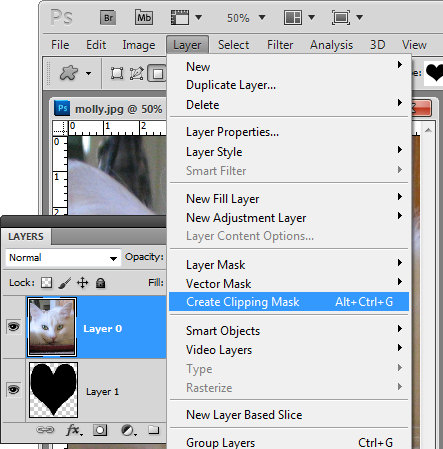
Now with the heart layer selected, drag it below the image layer and select the image layer again.

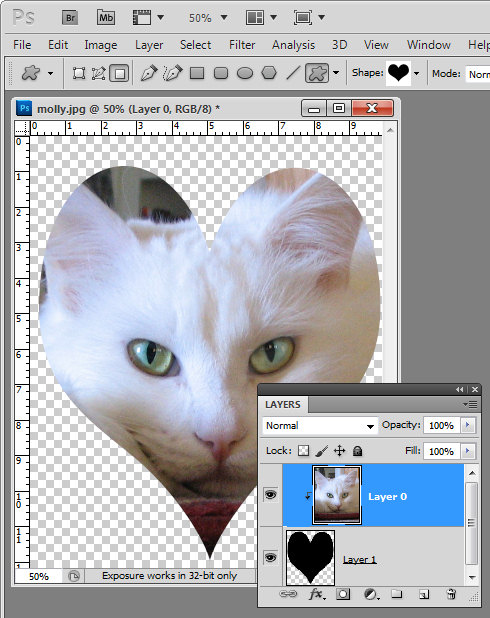
Choose Layer > Create Clipping Mask and your image will be clipped to the heart shape.

crop image to valentine heart shape

This method of creating a heart shape is ideal as the heart can be moved into a different positioned and resized by selecting the heart layer and resizing the heart appropriately.

In addition, you can click to select the image layer and drag with the Move Tool (V) on the image to place the image inside the heart in an appropriate position.

Crop an image to a Valentine heart shape

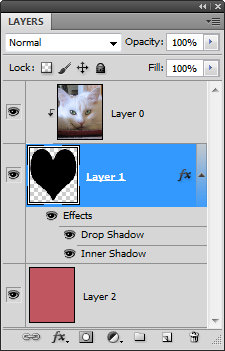
If you want a background for your image, click the bottommost layer and then Ctrl + Click (Command + click on the Mac) on the new layer icon at the foot of the layers palette.

This adds a new layer below all the other layers.

Select a foreground color to use, target your new layer and press Alt + Backspace (Option + Delete on the Mac) to fill  this layer with the foreground color.

Finish your Valentine heart effect by selecting the heart layer and apply a drop shadow to it by clicking the Add a Layer Style fx button at the foot of the layer palette and choose Drop Shadow.

Add some text and you’re ready to save and print the file.
There is a YouTube video of this process using Photoshop CS6 here – it is the same in any version of Photoshop.

Helen Bradley

Tuesday, January 11th, 2011

Who StumbleUpon Me?

find out who stumbledupon stumbled your web page

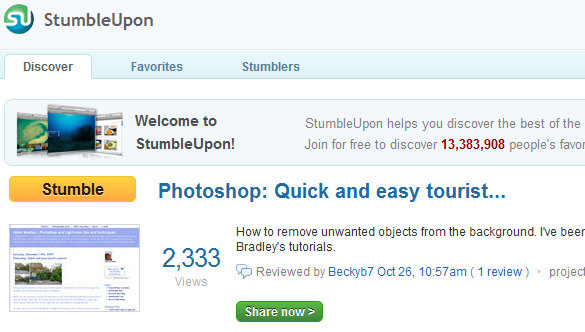
If you have a website or blog you will find that, if you’re lucky, you get StumbleUpon from time to time by someone. StumbleUpon is a good long tail link – if you get some positive feedback to the stumble you can get a lot of traffic over a long period of time – really good stuff if you’re tying to build your blog traffic.
I sometimes wonder just who ‘stumbled’ my sites by adding them to their StumbleUpon account. So I want to find out the person who first found the link, how many views it has had  and what folks think of it.

Here’s how to find who StumbleUpon your site:

First get the full URL of the page of your site that got stumbled – you’ll find this in your stats – you have to know what page people are stumbling or you won’t find the initial stumbler.

Then type this into your browser toolbar:

http://www.stumbleupon.com/url/<type your url in here>

In place of the <type your url in here> type the full url with or without the http:// part of the url – just don’t use the < or > characters.

Provided the person hasn’t set their page to private you can find the person who stumbled your site. It’s great information and a good way to track what folks think of your posts.

Helen Bradley

Tuesday, January 11th, 2011

Typing in the second column in Word

Ok, so you’ve formatted your text to be two columns in Word and you’ve typed something in the first column. You haven’t filled the first column because you don’t want to. Fair enough – it’s your document – your choice.

But you do want to type something in the next or second column but however hard you try – Word won’t play nice. It wants you to fill column one before you get to fill column two – you don’t want to – so you’re at a stalemate.

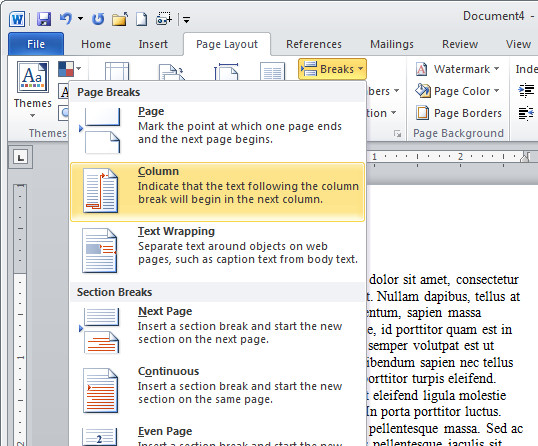
The solution is to force Word to the top of the second column and you do this by inserting a break. In Word 2002/2003 choose Insert> Break > Column Break.

In Word 2007 & 2010 choose Page Layout tab> Breaks > Column.

Now you can type at the top of the second column. Yeah!

Helen Bradley

Sunday, January 9th, 2011

Picture between columns in Word

I get a lot of folks at projectwoman.com who come looking for help with columns and Word – anything from Word 2002 through 2003 to 2007 and now 2010. I have to think the reason is that Microsoft doesn’t make it as easy as it thinks to work with columns.

In the next few posts I’ll show you some things to do with columns that I think most folk have trouble with.

First up, how to put a picture in between columns in Word. Start by formatting your text in columns and then add your picture.

Chances are it won’t move and sit between columns. The issue is that Word inserts images as In Line With Text by default which is the setting MOST OF US WOULDN’T USE IN 1,000 YEARS – but Microsoft doesn’t really understand most users and so that’s what we get – images that are stuck – they won’t move where we want them to go and they won’t rotate.

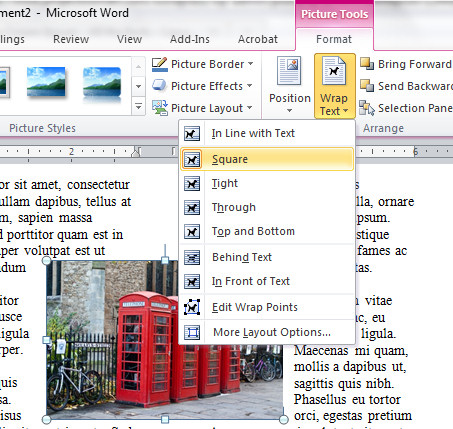
To fix this, in Word 2002/2003 from the Picture toolbar find the Text Wrapping button, click it and choose practically anything except In Line With Text – I choose Square because it is the best all round setting.

In Word 2007/2010 click the Picture and from the Picture Tools > Format tab on the ribbon click the Text Wrapping button and choose Square.

Now your picture does what you expected it to do in the first place – it moves, it can be rotated and when you drag it over the space between two columns it sits where it is put and it pushes the text out of the way around it. Neat huh?

One day… maybe Microsoft will hear our cries of frustration and insert images so they behave like they should without us having to jump through hoops to make them.

Helen Bradley

Saturday, January 8th, 2011

Create a Vector Sunburst in Illustrator

I’ve been looking around for some time for a good way to make sunbursts in Illustrator. Those methods I’ve seen suffer from one of two problems, one is that some use a triangle shape which is repeatedly copied and rotated to create the sunburst – I’m lazy so that’s too much repetition for me to be bothered doing. In addition, getting a good balance between width of the ray and the number of rays is also a problem with this method so it’s a lot of trial and error. The other method uses a dash line stoke on a circle but it suffers from the problem that the middle of the shape never closes up to a good tight fit.

So, I’ve come up with my own take on creating sunbursts in Illustrator. What I like about it is that you can decide as you are making it the number of rays so you can make lots of thin rays or a few really thick ones and it’s all done automatically so there’s not copy and rotating involved. You can also adjust the spacing between the rays on the fly. The final thing I like is that the middle closes up nicely into a small circle.

The finished sunburst can be saved as a symbol so you can reuse it and, of course you can crop it to fill the artboard and color it to suit – I’ll show you how to do all this. Here’s how:

Step 1

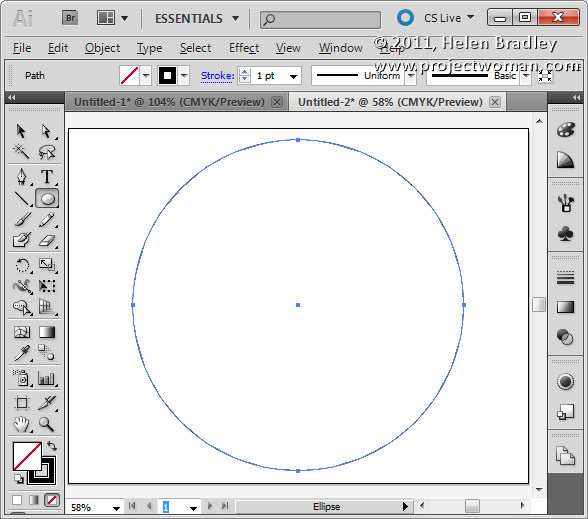
Start with any sized document in Illustrator. Select the Ellipse tool, hold Shift as you draw a circle on the screen. Set the Fill to No Fill and the Stroke to black.

Step 2

Choose Windows > Stroke to display the Stroke palette. Click the Dashed Line checkbox.

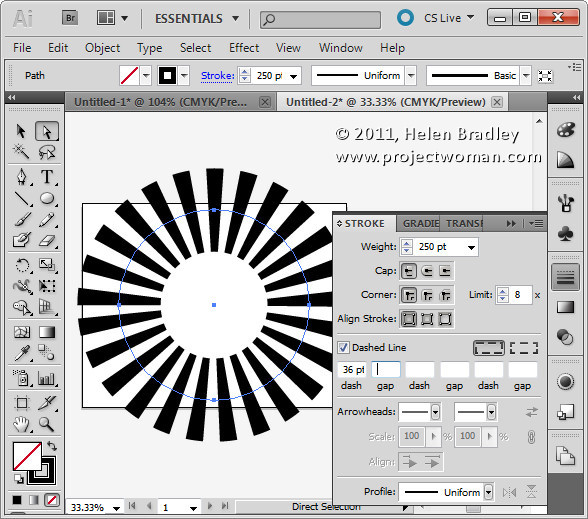
Here you determine the width of the rays and the gaps so don’t leave here till you have it right. Adjust the Weight value so you can see the rays – ignore the fact that they don’t meet in the middle but you will want to set a large enough value for weight that they come close to meeting – if you don’t the inside points will be difficult to select later on. Weight only affects the length of the rays and not their number or spacing.

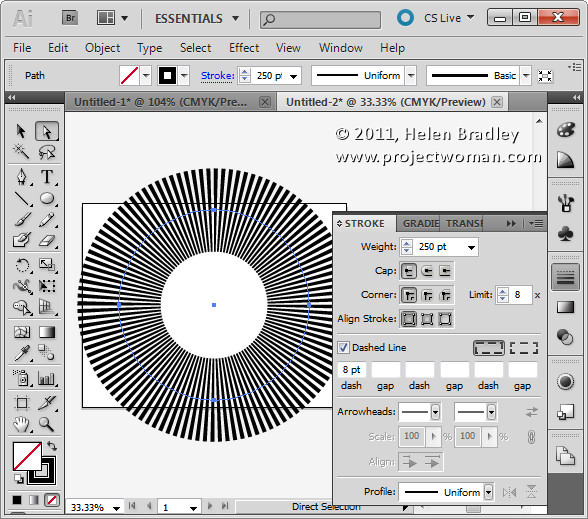
Set the Dash value to a value that gives you the number of rays you want. The larger the Dash value the smaller the number of rays.

This is a Dash of 36 pt:

This is a Dash of 8 pt:

Make sure that you have an even arrangement of rays around the circle and that two rays aren’t joined together or too close to each other – which can happen. If it does, try a slightly different value for the Dash – sometimes changing it by one or two points is all you need to even everything up.

If you want to adjust the spacing between the rays, enter a value for Gap – again, check that the rays look balanced before continuing. The larger the value of the Gap, the fewer the rays you will have.

Step 3

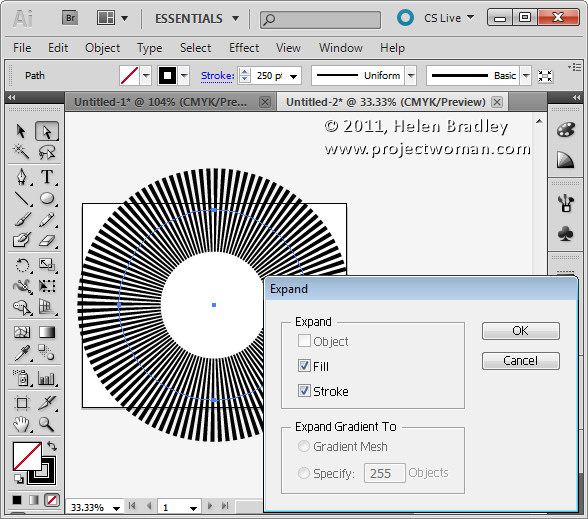
Now use the Selection tool (V) to select the Circle. Choose Object > Expand > Select Fill and Select the Stoke checkboxes and click Ok.

Now your vector shape is the rays themselves – not a stroked circle.

Step 4

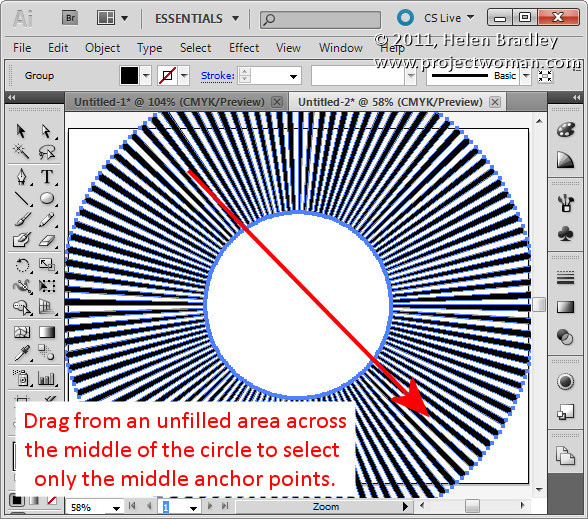
Click outside the shape to deselect it. Select the Direct Selection tool (A) and drag over all the inside anchors leaving the outside ones unselected. This is a little fiddly and you’ll find that the smaller the inside circle the easier it is to do.

If you have lots of narrow rays you may need to enlarge the Illustrator window and zoom in close to be able to start your selection not on a path.

Step 5

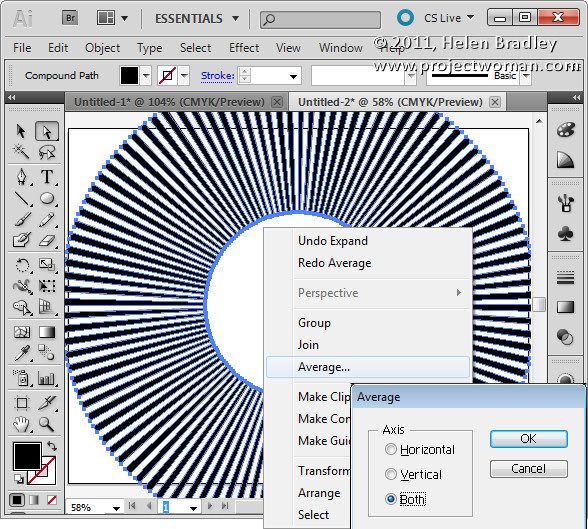
Right click your selection and choose Average > Both and click Ok. This positions all the anchor points at the center of the shape closing up the rays perfectly.

Step 6

Now you can select the shape and resize it.

You can change the fill color and add it as a symbol to the Symbol library by dragging and dropping it into the Symbol pane.


Step 7

While you’re on a roll, create a few more sunbursts with less or more rays that you can then add to the Symbols collection and then save as a Symbol set you can use any time.

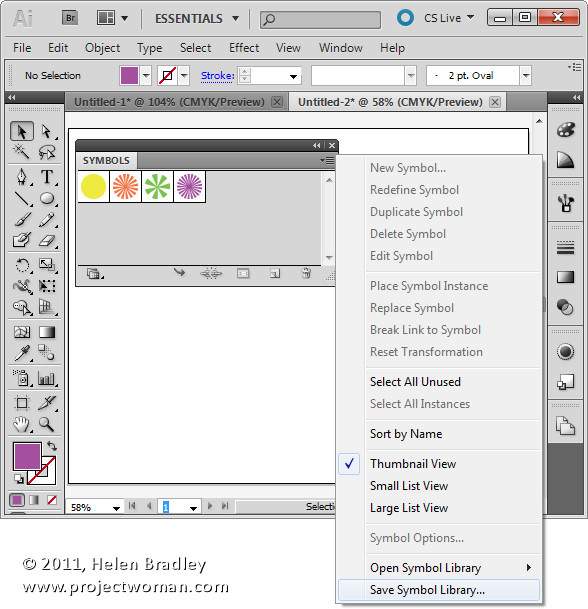
To save the Symbols, remove all but the symbols you just created from the Symbols pane by selecting them and drop them on the Delete Symbol icon.

Click the Symbol flyout menu and choose Save Symbol Library and save the symbols to a file on disk. In future you can select the same flyout menu on the Symbols pane and choose Open Symbol Library to import the symbols back into Illustrator so you can use them.

Step 8

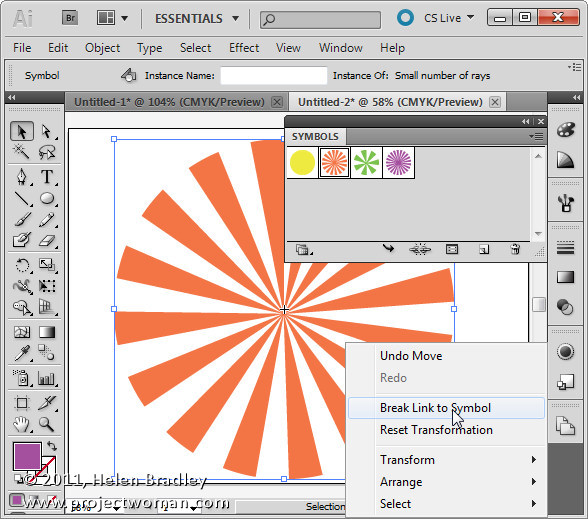
To use a sunburst symbol, drag it from the Symbol pane into the Artboard.

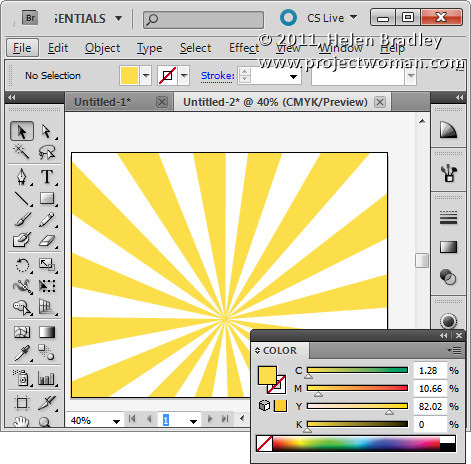
To recolor it, right click it and choose Break Link to Symbol, then select the shape and alter the Fill color and add a stroke color if desired. If you plan to crop the sunburst to the Artboard size following step 10 below, don’t recolor the shape right now.

Step 9

To trim the sunburst to the shape and size of the Artboard, first size it to fill the Artboard.

Step 10

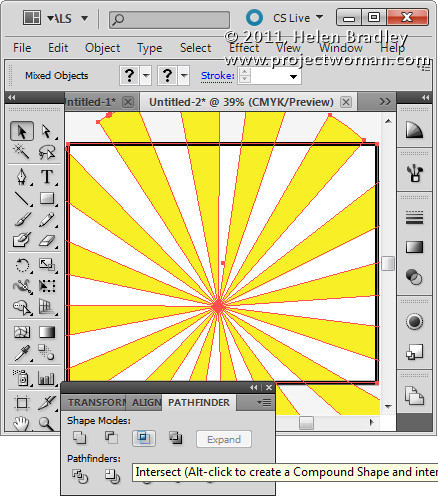
Drag a rectangle over the Artboard to the exact size of the Artboard.

Select both the rectangle and the sunburst under it using the Selection tool (V).

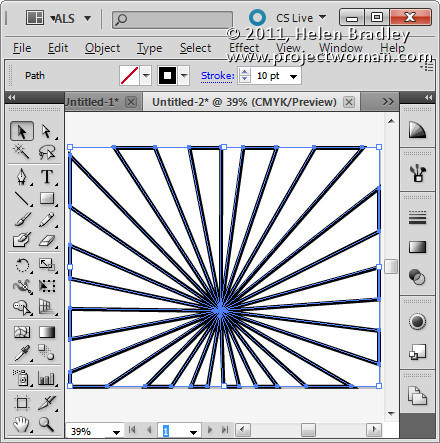
Display the Pathfinder palette by choosing Window > Pathfinder and select the Intersect option.

Step 11

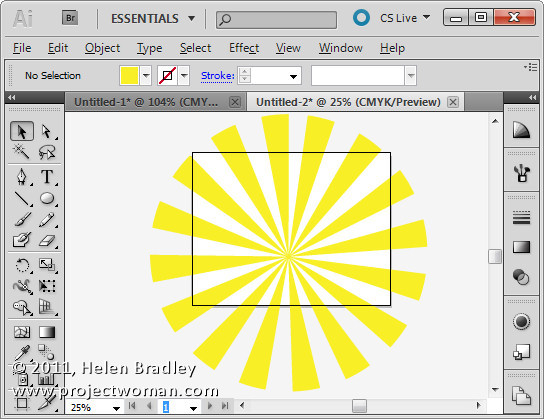
The sunburst will be cropped to the Artboard shape.

Step 12

You can now set its fill color and stroke to suit.

Helen Bradley

Page 2 of 3123