Wednesday, April 1st, 2015

Must-Have Apps for Improving Your Personal Productivity

Image credit © Kaspars Grinvalds, Shutterstock Inc

It used to be that, aside from making calls, we could do little more with our phones other than using the built-in calculator function. Needless to say, things have changed quite a bit. Ever since the advent of smartphones, we’ve seen apps for just about any function that you can imagine. Scan through the iTunes App or Google Play Store on any given day and you’ll see dozens of brand new apps and more are developed and released every single day. With millions of apps to choose from, it makes finding one that’s useful like finding the proverbial needle in a haystack.

At the same time, productivity continues to be a daily struggle. We attribute some level of our unproductivity to procrastination and distractions, which — perhaps ironically — seem inevitable as our smartphones keep us connected and informed of what’s happening on social media, on the news, and at places where we cannot physically be. It seems natural, then, that we would turn to our smartphones for help, hoping that there were some way these devices that so often prevent us from attending to important tasks would be able to help us complete them.

Fortunately, there are a variety of tools that are meant to make us more productive, responsible members of society, and we can access them right on our smartphones. Here are some apps that will help improve your personal productivity.

Wunderlist

It’s likely that you’ve at least heard of Wunderlist already, but if you haven’t, prepare to meet your new best friend. As the name implies, it’s one of the multitude of to-do list-making apps available for smartphones, but Wunderlist stands out for several reasons. First, Wunderlist isn’t just an app; while it’s available for free on Android and iOS devices, it’s also accessible on the web. This means that once you create and sign into your account, you can create and edit your to-do lists on one device, then access and continue them later on another. You can also create multiple lists, sorting tasks by their subject or some other label of your choosing.

Wunderlist via Google Play Store

Wunderlist also supports adding multiple users to a list, which offers great functionality both at work and at home. In the office, this means you could have a to-do list of tasks for a department that anyone in that department can access and work on, then have separate lists for individual people for projects and tasks assigned on an individual basis. At home, this translates as being able to create a master chore list, for example, then creating a grocery list for your spouse and assigning individual tasks to your teenager. Users need only to have an Android or iOS device, the app, and a Wunderlist account to be added to lists or create their own. Users added to a list can even exchange messages with each other right there in the app. As such, Wunderlist is an incredibly powerful app with great potential for not only your personal productivity, but also helping you to keep your employees or family more organized as well.


Shoeboxed

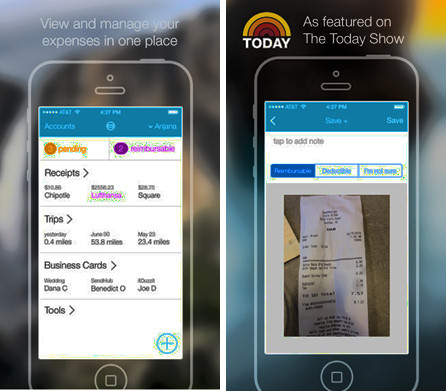
Do you find it difficult to keep track of your expenses anytime you’re traveling in the name of business? Do you not only lose receipts, but also hours of your time creating incomplete expense reports? Shoeboxed is the app you need because it can do all of the dirty work for you. Available for free on both Android and iOS devices, and offering web access like Wunderlist, Shoeboxed lets you scan receipts using your smartphone’s cameras, then collates and organizes all those business expenses for you. You can also do the same thing with all those business cards that associates were handing you; simply scan them into the app, then let Shoeboxed create a contact list by pulling the info from those business cards.

Shoeboxed via iTunes App Store

When you return from your business trip, Shoeboxed will have a detailed expense report ready for you to send, which you can also do right there in the app. Shoeboxed saves you time, the hassle of trying to hang onto all those receipts, and perhaps most importantly, is a free cloud-based service that you can access on all your connected smart devices. And even though it’s marketed for business trips, Shoeboxed can also be used by the thorough record-keepers among us, by entrepreneurs, and by those who freelance and need to keep track of expenses accrued in the line of duty. Having a detailed record of all business-related expenses will be an incredible relief come tax season.


Google Docs

If you’re not already using Google Docs, you probably will be eventually. Google Docs almost single-handedly brought word processing to the smartphone when probably just five years ago we all would have agree that we’ve never want or need to create and edit documents on a smartphone or tablet. However, Google Docs is a well-made, easy-to-use mobile word processor that can easily import and export files in the most essential document file types, such as Microsoft Word files and PDF files.

Via Google Play Store

Perhaps the most useful feature of Google Docs is its seamless integration with Google’s free cloud storage service, Google Drive. When you open or create a document in Google Docs, it’s automatically saved to your Google Drive while you have the option to save it locally on the device you’re using. Google Docs also auto-saves your work after every change you make, even if that change is as trivial and small as a single letter or punctuation mark. This makes it essentially impossible to lose any unsaved changes, which is a godsend when it comes to word processing — anyone who has ever lost hours of progress after Microsoft Word crashed will agree — and also means the document you’re seeing will always be the most up-to-date version. Since you can share documents with other users to work on a project remotely and simultaneously, it’s good to know that you’re working on the most current version and not spending time making changes that were already made by someone else.


It’s also useful to be able to type up important documents right from your smartphone. You probably won’t want to use your on-screen keyboard to write a term paper, but it’s good to know that if you ever needed to make small changes while on the go, Google Docs certainly gives you the option. On the other hand, you could connect a Bluetooth keyboard while you sit in a coffee shop or library and type longer documents more comfortably. Google Docs is an incredibly capable mobile word processor that’s free for Android and iOS devices, accessible on the web, and proves that it’s not unrealistic to create and edit documents on the go.


For more information, head to Modernize.com.
Post by Guest Blogger Dane O’Leary

Monday, March 31st, 2014

Create Guides Accurately in Illustrator


image credit ©ezza116, istockphoto.com

Learn to place guides in Illustrator in the position you want them to appear

Sometimes the differences between Illustrator and Photoshop are really annoying. In Photoshop it is simple to place guides in exactly the position you want them to appear but in Illustrator it isn’t easy at all.

I want to create a square document with guides half way vertically and horizontally so, I’ll start with a new document of a fixed and known size such as 1000 x 1000.

Then choose View > Rulers > Show Rulers so you can see the rulers top and left. With the Selection tool selected, click and drag on the ruler and drag a guide into position. You probably won’t be able to get it exact but that’s ok for now. You can go ahead and drag a guide from the other ruler too.

Guides are, by default, locked so you need to unlock them to move them. Choose View > Guides > Lock Guides to disable the check mark. Now you can drag the guide into position. On the Tool options bar you will see values for X and Y. For the vertical guide, X should be half your document width – in my case 500 and for the horizontal guide the Y value should be 500.

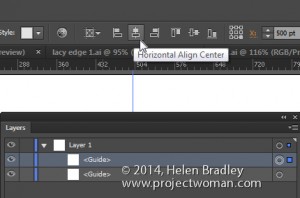
If you open the Layer palette you will see that guides are objects in the current layer. This means that you can click on a guide to select it in the Layer palette and use the tools at the top of the screen to align the guide. So, clicking on it and choosing Horizontal Align Center will center the vertical guide and Vertical Align Center will center a Horizontal guide.

Once your guides are in position, choose View > Guides > Lock Guides to lock them so they won’t move. On this same submenu you can hide guides – this locks them when they are unhidden again or clear guides to remove them from the document entirely.


Other handy tricks include being able to create a vertical guide by dragging down from the top ruler  and hold Alt or Option to change if from horizontal to vertical.

You can make new guides (but not existing ones) snap to dividers on the rulers if you hold Shift as you draw them by dragging down from the ruler.
Helen Bradley

Helen Bradley

Tuesday, April 16th, 2013

Help! My images disappeared from my iPad and iPhone

Understand the limits of the Photo Stream and how to save images from it so they aren’t removed from your iPad or iPhone

Sometimes you may know that you had some images on your iPad or iPhone but suddenly you find that they’ve gone.

This happens to me when I drop some images into my Photo Stream on my Windows PC that I want to use on my iPad. I drop images into the Uploads folder on my PC and, via the iCloud, they are synced automatically to my iPad. I know the images got there safely – I put them there months ago and I know that I saw them on my iPad but suddenly today they aren’t there. Confusing? Happened to you? It probably has and here is the explanation as to why they disappear and how to stop them from doing so.

The issue is the Photo Stream. The photo stream on the iPad and iPhone only store the last one thousand images – if you shoot lots of images and, say have your iPhone and iPad synced then you’ll run out of space pretty quickly. When you do then images are knocked out of the Photo Stream to make room for more recent ones.

The issue doesn’t happen on your Mac or PC because they have plenty of space so photos in your Photo Stream folders there are always there – it is just a protection against junking up your iPhone or iPad with ‘stuff’.

So, what do you do when you want to keep some of the images from your Photo Stream permanently and you don’t want to lose them? The answer is to move them to an album or to your Camera Roll. The images in your camera roll and in albums are there to stay. And just to clarify, you don’t have to move images from the Photo stream that you captured with that device – because images you capture on the iPad for example are in the Camera Roll and stay there. The images you want to save are those that get synced to the iPad via iCloud from other devices such as your iPhone or PC or Mac – they are the ones that only hang around for a short time.

How to move images from your Photo Stream to an album

So, to move a lot of images to an album (an easy solution for lots of images that you want to save to somewhere that isolates them from all your other images), tap Photos, tap Photo Stream, tap My Photo Stream.

You should now see all the thumbnails of images in your photo stream. Then tap Edit.

In this mode you can now tap the images that you want to save – each of them should have a blue checkmark on them. Now tap Save and choose to Save to an Existing Album or Save to New Album.

I have an album for images I want to edit and play with on the iPad called Editable Pix so I typically tap that to select it. This lets me store those images so they are isolated from all the other images in my Camera Roll.

How to move images from your Photo Stream to your Camera Roll

It is also possible to save photos from the Photo Stream to the Camera Roll. The advantage of this is that they are in the Camera Roll itself and in some situations that might work best for you.

To do this, again tap Photos, tap Photo Stream, tap My Photo Stream so you see all the thumbnails of images in your photo stream. Again tap Edit. In this mode you can now tap the images that you want to save – each of them should have a blue checkmark on them. Now, tap the Share button in the top left of the screen:

And choose Save to Camera Roll. (It is very confusing that these two processes that really are so similar are handled so differently in iOS6).

How to save one image from your Photo Stream to your Camera Roll

Now, if you just want to save one image from the Photo Stream to the Camera Roll, tap Photos, tap Photo Stream, tap My Photo Stream so you see all the thumbnails of images in your photo stream. Tap the one image that you want to copy to the Camera Roll so it is showing full screen. Now tap the Send to button that is a box with an arrow coming out of it in the top right of the screen and choose Save to Camera Roll from the menu.

Now you will never again lose images off your iPhone or iPad that you really want to keep.

Helen Bradley

Friday, March 22nd, 2013

Sync photos from iPad or iPhone to your Mac

Learn how to download photos from your iPad or iPhone to your Mac


I’ve been using iCloud on the PC for a while now to sync photos from my iPad to my PC and it works well. On my new Mac, however, I had a problem, you see the feature is built in so you don’t have to install it – but you do have to find it! Here’s how:

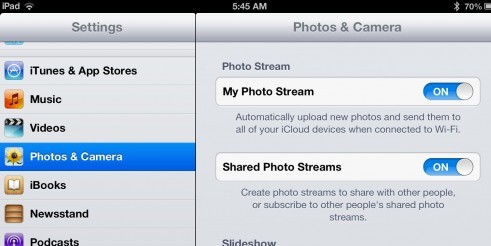
1. Assuming you already have an iPad or iPhone and you have been taking photos with it, then you want to get them to your Mac. Start on your iPad and make sure it is set to sync. Do this in Settings – scroll to find Photos & Camera and make sure that My Photo Stream is turned on. This means that when you are on a wifi connection your photo stream will be synced with iCloud.

Note:
The photo stream has some limits. One is that iCloud itself only stores images for 30 days so after that they disappear. However provided you are connected via wifi on a regular basis these will be synced frequently so that won’t be a big issue.

On a device like the iPad and iPhone the photo stream will only contain those most recent 1,000 images – older ones are removed. This is because you have less space on your iPad and iPhone than on a Mac or PC. Remember too that the photo stream contains images from the iPad/iPhone and from your Mac or PC so this 1,000 image limitation is for images from all devices in total, so it’s not as big as it might seem.

On the PC that is less of a problem because you have a special Photo stream folder that you put images into to sync them, so you know how many you are putting there. It is more of an issue on the Mac because the process is more automated so you have to be mindful of what is happening. On your Mac or PC all the images from your Photo stream are stored – because there is more storage available on them.

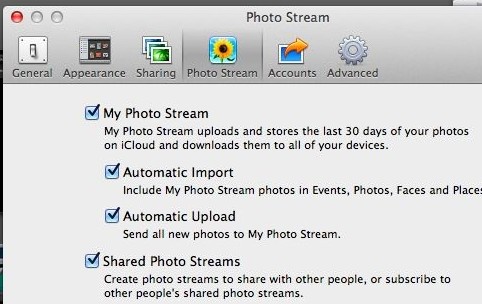
2. To set up the Mac. You need to click iPhoto to launch it and then click Web: Photo Stream and turn this on.

3. Now, if you are connected via wifi you can wait as your photo stream downloads automatically for you otherwise this will happen automatically next time you are connected.

Once images are downloaded to iPhoto they will be added to the Photos folder so even if you turn off Photo Stream at some time the images that are already downloaded will have be stored there permanently.

Helen Bradley

Tuesday, March 19th, 2013

Improve your photography today with apps

image credit: © istockphoto.com, Yuri Arcurs

Learn how you can improve your photography with handy apps

Among the thousands of new apps and programs we’ve seen in the last couple of years, there are many that are ideal for photographers, both amateur and professional. Whether you’re a professional looking for a way to edit and share your photos, or someone who simply wants to do more with photos with your phone or tablet, there are dozens, if not hundreds of apps and programs designed to help you out. What you choose to use will depend to some extent on how serious a photographer you are, but ultimately there is something for everyone.

Here is a look at how to improve your photo taking and editing through 5 simple apps and programs.

Photoshop Express

This is a fairly self-explanatory app – from the makers of Photoshop and Photoshop Elements which most photographers will be familiar with. This app is by no means as complete or effective as the full version program, but the interface is simple and easy to use, and for basic effects on the go it is a handy app. It is free in its basic form, but has additional features available for purchase.

Camera+

If you’re looking for an app that improves the quality of your photos without any complicated editing, this is the one for you. Basically, Camera+ is a better version of the basic camera in your smart phone, and has the ability to take clearer, more sharply focused photos. You can apply basic effects such as contrast, color schemes and retro effects as well as crop and rotate the photo to improve the quality of photos that your phone’s camera captures.

Dynamic Light

This is a great app for manipulating the lighting in your photos. The end result can look more artistic than natural, so if that’s something that interests you as a photographer, this is definitely an app for you. You can select a photo and an effect, then adjust the “dynamic light” dial to control how the effect is applied to the image or you can shoot the image using the app. It’s a great way to turn an ordinary image into a striking one.

Filterstorm

A great app for photo editing, Filterstorm essentially takes the best features of Adobe Photoshop Lightroom and puts them in a simple app. It’s more about adjustments than filtering, but does allow you some simple effects for manipulating lighting, colour, and brightness among other things.

This is a guest post by Dylan Bailey. Dylan is a freelance writer and keen amateur photographer.

Helen Bradley

Sunday, March 17th, 2013

Add images to your iPad & iPhone photo stream from your Mac

See how to upload images from your Mac to your iPad or iPhone

Sometimes you will get images on your Mac that you want to share with your devices such as your iPad or iPhone. To do this you can add them to your photo stream and they will be synced automatically next time you are connected using a wifi connection.

To do this, from inside iPhoto, click the image(s) to add to the photo stream then click the Share option on the toolbar, click Photo Stream > My Photo Stream. The images will be uploaded to your photo stream and then downloaded to other devices when they next update via a wifi connection.

Of course, for this to work the images have to be in iPhoto. If an image is not, for example, it is on the desktop – you can add it to iPhoto by dragging and dropping it into iPhoto and then add it to your photo stream.

Of course if you have your iPhoto set up to automatically send all new images to your photo stream the very process of adding images to iPhoto will add them to your Photo Stream. To do this in iPhoto, choose iPhoto > Edit Preferences > Photo Stream and, under My Photo Stream (which should already be enabled), check Automatic Import.

Helen Bradley

Wednesday, March 13th, 2013

Updated review – Photoshop Express for the iPad

I’ve been revisiting some of the apps I’ve previously reviewed to see what changes have been made to them recently and how they have developed. One of these apps is Adobe Photoshop Express for the iPad. This app is free but it does have some in app purchases – one of which – the Camera pack that includes Noise removal – you can safely ignore. I think it is expensive and not worth the $4.99 that Adobe charges for it. However, ymmv.

The free Effects in Photoshop Express are pretty limited and there are just nine of them so unless you buy the add on Effect Pack ($2.99) you won’t have a lot of creative options. That said, the Effect Pack has a lot of fun effects in it. You could get access to similar effects for free in other apps, but if you want everything in one place you might consider this pack worth shelling out for. There is also a Border pack for 99¢.

Like many free apps the add on borders and effects are shown in the app so you can see them but not use them unless you buy them. You can’t hide them either so this might be a bit off putting – personally I’d rather not see what I don’t own, but that’s my take on it.

One change to the app that I like is the on screen prompts showing you how to use the app. This was a huge complaint that I had initially with the app as it had no indication as to how you made your adjustments. I thought at the time that this made it very hard for inexperienced users to use the app as it wasn’t clear how to do so. In a free tool aimed at beginner users I thought this was inexcusable.

Now the first time you choose an option like Brightness and Contrast an overlay appears showing you how to adjust these options. It’s much less confusing and a whole lot easier to work with. So much so that I’d wholeheartedly recommend this app for beginner to intermediate users.

In Photoshop Express you can edit images from your Camera Roll or capture images using the app. What you cannot do is upload images to Adobe Revel – the new online replacement for photoshop.com (and which was previously called Adobe Carousel – have I confused you yet?). You can also not download images from Adobe Revel to edit them in the app. Since Adobe owns all these sites and apps it would be nice if all its apps and storage locations talked to each other instead of operating in isolation.

Other changes I noticed is that the feature for adding effects and borders has been revamped allowing you to see the full range of effects and borders in one large screen already in place on a small version of your images. Those that are not enabled have a blue mark on the corner and there is a shopping cart link in the bottom right of the screen that you can use to buy add on packs, if desired.

So far as sharing is concerned, Photoshop Express is light on options when compared with some other apps. You can share to Facebook, Twitter, Tumblr and email images but that is all. You can also save images to your Camera Roll.

In all, the changes to Adobe Photoshop Express are welcome and make the app a lot more usable for its target audience. I now actually like this app and would heartily recommend it particularly for beginner to intermediate users looking for a simple and easy to use photo fixing tool.

Helen Bradley