Articles | Photoshop blog | Photography blog | about me | e-mail

Helen Bradley - MS Office Tips, Tricks and Tutorials

I'm a lifestyle journalist and I've been writing about office productivity software for a long time. Here you'll find handy hints, tips, tricks, techniques and tutorials on using software as diverse as Excel, Word, PowerPoint, Outlook, Access and Publisher from Microsoft and other applications that I love. My publishing credits include PC Magazine, Windows XP mag, CNet, PC User mag, SmallbusinessComputing.com, Winplanet and Sydney Morning Herald.

Wednesday, September 16, 2009

Outlook Send a Contact's details via Email

To share an Outlook Contact's details with someone else you can send it via e-mail.

This lets you get the details you have recorded about a contact to someone else without having to pull all the details across manually. It's simple and quick.

To do this, select the Contacts module and open it. Double click to open the contact's details that you want to send to someone.

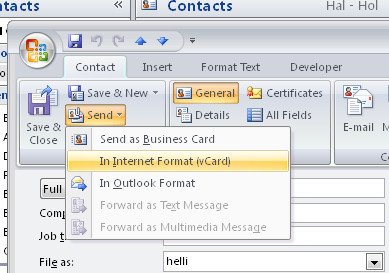
From the Contact tab on the Ribbon click the Send dropdown list and choose In Internet Format (vCard).

This opens a new message dialog with the details attached in a .vcf format file. All you need to do is to enter the recipient's email address and your message and click Send.

When the recipient receives the message, they can click the attachment to open it and add the person's details automatically to their Contacts list.

Labels: , , ,

Add to Technorati Favorites

Thursday, August 27, 2009

Outlook: Create a New Contact from an Email


Adding a new person as a contact in Outlook is easy but not a self evident process.

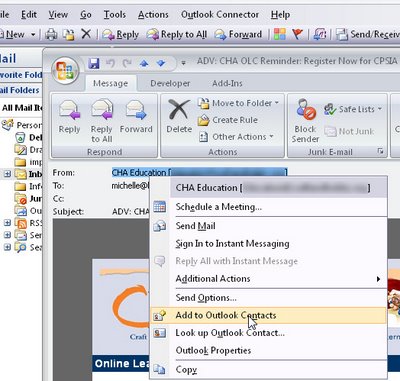
To add an email address to your Contact list from the message window, right-click the address in the From: details at the top of the screen - it doesn't look like this is clickable but it is.

Select Add to Outlook Contacts from the shortcut menu.

The Contacts dialog opens automatically with the email address in place, enter any other details you want to record and click Save & Close to end.

Labels: , , ,

Add to Technorati Favorites

Monday, August 24, 2009

Outlook Sticky Notes

Like electronic yellow stickies, Notes are useful for storing quick reminders and other information you need close at hand.

To create an Outlook note choose File > New > Note.

Type your text into the Note area. You can move the note so it's visible, or hide it by clicking the close button in its top right corner.

To view a note, click the Notes button at the foot of the pane on the left of the Outlook window and click the Note to view it.

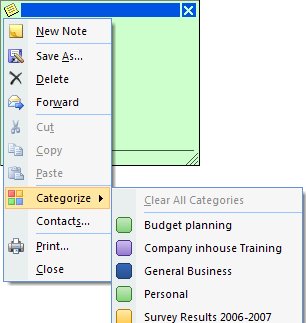
To delete a note, right click it and selecting Delete, or categorize it by right-clicking it, choose Categorize and select a category from the list.

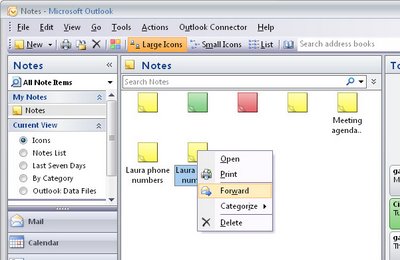
You can send a Note to someone via e-mail by right-clicking the Note and select Forward. Outlook opens a New Mail Message window with the Note already in place as an attachment.

Labels: , , ,

Add to Technorati Favorites

Thursday, August 6, 2009

Managing Public Holidays in Outlook


When is Memorial Day in the US or Anzac Day in Australia?

If you're unsure, luckily for you, Outlook isn't.

Most national holidays are stored in Outlook - you just need to find them and add them to your calendar.

Here's how:

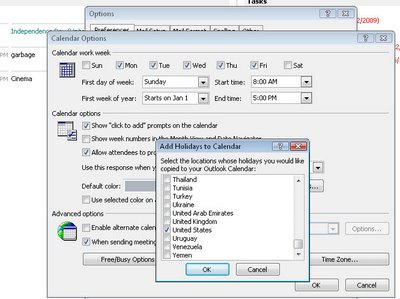
Choose Tools > Options > Preferences tab ad click the Calendar Options button.

Click the Add Holidays button and from the list choose the country (or countries) you want the holidays for and click Ok.

Wait while Outlook adds these details to your calendar and click Ok twice to exit.

The holidays will appear under the date in most Calendar views.

Labels: , , , ,

Add to Technorati Favorites

Wednesday, January 30, 2008

Outlook: Managing Blocked Senders


I'm sure you've had that "that was a dumb thing to do" feeling before. You do something that you thought was smart but ends up being very silly indeed.

I got that recently when I added someone to my Outlook Blocked senders list. Yikes! they were so not supposed to go there!

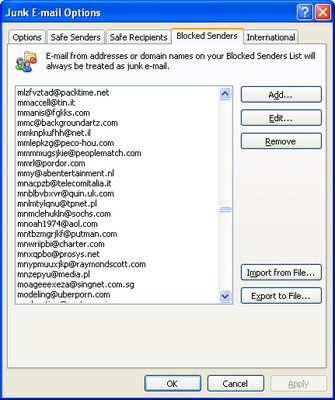
Luckily it's fairly easy to undo the damage. In Outlook choose Tools > Options > Preferences tab and under the E-mail options click Junk E-mail. Click the Blocked Senders tab and locate the email address that shouldn't be there and click Remove. Simple!

Now, if you need to go in reverse and add someone, here's how (believe me, I'm astonishingly good at this step): In Outlook choose Tools > Options > Preferences tab and under the E-mail options click Junk E-mail. Click the Blocked Senders tab. This time click Add, type the email address or an entire domain name (but be sure you really want to do this!) and click Ok.

If you have an email from the person in your inbox there is an even easier solution. Right click the email, choose Junk E-mail > Add Sender to Blocked Senders List.

There you have it.. get someone onto the Blocked senders list and get them off again. Better still, it works in Outlook 2002, Outlook 2003 and Outlook 2007.

Labels: , , ,

Add to Technorati Favorites

Wednesday, October 17, 2007

Keep Outlook trim, taught and terrific!

To ensure your Outlook .pst file stays trim and doesn’t get bloated with old and outdated emails, configure its AutoArchive options so that older messages are automatically removed or filed away. To do this, right click the folder to archive (such as your InBox) and choose Properties, AutoArchive tab and select the Archive this folder using these settings option. Now enable the Clean out items older than and set the appropriate time period. Only select to Permanently delete old items if you really don’t want them saved. Enable, instead, Move old items to default archive folder and Click Apply.

If you haven’t got AutoArchive configured to run periodically, you’ll get a warning to this effect and Outlook will set it to 14 days by default. You can change the timing by choosing Tools, Options, Other, AutoArchive. Now, every 14 days (or when you specify), AutoArchive will run and the old items will be moved to your archive folder. Your archive file will appear in your folders list so you can drag and drop messages from it back into your regular Outlook folder if there are archived messages you need to refer to.

The reason you need to do this is two-fold. One is that Outlook stores everything in its PST file - emails, contacts, appointments and worst of all - email attachments. So the file can get very large indeed. At or near 2GB in size the file becomes unstable and you risk losing everything - permanently - can we just say "Don't put all your eggs in one basket"? Archive now - before your computer does the deed for you - permanently and with little or no chance of recovery.

Labels: ,

Add to Technorati Favorites

Tuesday, October 16, 2007

OOPS! I didn't mean to send THAT!

If you too often send an email message and then think "Oh no! I forgot to say xyz" or "Oops, I shouldn't have been that blunt", then build a delay into Outlook so the messages aren't sent right away. It just might save you having to write a second email or save you grovelling to your boss!

To do this use a rule to delay sending emails. Choose Tools, Rules and Alerts and click on New Rule. Choose the Start from blank rule option and then select Check messages after sending and click Next. Click Next as all messages will be delayed (but you can set an exception shortly) and click Next and Ok again to confirm the rule will apply to all sent messages. Choose Defer delivery by a number of minutes and set this to the number to wait – say 2 minutes and click Next.

Now, set an exception for messages that just have to be sent immediately, for example, select Except if it is marked as importance and set this to High. Click Next, type a name for the rule such as Delayed Send, enable the Turn on this rule checkbox and click Finish.

Now, whenever you click Send, your messages will be held for 2 minutes before being sent except if you make them High importance.

No more grovelling!

Labels: ,

Add to Technorati Favorites

Friday, July 27, 2007

Outlook on a Go Slow route to nowhere


You gotta love and hate Outlook. It's like the little girl with the curl - when it's good its very good and when it's bad it's awful.

Of course, one of the biggest problems with Outlook is it's "go slow" behaviour. Part of the problem is that it stores everything in a single .PST file - and I mean everything that really matters like your emails, attachments, contacts and appointments. If that's not bad enough (read all your eggs are in one burgeoning basket), there's an upper limit to the size this file can grow to before Outlook turns up its little toes and stops working. The upper file size limit is 2GB and while this sounds big, it's not.

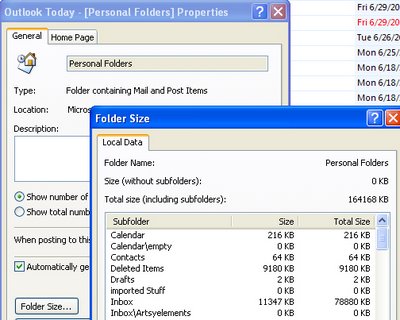
So, if Outlook is running slow, check your file size. Right click the Personal Folders link at the top of your Folders list, choose Properties for "Personal Folders" and click the Folder Size button. Wait as Outlook calculates the folder size. The closer it is to the magical 2GB limit, the more trouble you're in.

The solution is to delete old and unwanted emails and to archive others to get it down to size.

Of course all this stupidity makes you hanker after a program that doesn't store all the data in one place. Not unsurprisingly, most programs behave this way - Outlook is the exception to the rule.

Labels: , , ,

Add to Technorati Favorites

Thursday, July 26, 2007

Outlook 2003 Backup

No clue why this is the case but Microsoft didn't include a backup routine in Outlook 2002 or 2003. What do you think they expect us to do if our computers crash? Do they think that email has no value to anyone? Well, it has value to me so I need to back my PST file regularly. Luckily there's a free add-in you can use to do it. Since Microsoft created the add-in you have to wonder why they didn't include the feature in Outlook!

Find it here Outlook PST file backup - download it, install it and then backup by selecting the new option which appears on your File menu.

So simple - just makes it all the more strange that Microsoft doesn't do it all for you without making you jump through hoops to do it yourself.

Labels: , , ,

Add to Technorati Favorites

Tuesday, June 19, 2007

Outlook Notes anywhere

Still on the subject of Outlook Notes (on the basis of when you're on a good thing stick to it), did you know Notes can be dragged out of Outlook?

Go ahead, grab a Note adn drag it out of Outlook. Put it anywhere you like - it will sit on the Desktop or your Quick Launch bar. If you close Outlook, you can view the note's contents without having to open Outlook by just double clicking on it.

This feature makes an Outlook Note something of much higher value than before. Need to remember a phone number? Type it into a Note and drag and drop it to your Quick Launch bar and it's there handy for when you need it.

Labels: , ,

Add to Technorati Favorites

Monday, June 18, 2007

Color Your World - Outlook Notes


Ok, so yellow sticky notes just don't work for me. I'd rather mine were, well, anything but yellow. In Outlook 2007 you can color your Notes by clicking the indicator in the top left corner, choose Categories and then the category to assign the note to - the category color becomes the Note color. In Outlook 2003, click the indicator in the top left corner of the note and choose Color and then a different color for your note.

To change the default color in Outlook 2003 and Outlook 2007, choose Tools, Options, Preferences tab and click Note Options. Set the Color value to your chosen color and click Ok twice. There's only a limited color selection available this way but it does make a change from yellow.

Labels: , , ,

Add to Technorati Favorites

Monday, April 16, 2007

Fixing Subject lines in Outlook

It's just plain annoying when someone types a stupid subject to an email message or worse still who doesn’t include one at all!

When you think about it, finding emails in an inbox is difficult enough without having to work around silly subject lines - at least in Outlook 2003 and earlier versions.

Luckily there is a solution when someone messes with your neatly organized inbox, and it's a fix you can apply yourself. Simply open the Outlook email message and type over the current subject line - it looks like you can't do this but it works just fine.

Then, when you close the message, you’ll be asked if you want to save the changes so select Yes and you’re done - sensible subject lines for all your messages.

Labels: ,

Add to Technorati Favorites

Monday, April 9, 2007

No good news - Outlook


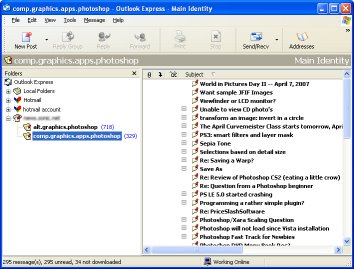
Even with the new Outlook 2007 you can still not read newsgroups inside Outlook so you’re stuck with Outlook Express.

To configure Outlook Express as your default news handler open Outlook Express and choose Tools > Options > General tab and enable the Make Default button to make Outlook Express your default email handler.

You can now create a news account by choosing Tools > Accounts > News tab, click Add and then News. Enter the News further details that your ISP will provide you with and click Finish and then Close.

You can now determine which newsletters you want to subscribe to and how they will be handled in future.

Labels: , ,

Add to Technorati Favorites

Monday, March 26, 2007

Change the color of unread Outlook messages


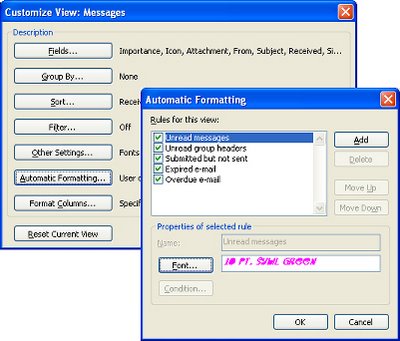
Outlook highlights all unread messages in your Inbox using bold type. If you'd like something more flashy or subtle, simply change the formatting option. To do this, click your Inbox and choose View, Arrange By, Current View, Customize Current View. Click Automatic Formatting, click Unread Messages and click Font and set the color, font and size to use for unread messages. When you're done, click OK - simple, and from now on, very colorful!

Labels: , ,

Add to Technorati Favorites

Saturday, March 10, 2007

Color code Outlook 2003 appointments

I'm a visual person so I like to see things and I use the Outlook calendar to plan my day. But some appointments are really important and some I can miss if I need to.

So, I like to color code my appointments so I know at a glance what has to be done. I show personal appointments as one colour, online seminars and things that would be nice to attend but which I don't have to attend as another color and stuff I have to do as yet another color.

To do this, open the Calendar and select the Calendar Coloring button on the Standard toolbar. Choose Edit Labels and, opposite each color make sure the descriptions for the types of appointments match those you want to use and, if not, change them (you only need to do this step once).

Then, to color code an appointment click the Label drop-down menu and choose the color to use - simple but very effective!

Labels: , ,

Add to Technorati Favorites

Tuesday, February 20, 2007

Outlook 2003 - out of office reply

If you're not around to read your email you can configure Outlook to automatically reply to incoming messages to tell senders that you're out of the office and when you'll return.

There are two possible scenarios, either you're using Microsoft Exchange Server at work or you're using a standalone version - most likely at home.

If you're using Outlook 2003 with Microsoft Exchange Server service you'll find in your profile that you have an Out of Office Assistant you can use to manage replies to your emails when you're out of the office. To do this, choose Tools, Out of Office Assistant and click the I am currently Out of the Office option. In the AutoReply only once to each sender with the following text area type the message. It is usual to indicate that you are out of the office and the time you anticipate returning.

You can also create a rule so that only certain types of messages receive this reply. To do this, choose Tools, Out of Office Assistant and click the Add Rule option to specify the types of messages to which the reply will be forwarded. For example, you may create one reply for external mail and one for internal mail.

If you don't have the Out Of Office Assistant available (this will be the case if you're using a standalone version of Outlook), you can mimic the solution using a template reply email and a rule. Ensure you are using Outlook as your email creating software – this won't work if you're using Word. To check this choose Tools, Options, Mail Format tab and ensure Word is not selected here and ensure Plain Text is selected. Now follow the instructions in the previous tip to create a reply template message.

Now choose Tools, Rules and Alerts and click the E-mail Rules tab and click New Rule to start the Rules Wizard. Click Start from a blank rule and select Check messages when they arrive, and click Next. When prompted with Which condition(s) do you want to check? select a box describing the type of message to apply it to – such as emails received through the specified account or Sent Only To Me. Click Next. When prompted with What do you want to do with the message?, click the Reply using a specific template option. In the second panel, click the specific template option and select your reply template and click Open. Click Next, add any exceptions and click Next. Name your rule and set it to run and click Finish.

Outlook tracks who has received the replies and won't send multiple replies even when it receives multiple messages from the same person.

Labels: , , ,

Add to Technorati Favorites