Articles | Photoshop blog | Photography blog | about me | e-mail

Helen Bradley - MS Office Tips, Tricks and Tutorials

I'm a lifestyle journalist and I've been writing about office productivity software for a long time. Here you'll find handy hints, tips, tricks, techniques and tutorials on using software as diverse as Excel, Word, PowerPoint, Outlook, Access and Publisher from Microsoft and other applications that I love. My publishing credits include PC Magazine, Windows XP mag, CNet, PC User mag, SmallbusinessComputing.com, Winplanet and Sydney Morning Herald.

Thursday, December 17, 2009

PowerPoint: Create handouts in Word

So, you've finished designing your presentation in PowerPoint and it's time to you’re your final preparations.

One thing you will need is handouts for your participants. It is easy to use Microsoft Word to create custom handouts for your PowerPoint presentation.

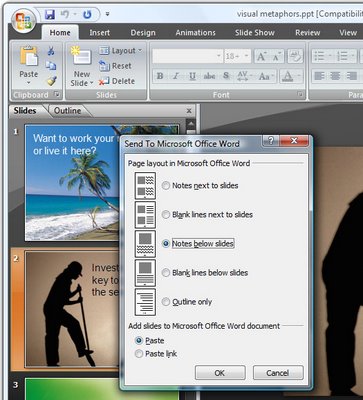
First complete the presentation so the slides are all is complete select the Office button and choose Publish > Create Handouts in Microsoft Office Word.

When the Send to Microsoft Office Word dialog appears, select the layout for the slides and text. There are various combinations of slides, notes and blank lines that you can choose from.

Select either the Paste or the Paste Link button depending on whether you want to embed the slides in the Microsoft Word document or simply link to them.

When you are done, click Ok and wait as Microsoft Word opens and the slides, notes and blank lines are created automatically for you in a new Word document.

Once the handouts are complete, you can format the document as you wish and add a cover page, headers and footers as desired and then print your slide handouts for distribution at presentation time.

Labels: , , , , ,

Add to Technorati Favorites

Thursday, November 19, 2009

PowerPoint Placeholders

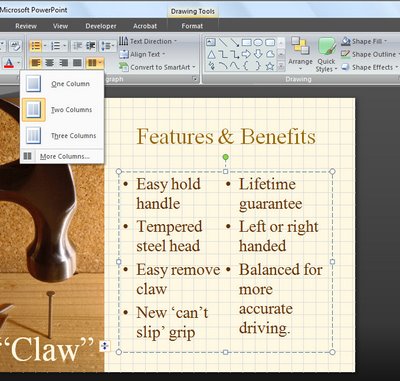
One of the long awaited features of PowerPoint 2007 is its ability to format a two column placeholder for a slide.

This lets you place multiple columns of text inside a single text placeholder.

To do this you will need to be working in Normal mode so choose View > Normal.

Click the text placeholder that contains the text that you want to display in multiple columns and from the Home tab click the Columns button in the Paragraphs group.

Select the number of columns to split the text into and it will be automatically adjusted to suit.

Simple when you know how?

Labels: , , ,

Add to Technorati Favorites

Tuesday, October 6, 2009

Placeholders in PowerPoint 2007

One new feature of PowerPoint 2007 is that you can now add your own placeholders to PowerPoint slide layouts.

In past versions of PowerPoint each slide could have only one text placeholder that would behave as a PowerPoint text placeholder – you could add text boxes but the text couldn't be formatted in them the same way as it could when you used a placeholder. Now you can have multiple text placeholders on a slide.

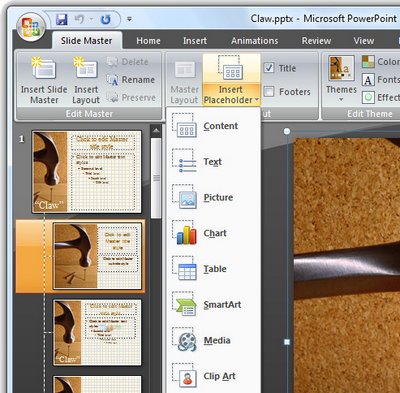
To see these at work, choose View > Slide Master to move to the Slide Master View and then click the Slide Master tab at the left of the Ribbon.

Select the master that you want to add an additional placeholder to and select Insert Placeholder from the ribbon.

From the list, select the type of placeholder to use – these include placeholders for text, picture, chart, table, SmartArt, media and clipart. You can, if desired, add multiples of these placeholders to a slide so you can have a slide layout that has all the elements on it that you need.

For example, you may wish to have a text placeholder next to a chart or text and a picture located side by side. Each placeholder can be sized and positioned anywhere on the slide.

Labels: , ,

Add to Technorati Favorites

Wednesday, July 1, 2009

PowerPoint: Custom slide navigation with Action buttons


While many people make their presentations in the presence of an audience and they move from one slide to the next, not all presentations are delivered this way. Many slide shows are viewed by people at their desk and when you are creating presentations for display this way, you can create a custom navigation scheme for the user to use to progress through the show.

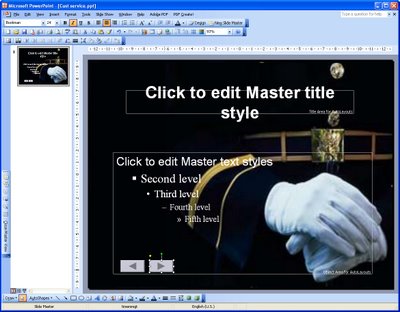
To do this, start by choosing View > Master > Slide Master to move to the Slide Master view. In PowerPoint 2007 select the topmost slide in the layout pane. Choose Slideshow > Action buttons and select the Action Button: Back or Previous. Click and drag the Action button on the slide – the Action Settings dialog shows Hyperlink To: Previous Slide - click Ok.

Repeat and this time add the Action Button: Forward or Next. This Action button is hyperlinked by default to the next slide.

Add an Action button that goes to the first slide by choosing Slideshow > Action buttons > Action Button: Home.

To size the Action buttons Control + Click on each of them in turn, right click and choose Format AutoShapes. Select the Size tab and adjust the width and height for all at the one time.

Click the Draw button on the Drawing toolbar, choose Align or Distribute > Distribute Horizontally to create even spacing between each button. Drag the shapes into the footer area so they are clear of the area covered by the slide content. Click Close Master View to return to your presentation.

Any shape can be configured to perform like an Action button. Add the shape to the slide, right click and choose Action Settings from the menu. You can hyperlink the shape to any slide, Office document or web page.

Labels: , , , ,

Add to Technorati Favorites

Monday, June 29, 2009

Flash files in PowerPoint 2007 Presentations

It's easy to add Flash movies to your PowerPoint presentations and to configure them to play. Here's how:


Step 1
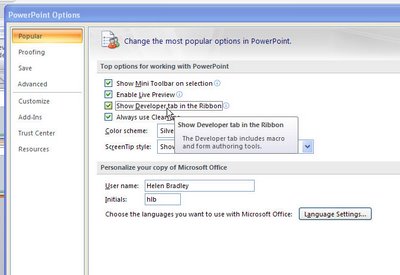
Start by loading the Developer tab which provides access to the objects that you need to do this. Click the Office button, choose PowerPoint Options > Popular group and enable the 'Show Developer tab in the Ribbon' checkbox.

Step 2
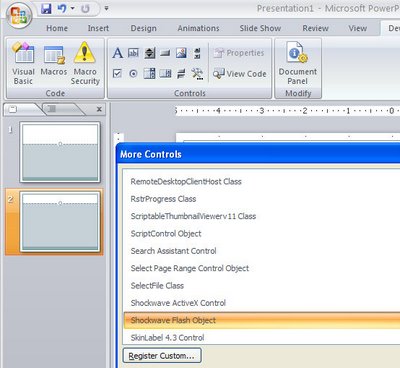
Switch to the slide that will be used to play the Flash video. Select the Developer tab on the Ribbon, click the More Controls button and locate and select the Shockwave Flash Object entry in the list. Click Ok and drag a shape onto your slide.

Step 3
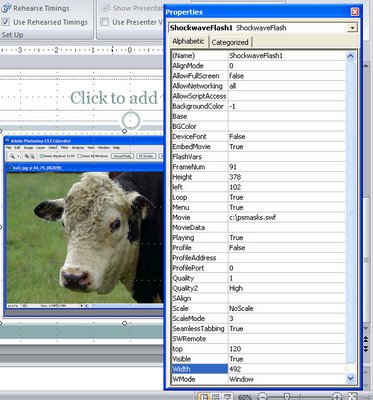
Right click the shape and choose Properties. Set the Playing property to True, the Embed Movie property to True and set the Movie property to the full filename and path of the Shockwave movie file. Click Ok. You must run the presentation to preview the movie file.

Labels: , ,

Add to Technorati Favorites

Thursday, April 16, 2009

Send to PowerPoint missing? Not really!


In Word 2003 you could create an outline in Word and then send it to PowerPoint where it would be converted to a PowerPoint slide show. Level 1 became the slide title and level 2 the first level bullet points and so on.

I hear a lot of grumbling that this feature has been removed from Office 2007 – not so! It just isn’t quite where you expect it to be. In fact, you have a few options in PowerPoint 2007 and Word 2007.

Option 1
You can add the Send to PowerPoint button to the Word 2007 Quick Access toolbar by clicking the Office button and choose Word Options > Customize and from the Commands not in Ribbon collection choose the Send to Microsoft Office PowerPoint option and click Add to add it and then Ok. Now you can click it to send the outline file to PowerPoint.

Option 2
You can also approach the task from PowerPoint 2007 which is really the better option. One alternative is to open the Word outline file in PowerPoint and the slides will be automatically created for you. To do this click the Office button and choose Open and from the Files of type list choose All Files so you can see and open your Word file.

Option 3
This is my fave!

Open PowerPoint 2007 with a new slide show and make sure your Word 2007 outline file is closed.

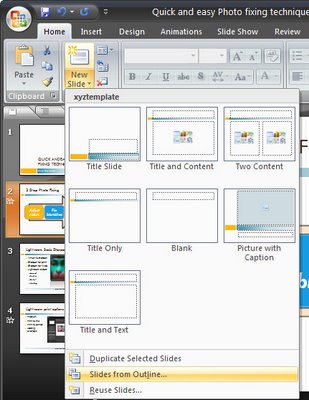
Choose the Home tab on the Ribbon and click the little arrow on the New Slide button. This opens a menu which includes the option Slides from Outline – select this and open your Word 2007 outline file. The slides are automatically created for you.

So, the option to Send to PowerPoint is not there in Word 2007 but you have so many more ways to complete the task now.

Labels: , , , ,

Add to Technorati Favorites

Friday, April 3, 2009

PowerPoint - Create a Custom Show


Did you know that one PowerPoint presentation can be reused over and over again, in different configurations for all sorts of purposes. A large presentation can be broken up into shorter presentations and a regular presesntation can be reworked to be used as a Kiosk presentation at a tradeshow. You can do all this without creating additional files or duplicating slides which means that you can make changes to all the shows in one step.

Create the new show
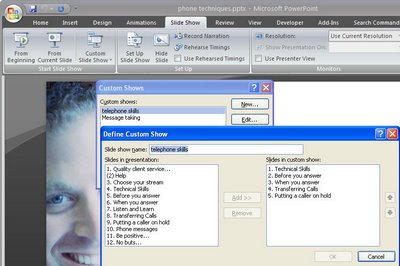
1 To create a new custom show from an existing presentation, open the presentation and, in PowerPoint 2003, choose Slideshow > Custom Shows and in PowerPowerPoint 2007 click the Slide Show tab > Custom Slide Show. Click the New button and type a name for your custom show – use a name that identifies what it contains or the audience you will present it to.

Add the slides
2 From the Slides In Presentation list click each slide that you want to include in the shortened or custom slideshow and click Add to add it to the slides in custom show dialog.

Organise the slides
3 Use the arrow buttons by the Slides In Custom Show pane to rearrange the slides to a different arrangement in the custom show if desired. When you are done, click Ok to create your custom show.

Selecting a custom show
4 If you click Close you’ll be returned to your original presentation but you can select the custom show at any time by choosing Slideshow > Custom Shows, select the custom show by name and click Show. Now if you run the slide show you'll see the slides in the selected custom show only and in the desired order.

Customising the show
5 To customize the setup for your custom show, choose Slide Show > Set Up Show. Select the Custom Show option in the Show Slides area and click your show name in the dropdown list. Select whether the show will be given by a speaker, at a kiosk, or browsed by an individual and then set the show options. Click Ok to confirm your choice.

Things to watch out for
There are a couple things to be aware of when you are using custom shows. If you have the custom show selected, while you can still work on other slides - even those not in the custom show - if you choose to view the show you’ll see only slides in the custom show and not necessarily those you've been working on.

To view the entire show, choose Slide Show > Set Up Show (in PowerPoint 2007 choose Slide Show > Set Up Slide Show), and select All from the Show Slides list. Now when you run your presentation you’ll see all the slides in your presentation.

Labels: , ,

Add to Technorati Favorites

Wednesday, March 11, 2009

PowerPoint slide show file - PPSX vs PPTX


What is in a name? Is there a difference between a PowerPoint 2007 PPSX and a PPTX file? (or a PPS and a PPT file in PowerPoint 2003 and earlier versions?)

The simple answer is, of course, yes there is a difference.

The long answer explains that difference so sit tight, here's the long version:

The PowerPoint Slide Show files (PPSX and PPS) are files you can double-click on in Windows Explorer and the presentation will launch and start to display automatically bypassing PowerPoint itself. When you exit the presentation you will be taken back to Windows rather than left in PowerPoint with the presentation layout visible on the screen.

On the other hand, when you double click to open a PPTX or PPT file, it opens inside PowerPoint ready for editing or presenting. When you're done, you get dumped back in PowerPoint with, you guessed it, your presention visible on the screen - not very professional if your audience is watching.

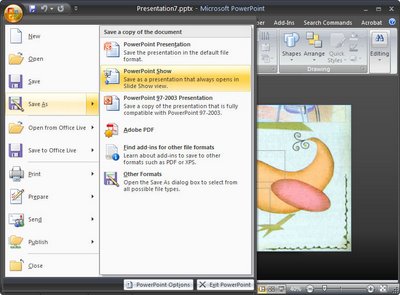
To save a presentation as a PPS file in PowerPoint 2003 and earlier, choose File > Save As and from the Save As Type dropdown list choose PowerPoint Show (*.pps) and click Save. In PowerPoint 2007, choose File > Save As > PowerPoint Show and the correct format will be automatically created for you.

PPSX and PPS files can be edited in PowerPoint in the same way as PPTX and PPT files can - you just have to open PowerPoint first and then choose File > Open to open the PPSX or PPS file as you can't double click to open it.

So, now you know.

Labels: , , , , , ,

Add to Technorati Favorites

Wednesday, May 21, 2008

Play Flash movies in PowerPoint 2007

It is possible to play Flash videos from inside your PowerPoint presentations at run time. This gives you additional tools that you can use to add visual effects to your slide shows. To do this you must first display the Developer tab in PowerPoint by choosing the Office button > PowerPoint Options > Popular group and enable the Show Developer tab in the Ribbon checkbox. The Developer tab provides access to the objects that you need to use to insert and play the Flash videos.

To configure a slide to play a Flash video, select the slide so it is visible in the editing area. Click the Developer tab on the ribbon and locate and click the More Controls button. From the list, select the Shockwave Flash object entry and click Ok. Drag a shape onto your slide – this will be the box in which the Flash presentation will play. Right click the shape and choose Properties. You now need to configure certain properties regarding the Flash object. For example, set the Playing property to true and the Embed Movie property to true. To configure the Flash movie that will play in the slide, set the Movie property to the full file name and path of the Shockwave movie (swf) file that you want to play and click Ok. To see the Flash movie play you will need to preview the presentation.

Labels: , ,

Add to Technorati Favorites

Friday, May 9, 2008

Don't tell them I told you how


.
I am not a big fan of all singing all dancing PowerPoint presentations. However, one of the questions I get a lot is how to make a sound track play across multiple slides in PowerPoint.

So, if you're assaulted with bad music next time you attend a PowerPoint driven presentation, don't blame me, I'm just the messenger.

Here's how to do it. First add the sound clip to the slide by choosing Insert > Sound and choose your clip. Select whether the sound should play automatically or only when the icon is clicked. So far so good.

Your sound clip is now in place but it stops when you move to the next slide - not good.

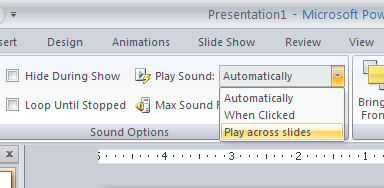
To fix this, click the sound icon and in PowerPoint 2007 click the Sound > Options tab on the ribbon. Now locate the Play Sound entry and change it from Automatically to Play across slides.

This is far from being an intuitive alternative in my mind - since when did Automatically become an alternative to Play Across Slides? Frankly I want both, not either/or. Don't stress over it though because you actually get both options.

< Note to self > - it's Microsoft's world, we just live in it.

Labels: ,

Add to Technorati Favorites

Saturday, April 19, 2008

Kiosk Presentations


You're not always going to be there when a presentation shows. Some PowerPoint presetations are shown on computers where not one is in attendance or you might want to send an autorunning slideshow to mum to show off your latest pix.

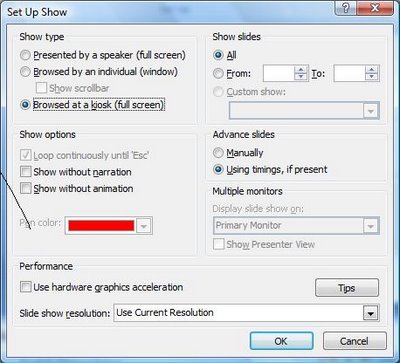
These work if they're set up as Kiosk presentations. You need to set the presentation so the slides more forward after a period of time and not by mouse click. Do this on the PowerPoint 2007 Animation tab. Then choose the Slide Show tab and click Set Up Show. Choose Browsed at Kiosk and make sure the Advance slides option is set to Use Timings if present. The the show will run automatically without needing attention.

There you have it, hands free PowerPoint slide shows.

Labels: ,

Add to Technorati Favorites

Wednesday, October 24, 2007

Reduce the size of your PowerPoint 2007 images


When you're emailing PowerPoint presentations or displaying them on a computer screen you don't need or want overly large images. To avoid this, compress the images in your presentation.

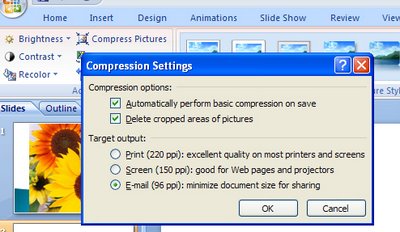
Click any picture in your presentation and then, from the Ribbon choose the Picture tools tab and then the Format tab. Locate the Adjust group and click the Compress Pictures button. Disable the Apply to selected pictures only checkbox (you want to resize all of them), and click Options and select 96dpi (the smallest resolution on offer) and click Ok and Ok again to compress them.

Labels: , ,

Add to Technorati Favorites

Monday, August 27, 2007

PowerPoint Speaker Notes: PowerPoint 2007

It's sad but true, Speaker notes have changed functionality in PowerPoint 2007. It makes good sense but it's a feature to be missed by some.

In PowerPoint 2003 you could configure Speaker Notes to show on the screen at presentation time. This meant that even if you had only one monitor you could see the notes. Some folk used this tool - even though Speaker Notes weren't technically designed to be viewed by the audience.

In PowerPoint 2007 the feature has been disabled. Now you can only see Speaker Notes if you have two montiors. One for the presenter and one for the audience. The Speaker Notes apppear on the presenter's view.

So, the moral of this is, if you're using PowerPoint 2007 and you want your audience to see something - put it on the presentation itself, you can no longer bury good stuff in Speaker Notes and then expect to show it at presentation time.

Labels: ,

Add to Technorati Favorites

Monday, August 20, 2007

Recycle your slide shows - PowerPoint 2007


I hate wasting time and doing things more than once, in my book, constitutes a major waste of time. In PowerPoint 2007, like earlier versions of PowerPoint you can reuse slides from another presentation. It's just not so obvious how to do it in PowerPoint 2007. In case you really can't find how to do it, here's the low down:

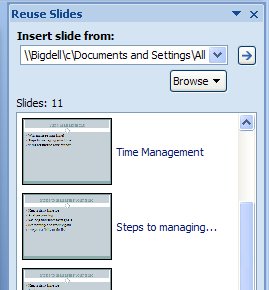
On the Home tab click the down pointing arrow to the right of the New Slide option. At the foot of the dialog is a Reuse Slides option, click it and a Reuse Slides dialog appears on the right of the screen. Here you can choose a slide show to grab slides from, thumbnails of the slides in the file appear in the dialog and you can choose the ones to insert into this new presentation. You can also select if they should bring their formatting with them (not a good idea) or have the formatting of the present show applied to them (much better idea).

Labels: ,

Add to Technorati Favorites

Thursday, July 12, 2007

Don't look now! WordArt in Word 2007


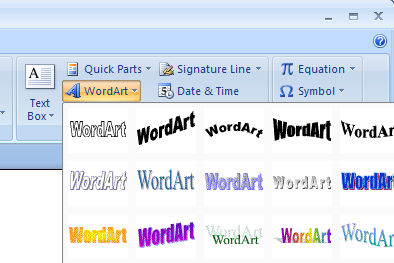
If you've tried the new WordArt tool in PowerPoint 2007 you've probably discovered how neat it is. No more bent words in putrid magenta colors and instead, theme aware text that looks great for headings and which will change color when you change the Theme.

Try the same thing in Word 2007 and you're in for a ghastly surprise. WordArt missed out on getting a makeover in Word 2007 and, instead, it's the same application it has always been - functional but requiring a lot of additional work on behalf of the user to make it look even half good.

Here's hoping that the next implementation of Word, whenever that appears, finally does away with this and gives us WordArt that is usable and as functional as that in PowerPoint 2007 and Excel 2007.

Labels: , , ,

Add to Technorati Favorites

Friday, July 6, 2007

Close everything NOW! Excel 2007 and PowerPoint 2007

Yum, it's like a boss key for Excel and PowerPoint. Double click the Office button in either application and it's like a Close All tool - everything closes quickly and automatically.

Doesn't work in Word, wonder why not?

Labels: , ,

Add to Technorati Favorites

Thursday, June 7, 2007

What's your fancy? It's Oriel for me...


The new PowerPoint 2007 is just wonderful! It really makes the task of creating a presentation easy and fun. Pity you can't say that for the task of sitting through most of them!

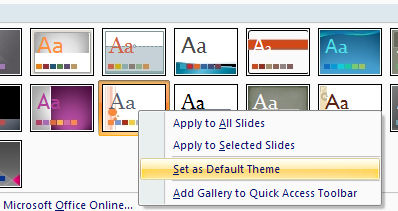
If you don't like the Office Theme which is the default, you can easily make any theme your own. Open the Theme gallery on the Design tab and right click the theme of your choice, choose Save As Default Theme and every time you start PowerPoint that's what you'll see. Neat huh?

Labels: , ,

Add to Technorati Favorites

Wednesday, June 6, 2007

Love the theme, hate the background image?


Yum, PowerPoint's new themes. They're fun, colorful and a far cry from the drab and boring ones we've lived with for so long. So, what happens when you love everything about a Theme except its background?

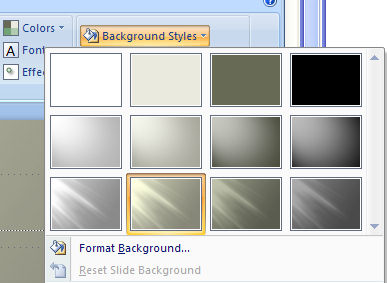
Well, since I'm waxing lyrical about PowerPoint you can probably guess I'm about to let you in on a trick for fixing the background problem in your PowerPoint 2007 theme love affair? Click the Background Styles option in the Design tab and there is an entire selection of different backgrounds all coordinated with the theme. If you change your color scheme the background's colors change too - sweet!

Labels: , ,

Add to Technorati Favorites

Tuesday, May 15, 2007

Grid and Guides in PowerPoint 2007


If you're like me you like to have everything neatly aligned on your PowerPoint slides. If you don't, a slide with navigation and action buttons can very quickly become very untidy.

To line everything up, you need to be able to see the gridlines. Gridlines on a PowerPoint slide? I hear you ask. Why not?

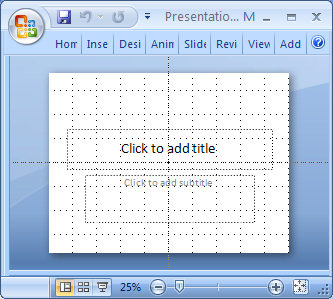
To see the gridlines, right click an empty area on a slide and choose Grid and Guides. Select the Display Grid on Screen checkbox and configure the grid size and click Ok. You can also display drawing guides using the same dialog. By default these are placed in the middle of the slide horizontally and vertically.

To add a new guide, hold the Control key as you drag a new guide from an existing one.

Reverse the process to hide the guides and grids when you're done.

Labels: , ,

Add to Technorati Favorites

Thursday, May 3, 2007

Gilding the Lily - Animating SmartArt


I love the new SmartArt feature in Office 2007 and I'd buy Office just to get hold of it. The images are drop dead gorgeous and they're so easy to make and to color.


So, what's better than great looking SmartArt? Animated SmartArt, that is. Launch PowerPoint 2007 and create a SmartArt object. Select it and then click the Animations tab. From the Animate dropdown list choose One by One and Preview the result - deliciously animated SmartArt. Of course, you can do all sorts of Animations - this is just to whet your appetite.


Fun huh?

Labels: , ,

Add to Technorati Favorites

Friday, April 27, 2007

Vale PowerPoint features

Hmm - there is good and bad in everything I presume but I'm particularly bummed by the fact that a couple of the tools that I have grown to love in PowerPoint over the years have been removed from the new PowerPoint 2007. Well, perhaps love is too strong a word, but I liked them a lot and they're gone.

Gone is the AutoContent Wizard but you can find much of its functionality in templates. There's no broadcast feature and no macro recorder (but you can still use macros), and no title master - but there's a new title layout which really makes better sense. All this I could live without, what I'll miss is the Speaker Notes tool which let you record notes while making a presentation which you could save later on. Gone too is the summary slide tool which really is a big omission - summaries were a great way to create an agenda so folks knew what they'd be learning... poor choice of tools to go in my book.

Labels: ,

Add to Technorati Favorites

Wednesday, March 21, 2007

Too cool for school - Office 2007 SmartArt


New to Microsoft Office 2007 PowerPoint, Excel and Word is the SmartArt feature which is one you’re just going to love.

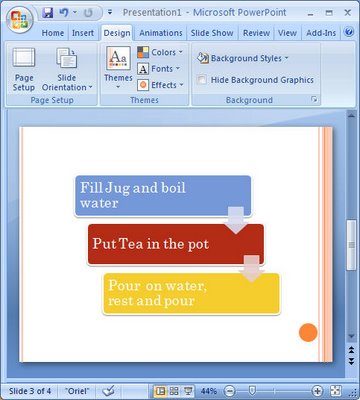
To test it out add a new slide to a PowerPoint presentation, for example, and select the blank layout. From the Insert tab on the Ribbon, select SmartArt and then one of the SmartArt objects.

I like the one called Staggered Process which I've shown here as it makes a great display for a simple step-by-step process. Select your choice of design and then you’ll see text brackets appear on the screen. Click in them or click the double-pointing arrows at the left of the SmartArt object and type your text in the special dialog.

Once you’ve got your bullet points in - and you can add more than the default three if you need more - you have a simple step-by-step graphic. But - this is only the beginning.

There are lots of different looks for your graphic including beveled edges and 3D effects, and you can choose these from the SmartArt styles dropdown list in front of you. You can also change the colors used in the design which, of course, are based on the current document Theme colors. Change the Design Ttheme and the look of the project changes with it.

It’s about as simple as it’s ever going to be to add great looking step-by-step graphics to a PowerPoint slide. They are, seriously, way cool...

Labels: , , , ,

Add to Technorati Favorites

Sunday, March 18, 2007

PowerPoint 2007 Torn Photo Edges


One of the cool things about PowerPoint 2007 is the way that you can create fab photo edges with no work at all.

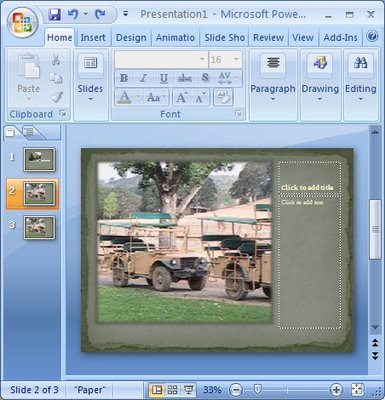
To see this at work add a new slide using the Home tab, click New Slide and then from the Layout list choose Picture with Caption. Now click on the icon in the middle of the slide to add your picture.

Go to the Design tab and choose one of the designs to use for your slide. You’ll see that designs like Opulent create a stacked photo effect, Paper creates a rough paper edge effect, Solstice creates an effect where the photo looks adhered with sticky tape (this is soooo cool!), Concourse has an interesting shadowed edge effect, Flow tips the image on an angle, and Foundry rounds the opposing corners.

From here you can click the picture and then click the Picture Tools, Format tab to add other picture effects to your image such as a reflection or soft edges.

There’s really an almost unlimited number of variations available. I dare you to stop at just using one!

Labels: , , , ,

Add to Technorati Favorites