Articles | Photoshop blog | Photography blog | about me | e-mail

Helen Bradley - MS Office Tips, Tricks and Tutorials

I'm a lifestyle journalist and I've been writing about office productivity software for a long time. Here you'll find handy hints, tips, tricks, techniques and tutorials on using software as diverse as Excel, Word, PowerPoint, Outlook, Access and Publisher from Microsoft and other applications that I love. My publishing credits include PC Magazine, Windows XP mag, CNet, PC User mag, SmallbusinessComputing.com, Winplanet and Sydney Morning Herald.

Thursday, February 18, 2010

Word 2007 - Picture styles

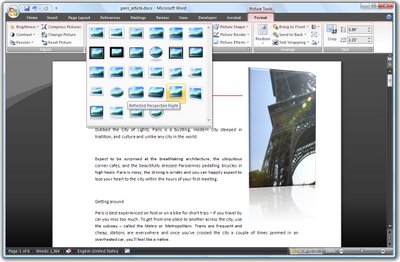
Word 2007 comes with a range of styles you can use when inserting images into your document.

To see them at work, insert a picture into your document, click the image and choose Picture Tools > Format on the Ribbon.

The Picture Styles are formats you can apply to your image and they include some very attractive looking options.

Once you’ve selected a picture style you can adjust things like the Effects which are attached to it.

For example, you can create a picture reflection by selecting the picture and then choose the Picture Effects > Reflection option to create a reflected edge.

You can also recolor the picture border if desired by using the Picture Border option. If you have a picture inserted in a document and formatted the way you like it but determine that you don’t like the picture and want to replace it, choose Picture Tools > Format and click the Change Picture option and choose an alternate picture to use. The format will remain and only the picture itself will change.

Labels: , , , ,

Add to Technorati Favorites

Thursday, February 11, 2010

Word 2007 Quick Tables

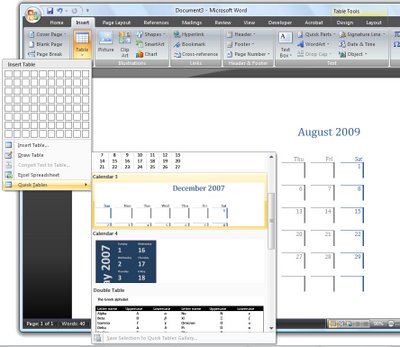
New to Word 2007 is the Quick Tables feature.

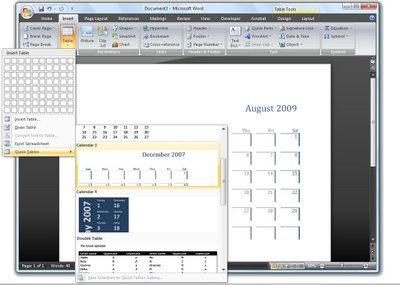
To see what is available, click the Insert tab, choose Table > Quick Tables and choose from a range of preconfigured tables such as calendars and tables with sub headings and other features.

Once the table is inserted into the document, you can replace the text in it with your own text such as the dates for your desired calendar month.

Most of the elements that you're used to selecting from the Tables menu in previous versions of Word can be found on the Tables Tools > Layout tab and these include the ability to repeat header rows at the top of the table and options for adjusting the text direction and inserting and deleting rows.

Once you have a table formatted in the way you want it to look you can add that particular format to the Quick Tables Gallery so you can use it anytime.

To do this, click inside the table and choose Table Tools > Layout tab. Click Select > Select Table so the entire table is selected. Now, from the Ribbon, choose Insert > Table and click on the Quick Tables option.

Choose Save Selection to Quick Tables Gallery and the Create New Building Block dialog will appear. Complete it as you would for a regular Building block element with the exception that this time, leave the Gallery option set to Tables so the table will appears in the Quick Tables Gallery.

Click Ok when you're done. In future, your custom designed table will be selectable from the Quick Tables Gallery.

Labels: , , ,

Add to Technorati Favorites

Thursday, February 4, 2010

Tables in Word 2007

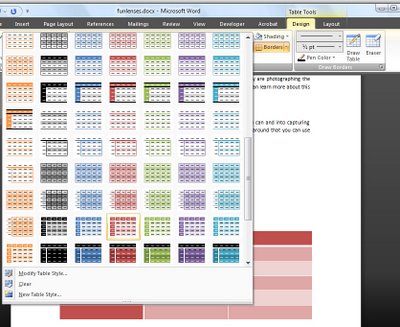
The table options in Word 2007 allow you to create quite sophisticated tables more easily than you’ve been able to in the past.

Click the Insert tab and click the Table button and drag over the number of cells you want for your table.

With the table selected, choose Table Tools > Design tab and choose a Table Style from the dropdown list.

Many of the styles are linked to theme colors so you can create a table with an attractive style which like other Word objects changes color to match the theme when it changes.

When you have a table style selected you can configure other options for it by, for example, selecting the Banded Rows checkbox in the Table Style Options group and adjusting the look of the first and last columns and header row using the checkboxes.

Labels: , , , ,

Add to Technorati Favorites

Thursday, January 28, 2010

Word 2007 - Formatting with Styles

Microsoft Word 2007 provides styles that you can use to format your documents.

These make it easier for you to change the look of a document very quickly by combining styles with the new Office 2007 themes.

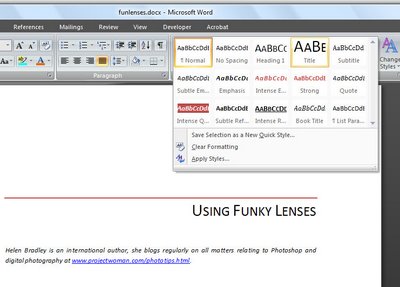
To get started with styles, with a document open on the screen click the Home tab and choose the Change Styles button.

Here you can select a Style Set for your document, for example choose Distinctive or Elegant, Fancy or Formal depending on what you want your document to look like.

Once you have selected a Style Set, the Styles group on the Home tab will display styles from that set.

To apply a style to text, select the text, for example a title, then in the dropdown Style list and hold your mouse pointer over one of the styles to see how it would look if applied to that text. Select the style that you want to use and click it to apply it.

You can also add your own choice of formats as a selectable style. For example, format a piece of text so it looks the way you want your style to appear and select this text. Open the Style list and choose Save Selection as New Quick Style.

Give the style a name, click Modify to change any of its characteristics and click Ok to save it as a Quick Style. This style now appears in the Style list and you can select it to apply to text in your document at any time.

Labels: , , ,

Add to Technorati Favorites

Thursday, January 21, 2010

Word 2007: Drawing in documents

One technique that has changed with Word 2007 is drawing in documents.

Instead of having a Drawing toolbar you now select shapes from the Shapes dropdown list on the Insert tab.

From this list you can select shapes such as lines and all the AutoShapes that you are used to using in earlier versions.

To create a drawing, for example, you can select and insert the shapes that make up the drawing and then format them using the Drawing Tools > Format options on the Ribbon.

Many of the color options that are available are connected to the theme colors so, provided you use a theme color in your drawn shapes, the colors will change automatically later if a different theme is applied to the document so the drawing stays consistent with the remainder of the document.

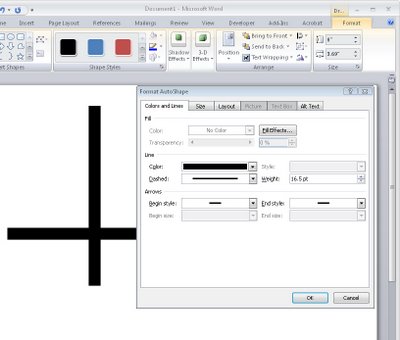
Find the shape formatting tools on the Drawing Tools > Format tab on the Ribbon.

What is missing in Word 2007 is the ability to right click a shape and have the format AutoShape dialog appear as it does in Excel and PowerPoint.

The Format tab and the Format Object dialog in Word offer less features than are available in the new graphics engine in the other applications.

Labels: , , , , ,

Add to Technorati Favorites

Thursday, January 14, 2010

Select a table cell contents in Word 2007

image

Confession time. I had a picture in a table cell in Word and try as I might I couldn’t get the little black angled cursor to appear so I could select the cell’s contents. Frustrating – yep, I’d say so.

image

Nope – wrong arrow, the image is so close to the table cell it’s almost impossible to get the cell select arrow to appear.


imageThis is what it should  look like. 

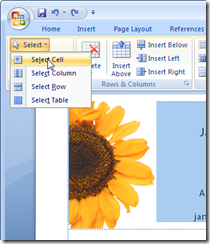
Then I remembered the new feature in Word 2007 – it’s on the Table Tools >Layout tab (so you have to have a table and click in it to see this option). On the far left is the Select button – new to Word 2007. Click it and you can select what to select. Oh! let’s back up a bit  here - it would be a good idea to click in the cell you want to select before you begin - forgot that bit.

Using this you can select a cell then right click and, as I did, choose Copy to copy its contents. Don't be fooled by the fact that not everything in the cell looks like it is selected - just trust that it is.

There are other options there that include Select Row, Select Column, Select Table – much easier than trying to juggle those little arrows when they just won’t appear.

Labels: , , , , ,

Add to Technorati Favorites

Tuesday, December 1, 2009

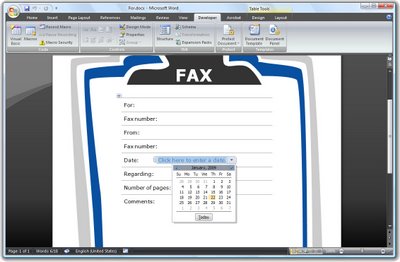
Word 2007 - Add a Date Picker control

Word 2007 has a cool Date Picker control you can use to insert a date into a document.

To insert one into your document first display the Developer tab by selecting the Office button, click Word Options and from the Popular category choose the Show Developer tab in the Ribbon option.

Now click the Developer tab and, in the Controls area you'll find entries for the Building Block Gallery and for elements such as a Date Picker and a Text Box which you can use in your documents.

Select Design Mode, click the Date Picker control to add it and then click Design Mode again to exit that mode.

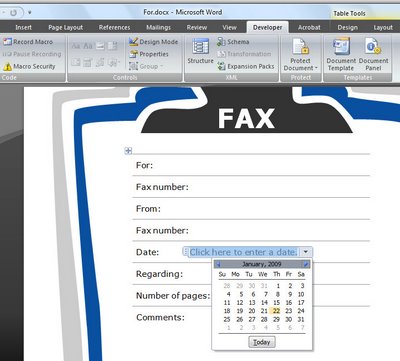
The user will see a Click here to enter a date option and, when they click the content control, a dropdown date picker will appear allowing them to select a date to insert into the document.

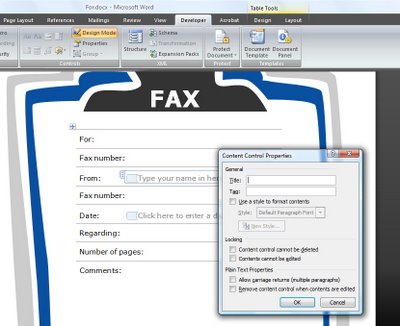
To ensure the date is formatted in a particular way, with Design Mode enabled click the Date Picker and choose Properties from the Ribbon. From the Properties dialog select a date format to use from the list.

You can use content controls like these to create memo and fax cover sheets complete with prompts to your user as to the details required.

Labels: , , , ,

Add to Technorati Favorites

Tuesday, November 24, 2009

Word 2007: Make your own Click and Type controls

Word 2007's new Content Controls let you do some pretty snazzy things in your Word documents.

You will have worked with Word's own controls when you add a cover page or header and footer using the Insert tab options in Word 2007. In this case you may have noticed that, if your document already has a title configured in the document properties, the title appears automatically on the cover page and in the header.

Alternatively, if it doesn't have a title, when you double click the Title area and type one, any other object in the document that includes a title will be updated automatically. This behavior occurs because the document information is inserted using content containers which are linked to the document properties.

You can take advantage of this behavior in your own designs and you can create and use unlinked content containers to prompt for details to be inserted in your own documents.

To see how content containers work you’ll need to display the Developer tab which you can do by selecting the Office button, click Word Options and from the Popular category choose the Show Developer tab in the Ribbon option.

Click the Developer tab and, in the Controls area you'll find entries for the Building Block Gallery and for elements such as a Date Picker and a Text Box which you can use in your documents.

So, for example, to prompt a user to insert an entry from the Quick Part Gallery, click where you want the Quick Part Gallery entry to appear. Click the Developer tab and click the Design Mode button so you are in design mode.

Now click the Building Block Gallery button. This inserts a small content container with the words [Choose a building block] as the prompt. Exit Design Mode by clicking Design Mode button once again and you will see that the document contains a clickable link in this position prompting the user to choose a building block.

In practice, all the user needs to do is to click on the Choose a building block link to show the dropdown list and they can then select the building block to insert at this position in the document.

You can also provide a link that the user clicks on to type custom text. To do this, check you're in Design Mode and select the Text button from the Controls group. Between the markers type the text describing the content to be inserted in this position.

To test this, deselect Design Mode and click the element to see it highlighted and type the text prompted for. The text you type appears in line with regular text in the document and can be formatted by right clicking on the text and apply a format to it.

Note, however, that the entire content control is formatted at the one time and individual letters and words cannot be formatted independently of the others.

Labels: , , ,

Add to Technorati Favorites

Tuesday, November 3, 2009

Word 2007 - Boilerplate paragraphs

One typical use for Microsoft Word is in offices where documents and letters are created by assembling a series of standard paragraphs from a range of alternatives.

In the past Microsoft Word included the AutoText and AutoCorrect features and, like many users, you may have adapted AutoCorrect to use in creating boilerplate documents.

Some other users tweaked the AutoText tool so they could use it to insert content, such as graphics and text.

The AutoText tool no longer appears in Word 2007 and it has been replaced by a Quick Parts Gallery which makes saving, organizing and assembling documents from stored paragraphs, aka Building Blocks, much easier to achieve.

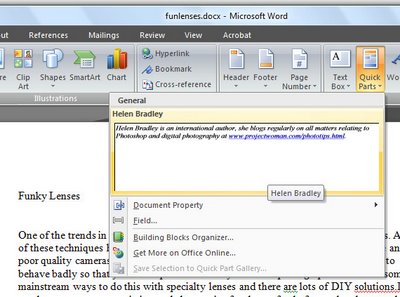
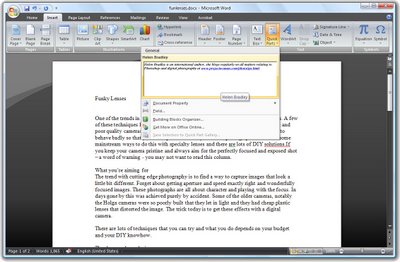
Find the Quick Parts tool on the Insert tab and click the down pointing arrow to open the Quick Parts Gallery.

Here you have a number of options including Document Property which lets you insert some of the common document properties into your document by clicking on the one to insert.

The Field option lets you insert fields much as you could in earlier versions of Microsoft Word.

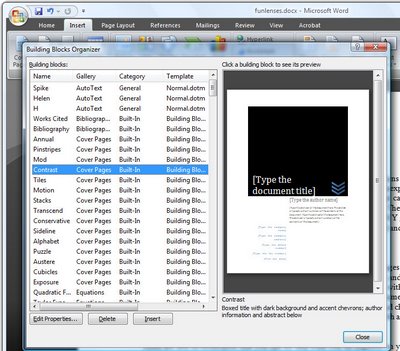
The Building Blocks Organizer is the newest feature and this is a repository of text blocks which you can add to your Word documents. These Building Blocks can be sorted by Name, Gallery or Category. Some of the Building Blocks come built-in to Microsoft Word and others are legacy AutoText entries from earlier installations of Microsoft Word.

You can insert a Building Block into a document by selecting the entry in the list and click Insert.

Labels: , , , ,

Add to Technorati Favorites

Saturday, October 17, 2009

Word 2007 - Instant Document Elements

Hand in hand with the new Building Blocks tools in Word 2007 are the new smart document elements created using content controls.

These elements allow you to instantly create headers, footers, text boxes and cover pages for your Word documents.

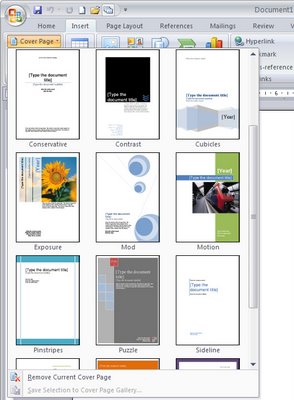
To see how these work, select the Insert tab and select the Cover Page dropdown list. From here you can select a sample cover page to use for your document.

If you select one such as Exposure a new cover page will appear in your document. This particular one includes an image and space in which to type the document abstract, the year and document title as well as your company name, etc.

You can select and delete any of these elements that you don’t want to use on your cover. Alternately, click on the elements you do want to include and type the information prompted for.

To replace the photograph on the cover page, click it to select it, right click and choose Format AutoShape > Colors & Lines tab and click the Fill Effects button. Select the Picture tab and click Select Picture to choose a replacement image.

Once you've selected the replacement image, enable the Lock Picture Aspect Ratio checkbox and click Ok twice. The original image will be replaced by the one you chose.

If you later change your mind and choose an alternative Cover Page, the text you've typed will, where it is appropriate, appear in the alternate cover page and the original page will be removed automatically.

Headers and Footers
Other elements which work similarly to the cover page are to be found also on the Insert tab and these include the Header and Footer and Text Box. To add a header to your document, for example, select the Header option and choose the header to use.

It makes good sense to choose the same style header as you used for the cover page as these are designed to look good together, although this is not a requirement and you can choose any header you like.

Similarly, you can add a footer by clicking the Footer button and choose a footer to add to the document.

Text boxes
The Text Box tool lets you add a formatted text box which contains prompts as to where you should insert your content. In this case, select a text box style that suits the type of text you want to insert such as a breakout quote or a sidebar.

Any element such as Header content or a Text Box can be reformatted by right clicking its edge and choose Format AutoShape or Borders and Shading, or whatever prompt suggests that it will let you format that particular element – what you see in the menu will depend on the element you have selected.

For example, you can change the fill color of a Text Box and, if you change it to a fill color which is a theme color, the Text Box color will update later on if you change the document theme.

To change the theme, select the Page Layout tab and choose an alternate option from the Themes list. By holding your mouse over a theme you can preview its effect on the document underneath, select the theme you want to use. To change the font used, select the Theme Fonts option to right of the Themes list and choose an alternate font combination.

Labels: , , , ,

Add to Technorati Favorites

Saturday, October 10, 2009

Word 2007 DIY Quick Parts

Quick Parts in Word 2007 is the new replacement for AutoCorrect and AutoText from earlier versions of Word.

To add your own text to the Quick Parts gallery, type the paragraph or open a document which contains it and select it.

Click the Quick Parts button and choose Save Selection to Quick Part Gallery and, when the Create New Building Block dialog appears, type a name for the Building Block.

This will be the name you'll use to identify it in the list so make it self-explanatory of what the Quick Part contains.

Select the Gallery to add it to, in most cases this will be the Quick Parts Gallery.

Select a Category from the list or click the Create New Category option to create your own subcategory of the Quick Parts Gallery. By creating sub categories you can organize your Quick Part entries so that they are easier to find.

Type a description of the Quick Part, if one is needed to identify it, and, from the Save In list, choose buildingblocks.dotx which is the default setting.

From the options dropdown list you can select to Insert Content Only, or insert the content in its own paragraph or its own page depending on how the content should be used. Click Ok when you are done.

In future you can insert the Quick Part into a document by clicking the Quick Part button and then select it from the dropdown list.

If it does not appear in the list, click the Building Blocks Organizer and select the Building Block by name.

You can locate building blocks in the organizer by sorting on the Gallery column and locate the Quick Part area which is where your building blocks will appear. Click the one to insert and click Insert.

Labels: , , , ,

Add to Technorati Favorites

Thursday, August 13, 2009

Word 2007 – Sort Words, Paragraphs and Table Cells


Word 2007 finally fixed a huge problem that existed in earlier versions - it looked like there was no way to sort data in a list.

This wasn't the case - you used the table sort feature but it was far from being self evident.

Now Word 2007 uses the same tool it just puts it in a smart place.

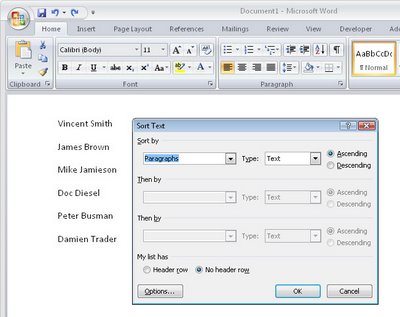
To sort a list or series of words or paragraphs, select the text.

From the Ribbon, click the Home button and click the Sort button in the Paragraph group.

Choose Paragraph to sort on the first word and click Ok to sort the data in order.

If you're using an earlier version of Word, then visit this post to see how to sort in Word 2003 and earlier:

Sorting a Word list
http://www.projectwoman.com/labels/Table%20Sort.html

Labels: , , , , ,

Add to Technorati Favorites

Friday, July 17, 2009

Word 2007 - instant tables


New to Word 2007 is its Quick Tables feature which provides custom formatted tables for inserting in a document. To see the tables available click the Insert tab and choose Table > Quick Tables. The preconfigured tables include calendars and tables with sub headings and other features already formatted. Click a table to insert it and, once in the document replace the text in the table with your own text such as the dates for your desired calendar month.

These tables are a quick way to create some really great looking tables, one wonders though why no one made the calendar options just a little bit smarter so they automatically enter the desired month and days. Just a thought Microsoft!

Labels: , , ,

Add to Technorati Favorites

Wednesday, July 8, 2009

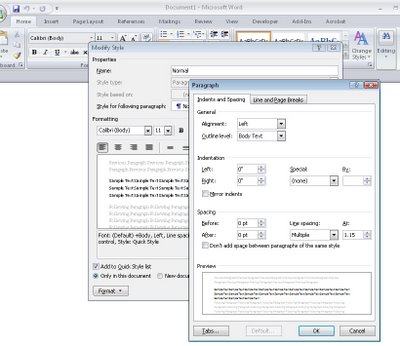
Word 2007 - Update Normal Style

The Normal style is applied to text by default if no other style is applied.

If the Normal style for any of the style sets is not to your liking, select it in the style list, right click and choose Modify.

You can now alter the style, for example you can reduce the inter-paragraph spacing by clicking Format > Paragraph and reduce the Spacing After value.

Click Ok and then, to apply this change to all new documents based on this template, select the New Documents Based on This Template option and click Ok.

By configuring the styles to suit your needs you can quickly format your documents to a consistent look without having to make all the format changes individually.

Labels: , , ,

Add to Technorati Favorites

Thursday, June 18, 2009

Word 2007 - smart date entry


Word 2007 has some totally cool new tools for entering data in your documents. Trouble is they are hidden so most folks don't know they are there.

To start, display the Developer tab by clicking the Office button > Word Options > Popular > Show Developer tab in the Ribbon.

Now click the Developer tab and, in the Controls area you'll find entries for a range of tools including the Date Picker. To insert the date picker into your document click Design Mode and then click the Date Picker button. Click Design Mode again to exit that mode.

Now your user will see a Click here to enter a date option and, when they click the content control, a dropdown date picker will appear allowing them to select a date to insert into the document.

To ensure the date is formatted in a particular way return to the Developer tab, click Design Mode and click the Date Picker in the document. Click the Properties button on the Ribbon and from the Properties dialog select a date format to use. Make sure to deselect Design Mode before you return to your document.

Labels: , , ,

Add to Technorati Favorites

Monday, June 15, 2009

Word 2007 working with boilerplate text


One typical use for Microsoft Word is in offices where documents and letters are created by assembling a series of standard paragraphs from a range of alternatives. In the past Microsoft Word included the AutoText and AutoCorrect features and, like many users, you may have adapted AutoCorrect to use in creating boilerplate documents. Some other users tweaked the AutoText tool so they could use it to insert content, such as graphics and text.

The AutoText tool no longer appears in Word 2007 and it has been replaced by a Quick Parts Gallery which makes saving, organizing and assembling documents from stored paragraphs, aka Building Blocks, much easier to achieve.

Boilerplate text with Quick Parts
Find the Quick Parts tool on the Insert tab and click the down pointing arrow to open the Quick Parts Gallery. Here you have a number of options including Document Property which lets you insert some of the common document properties into your document by clicking on the one to insert. The Field option lets you insert fields much as you could in earlier versions of Microsoft Word.

The Building Blocks Organizer is the newest feature and this is a repository of text blocks which you can add to your Word documents. These Building Blocks can be sorted by Name, Gallery or Category. Some of the Building Blocks come built-in to Microsoft Word and others are legacy AutoText entries from earlier installations of Microsoft Word. You can insert a Building Block into a document by selecting the entry in the list and click Insert.

Create you own entries
To add your own paragraphs to the gallery, type the paragraph or open a document which contains it and select it. Click the Quick Parts button and choose Save Selection to Quick Part Gallery and, when the Create New Building Block dialog appears, type a name for the Building Block. This will be the name you'll use to identify it in the list so make it self-explanatory of what the Quick Part contains. Select the Gallery to add it to, in most cases this will be the Quick Parts Gallery.

Select a Category from the list or click the Create New Category option to create your own subcategory of the Quick Parts Gallery. By creating sub categories you can organize your Quick Part entries so that they are easier to find. Type a description of the Quick Part, if one is needed to identify it, and, from the Save In list, choose buildingblocks.dotx which is the default setting. From the options dropdown list you can select to Insert Content Only, or insert the content in its own paragraph or its own page depending on how the content should be used. Click Ok when you are done.

In future you can insert the Quick Part into a document by clicking the Quick Part button and then select it from the dropdown list. If it does not appear in the list, click the Building Blocks Organizer and select the Building Block by name. You can locate building blocks in the organizer by sorting on the Gallery column and locate the Quick Part area which is where your building blocks will appear. Click the one to insert and click Insert.

Labels: , , ,

Add to Technorati Favorites

Monday, May 4, 2009

Word does Math - in tables!


Lots of folk do things like use Word for invoices simply because it's easy to do. When it comes to laying out data for an invoice a table makes a good choice as everything looks very neat.

It is also a good choice because, once your data is in place, you can get Word to do the calculations for you.

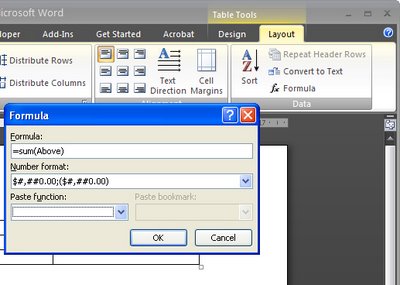
So, for example if a column contains a series of numbers that you want to add up, click in the blank cell at the bottom of the column of numbers and choose Table > Formula (in Word 2007 choose the Table Tools > Layout > Formula button). Make sure the formula reads =sum(above) and click Ok. Now the total is in place in the cell.

If you change the numbers in the cells above, you'll need to recalculate the formula. To do this, click in the cell containing the formula and press F9.

The Table Formula dialog also includes an option for formatting the numerical result so it looks the way you want it to - with numbers after the decimal point and even a leading $ or £ symbol.

Labels: , , , ,

Add to Technorati Favorites

Thursday, April 16, 2009

Send to PowerPoint missing? Not really!


In Word 2003 you could create an outline in Word and then send it to PowerPoint where it would be converted to a PowerPoint slide show. Level 1 became the slide title and level 2 the first level bullet points and so on.

I hear a lot of grumbling that this feature has been removed from Office 2007 – not so! It just isn’t quite where you expect it to be. In fact, you have a few options in PowerPoint 2007 and Word 2007.

Option 1
You can add the Send to PowerPoint button to the Word 2007 Quick Access toolbar by clicking the Office button and choose Word Options > Customize and from the Commands not in Ribbon collection choose the Send to Microsoft Office PowerPoint option and click Add to add it and then Ok. Now you can click it to send the outline file to PowerPoint.

Option 2
You can also approach the task from PowerPoint 2007 which is really the better option. One alternative is to open the Word outline file in PowerPoint and the slides will be automatically created for you. To do this click the Office button and choose Open and from the Files of type list choose All Files so you can see and open your Word file.

Option 3
This is my fave!

Open PowerPoint 2007 with a new slide show and make sure your Word 2007 outline file is closed.

Choose the Home tab on the Ribbon and click the little arrow on the New Slide button. This opens a menu which includes the option Slides from Outline – select this and open your Word 2007 outline file. The slides are automatically created for you.

So, the option to Send to PowerPoint is not there in Word 2007 but you have so many more ways to complete the task now.

Labels: , , , ,

Add to Technorati Favorites

Thursday, April 9, 2009

Cool Word 2003 and 2007 Breakout Boxes


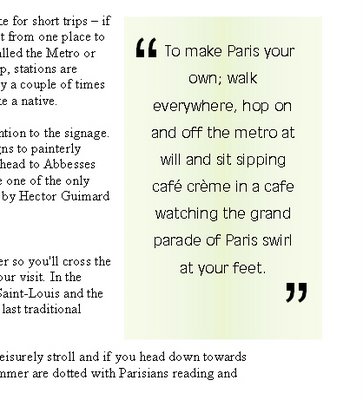
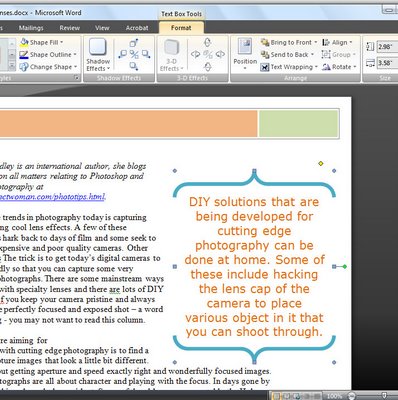
Breakout boxes or pull quotes are a great way to add visual variety to a very text heavy document. Even if you don't have images you can use you can still add some color and interest to the page. To do this, you will need some text to use – ideally it will be an interesting quote or sentence or two from the document itself. You will copy this so it appears in the correct position in the text but so it is also a feature element on the page.

Create a textbox
Start by selecting and copying the text. Click outside the text so it is no longer selected and choose Insert > Text box and draw a textbox on the page. Click inside it and choose Edit > Paste to paste in the text on the clipboard.

Format the text
Text in a breakout box looks better if it is formatted differently to the surrounding document, for example you may want to center it, change the font and adjust the line spacing to double line spacing so that the text looks very different.

Format the text box
You can add a colored background behind the textbox by selecting the textbox and choose Format > Textbox and from the Colors and Lines tab select a Fill Color for the textbox. To remove the border line, choose Line Color > No Line (or choose a line option that you like), and click Ok.

Add quote marks
Adding an oversize pair of quotation marks helps delineate the breakout box or pull quote from the remainder of the document. In this instance it’s best to place the oversize quotation marks each in a separate textbox, format them so they are very large, set the textbox so that the fill color is set to No Fill and the line color to No Line and then drag it into position over the textbox that contains the breakout text.

Set the wrapping
If you set this small textbox’s wrapping to in front of text the text will not be forced to wrap around it and the textbox with the pull quote will control the wrapping not the double quote marks. Format the double quote marks in an interesting font that has an attractive shape for the quotes so that you create an interesting effect.

Labels: , , , , ,

Add to Technorati Favorites

Wednesday, April 8, 2009

Accessing the Clipboard contents in Word 2007


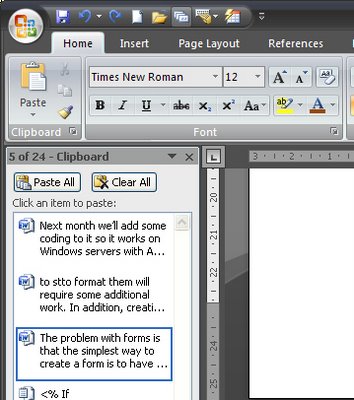
In previous incantations of Word it was fairly easy to see, and therefore to know, that the Office clipboard contains more than just the most recently copied or cut item. In Word 2007 this is not the case and you need to know where the clipboard is and to understand that it contains much more of your document history than you might think it does.

How it works is that it retains everything you copy and cut to the clipboard during the current session. As you copy or cut something, all the other items are moved further down the stack leaving the current item at the top. This is the item that is pasted in if you choose the Paste option. However, you can paste anything that is on the clipboard, provided you can find it.

In Word 2007 click the Home tab and, below the Paste button you will see a small entry for the Clipboard and a flyout indicator. Click it and the clipboard will appear and all the items in it will be listed. The clipboard stores up to 24 items and as each additional one is added the one at the bottom is lost. You can paste any of the items that display in the list into your document by just clicking on it.

So, next time you know you cut or copied something a while ago and you need it back, check the Clipboard, chances are it's there waiting.

Labels: , ,

Add to Technorati Favorites

Tuesday, March 10, 2009

Instant text boxes in Microsoft Word


Just a short tip today, I just tripped over this and thought "WOW! I didn't know that!" so I wonder if you know it too?

Ok.. step back a bit. I'm doing a column on columns in Word and I'm showing how to place a text box or image in a document laid out in 2 columns so the text box or image travels with the text and how to take it out of the line of text so it floats independently.

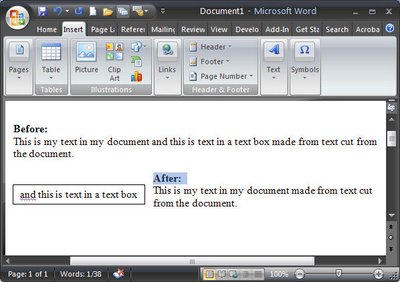
To create the text box, I select my text, then realize I need to create the text box first and click the Text box button without deselecting the text. [insert WOW moment in here].

What happened was that the text box got created automatically and the selected text appears inside it - just like that - how cool is that?

So, next time, instead of creating a text box and then copying and pasting text into it, select the text and click the Text Box button on the Drawing toolbar in Word 2003 and earlier and it will all be done automatically for you in one smooth step. The same process works in Word 2007 too but you must click the Insert tab, click the Text box button and choose Draw Text Box for it to happen.

Instant text in text boxes in Microsoft Word - can't ask for anything more simple than that.

Labels: , , , , ,

Add to Technorati Favorites

Monday, March 2, 2009

Protect part of a Word document


You know when it happens. You're developing a template or document for someone to work on and you know that they will clobber part of it when you least expect it. So, you want to protect this from happening and make sure your document never gets destroyed.

Problem is how to do it?

Solution? Read on..

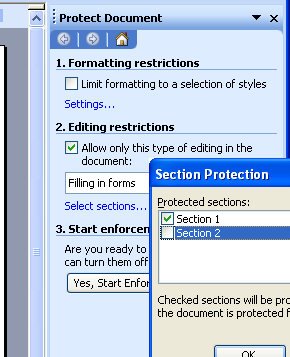
Ok.. so, Word has a document protection feature you can use but it only protects the whole document. But, it can be tweaked to protect only part - but we have to set it up to work this way. So, you have to add section breaks around the area to protect. Pretty easy to do. Click just above where the protection is to start and choose Insert > Break > Continuous - this adds a continuous section break in at this point and, because it's continuous there isn't really any indication it's there.

Move to just beyond the area to protect and repeat to add another continuous section break. If you just want to protect the beginning or end of your document you only need one section break.

So far, so good. Now for the protection bit. Choose Tools > Protect Document and in the Editing Restrictions area, click the checkbox and from the list choose Filling in Forms. Now click Select Sections and check the sections to protect (ie leave the ones you want to be able to edit unchecked).

Then click Yes, Start Enforcing Protection and, if desired, add a password.

Now users are locked out of the protected area of the document and they can't change it.

In Word 2007 it works just the same. Find the section breaks in Page Layout > Breaks > Continuous and the protection tool in Review > Protect Document > Restrict Formatting and Editing.

Neat huh?

Labels: , , , ,

Add to Technorati Favorites

Thursday, January 8, 2009

Change spelling wavy underline color

Ok, so this post can happily be filed in the "Gee I really needed to know that - NOT!" category. It's seriously fun but, unless you're color blind, not something you absolutely HAVE to know.

It's easy (if you're a dab hand at changing registry entries) to change the color of the wavy underlines used for spelling and grammar errors in Word 2007. Choose Start > Run > Regedit and locate this key:

HKEY_CURRENT_USER\Software\Microsoft\Shared Tools\Proofing Tools

If the SpellingWavyUnderlineColor entry exists, double-click it and when the Edit DWORD value dialog appears, click Hexadecimal and type an eight digit hexadecimal number representing the RGB color value of the color to use (add two leading zeros to the value). So to use Blue, type 000000FF and click Ok. If the value isn't in the list, choose Edit > New > DWORD value, type SpellingWavyUnderlineColor and then double-click it and change its DWORD value to the hexadecimal number you want to use.

To change the grammar underline color, change the GrammarWavyUnderlineColor value, and to change the contextual spelling error color change the ContextualSpellingWavyUnderlinecolor entry. If any entries don't exist, just create them.

When you're done, close the registry, restart the computer, and restart Word and the changes will be in place.

If you don't know what hexadecimal color is what, visit http://www.patman.org/webdesign/hexcolors2.asp and find a color and its appropriate hexadecimal value here. Add two leading zeros and you're done.

Of course, before you touch the Registry you should back it up in case everything goes pear shaped. Also - NEVER mess with anything you don't understand!

Labels: , , ,

Add to Technorati Favorites

Sunday, December 28, 2008

Don't Spell Check This..


Often when you’re working on a document including one which contains code, or foreign language words you will want the document spell checked but you’d like the code or foreign language words omitted – so you’re not distracted by the red underlining everywhere.

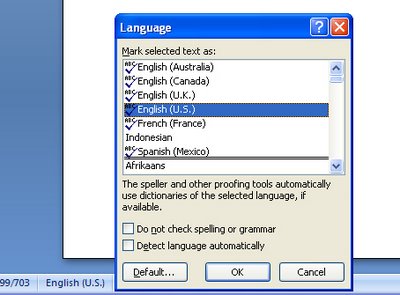
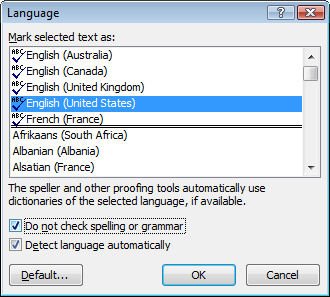
To do this, in Word 2007, select the text you don’t want to be checked and double click the Language entry on the status bar – typically this will show English (United States) or similar. When the dialog appears, choose the Do not check spelling or grammar checkbox. This disables spell checking for this particular word or selection. The rest of the document is spell checked as usual but words you don’t want to be checked, won’t be.

Labels: ,

Add to Technorati Favorites

Monday, March 3, 2008

MIA - Word 2007 loses Versions


There was a handy utility in Word prior to and including Word 2003 which disappeared without ceremony in Word 2007 called Versions. The premise was that you could save multiple versions of a document - like a snapshot of the document at different stages of its development - inside the one file. The document took with it a history of what it had looked like at various times in its past. To use it, choose File > Versions and then just save a version now or set it to save one automatically each time you close a file.

If you didn't use versioning, you may not mourn its passing. If you did use it you are left wondering why it got axed. It was a handy tool, it worked, it did a job that meant many folk who might otherwise have lost work permanently actually had the backups of their work on hand when they needed it. Nice work Microsoft - NOT!

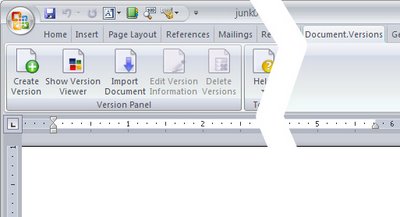
Anyway the clever folk at Edenic Software have created a neat little add-in which puts Versions back into Microsoft Word. The tool is called Document.Versions and it installs as a new Ribbon entry. It works pretty much like the old tool but this one is nice and visible and made by folks who care so it's likely to be around for quite some time. I've been trialling a Beta version and the final release is out very soon.

If you loved versions and if you're annoyed (I'm trying to be polite here) that Microsoft took away a great tool, then take yourself over to OfficeVersions.com and grab a trial version of the add-in. You can trial it for 30 days and then buy a licence for less than it will cost in your time to get back information you've lost when someone edits your document without turning on Tracked Changes, for example!

Oh, and look out for other .Version tools coming soon. Versions add-ins for Excel and PowerPoint are planned - called Spreadsheet.Versions and Slideshow.Versions. While versioning was never a feature of either Excel or PowerPoint that doesn't mean these won't be very handy additions to Excel 2007 and PowerPoint 2007 too.

Labels: , , ,

Add to Technorati Favorites

Friday, December 21, 2007

Word 2007 - Building Blocks

Whenever you type the same thing in Word more than once, ask yourself if there isn't a smarter way to work. The new Building Blocks feature in Word 2007 lets you create and save frequently used content so that it can be easily inserted into your document.
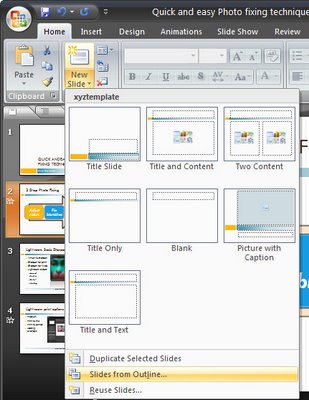
So, for example if you repeatedly add a disclaimer or a bio to your documents, create it as a building block and insert it into the document when required. To do this, type the text to create as a building block and select it. Choose Insert, Quick Parts and choose Save Selection To Quick Part Gallery. Type a name for the block, select the gallery to attach it to and the category and description of the Building Block. It’s best to save the building block to buildingblocks.dotx as building blocks saved to this file are available regardless of which template is currently in use. Choose the options for the content and click Ok.

In future, to add a Building Block to a document, click the Insert tab and then Quick Parts and select the block to add.

Labels: ,

Add to Technorati Favorites

Wednesday, December 5, 2007

Images in Word tables

It is possible to place an image inside a table cell in Word. To do this, first create a table, click inside the cell and then choose Insert Picture > From File and select the image to insert. You can size the image inside the table cell as requiredby dragging on its sizing handles.

If you set the image's Text Wrapping to Behind Text or In Front of Text the image will no longer be constrained to the table and will jump out of it and operate independently of it. To wrap text around the image inside the table cell use the Square or Tight options for best results. In Line With Text only wraps one line and it's pretty awful.

Labels: , , ,

Add to Technorati Favorites

Tuesday, October 30, 2007

Making Columns in Word

There are lots of ways to create text in columns in Word but the easiest is to type the text (or at least some of it) and select it or position the cursor where the columns should begin. Then choose Format, Columns and select the number and spacing of columns.

From the Apply To dropdown list choose what to apply the columns to. If you have text selected, you'll typically select Selected text. If you haven't selected text you can apply them to the Whole Document or This Point Forward. Using This Point Forward lets you create a heading on the page with the text in columns under it.

Labels: , ,

Add to Technorati Favorites

Saturday, September 29, 2007

Smarter Table Headings in Word

When you have a table in Word that extends beyond a single page in your document it can be hard to follow what the table is all about when you’re looking at page 2 because the headings are all back on page 1.

Solve this problem in Word by selecting the rows that contain the headings and, from the Table Tools tab on the toolbar, click the Layout option and then choose Repeat Header Rows. The contents of the header row will now appear on all pages where the table appears.

Labels: , ,

Add to Technorati Favorites

Thursday, September 20, 2007

Color your world in Word 2007

Let’s face it, plain old white backgrounds are, just that, plain old white backgrounds. If you’re like me, you’ll want to change the color of your page background.

To do this, choose the Page Layout tab from the Word 2007 Ribbon, and choose the Page Color dropdown list and choose a page color from it. If you choose a color from a Theme set then, later, when you change the Theme - the page color changes accordingly.

Labels: , ,

Add to Technorati Favorites

Wednesday, September 19, 2007

Formatting table cells in Word


Since Microsoft Word 2002, it has been possible to format a series of cells in a table all at the one time, even if they are not contiguous (a lovely word that means not side-by-side).

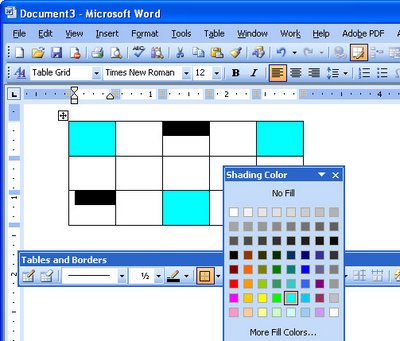
To do this, select the first cell then Control + click on the other cells that you want to share the same formatting. Once all the cells are selected you can apply a formatting such as a shading to those cells. Note, that the Shading button on the Tables and Borders toolbar in Word 2002/2003 is the one to use, the one on the Drawing toolbar is the Fill button - it looks the same but doesn't work the same!

Selecting and formatting non contiguous cells all at ones makes it a quicker process to format a table than it would be if you selected and formatted each cell individually.

However, of course, the F4 key still works in cells in a table so you can, for example, fill a cell with a shading color or a format option and then click in another cell and press the F4 key and have that format applied to this cell too. The F4 key is a repeat key which repeats the previous command and it's a great key to learn to use anytime you're working with Word.

Labels: , , ,

Add to Technorati Favorites

Friday, September 14, 2007

How-To with Helen Bradley


I write for lots of wonderful publications across the globe and one of them is Internet.com's Small Business Computing web site.

The great news is that I now have my own section and here it is: SmallBusinessComputing.com. Check a few sections down and you'll see a link to all my small business columns. There are heaps of columns on all things Office including Office 2007 and lots of stuff for earlier versions too. It's a great way to get down and dirty with some of the new features in Excel, PowerPoint and Word including Themes, SmartArt, Charts and lots of other handy tools.

Labels: , , ,

Add to Technorati Favorites

Tuesday, September 11, 2007

Watch your language!


I write for magazines and online providers all across the world. One day, I'm typing a Canadian article, another an Australian one and later in the week my work gets sent off to the UK and the USA. I'm constantly juggling color/colour, labor/labour and tricky ones like jewelry/jewellery. It's confusing to say the least and the last thing I want to do is to miss obvious misspellings. That's why I rely on Word's language tools.

Prior to Word 2007 I can set the language for a document by selecting it and choose Tools, Language, Set Language and choose the proofing language.

In Word 2007, of course, everything is different but it's easy to find - thank you Microsoft!

In Word 2007, select your document (Control + A works just fine) and click the language indicator on the Status bar - the Language dialog appears and you can choose the language to use to proof the text.

Labels: , ,

Add to Technorati Favorites

Monday, September 10, 2007

MIA – Word 2007 commands


It happens for the first few months of using any significant program update like Microsoft Word 2007 – you go looking for something and it’s not where you expect it to be. It can take time to find it and sometimes, it was there in front of your nose all the time.

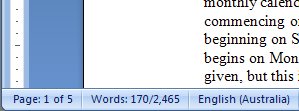
Take the Word Count tool in Word. It got it’s own toolbar in Word 2003 but in 2007, of course, we have the Ribbon and try as you might you won’t find any Word Count icon on the Ribbon. The reason is that it’s there, under your nose! Check the bottom left corner of the screen and Word is counting your words as you type them. Need a quick count of the words in a paragraph? Too easy, select the paragraph (tip in a tip: Click it 3 times with your mouse) and then read off the results in the same place.

Easy when you know how.

Labels: ,

Add to Technorati Favorites

Wednesday, September 5, 2007

Word 2007 - Help, my SmartArt disappeared

Open a Word 2003 document in Microsoft Office 2007 and click Insert SmartArt. You might be surprised at what you see. The beautiful Word 2007 SmartArt dialog disappears and all you have is the old Word 2003 diagramming tool.

At this point you might wonder exactly what has happened. The answer is that Word is operating in compatibility mode as you can see by looking at the toolbar. To convert the Word 2003 document to 2007 format so that you can use Word 2007 features such as SmartArt and Themes, click the Office button and choose Convert. Once the document is converted you can then use all the lovely new features of Word 2007 even on your older Word documents.

Labels: , ,

Add to Technorati Favorites

Monday, September 3, 2007

Random text in Word 2007


In olders versions of Word, you could enter random text into a document using something like this typed in at the beginning of a new line and press Enter:

=rand(2,3)

This gives you 2 paragraphs each of 3 sentences of the text "The quick brown fox jumped over the lazy dog." It was not particularly original but it was handy for filler text.

In Word 2007, the news is better still. There are two options:

type

=rand(3)

To get three paragraphs of random text, this time it actaully makes sense and looks like real text.

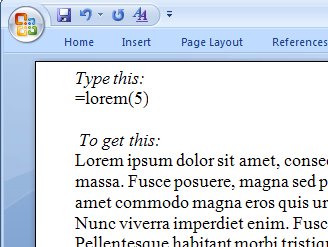
The best news is, however, that Lorem ipsum can be entered automatically. Now I can remove the AutoText entry I always use to insert this Latin text and do it anywhere, anytime in Word 2007. Here's what you type:

=lorem()

this gives you a little sampler of text. Type:

=lorem(10)

to get 10 paragraphs of it.

It's easy to remember and easy to use and, well - thank you Microsoft, I'm impressed!

Labels: , ,

Add to Technorati Favorites

Wednesday, August 29, 2007

What personal information are you sharing?


Word has been a problem in the past - it buries information in your Word documents that interested people can find and use.

Talk to those politicians, for example, who have used Track Changes to make changes to a document then mistakenly sent off the document complete with original text. Any one in the know takes around 2 seconds to find the deleted information and then another 2 seconds to tell every man and his dog exactly what that politician didn't want them to know.

So, in Word 2007, life is better, and you can remove personal and hidden information from your Word documents quite easily - if you know how to make it so.

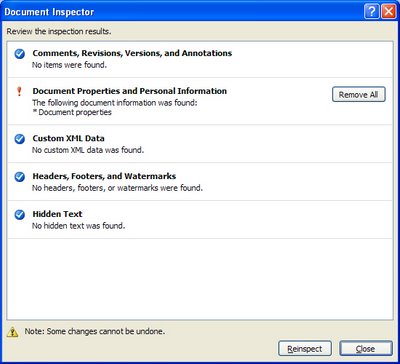
To see what is buried deep in your Word documents for everyone to see, save your document then click the Office button. Choose Prepare, then Inspect Document to launch the Document Inspector. A dialog opens to show options describing you might want to check - I can't see any reason for not checking all the checkboxes. Now click Inspect and you'll see a list of personal and hidden stuff that is lurking in your document. Click any option to remove what you don't want others to see and then click Reinspect to check it's all gone.
Now you'll never send out anything that will be embarassing - and you know how to easily find the hidden stuff in Word files you receive from others ;)

Labels: , ,

Add to Technorati Favorites

Wednesday, August 22, 2007

Rotated Text in Word 2007


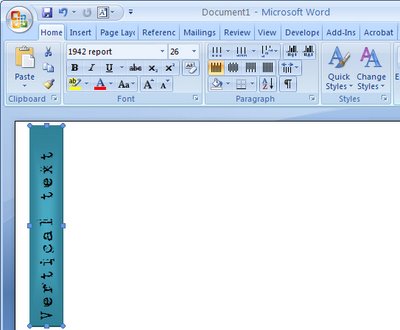
I love the look of page headings that appear down the side of the page - vertical text mixed with regular text just looks so cool.

Here's how to create rotated text or vertical text on a page in Word 2007:

Start by creating a text box so choose Insert > Text Box and select either a text box style from the list (not the best idea), or click Draw Text Box to draw your own (much better).

Type your text in the text box then click Text Box Tools > Format and locate the Text Direction button. Click it to rotate the text to the desired orientation. Now simply size the text box to the desired size and move into position and apply one of Word's new text box styles and you're done. Simple and fun.

Labels: , , ,

Add to Technorati Favorites

Thursday, August 9, 2007

Shapes are different in Word 2007


I've been working with shapes a lot in Office 2007 cause I've just written a huge article about them. It didn't start out to be huge but that's the way it ended up. You see there's just so much to learn about them and it's not all intuitive. The problem as I see it is that part of Office 2007 was just cobbled together (love that word cobbled!). Things aren't consistent, far from it. One of the most interesting inconsistencies is how Shapes are implemented in Word and in Excel and PowerPoint.

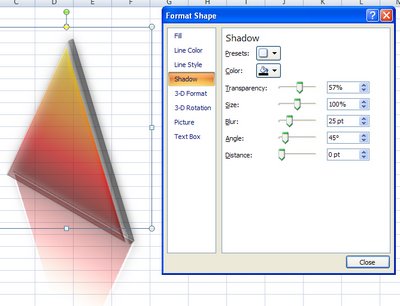
In Excel and PowerPoint shapes work the same pretty much and, if you add a shape and right click it you can choose Format Shape and you get this snazzy new dialog to work with. Do the same in Word and life is very different indeed - there's no new dialog just the old stuff.

What this means in practical terms is that you can't fill a Word shape with an image from the clipboard or a clip art image - you can in Excel and PowerPoint and you can't create your own custom multicolor gradient for a Word shape. The issue is that there's a new graphics engine in Office 2007 called Escher graphics (presumably named after one of my favourite artists, MC Escher) which is implemented fully in Excel and PowerPoint but only partially in Word. So, don't expect Shapes in Word to behave the same as they do in PowerPoint or Excel, cause they won't - it's that simple.

Labels: , , ,

Add to Technorati Favorites

Thursday, August 2, 2007

Print in Reverse - Word


Are you one of those people who print long documents in Word and then spend a few mintues reversing the page order because they come out printed back to front? Or do you print multiple copies of a document and then have to collate them by hand?

If you are, it's probably cause you haven't read this blog post! You see, life doesn't have to be this difficult. Word will collate for you and it will print in the order you want and if it's not doing it right you can change it.

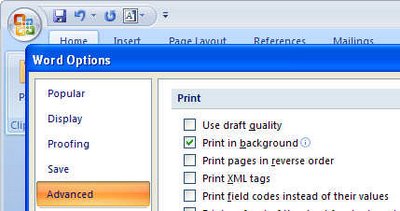
First things first, if you need to reverse your print order, choose Tools, Options, Print and change the setting in the Reverse Print Order checkbox - if it is checked, uncheck it and if it is clear then check it. This setting remains for all documents so now you don't have to shuffle paper any more.

The collating options are in the printing dialog. Choose File, Print and you can click to set one of two collating options for multiple prints.

In Word 2007, find the print options by clicking the Office button, choose Word Options, Advanced and scroll down to locate the Print options.

Labels: , , ,

Add to Technorati Favorites

Wednesday, July 11, 2007

Configuring Themes in Word 2007

While themes are a gimme for working in PowerPoint, they don't appear to be as useful in Word as they don't seem to do much to format the document if you're not using diagrams or shapes. However the problem isn't quite this simple. Themes in Word won't apply to the text in the document if you don't have a style in place. Use the Home tab to view the Styles option and click Change Styles and select a Style Set. Now, when you choose the Theme, the styles available change.

All of a sudden, themes make a little more sense in Word 2007.

Labels: , ,

Add to Technorati Favorites

Thursday, June 21, 2007

Versioning in Word


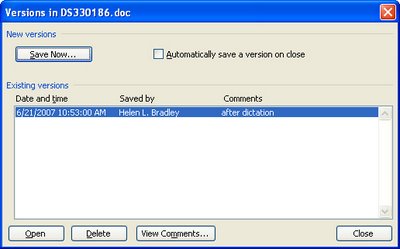
Ever had that "Woops! I shouldn't have deleted that!" feeling? If you use versions in Word, you never will. Versions let you save a copy of the document's current status in the document file. Each new version is stored in the same file so you can return to a previous 'version' any time.

To save a version and configure it to happen automatically, choose File, Versions and click Save Now. You can also configure it so a version for your file is saved each time the file is closed. Then, using the same tool you can view and use an older version of the file whenever you need it.

If you're prone to changing your mind, it could be just the tool you need!

However a word of warning, versioning isn't supported in Word 2007 and you'll lose your versions if you open and save a versioned document using Word 2007. So, this tool is only for those of you who haven't yet upgraded.

Labels: , ,

Add to Technorati Favorites

Thursday, June 14, 2007

A map to find your way around - Word


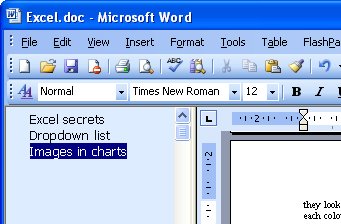
The Document map tool in Word is a cool way to find your way around a long document. Click the Document Map icon on the toolbar in Word 2003 or earlier or choose View, Document Map and it appears down the left of the page. In Word 2007, the Document Map checkbox is on the View ribbon tab.
If you use styles, in particular the heading styles, the items formatted with these styles appear in the list. Simply click one to move automatically to that item.

It's simple and a smart way to find your way around a seriously big document.
Labels: , ,

Add to Technorati Favorites

Tuesday, June 12, 2007

Changing Excel 2007 Default template location


Q: Where do you go to change the default locations for templates in Excel 2007?

Luckily I already know the answer to this question because my bet is that it’s going to take your hours to work out how to do it. You see, there’s no way in Excel to change the default location for where its templates are stored, in particular as one of my blog readers found to his chagrin, the default location for saving chart templates.

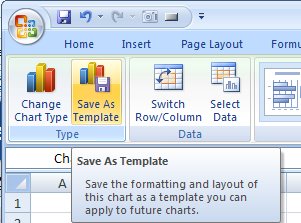
Perhaps I’ll start this story again, this time at the beginning. In a recent blog entry I showed you how to save a chart template. The process is this: create your chart in Excel 2007 and then from the Design tab which appears only when you have the chart selected, click the Save As Template button in the Type group and save your file in your default templates folder which should be c:\Documents and Settings\username\application data\Microsoft\templates. The file should have the .crtx extension.

Close your Excel worksheet, close Excel, open Excel again, create the data for a new chart, select the data and choose Insert, Other Charts, All Chart types, Templates and your chart template should appear in the list. So far so good.

Problem is that not everyone’s installation of Excel 2007 looks to this default location for either saving chart templates or finding them when you need to use them. In particular you may confront this problem if you’re on a network. So the question then becomes where are your chart templates supposed to be saved to? Answer - who knows? You see, there's no setting in Excel to say where to put them, so you have no clue where Excel is looking for them, so you can't put them there because where is "there"?

So, we're now at the point where we know there’s no setting in Excel for specifying the default location for templates. If we could set this, we could save our template there and Excel could find it... simple to understand, but problematic to achieve.

The solution that I found and which works is to make the change in Word 2007 - not exactly the first place you'd look huh? If you visit this link: www.kbalertz.com/kb_924460.aspx you’ll see buried in the KnowledgeBase article quoted there, information on how the template locations in Office 2007 programs are managed.

There are some registry entries that you can change but the simpler solution is to change the location in which your templates are stored using the Word settings. When you use Word 2007 to change the location where your Word templates are stored you also change the location where all Office 2007 templates are stored. So Word’s settings control every other program which is sort of handy to know because you could spend all day looking in Excel for a place to change the Excel template location.

So here’s the short information on how to change Excel’s default template locations: --

Start Word 2007, click the Office button and choose Word Options, Advanced and locate the General group. Click File Locations, User Templates, Modify and in the modify location dialog change the setting in the folder name list or the look in list to point to the folder where your templates will be saved.

For ease of access and backup I suggest that you put it where they were supposed to be put in the first place which is Documents and Settings\username\Application Data\Microsoft\templates but theoretically you could put them anywhere.

This changes the setting in the Windows registry so that all templates are now saved to this location.

The KnowledgeBase article makes essential reading for anybody trying to manage Microsoft Office applications particularly in a network situation.

Labels: , ,

Add to Technorati Favorites

Thursday, May 31, 2007

Haven't I said this before?


Ever get that sense of deja vu - you've said this before.. oh so many times? Office has never had a good tool for managing blocks of text that you use repeatedly. The is AutoText and AutoCorrect but they're not highly visible or intuitive. In Office 2007 another tool is thrown into the mix. The jury is out on whether this is a good thing or just another option that isn't properly thought our or implemented. Anyway, it's worth testing out to see if it works for you. BTW the technical term for text you use over and over again is boilerplate text... not sure why, but there it is!

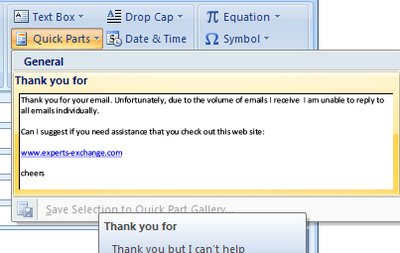
In Word, for example, type and select the text that you use a lot and, on the Insert tab choose the Quick Part option. You can save the text and later insert it using the same tool - it's kinda nice that the tool shows you the full text before you insert it.

Interestingly the same feature is available in Outlook 2007 where it just might be a litte bit more use.

Labels: , , ,

Add to Technorati Favorites

Thursday, May 24, 2007

Showing the Styles pane in Word 2007


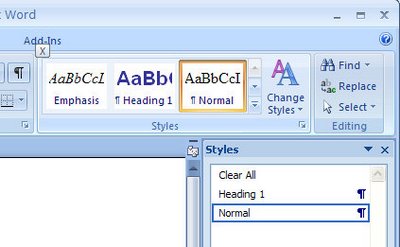
The Styles task pane in Word is a handy way of tracking what styles are applied to a paragraph and for formatting text with styles. You might be wondering if the Styles task pane is totally missing it in Word 2007. Don't worry - it is still there, you just have to find it.

Click the Home tab and locate the Styles group. Click the indicator in the bottom right corner to open the Styles dialog - voila! just what you need. To dock it so it sits permanently on the right of the screen, double click its title bar. You can also display it by pressing Control + Alt + Shift + S.

Labels: ,

Add to Technorati Favorites

Friday, May 18, 2007

Cover Pages to Go - Word 2007


There's a lot to love about the new Word 2007 and one of those things is the new Cover Pages tool. Cover pages are an all important introduction to your documents - they sit on the front of your document and they're the first thing someone sees when they view your work. They should say all sorts of things about your professionalism and your style. If they're plain and dull, they (and you) deserve better. Now there's no excuse for plain ol' cover pages.

When you're next in the market to create a document of any more than two or three pages, check out the Cover Pages options. Click the Insert tab and choose Cover Pages. A gallery opens up and you can choose the page of your liking. It appears as a new first page for your document complete with places already marked into which you can type your information. Click and type and you're done - simple, effective and a 'must have' solution for better business documents.

Labels: ,

Add to Technorati Favorites

Thursday, May 17, 2007

Languages and Word 2007


I write articles for magazines all over the world. One day I’ll wake up and think Canadian and other times I’m English or an Aussie or American.

Each country spells differently, it can be color or colour or honor or honour and there are really tricky ones like dialing and dialling. To help out, I use the Language options in Word. It used to be easy in Word 2003, select the document using Control + A, and apply the language to it using the Tools options.

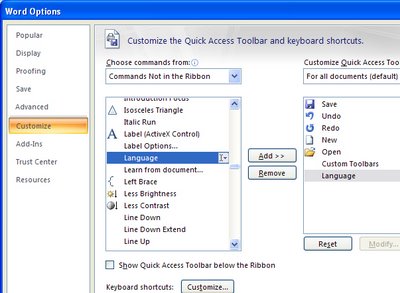
I spent a horrible amount of time in Word 2007 en-route to New Jersey recently looking for the Language tool. Yikes, could not find it anywhere. Ring the alarm bells, I need this feature. My solution, use the Customize tool and add the Language option to the Quick Access toolbar. Now it’s where you want it, handy and accessible. Bummer it can’t be found on the Ribbon anywhere but at least this now works and probably it's better than even in Word 2003.

Labels: , ,

Add to Technorati Favorites

Thursday, May 10, 2007

PDF Writer for Office 2007 - free!


Why would you go to all the trouble of creating Office 2007, packaging it into a cute box and then leave some of the best bits out? Ask Microsoft because I sure as heck don't understand it. In the past they've left out Producer for PowerPoint, options in Excel and now, in Office 2007, the PDF writer. Seriously - it's silly and it's sad 'cause lots of folks don't know that these tools are there so they struggle along without them or worse still, go and pay for something they could have had for free.

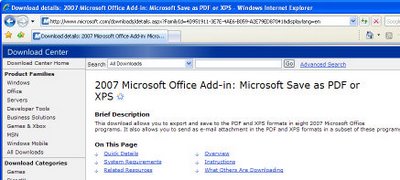
So, in the interests of getting the word out, here's a download link for the PDF writer for Office 2007. Grab it, install it and use it.. you're entitled to it.

Labels: , ,

Add to Technorati Favorites

Thursday, April 19, 2007

It's an oldie but a goodie - Adjustable font sizes in Word

This tip has been circulating around the traps for many years but there are still many users who don't know it exists.

It’s a simple technique for increasing the size of the font in a document. To do this select the text and press Ctrl + ] to increase the font or Ctrl + [ to decrease the font size by one point.
To scroll through the range of font sizes available in the font dialog use Ctrl + Shift + > and Ctrl + Shift + <.

If you want a font size that is not in the font dialog, type it in the font size box by clicking on the curretn font size and type the font size that you want, for example 140 and press Enter. This is a quick way of getting a very large font particularly when the options in the font dialog cease at 72 points - the rough equivalent of one inch high characters.

Labels: , ,

Add to Technorati Favorites

Wednesday, April 18, 2007

Configuring Word 2007 options


One hazard of upgrading to a new piece of software such as Microsoft Word 2007 is learning the interface over again. The new Microsoft Word looks so different to the old versions that you can spend hours in the first week or two looking for things that were in one place but have moved or appear to have totally disappeared.

For example, In Microsoft Word one of those features is the Options dialog which used to be obtainable through Tools, Options in Microsoft Word 2003 and earlier. This dialog gives you access to most of the configurable options in Microsoft Word.

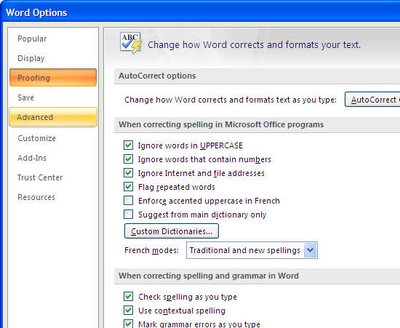
To find it in the new Word 2007 click the Office button in the top left corner of the Word 2007 window. From the bottom of this dialog choose Word Options and you will now find many of the configurable preferences that were available in earlier versions of Word now accessible in Word 2007 and some new ones. For example, switch between Silver, Blue and Black color schemes, set your user name and initials, the languages to use, configurations for AutoCorrect etc..

In fact this dialog is a veritable cornucopia of Word configuration tools.

Labels: , ,

Add to Technorati Favorites

Wednesday, March 21, 2007

Too cool for school - Office 2007 SmartArt


New to Microsoft Office 2007 PowerPoint, Excel and Word is the SmartArt feature which is one you’re just going to love.

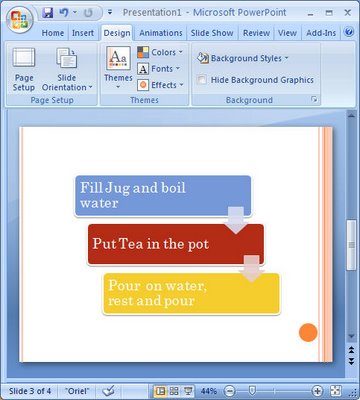
To test it out add a new slide to a PowerPoint presentation, for example, and select the blank layout. From the Insert tab on the Ribbon, select SmartArt and then one of the SmartArt objects.
I like the one called Staggered Process which I've shown here as it makes a great display for a simple step-by-step process. Select your choice of design and then you’ll see text brackets appear on the screen. Click in them or click the double-pointing arrows at the left of the SmartArt object and type your text in the special dialog.

Once you’ve got your bullet points in - and you can add more than the default three if you need more - you have a simple step-by-step graphic. But - this is only the beginning.

There are lots of different looks for your graphic including beveled edges and 3D effects, and you can choose these from the SmartArt styles dropdown list in front of you. You can also change the colors used in the design which, of course, are based on the current document Theme colors. Change the Design Ttheme and the look of the project changes with it.

It’s about as simple as it’s ever going to be to add great looking step-by-step graphics to a PowerPoint slide. They are, seriously, way cool...

Labels: , , , ,

Add to Technorati Favorites