Stupid Photoshop tricks #2 - Fold a Photo
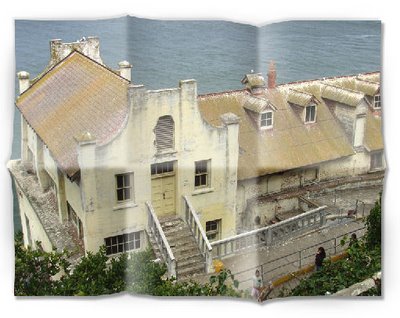
I love the texture of old heritage photos, particularly those that have been kicking around for some years and which have managed to accumulate folds and crinkles. While it can take many years for a printed photo to develop this sort of quality, luckily Photoshop allows us to create a similar effect for our digital photos in far less time. With the help of the Liquify filter to distort the edge of the photo and some gradient fills to add the highlights and shadows you can create the effect of a folded photo in minutes.
The Liquify filter is a tool which is often used to create funny effects like making a person’s eyes bulge or pushing their nose out of shape. It also has more serious applications, not only in photo retouching but also, as you are about to see, in creating interesting effects with your photos. We will use the Liquify filter to bend the edges of the photo to give the impression that it’s been folded and then unfolded.
Here’s how to get started on the effect:
Step 1
Open the photo that you want to use with this effect. I have used a landscape orientation photograph which will be folded into six panels. Duplicate the background layer by choosing Layer, Duplicate Layer and click Ok. Turn off the layer visibility icon for the Background layer.
Step 2
Add some extra canvas around the image by choosing Image > Canvas Size and click the middle of the nine Anchor points. Select the Relative checkbox and add a small amount of space around the image. For example, for an 7 x 5 inch image add 2 inches to the Width and Height. Click Ok to add the extra canvas, (see Fig 1).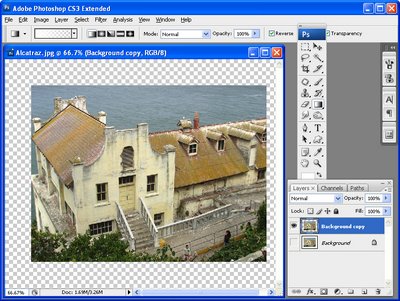
Fig. 1. To make room around the photo so you can warp its edges, add some extra canvas.
Step 3
To alter the edges of the photo so they’re not square, you will use the Liquify filter. Choose Filter > Liquify and select the Forward Warp Tool in the top left of the screen. Select a large brush size and, working across the top edge of the image, start at a position one third of the way across and pull the edge gently up using the Forward Warp Tool. At the two-thirds mark pull down slightly.
Along the right edge, pull the image out at the half way position and do this again half way down the left edge, pulling outwards here too.
Across the bottom, push the edge up at a position one-third in from the left hand edge and push it down at a position two thirds in from the left edge.
Step 4
Reduce the brush size and push again on all these points to create a sharper distortion in the edge. Reduce the brush size again and continue to refine these points until they are smooth but obvious.
Step 5
Switch to a large brush size and push or pull on the corners of the image to get a very subtle change so the corners aren’t perfectly square, (see Fig 2). When you are done you can save the mesh so you can use it later on by clicking the Save Mesh button. Click Ok to return to editing in Photoshop.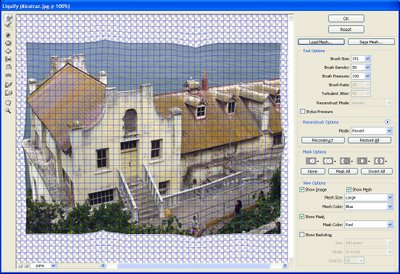
Fig. 2. The Liquify Filter lets you warp the edges of your image so it will look like it has been folded.
Add the shadows
Shading will help you achieve the effect of a photo that has been folded and then opened flat:
Step 6
Use the Rectangular Marquee tool to select the top half of the image. Apply a feather to this selection by choosing Select > Refine Edge and adjust the Feather value to achieve a soft edge, (see Fig 3). Add a new layer by choosing Layer > New > Layer and click Ok. 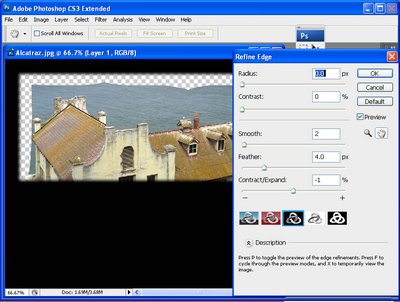
Fig. 3. Use the Refine Edge tool in Photoshop CS3 to add a feather to the selection to soften it.
Set the foreground color to white and the background color to a mid-grey. Click the Gradient tool – it shares a toolbar position with the Paint Bucket Tool – and click in the gradient display on the tool options bar to open the Gradient Editor. Select the Foreground to Transparent gradient and click Ok, (see Fig 4). 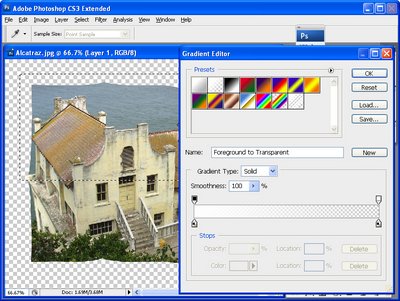
Fig. 4. The shadows and highlights are created using a Foreground to Transparent gradient.
Drag your mouse from the top of the image downwards and just over the edge of the selection you made. You will get a gradient which ranges from transparent to white and the white part will be across the middle of the image. The gradient fill is contained inside the selection.
With this layer still selected, choose Layer > Create Clipping Mask so that the gradient fill constrained so it appears over the image and no longer outside it, (see Fig 5).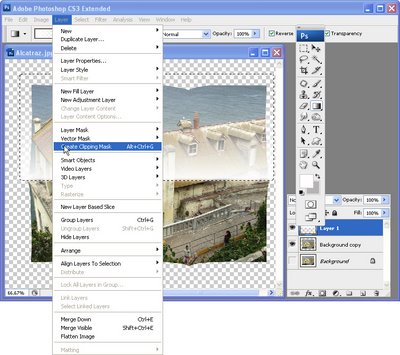
Fig. 5. To confine the gradient so it covers the image and not the area round it, use Layer > Create Clipping Mask.
Set the Blend Mode for the layer to Screen to lighten the image and adjust the Opacity so the effect is subtle – around 30-40% Opacity is a good value, (see Fig 6). 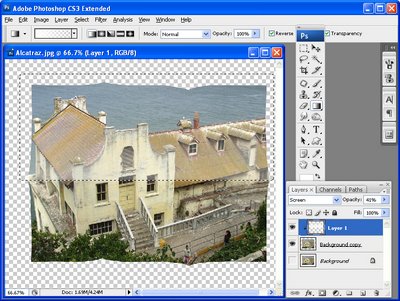
Fig. 6. Blend the highlights into the image using the Screen layer blend mode and a reduced layer opacity.
Step 7
Invert the selection by choosing Select > Invert. Add a new layer, switch the foreground and background colors by clicking the Switch Foreground and Background Colors icon and apply a light grey gradient fill to the bottom half of the image, this time drag the gradient from the bottom of the image upwards to finish slightly over the top of the selection marquee.
Again, create a clipping mask from this layer by choosing Layer > Create Clipping Mask. Set the blend mode for this layer to Multiply and reduce the opacity to get a slight darkening of the photo along the middle ‘fold’ line, (see Fig 7).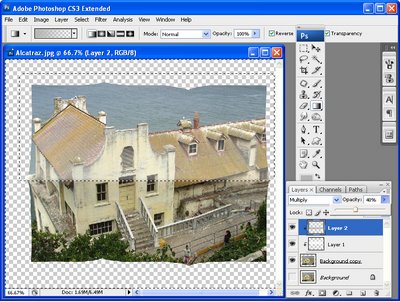
Fig. 7. Add the shadow to the bottom of the image using a grey gradient, this time using the Multiply blend mode.
Step 8
To add the additional highlights you will need six layers, one for each of the six panels that would be created by folding a photo three times. Each panel will have either a white or grey gradient applied to it. When you apply a grey gradient, use the Multiply blend mode and when you apply a white gradient, use the Screen blend mode for the layer.
When creating each panel, create a new layer, make your selection using the Rectangular Marquee tool, feather the selection, apply the gradient, set the layer blend mode, adjust the layer opacity and create the layer as a Clipping mask.
The gradients should be applied as follows:
top left – apply a white gradient to the right hand side of the panel
top middle - apply a grey gradient to left and right sides of the panel
top right – apply a white gradient to the left side of the panel
bottom left – apply a grey gradient to the right hand side of the panel
bottom middle – apply white gradient to the left and right sides of the panel
bottom right – apply a grey gradient to the left side of the panel
You might recognize there is a pattern to how these gradient fills are applied. 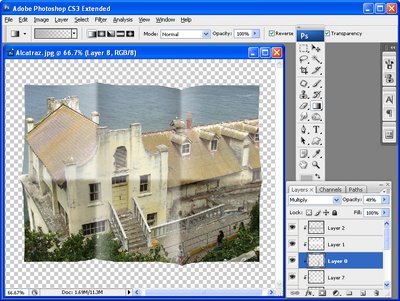
Fig. 8. Add shadows to all six of the panels that the folded photo shows.
Step 9
Click the Background layer and choose Layer, New, Layer. Fill this layer with white.
Click the Background Copy layer to select it and click the Layer Style icon at the foot of the Layer palette. Select Drop Shadow and add a drop shadow with the angle of the light at around 130 degrees. Click Ok when you’re done. Right click the Effects layer that contains the Drop Shadow and choose Create layer. This moves the Drop Shadow to its own layer.
Apply a second drop shadow to the Background Copy layer, this time make the shadow smaller, lighter and configure it so the light comes from the opposite direction. 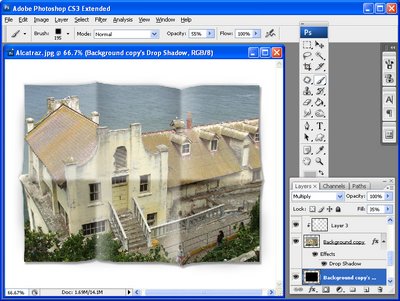
Fig. 9. Add two drop shadows using the Layer Style tool to make the paper look dimensional on the page.
The final image looks like our photo has been folded in three and then opened out. This process can be applied to other creative folds. You can use it to create a photo that has been ‘folded’ more or less times than the three shown here, or one which has a bent corner or which is folded accordion style. A simple combination of lights and darks created using gradient fills will give you a realistic folded look.
Photo credit: Brenda Smith
Labels: fold a photo, gradients, Silly Photoshop Tricks, Stupid Photoshop tricks
