Articles | Photoshop blog | Photography blog | about me | e-mail

Helen Bradley - MS Office Tips, Tricks and Tutorials

I'm a lifestyle journalist and I've been writing about office productivity software for a long time. Here you'll find handy hints, tips, tricks, techniques and tutorials on using software as diverse as Excel, Word, PowerPoint, Outlook, Access and Publisher from Microsoft and other applications that I love. My publishing credits include PC Magazine, Windows XP mag, CNet, PC User mag, SmallbusinessComputing.com, Winplanet and Sydney Morning Herald.

Wednesday, December 5, 2007

Images in Word tables

It is possible to place an image inside a table cell in Word. To do this, first create a table, click inside the cell and then choose Insert Picture > From File and select the image to insert. You can size the image inside the table cell as requiredby dragging on its sizing handles.

If you set the image's Text Wrapping to Behind Text or In Front of Text the image will no longer be constrained to the table and will jump out of it and operate independently of it. To wrap text around the image inside the table cell use the Square or Tight options for best results. In Line With Text only wraps one line and it's pretty awful.

Labels: , , ,

Add to Technorati Favorites

Wednesday, October 24, 2007

Reduce the size of your PowerPoint 2007 images


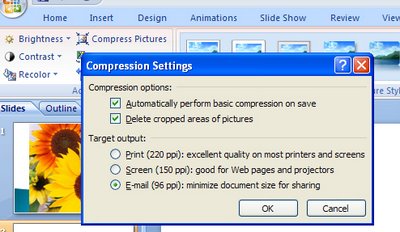
When you're emailing PowerPoint presentations or displaying them on a computer screen you don't need or want overly large images. To avoid this, compress the images in your presentation.

Click any picture in your presentation and then, from the Ribbon choose the Picture tools tab and then the Format tab. Locate the Adjust group and click the Compress Pictures button. Disable the Apply to selected pictures only checkbox (you want to resize all of them), and click Options and select 96dpi (the smallest resolution on offer) and click Ok and Ok again to compress them.

Labels: , ,

Add to Technorati Favorites

Thursday, March 22, 2007

Pictures inside Excel comments


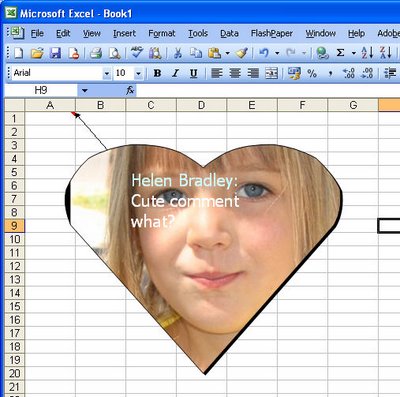
In a previous tip of the day, I showed you how to create shaped comments in Excel but today I’m going to go one step further and create pictures inside the comment.

As you might expect, start off in Excel and add a comment to a cell. Right-click the cell and choose Show comment and then click the border of the comment to select it. Choose Format, Comment and, from the Colors & Lines tab's Color dropdown list choose Fill Effects and then the Picture tab and click Select Picture.

Find a picture to add to your comment from those in your My Pictures folder, enable the Lock Picture Aspect Ratio checkbox and click OK twice. You’ll now have the image inside your comment.

Depending on the image that you have used you may want to change the format of the text, for example coloring it a different color and sizing it large enough so that it can be easily seen.

Labels: , ,

Add to Technorati Favorites

Sunday, March 18, 2007

PowerPoint 2007 Torn Photo Edges


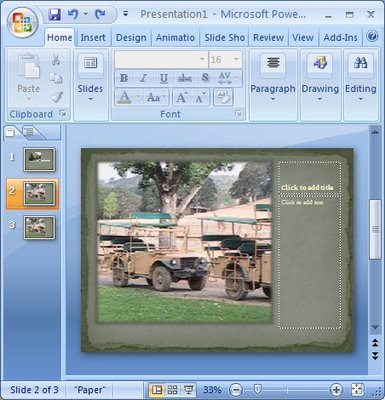
One of the cool things about PowerPoint 2007 is the way that you can create fab photo edges with no work at all.

To see this at work add a new slide using the Home tab, click New Slide and then from the Layout list choose Picture with Caption. Now click on the icon in the middle of the slide to add your picture.

Go to the Design tab and choose one of the designs to use for your slide. You’ll see that designs like Opulent create a stacked photo effect, Paper creates a rough paper edge effect, Solstice creates an effect where the photo looks adhered with sticky tape (this is soooo cool!), Concourse has an interesting shadowed edge effect, Flow tips the image on an angle, and Foundry rounds the opposing corners.

From here you can click the picture and then click the Picture Tools, Format tab to add other picture effects to your image such as a reflection or soft edges.

There’s really an almost unlimited number of variations available. I dare you to stop at just using one!

Labels: , , , ,

Add to Technorati Favorites