Articles | Photoshop blog | Photography blog | about me | e-mail

Helen Bradley - MS Office Tips, Tricks and Tutorials

I'm a lifestyle journalist and I've been writing about office productivity software for a long time. Here you'll find handy hints, tips, tricks, techniques and tutorials on using software as diverse as Excel, Word, PowerPoint, Outlook, Access and Publisher from Microsoft and other applications that I love. My publishing credits include PC Magazine, Windows XP mag, CNet, PC User mag, SmallbusinessComputing.com, Winplanet and Sydney Morning Herald.

Thursday, January 14, 2010

Select a table cell contents in Word 2007

image

Confession time. I had a picture in a table cell in Word and try as I might I couldn’t get the little black angled cursor to appear so I could select the cell’s contents. Frustrating – yep, I’d say so.

image

Nope – wrong arrow, the image is so close to the table cell it’s almost impossible to get the cell select arrow to appear.


imageThis is what it should  look like. 

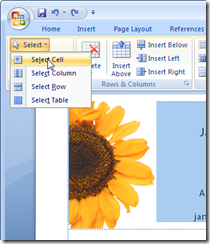
Then I remembered the new feature in Word 2007 – it’s on the Table Tools >Layout tab (so you have to have a table and click in it to see this option). On the far left is the Select button – new to Word 2007. Click it and you can select what to select. Oh! let’s back up a bit  here - it would be a good idea to click in the cell you want to select before you begin - forgot that bit.

Using this you can select a cell then right click and, as I did, choose Copy to copy its contents. Don't be fooled by the fact that not everything in the cell looks like it is selected - just trust that it is.

There are other options there that include Select Row, Select Column, Select Table – much easier than trying to juggle those little arrows when they just won’t appear.

Labels: , , , , ,

Add to Technorati Favorites

Friday, October 23, 2009

Excel 2007 - Check for Duplicates


The new Excel 2007 has far superior tools for finding and removing duplicate entries in a list. Thankfully - because this has been a nightmare in earlier versions.

To find and remove duplicates from a list of data in Excel 2007 first format the area as a table by selecting it and, from the Home tab, choose Format as Table.

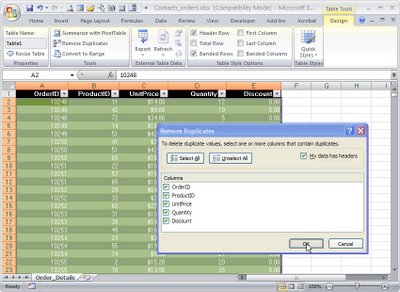
Click on any cell in the table and choose Table Tools > Design tab on the Ribbon.

Select Remove Duplicates to display the Remove Duplicates dialog. In this dialog are the Column headings for your data and all are selected by default. To remove the duplicate data from your worksheet leave all the column headings selected and click Ok.

If you want to remove rows where only certain data matches, leave the column headings for those particular rows selected and deselect the column headings for those columns which may have data that differs from one row to another. Now click Ok.

It is sensible to save your worksheet before running this Remove Duplicates option just in case you delete data by accident. If this happens and if you haven't closed the file, you can recover it using the Undo button.


If you are using an earlier version of Excel, here are links to earlier relevant posts:
Excel - finding duplicates
http://www.projectwoman.com/2007/02/excel-finding-duplicates.html
Check for duplicates in an Excel list
http://www.projectwoman.com/2007/01/check-for-duplicates-in-excel-list-1.html

Labels: , , ,

Add to Technorati Favorites

Saturday, September 29, 2007

Smarter Table Headings in Word

When you have a table in Word that extends beyond a single page in your document it can be hard to follow what the table is all about when you’re looking at page 2 because the headings are all back on page 1.

Solve this problem in Word by selecting the rows that contain the headings and, from the Table Tools tab on the toolbar, click the Layout option and then choose Repeat Header Rows. The contents of the header row will now appear on all pages where the table appears.

Labels: , ,

Add to Technorati Favorites

Wednesday, September 19, 2007

Formatting table cells in Word


Since Microsoft Word 2002, it has been possible to format a series of cells in a table all at the one time, even if they are not contiguous (a lovely word that means not side-by-side).

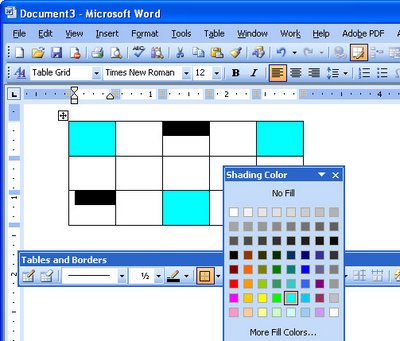
To do this, select the first cell then Control + click on the other cells that you want to share the same formatting. Once all the cells are selected you can apply a formatting such as a shading to those cells. Note, that the Shading button on the Tables and Borders toolbar in Word 2002/2003 is the one to use, the one on the Drawing toolbar is the Fill button - it looks the same but doesn't work the same!

Selecting and formatting non contiguous cells all at ones makes it a quicker process to format a table than it would be if you selected and formatted each cell individually.

However, of course, the F4 key still works in cells in a table so you can, for example, fill a cell with a shading color or a format option and then click in another cell and press the F4 key and have that format applied to this cell too. The F4 key is a repeat key which repeats the previous command and it's a great key to learn to use anytime you're working with Word.

Labels: , , ,

Add to Technorati Favorites

Tuesday, April 17, 2007

Decimal alignment in Word


While you may not realize it, we all use the number of characters in a number to determine just how big or small it is. For example 1000000 written like this is harder to determine the magnitude of than 1,000,000. So when you want your users to be able to understand the numbers that you are working with not only is it handy to use commas to separate the digits but aligning the numbers using their decimal points allows a quick check of how big a number is by how far it extends towards the left hand side of the page.

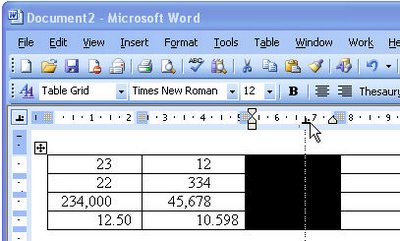
When you are working in a table of figures Word provides a simple way of aligning numbers. Select the column in your table and from the Ruler bar (View, Ruler) click on the tab indicator in the top left corner by the ruler, until you see the Decimal tab option appear. When the Decimal tab indicator shows, click on the ruler where you want the decimal tab to appear in the column of numbers.

Now when you type a number into that column it will be automatically aligned on the decimal tab and there’s no need to insert an actual tab character. Of course if you do want to include a tab character remember that you must hit Ctrl + Tab in a table because the Tab key simply moves you from one cell to the next and doesn’t actually add a tab character.

Labels: , ,

Add to Technorati Favorites

Wednesday, April 4, 2007


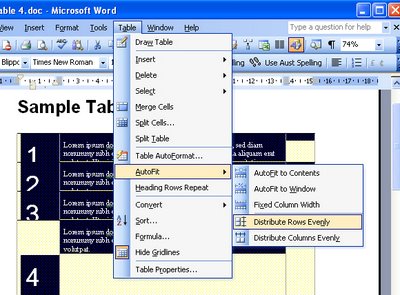
Hands up anyone who has ever spent hours trying to juggle a Word table to be evenly spaced. I confess to have dragged on one too many table borders in my time and all in the name of consistency.

In fact, consistency is much more easily obtained. So, I suggest you start by filling your table cells with whatever you need to put in them. Ignore that one looks deeper than the others. I like to finish all my table cell entries with two Enter keys - that prebuilds in a nice buffer of space.

Then, when you're done, go to the bottom of the bottomost cell and drag it down so the bottom cell is lots deeper than the others. Select the table - best way is to click inside it and choose Table, Select, Table. Now choose Table, AutoFit, Distribute Rows Evenly - instantly all your rows are evenly sized. If you haven't made them quite big enough, repeat the process - it's simple because Word does all the fiddly stuff for you.


Labels: , , ,

Add to Technorati Favorites