Tuesday, June 25th, 2013

Learn to control and manage the White Balance tool and loupe in Lightroom
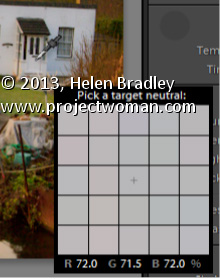
The White Balance Loupe shows you information about the color under the cursor. Across the bottom you will see the percent of Red, Green and Blue in the current selection. If the color is neutral then all values will be equal.
If you un-check the Auto Dismiss check-box at the foot of the preview, the Loupe will stay visible allowing you to click multiple times to find a good place to use to adjust the white balance. I think this setting should have been set to be not selected by default – it just makes white balance corrections so much easier because, let’s face it, none of us ever get it right first time every time!
Helen Bradley
Labels: adjust white balance, Auto Dismiss, balance, Lightroom, Loupe, show, show loupe, white balance, white balance adjustment
Categories:Lightroom, photoshop
posted by Helen Bradley @ 8:32 amNo Comments links to this post
Sunday, June 23rd, 2013

Learn how to quickly and easily adjust an image’s White Balance
In the Lightroom Basic panel’s White Balance area is a White Balance Selector. You can get to it by pressing the letter W. Hold the White Balance Selector over an area of the image which should be a neutral color, such as gray, black or white – gray is the better choice.
You will see the Loupe appear (which is a grid of 25 cells showing the color under and around the cursor). Click once to set the white balance, using the center color as a reference. If the result isn’t what you want, click again to sample another area. Continue until you get a good fix for the image.
Helen Bradley
Labels: 25, adjust white balance, Develop, Develop Module, develop toolbar, eyedropper, grid, Lightroom, Loupe, neutral color, w, white balance, white balance adjustment, white balance selector
Categories:Lightroom, photoshop
posted by Helen Bradley @ 7:49 am1 Comment links to this post

