Thursday, August 8th, 2013

Split Toning a Black and White Image – learn how to make the Highlights and Shadows Different Colors
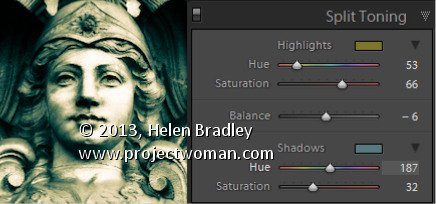
Split Toning applies one color to the highlights and another to the shadows in an image.
Good color choices when applying a split tone are colors that are opposite each other on the color wheel such as magenta and green, blue and yellow, or red and cyan – although you can choose any combination you like.
To apply the split tone effect, drag on the Hue slider or click the color picker to choose a color to use for the Highlights and then choose something else to use for the Shadows.
Adjust the Saturation of the colors as desired.
Balance allows you to fine tune how the colors are applied to the image – drag to the left to adjust the balance towards the shadow color and drag to the right to add more of the highlight color.
Helen Bradley
Labels: adjust, b & w, B&W, balance, Black, Black & White, Black & White Mix, black and white, color, color a black and white image, Develop, Develop Module, highlights, Hue, Lightroom, Photoshop, saturation, shadow, slider, split, split tone, splittone, tip, trick, Tutorial, white
Categories:Lightroom, photoshop
posted by Helen Bradley @ 6:48 amNo Comments links to this post
Monday, August 5th, 2013

How to use the Targeted Adjustment Tool to get a better Black and White Image
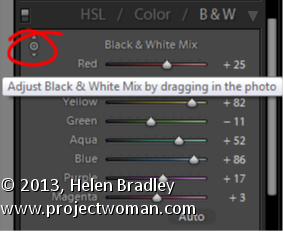
In the Black & White mix dialog is a Targeted Adjustment Tool (TAT).
You can use this TAT to craft your own black and white image.
To do this, select the TAT and drag up or down on an area of the image to lighten or darken the color under the TAT. This is often easier than dragging on the color sliders to adjust your black and white image.
The TAT is handy for crafting a black and white image to look the way you want it to look.
Helen Bradley
Labels: b & w, B&W, Black, Black & White, Black & White Mix, black and white, color sliders, Develop, Develop Module, dialog, Lightroom, Mix, Photoshop, Targerted Adjustment Tool, TAT, tip, trick, Tutorial, white
Categories:Lightroom, photoshop
posted by Helen Bradley @ 6:42 amNo Comments links to this post
Wednesday, July 31st, 2013

Learn how to use the color sliders to get a great Black and White image
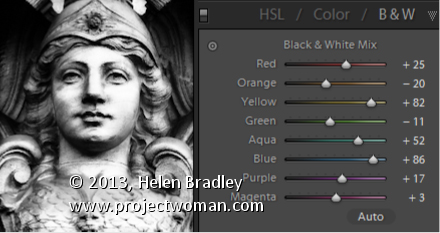
You can convert any image into black and white by pressing the letter V or select B&W. However, you can also craft your own black and white image to get a better result than you get with the default settings if you drag on the color sliders in the Black & White Mix panel.
Each slider controls one of the underlying colors in the image. Drag to the right to lighten a color in the black and white or to the left to darken it.
Using the sliders, you can get a crafted black and white image that looks the way you want it to look.
Sliders for which there is not corresponding color in the underlying image will have no effect or little effect when you drag on them.
Helen Bradley
Labels: b & w, B&W, Black, Black & White, Black & White Mix, black and white, color, color sliders, craft, desire, Develop, Develop Module, effect, Lightroom, Photoshop, Reset Black & White Mix, sliders, tip, trick, Tutorial, underlying, white
Categories:Lightroom, photoshop
posted by Helen Bradley @ 6:33 amNo Comments links to this post
Sunday, July 28th, 2013

Quickly Converting your Image to Black and White with this shortcut key
The simplest way to convert an image to black and white is to press the letter V. This is a toggle so press it once to turn the image into black and white and again to make it a color image.
You can also convert an image to black and white by clicking the B&W option in the HSL/Color/B&W panel.
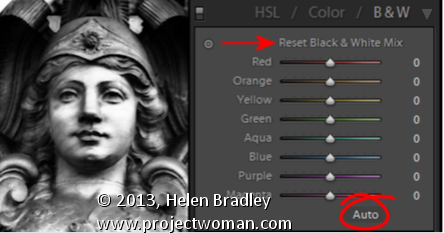
If Auto is enable click it to get a black and white conversion tailored to the needs of the image.
And, if the sliders are already all at different values you can reset them all to zero by holding Alt (Option on the Mac) and then click the ‘Reset black and white mix” option. Choose which is the best starting point for your conversion and progress from there.
If Auto is enabled, click it to get a black and white mix appropriate to the image.
Helen Bradley
Labels: Alt, Auto, B&W, Black, Black & White, black and white, color, convert, Develop, Develop Module, HSL, Lightroom, option, Photoshop, Reset Black & White Mix, slider, tip, trick, Tutorial, V, white
Categories:Lightroom, photoshop
posted by Helen Bradley @ 6:27 amNo Comments links to this post


