Tuesday, September 3rd, 2013

Photoshop – Craft a custom Black & White Photo

Learn how to craft a custom black and white image in Photoshop using the Black and White adjustment layer and a curves adjustment. The process also includes adding a simple vignette effect.

Transcript:

Hello, I’m Helen Bradley.

Welcome to this video tutorial. In this tutorial I’m going to show you how you can create a custom black and white conversion for your images in Photoshop.

Before we get started with this process let’s have a look and see what it is that we’re aiming at. Here is just a standard conversion to black and white of an image and I just used the desaturated command to get this image. And here is a more crafted version.

Here I’ve been able to make choices about exactly how my black and white image looks. And I like this one a whole lot better and I’m going to show you how you can create this affect yourself. And what we do is use a black and white adjustment layer to do it. So first of all I’m going to take all these layers and just trash them.

And let’s get started with this image which of course was originally a color image. Now one thing I did do to this image is I cropped the beam across the top of the image out of the way because I didn’t think that helped it at all. And now instead of doing a desaturation which you might do by choosing Image > Adjustments > Desaturate, which gives you this sort of flat conversion into black and white, we’re just going to undo that and we’re going to choose Layer > New Adjustment Layer > Black and White.

Now this allows us to craft a black and white and what you get is a series of sliders. And you get a sort of standard black and white adjustment. But with these sliders you can determine how individual colors in the image are converted. Now right now I want you to look at this Konica Minolta sign here and it was originally blue.

Now you can see that if I take the blue slider towards the left it becomes very dark. If I take it towards the right we actually lose that sign completely. And this is the way that we craft our black and white image. All we need to do is to bring the sliders to where we want them to be to get the effect that we want on the image.

Now for me I wanted my greens to be a big lighter. So I’m going to take my greens to the lighter side of the slider and I’m testing each slider individually to see which gives me the effect that I’m looking for. And I’m looking for a bit of a moody image here.

So everything is going to be towards the darks for this image. But I might kick the occasional color up to light to that I get a little bit of variety in the image. And I’m just going to craft that until I get what I want and close the dialog.

Now the beauty of using an adjustment layer by choosing Layer > New Adjustment Layer is that this is now editable so I can double click on this adjustment layer at any time and I can redo the adjustment. I can tailor it again to my specific needs.

Having done this I wanted to really give this image a kick so I also added a couple of adjustments to it and these were curves adjustments. I chose Layer > New Adjustment Layer > Curves and I did this twice because I wanted to use standard curves adjustment. So from the presets the first thing I did was I chose a strong contrast because I really, really wanted a contrast here.

But then I realized that that was over darkening it so I added another adjustment layer and this time I went for a lightening curves adjustment layer. So I just went straight back into Curves and this time chose Lighter because that gave me a lighter but still very strong contrast image. And I finished off with a vignette.

Now with the vignette I added a new layer so Layer > New Layer. And then I chose the Rectangular Marquee tool here on this brand new layer and I just selected inside the image, sort of around I guess about half an inch inside the image. Then with that selection in place I chose Select > Inverse so that now I have this very edge of the image selected.

And you can see that I made a really poor job of this so let’s go back and I missed the top of the image. Let’s try that again, select Inverse. Now it looks pretty even all the way around. I have a sort of brown selected here but it could be black. It could be anything. I’m going to press Alt Backspace or Option Delete on the Mac just to fill the selection with that color and then I’m going to deselect the selection with Select > Deselect.

I’m going to blend it in using a multiply blend mode because the multiply blend mode darkens everything. And you can see the darkening effect around the edge of the image when I turn it on and off. Of course it’s not only way too much but it’s also a really hard edge. So with this layer selected I’m going to choose Filter > Blur > Gaussian Blur.

Gaussian Blur is my sort of go to blur because what it allows you to do is to really heavily blur the edges. Now I’m down at the very bottom of the image so that we can see the edge that we’ve got. This is it with a zero radius blur but as soon as I start increasing the blur you can see that it softens out nicely. So I’m just going to make it nice and soft and then bring down the opacity of it until I get what I want. So this is the original image and this is our new crafted black and white version.

And I think that for me is a lot more interesting than this particular version that I got by just choosing to desaturate the image. If you like this sort of dark, grungy sort of version or if you want to be able to craft your black and white images with a bit more control than just a one-step click select option then this is the tool you need to do it. Use the black and white adjustment layer and craft your own images.

I’m Helen Bradley.

Thank you for joining me for this video tutorial. Look out on this YouTube channel for more of my video tutorials.

And subscribe so that you’ll be advised when new tutorials are launched and also visit my website at projectwoman.com where you’ll find more tips, trick and tutorials on Photoshop, Photoshop Elements, Lightroom, Illustrator and a whole lot more.

Helen Bradley

Sunday, July 28th, 2013

Lightroom Tip – Shortcut key to make your Image Black and White

Quickly Converting your Image to Black and White with this shortcut key

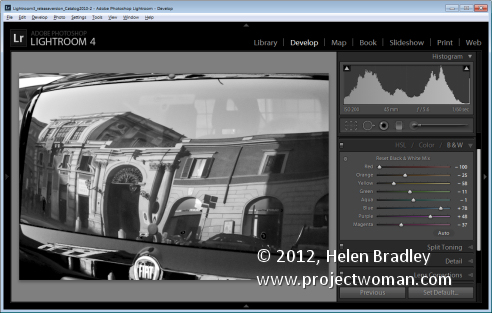
The simplest way to convert an image to black and white is to press the letter V. This is a toggle so press it once to turn the image into black and white and again to make it a color image.

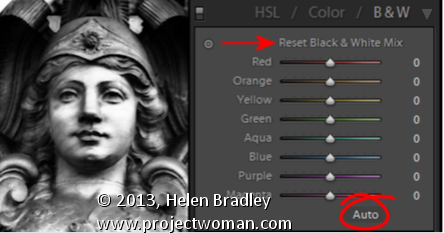
You can also convert an image to black and white by clicking the B&W option in the HSL/Color/B&W panel.

If Auto is enable click it to get a black and white conversion tailored to the needs of the image.

And, if the sliders are already all at different values you can reset them all to zero by holding Alt (Option on the Mac) and then click the ‘Reset black and white mix” option. Choose which is the best starting point for your conversion and progress from there.

If Auto is enabled, click it to get a black and white mix appropriate to the image.

Helen Bradley

Tuesday, June 11th, 2013

Word 2010 and 2013 Tip – Save documents for use with older Word versions

Learn to use ‘Save as type’ to format your document so users of older versions of Word can access them

You can easily exchange files with users of older versions of Word. This is because Word 2007, 2010, and 2013 essentially share the same file format. So it is pretty easy to open any Word document created using version 2007, 2010 or 2013 in any other of these three versions of Word. In addition, Word 2007, 2010, and 2013 will open files from any previous version of Word.

However, when you need to share a Word 2007, 2010, or 2013 file with someone using a much earlier version such as Word 2003 or a Mac version of Word, you must save the file using their particular Word file format. This is because the file formats are not the same and the older versions of Word cannot read the newer file formats.

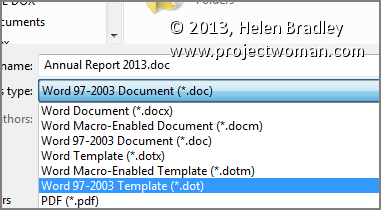
To save using the appropriate format, select the File tab on the Ribbon, and click Save As. In the Save As dialog, click the Save as type: dropdown list and select the word processing format that matches the software that your other user is using such as Word 97-2003 Document (*.doc). Then click Save to save it in that format.

Helen Bradley

Friday, May 3rd, 2013

Lightroom Tip – Understanding Import Options

Understanding Import Options

You have four import options for your photos – Copy as DNG, Copy, Move and Add. In some circumstances, not all these options are available – for example, you may choose Copy or Copy as DNG when importing from a camera card but you cannot select Move or Add when you are importing images from a card.

When you select one of these options that choice may affect the other options you have. For example, if you choose Add to add images to the catalog from a folder, you cannot choose to back up your files at the same time. You can also not convert RAW images to DNG if you are adding them to Lightroom.

So, if you want to convert images, or back up, or rename images as you import them, it is best to import them direct from your camera card. Copying them into a folder on your disk before adding them to your Lightroom catalog diminishes your options when working with your images.

Helen Bradley

Tuesday, April 2nd, 2013

Photoshop – Thicken and Thin out Lines

Learn to make lines thicker or thinner using a Filter in Photoshop. This is useful for adjusting scanned line art images, as well as, for thickening up lines on images which you have converted to a line drawing inside Photoshop.

Transcript:
Hello, I’m Helen Bradley. Welcome to this video tutorial. In this tutorial I’m going to show you how you can easily make lines thicker or thinner on line art images that you either scan into Photoshop or create in Photoshop yourself. In this video tutorial I’m going to show you a really quick technique for making lines a lot thinner or a lot thicker. And this is handy for images where you’ve actually converted it to line art or where you’ve got line art like this that we’ve actually scanned in.

To make the lines thicker choose Filter and then Other and then Minimum. And with Minimum you can then select the minimum radius which is going to make the image lines a lot thicker and you can test these out. Generally just one or two pixels is like all you need to do. And this is the original image and this is the thicker lined image. So let’s perhaps take this up to 4 and I’ll click Ok. And that has just thickened the line. So if that were all we wanted to do we could just save this and be off. But let’s have a look and see how we can make the lines thinner.

I’m going to choose Filter and this time, Other, and this time we’re looking at Maximum. And we’re just going to set the maximum line width. And so we want this down to something that gives us the lines that we’re looking for. So here I have it set to 5. This is what it was. This is what it is now. If I go a bit smaller the lines are going to get thicker. If I get bigger the lines are going to get thinner to the extent where they actually totally disappear. So you need to find this sweet spot here for your particular image. But if you do want to make the lines that are fairly thick right now to be a little bit finer then you can do that here with this tool. And these are again Filter, Other. Maximum allows you to set it so it’s smaller and minimum allows you to set the width so it’s larger.

I’m Helen Bradley. Thank you for joining me for this video tutorial. Look out for more tutorials on my YouTube channel. Please like and comment on this video if you do like it. And look out for more videos, tips, tricks and techniques on my website at projectwoman.com.

Helen Bradley

Tuesday, July 3rd, 2012

Photographing in Black and White Part 7 Your Digital Workspace

You can learn a lot about black and white photography using your favourite photo editing program as most have tools for converting from colour to black and white.

Avoid the adjustments that do the work for you such as by choosing Image > Mode > Grayscale as you won’t be able to make any creative changes to the image.

Instead, in Photoshop Elements, choose Enhance > Convert to Black and White and experiment with the sliders and options. There are different options down the left of the screen to select from and you can then adjust the red, green and blue sliders to fine tune the result.

In Photoshop, choose Layers > New Adjustment Layer > Black & White and adjust the sliders for the colors – this lets you control how the colours are converted to either black or white. In this way you can separate colors like Green and Red for example making them significantly different to what they would look if you do a regular conversion.

For more information on making a detailed colour to black and white conversion in Photoshop Elements visit this blog post: An Adjustable Black and White conversion http://projectwoman.com/2009/08/an-adjustable-black-and-white-conversion.html

In Lightroom and in Adobe Camera Raw you can convert to black and white and then adjust the color sliders to create a good looking black and white image.

Helen Bradley

Thursday, March 17th, 2011

Excel Convert dates from MDY to DMY

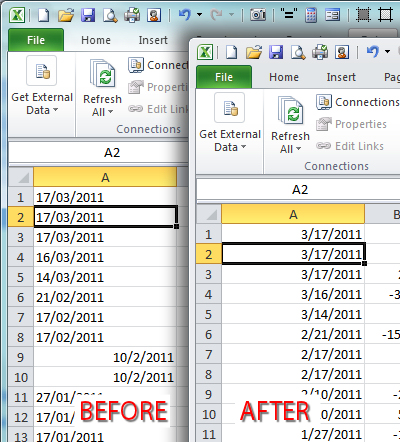
Today I encountered a problem when downloading some data from an Australian bank. Australia uses the DMY date format whereas the US uses MDY, my computer is set to use US as its region which means Excel expects dates to be entered using MDY format. Excel gets its country information which affects dates, in particular, from the setting you have for your Windows Region.

So, I had a .csv file in which all the dates were entered wrongly – they read 22/11/2010 instead of 11/22/2010, for example. When the dates are typed incorrectly for the country you are currently set to use, you can’t simply apply a format to them to fix the problem because there is no such date as 22/11/2010. And worse still a date like 2/1/2011 which is 2-Jan-2011 in Australia will be formatted as 1-Feb-2011 in my US Excel – throwing all my data spectacularly out.

So what to do?

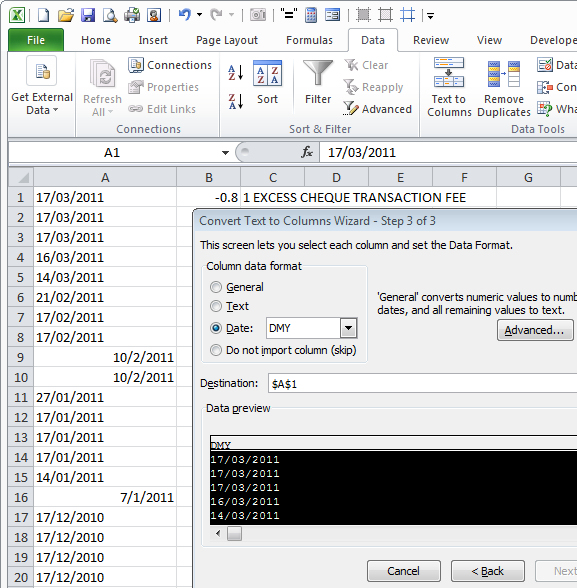
The simplest solution is to use the Excel data parse tool. Select the column of dates and choose Data > Text To Columns. This opens the Convert Text To Columns Wizard which is the old way of parsing data into Excel.

In Step 1 select either option as you only have one column of data selected anyway. Click Next twice. Now in step three of the wizard, select the Date option and select the formatting for the displayed data. So if the data has been typed in DMY format, select DMY. If it has been typed in MDY format, choose MDY. Click Finish.

The date data will be automatically converted to match the correct date syntax for your version of Excel. In short this converts all my Australian dates to US date format so they are correct in Excel. Select the column of dates and you can now format the dates using your preferred format.

It’s a simple but effective solution that avoids the necessity of retyping the date data.

Helen Bradley

Thursday, September 23rd, 2010

Handling MOD MOI movies

I hate it when camera manufacturers don’t use standard formats for their movie files.

My camera uses the MOD/MOI format which practically no player known to man (or woman) can play. It shouldn’t really be a problem as MOD is really just MPG in disguise and you should be able to rename the MOD file to read MPG and it should play – but you’ll encounter problems if you capture in 16:9 aspect ratio. Go figure!

Before you sling the camcorder into the trash and vow never to buy from that manufacturer again, read on. On second thoughts you should vow never to buy from a manufacturer that cares so little for their customers that they use impossible to read formats – after all you’re shooting movies – chances are you’ll want to do something with them – like watch them or perhaps I’m expecting too much?

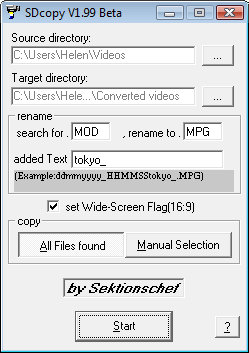
So, the solution is to download this little SDCOPY.EXE utility which comes bundled in a zip file that just needs to be extracted and then run.

It is simplicity itself, you tell it where your MOD files are and where you want the converted files to go (I recommend a second/separate folder) and if the widescreen 16:9 flag needs to be set and press Start and in a few minutes you have viewable converted MPG files.

So, thanks but no thanks Canon. I won’t be buying a new camcorder from you and thanks to Sektionschef for creating and continuing to support this handy utility.

Helen Bradley