Sunday, May 20th, 2012

Hand drawn frames in Photoshop

One technique I’ve seen used a lot lately on blogs, websites and even email newsletters is a hand drawn frame effect.

In this post, I’ll show you how to create an effect like this and save and use it for your images.
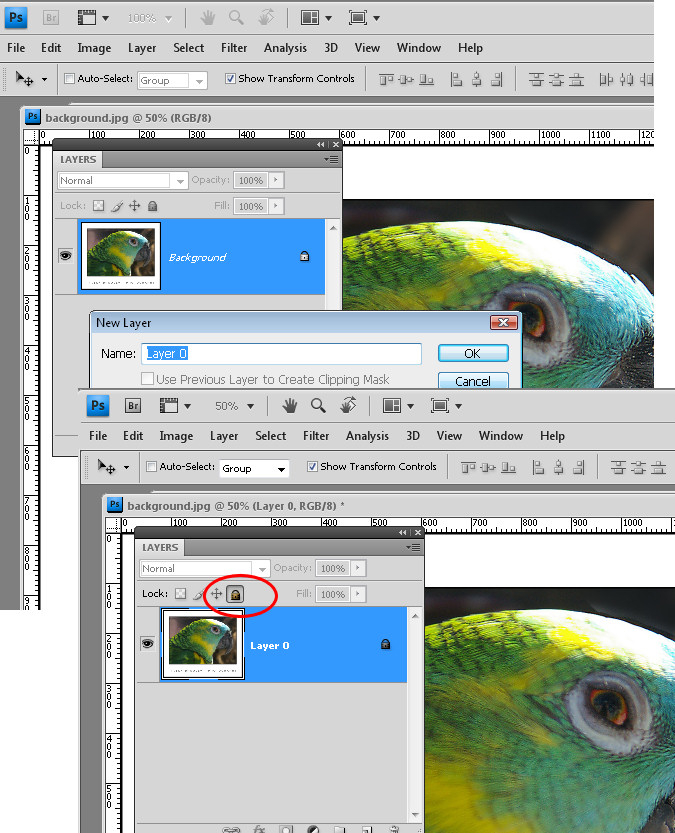
Step 1

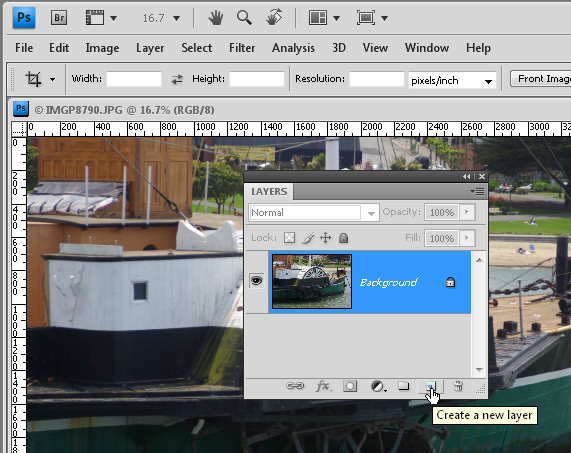
Start with a new image in Photoshop. A good size frame is important to create as you can size it down but not size it up as successfully. Start with an image around 4,000 pixels square with a resolution of 300 pixels RGB color and transparent background.

When the image opens, fill the background with a color of your choice, I’ve chosen a blue fill color.

Step 2

Add a new layer and then select the brush tool and a smallish brush. You want something that is going to ‘paint’ looking a little bit like pencil marks so I chose the Chalk 11 pixels brush and sized it up to around 57 pixels.

Select black or a dark brown or dark gray color as the foreground color and hand draw your frame. It will help if you use a tablet to do this although that’s not necessary and a mouse can be used.

Draw the frame so it has closed inside and outside edges to make the next step easier.

Step 3

Target the Magic Wand tool and click inside the frame. This selects the inner portion of the frame.

Choose Select >  Inverse to invert the selection.

Now hold the Alt key and click with the Magic Wand tool on the outer area of the image so you remove the outer edge from the selection.

To eliminate any anti-aliased edges, choose Select > Modify > Contract and contract the selection by around 12 pixels.

Step 4

Add a new layer between the frame drawing and the background and fill it with white.

Return to the frame layer and select the inside again, this time choose Select > Modify > Expand and expand the selection by around 12 pixels.

Add a new layer and fill the selected area with a black/brown or dark color. This is the template for your image.

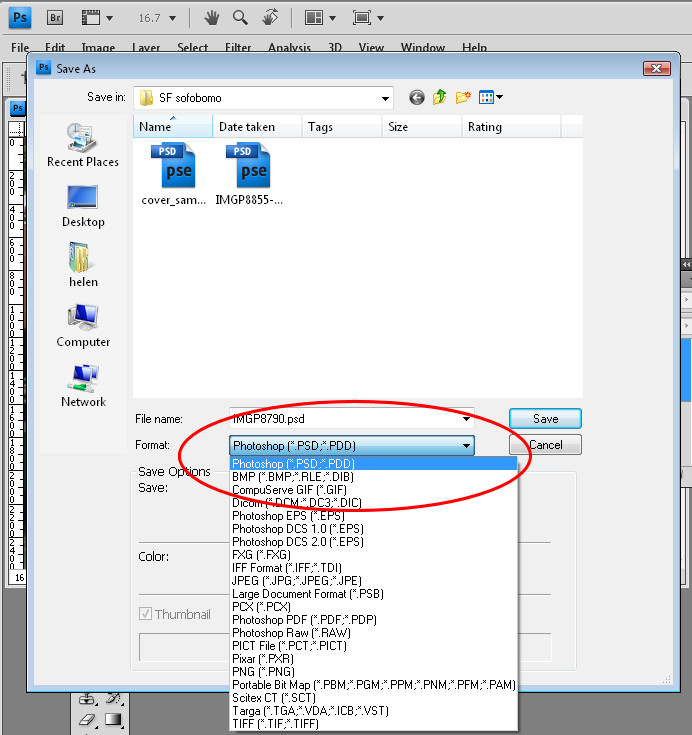
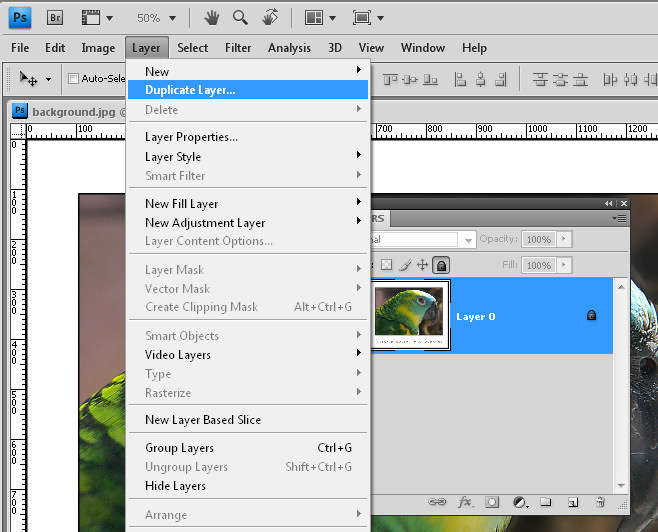
Save this image as a layered .psd file so you can use it anytime in future.
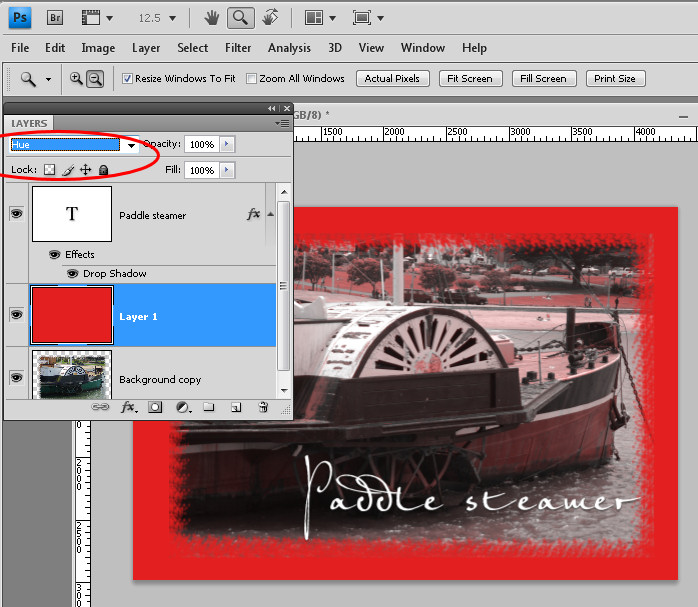
Step 5

To frame an image, open an image to frame and this frame too.

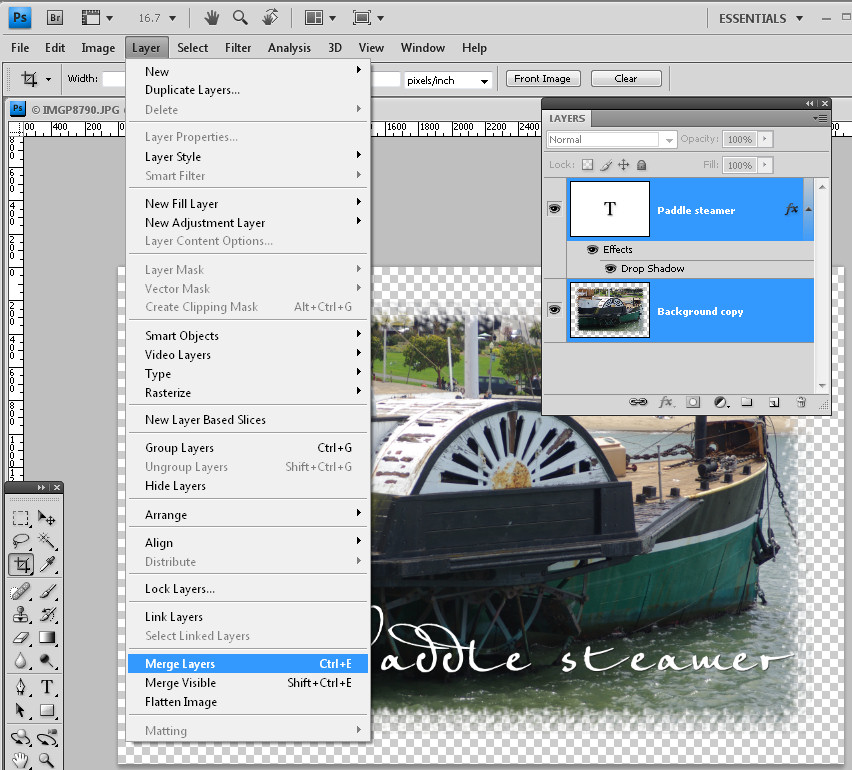
Drag the background layer of the image into your frame image holding the Shift key as you do so to center it. Press Ctrl T + Ctrl 0 to size the image to size. Make sure the image layer is directly under the drawn frame and above the dark template layer.

Now, with the image layer selected choose Layer > Create Clipping Mask to clip the image to the size of the inside of the frame.

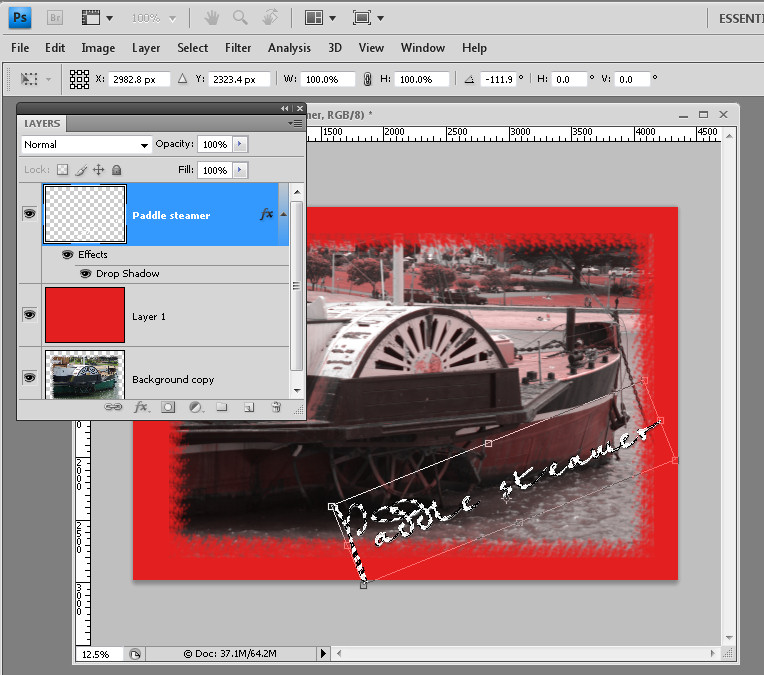
You can move the image layer using the Move tool so it is positioned as desired.

Now size and save the image for print or the web.


Helen Bradley

Wednesday, February 29th, 2012

Adobe Launches Photoshop Touch for the iPad

It has been a long time coming – way too long – but Adobe finally launched Photoshop Touch for the iPad.

I have reviewed it here for PC World and I wrote a how to for creatively editing images with it for Digital-Photography-School.com.

The app costs $9.99 so it isn’t cheap by iPad app standards but I think it is worth it. Downsides are non editable text, 1600 x 1600 px file size limit, no true editable masking tools and no adjustment layers. But it does have good layer tools (unlike Adobe Ideas you don’t have to shell out 99c for each new layer!), blend modes and it is easy to use.

Helen Bradley

Saturday, February 25th, 2012

Photoshop – Replace a Face

A reader recently emailed me a couple of photographs of her children. Unfortunately, as often happens with small children, one image had two of the three children looking at the camera and smiling and the other image had the exact opposite combination – only one child looking great. Her question was – could she take the good face from one of the images and paste it into the second image.

The answer is yes, and here’s how to do it in Photoshop without any need to cut and paste:

Step 1

Open both images in Photoshop. Drag the background layer from one image onto the other – in my case I dragged the background layer from the image with two out of the three faces correct and dropped it into the image that has only one good face.

You will have an image with two layers – the top has two good faces and the one below has the other one. Close the other image.

Step 2

Select both layers in the image that you’re working on and choose Edit > Auto-Align Layers and select Auto.

Photoshop will now align the two layers so that the faces in both layers will be aligned on top of each other. To do this you need to have two images with very little difference between them and this image lined up pretty well as a result.

Step 3

Click on the topmost layer and add a layer mask to it by clicking the Add Layer Mask icon at the foot of the Layers palette.

The mask is filled with white by default which means that the entire contents of the top layer is visible and the bottom layer not visible at all.

Step4

Select black as your foreground color and choose a soft edge brush. Target the mask by clicking on it so you’re painting on it and then paint over the child’s face in the image to reveal the face from the layer image below.

Step 5

You’ll need to make some small choices about how much of the layer below you reveal with the mask – if you take too much you can paint back on the mask with white to reveal the top layer again.

I made some small adjustments around the child’s collar to hide the fix. The red portion of the image shows the mask – I turned this on – it won’t typically be visible to you as you work.

Step 6

Finish by taking a critical look at the final image and, if necessary, adjust the mask or add a new layer and clone elements from the layers below to fine tune the image.

I had to do a small amount of cloning of the little girl’s shirt to fix a small problem and then I cropped the image and it was complete.

The entire process took all of around ten minutes.

Photoshop Elements

You can get similar results in Photoshop Elements 7 and above by opening the two images and choose File > New > Scene Cleaner and follow the instructions there.

Helen Bradley

Wednesday, February 8th, 2012

More Flexible Lightroom to Photoshop editing

If you work in Lightroom, at some stage you’ll probably want to take an image to Photoshop for some additional processing. How you send it to Photoshop will have an impact on the options available to you. One option in Lightroom is to take an image to Photoshop as a Smart Object and that has some advantages. Here’s how to do it and why you might consider using this feature.

Open as a Smart Object

In Lightroom, when you’ve finished processing the image and you’re ready to head to Photoshop, right click the image and choose Edit in > Open as Smart Object in Photoshop (this is available if you’re using Photoshop CS5, CS4 or CS3 – Smart Objects weren’t available in earlier versions of Photoshop).

Photoshop will open with your image open on the screen. If you look at the Layers palette you’ll see the layer has an icon in the bottom right corner of its thumbnail. This tells you the image is a Smart Object.

If you want to make further adjustments to the image you don’t have to start over. Instead, double click the image thumbnail in the Layers palette and the image will open in Adobe Camera RAW (ACR). The processing options in ACR are the same as you have in Lightroom so you can change how the image is processed.

When you are done making changes, click Ok. The changes to the image will appear in the Smart Object back in Photoshop.

Double processing

The obvious advantage of opening an image in Photoshop as a Smart Object is being able to make changes to the image even after it has been brought into Photoshop and even after you have made changes to it – such as adding an Adjustment Layer, for example.

In addition you can use this feature to process an image in more than one way and to blend the two versions together. To do this, right click on the smart object layer and choose New Smart Object via Copy. This creates a copy of the smart object layer.

Double click on the thumbnail of this second Smart Object to open it in ACR and now process it a second time to bring out detail in another part of the image. In this case I adjusted to get a better sky. When you’re done click Ok to return to Photoshop.

The changes have been applied to only the second copy of the image and not the first so there is a different version of the image in each layer.

To blend the two layers together add a Layer Mask to the topmost layer – to do this, select the layer and click the Add Layer Mask icon at the foot of the Layers palette. Target the mask by clicking its thumbnail in the Layers palette and paint on the image with black to bring back detail in the layer below.

If any of the layers still needs fine tuning, return it to ACR to fix it.

Because the two versions of the image are on separate layers you can blend those two layers together using a blend mode or adjust the Opacity of the top layer.

When you are done, click Save to save the file, close it and return to Lightroom. Your edited version of the image will be saved in the same location as the original image and will appear in Lightroom too.

If  you want to edit this image again at a later date and have the Smart Objects still in place, when you right click the image and choose Edit In > Adobe Photoshop CS5 (or CS4 or CS3), choose Edit Original.

Taking your images to Photoshop as Smart Objects gives you additional tools for working with your images in Photoshop – it’s a handy technique to add to your Lightroom/Photoshop toolkit.

Helen Bradley

Monday, February 21st, 2011

Replacing skies in Photoshop

Reader Michael P. recently sent me an image he’s been working with – his challenge was to replace the sky in the image. The problem was that in replacing the sky the image had ended up with a lot of halos around the edges making the sky replacement look less than believable.

Kindly Michael sent me some of the images he wanted to work on to explain how to fix them more realistically.

This is the building we’ll work with:

Here’s what I did:

Start by duplicating the background layer.

Drag the background layer from your sky image into your image – if you hold Shift as you do this it  will be positioned in the middle of the image.

Move this layer so it is over the blown out sky.

Move the sky layer so it sits between the two image layers.

Select the topmost layer of the image, select the Add a Layer Style icon at the foot of the layer palette and select Blending Options.

In the Blend If  area locate the This Layer bar and drag in from the right hand side of the bar. To split the adjuster in two, hold the Alt key as you drag one marker away from the other.

If you have a really blown out sky set the right side of the marker at 255 and the left side at a value that gives you a good blend effect for the sky – such as 248 or so.

Each image will require different settings.

Look at the result and see if the sky that you’ve brought in really suits the image.

Unfortunately I don’t think this sky works particularly well for this image and the image needs something a lot less dramatic.

Here is a sky from my own collection which I think will work better.

I dragged it into the image above the first sky layer but under the second image layer. The original Blend If adjustment settings work just fine with this sky so there is nothing more to do there.

However, there are still problems along the skyline. These can be easily fixed by lightening the sky which I think is still way too dark for this image.

Select the sky layer and choose Image > Adjustments > Levels. What I am looking for here is to lighten the sky so that it blends in more with the image and looks more like it belongs.

Having lightened the sky, you’ll can further blend it into the image by adjusting the opacity of the sky layer down a bit.

Because the original image is underneath the sky as well as on top of it the effect of reducing opacity is to blend the sky into the underlying image.

If you find some bleeding of the sky into the buildings you can add a mask to the sky layer by selecting that layer and click the Add Layer Mask icon at the foot of the layer palette.

Paint with black on the mask to remove any blue sky in lighter areas of the building.

Typically if you find that you’re getting distinct over-lapping of sky around the edges where the blown out sky meets buildings or other elements in the image, the problem will be that you’re trying too hard to replace the blown out sky with something that is too much sky for the image.

You’ll get a better result if you work with a much lighter but still interesting sky.

If you find that you have some very light elements in the original image that are showing white fringing over the blue sky you can avoid these by placing a portion of the sky with white clouds in it under these areas to minimize the obvious white edges.

Helen Bradley

Tuesday, June 23rd, 2009

10 Ways to Create, Copy, Blend, Merge and Save Photoshop Layers


Layers are a key tool to working successfully in Photoshop. Here are my 10 best tips for working with them:

1 Create a layer in Photoshop
To create a new layer in Photoshop, choose Layer > New > Layer or, better still, click the Create a New Layer at the foot of the Layer palette.

2 Display the Layer Palette in Photoshop
Ok, let’s go back a step first. If you can’t see the layer palette choose Window > Layers and it will show on the screen. Pressing F7 does the same thing.

3 Save Photoshop layers
Layers are saved in Photoshop when you save the Photoshop file in a format that supports layers. The simplest format to use is the PSD format. Choose File > Save As and choose PSD from the Save As Type dropdown list.

4 Merge layers in PS
When you have multiple layers in a Photoshop imager you can merge them to flatten the file in a number of ways. You can save the image using a file type that does not save layers such as JPG. You could also use Layer > Flatten Image to flatten the image to a single layer or you can select all the layers by Control + Clicking on them (Command + Click on the Mac) and then choose Layer > Merge Layers to merge them all to a single layer but retain the layer opacity. In this case, you should save your image as a PNG or PSD file or some other format that saves transparency if you want to keep this.

5 Blend layers
You can blend one layer into the layer below by using the blend modes in the layer palette. Select a blend mode from the blend mode dropdown list to change the way the layer interacts with those below. Some blend modes work when the two layers are the same and some don’t. They also work if you have two different layers.

6 Rotate a layer
You can rotate a layer inside a Photoshop image by Ctrl + Clicking on the layer thumbnail to select the layer itself (use Command + click on the Mac). Choose Edit > Transform > and choose Rotate 180, Rotate 90 CW or Rotate 90 CCW to rotate in a fixed rotation. Alternatively, select Edit > Free Transform and you can rotate the layer by dragging on it. When you’re done, press Enter to confirm the rotation. To turn off the marching ants, press Ctrl + D or choose Select > Deselect.

7 Unlock a layer
To unlock a layer (provided it is not the background layer) select the layer and click the Lock all Icon in the layers palette – if the layer is locked, this unlocks it.

To unlock the background layer, double-click the layer and press Ok to turn it into a regular layer which unlocks it automatically.

8 Copy a layer
To copy a layer in Photoshop, select the layer and choose Layer > Duplicate Layer and press Ok. Alternatively, working in the layer palette drag and drop the layer onto the Create New Layer icon to create a copy of it.

9 Select a layer
To select a layer in Photoshop, hold the Ctrl key on a PC (Command on the Mac), and click on the layer thumbnail in the layer palette. This selects the layer. You will see the marching ants around the layer.

10 Flatten layers and still keep them
I call this my “have your cake and eat it too” tip. To flatten all the layers in an image to one layer but still keep all the layers intact, click on the topmost layer in the Layer stack and press Control + Alt + Shift + E on the PC or Command + Option + Shift + E on the Mac.

Helen Bradley

Sunday, February 25th, 2007

GimpSHOP – all about layers, layer palettes and masks

GimpSHOP is Gimp with a great front end that makes it work much like Photoshop which you can find free for downloading here: GimpSHOP.

GimpSHOP, like any good photo editing program supports layers, and layer masks. These features aren’t always simple to get your head around but when you do, you’ll find they’re invaluable tools to use for photo editing tasks. Here, step by step, is how to work with them:

Step 1
To display the Layers palette press Shift F7 or choose Window, Layers. To add a new layer choose Layer, Duplicate Layer. There are no adjustment layers available in Gimp or GimpSHOP so this process keeps your original photo layer safe in case you need to use it later on.

Step 2
To adjust the levels in the image to improve its tonal range, choose Image, Adjustments, Levels and drag the sliders on the Input area of the dialog to adjust the contrast. The sliders under the chart should be moved inwards so they appear under the ends of the chart. The middle slider adjusts the midtones. Click Ok to apply this to the layer.

Step 3
To see how you can apply an effect or adjustment to this layer and blend it with the layer below, first create a duplicate of the top layer by choosing Layer, Duplicate Layer. Apply the edge detect filter by choosing Filter, Edge Detect, Edge and choose the Sobel Algorithm with the default value. This gives a new layer which is predominantly black and which displays the coloured edges in the image.

Step 4
Now, in the Layers palette, select the Divide blend mode from the dropdown list. Blend modes control how the top layer interacts with the layers below. Drag the opacity slider to the left to reduce the opacity of this layer so that some of the layers below show through thus mitigating some of the effect created by blending the layers together.

Step 5
To edit the effect the top layer gives to the image, use a Layer mask. Choose Layer, Mask, Add Layer Mask and choose White (full opacity) and click Ok. You should see no change in the image. Now select black or grey as the paint colour and paint the image to show part of the layers below through the image, thus effectively removing the effect of the blended edge filter. Paint with white to reapply the layer effect.

Step 6
The Layers menu offers tools for viewing a layer mask, applying it permanently to the layer, deleting it and making a selection based on it, etc.. You can also use the menu to configure the size of the thumbnail images by clicking by choosing Preview Size and then choose a view size from the list.

Helen Bradley

Page 2 of 212