Friday, December 30th, 2011

Lightroom – help my import dialog just shrunk!


I just got a help! email from a reader who lost her import dialog. It had shrunk to a small size and none of her regular options were available. She is using Lightroom 3 and this shrinking dialog is actually a feature – it’s just she wasn’t seeing it that way – and who can blame her?

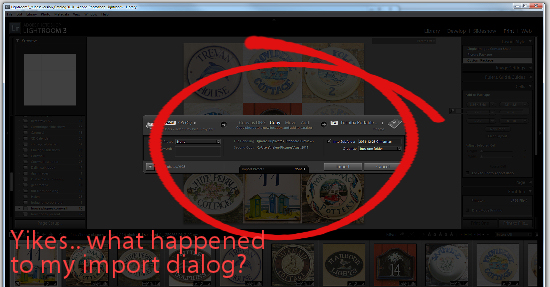
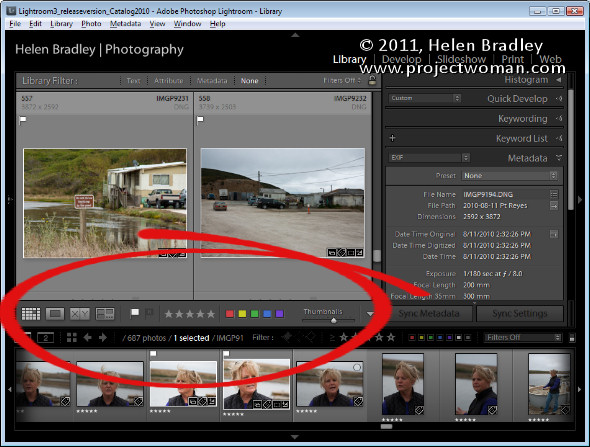
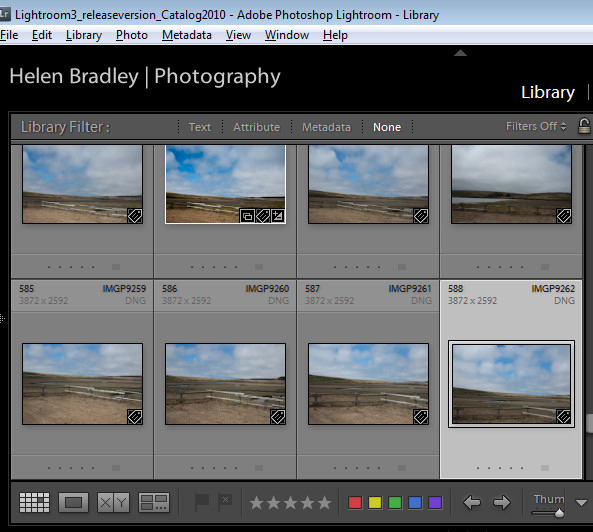
If something happens to change your screen and you don’t know how to undo it all of a sudden a feature becomes a disaster. Here is what her screen looked like:

There is a small button in the bottom left of the Import dialog shown circled here and it switches you into this mode. All you need to do to get back to where you want to be is to click on it again and the import dialog goes back to its regular size.

When you know how, it really is a feature, until then… help! my Lightroom import dialog shrunk.

Helen Bradley
Friday, December 16th, 2011

Blow it Up with Alien Skin Blow Up 3

I’ve never used an upsizing or enlarging program before. Instead, when I need to enlarge an image, I perform the age old trick of increasing an image’s size by 110 percent multiple times in Photoshop to enlarge it. It seems to do a reasonable job of the enlarging process.

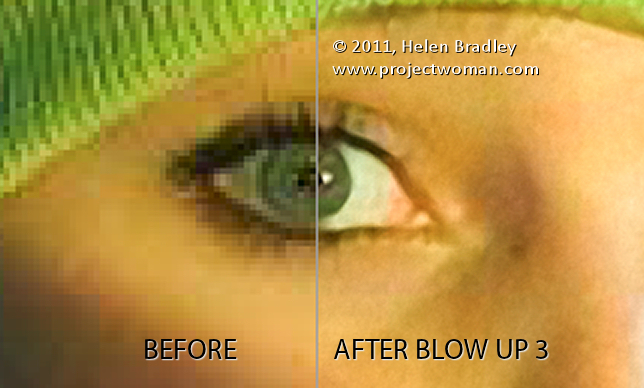
However, recently I was offered Alien Skin’s Blow Up 3 to test – since the folks at Alien Skin make some really cool applications I thought I’d give Blow Up 3 a try. I actually had an image that needed of blowing up for a magazine article. The image I had was a totally cool image but from a very old camera phone so it was a tiny 479 x 640 pixels in size. Not only was it very small but it had some very obvious jpg artifacts so when I enlarged it 300 percent it showed not only those artifacts at an enlarged size (the result was horrible) but the image also showed some distinct pixelization.

This was a perfect image to try out with Blow Up 3 – if I succeeded with the task the image would be acceptable quality for the magazine, if not, I needed to find something else.

Alien Skin Blow Up 3 with Lightroom

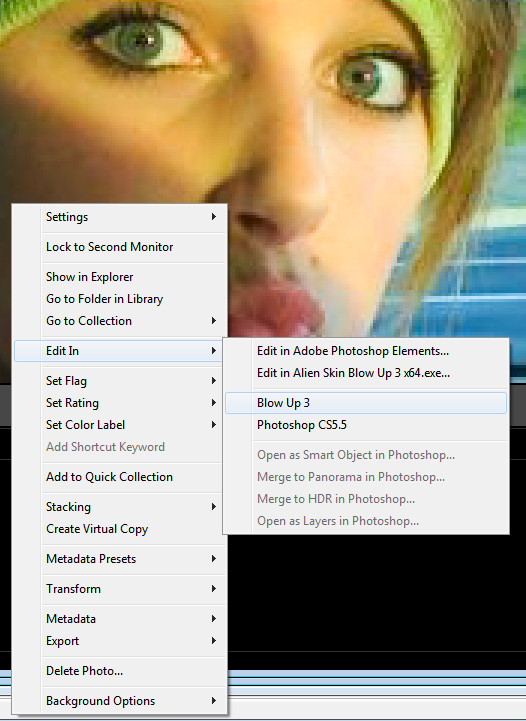
I had already installed Alien Skin Blow Up 3 for Lightroom, so running it is as simple as right clicking the image in Lightroom and choosing and choose Edit In > Blow Up 3. You get a choice of opening the image from Lightroom either as a copy with Lightroom adjustments, you can edit a copy or edit the original. You just select the option to use and click Edit and it opens automatically in Blow Up 3.

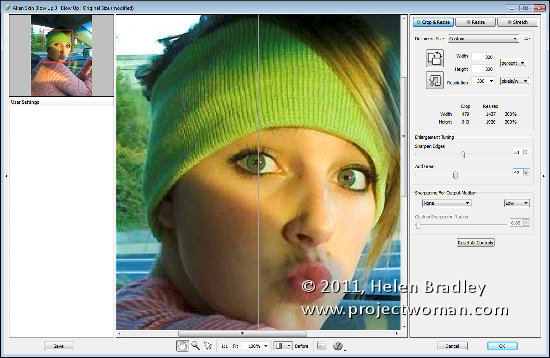
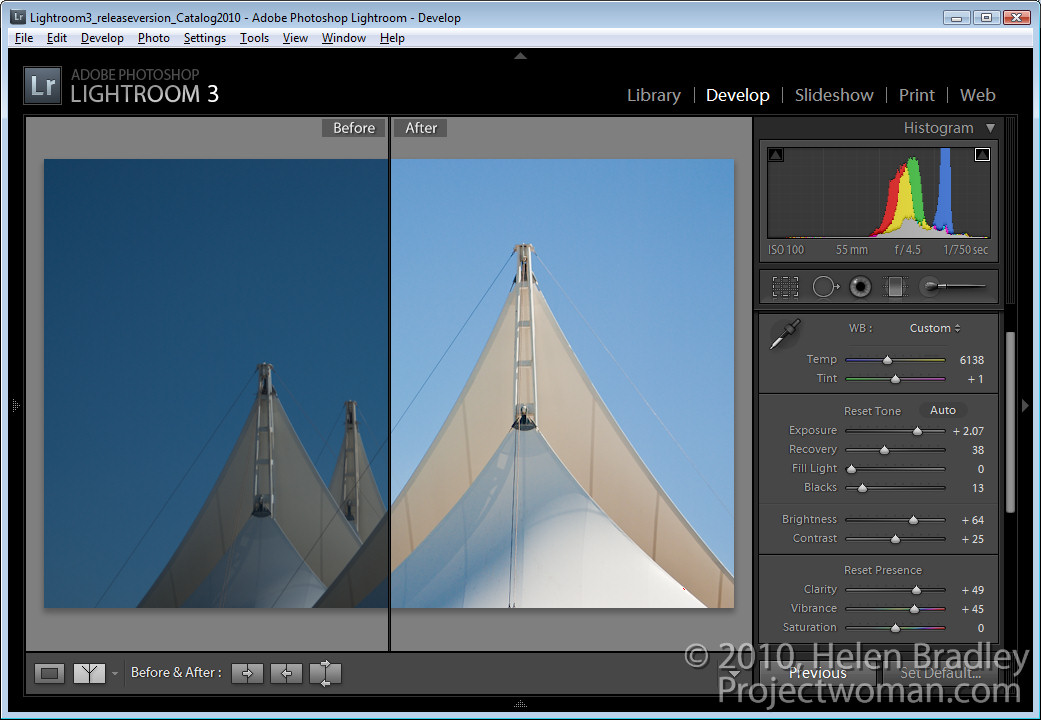
Blow Up 3 really couldn’t be easier to use. In fact I was a little confused at first because I kept looking for more options where there really weren’t any. I selected the Before/After option at the foot of the main screen so I could see the before version on the left and the after version on the right. I wanted to see as I worked just how effective the program would be. I then selected the Crop & Resize option and set it to Percent. I selected 300 percent for width and height and a resolution of 300 pixels per inch.

With the Before/After view on the screen, it was clear that the result would be a significant improvement for this image. The settings you can choose from include grain and sharpening. I checked out the grain slider. For this image, if I didn’t add grain, the jpg artifacts were still very apparent and they really detracted from the image because they were so visible. I opted to add a lot of grain to the image so I set the value to around 30 to soften and blend the artifacts.

I also checked out the Sharpen Edges setting to see how that would affect the image. For this image, I really didn’t want a lot of sharpening so I opted to set it to 40. This gave me some sharpening around the edges such as in her eyes but not really obvious haloing which the higher values produce.

Then, it is as simple as clicking Ok to blow up the image and be taken back to Lightroom where the blownup version appears in the same folder as the original so I found it alongside the original in the filmstrip.

From its original size the image is now nearly 1500 x 1900 pixels in size well suited to being used in a magazine and way more pleasing to look at than it was originally – sans artifacts. If you need to enlarge images significantly this application has the goods.

Helen Bradley
Monday, October 24th, 2011

Lightroom toolbar techniques

If you’ve seen items come and go in your Lightroom interface and if you’re confused about what exactly is happening chances are you hit a keyboard shortcut that displays or hides one of the interface features. When I was new to Lightroom it was the Toolbar – I could make disappear in a heartbeat – problem was it took a lot longer to work out what had gone and how to get it back.

As I soon learned, the toolbar can be hidden and displayed using the T shortcut or you can choose View > Toolbar. The toolbar is visible in Library, Develop, Slideshow, Print and Web view – but here’s the catch – there is a separate toolbar for each module and hiding one doesn’t hide them all – likewise displaying a toolbar only does so for the current module not all of them.

That said, you’ll want to have the toolbar visible in most of the modules most of the time because it has some handy features that you will use regularly.

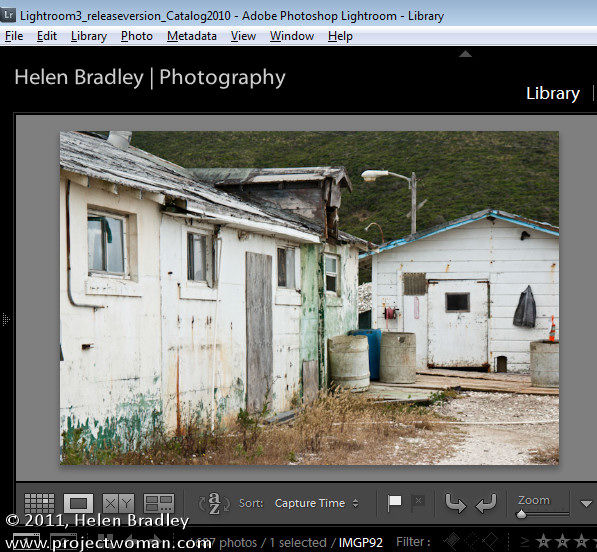
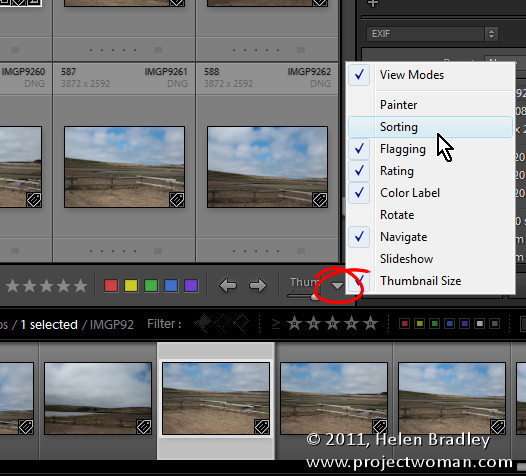
The toolbars in the Library and Develop modules are customizable – those in the other modules are fixed in what they display. To add to the general confusion, the toolbar you see in Grid view and the one you see in Loupe view in the Library module are both toggled on and off as if they were the same toolbar but they are separately customizable so you can select which tools appear in which view and they can look very different in each view as shown in these images of firstly Loupe view then Grid view:

To customize a toolbar click the down pointing arrow at its far right and select the options to display and hide. When you are working on a laptop, for example, and where screen real estate is a valuable commodity, you’ll need to be judicious about what tools are visible and which are not.

One option on a laptop that I like to disable is the rotation tool in Grid view in the Library. The reason is that I can set the thumbnails in Grid view so they show rotation icons so I don’t need the additional tool on the toolbar. However, in Loupe view this rotation tool doesn’t appear so I add it to the toolbar.

If you often resize your thumbnails then including the Thumbnail Size slider is a good idea – if you need the space it takes up for other tools then hide it and learn the = and – shortcut keys for managing the thumbnail size instead.

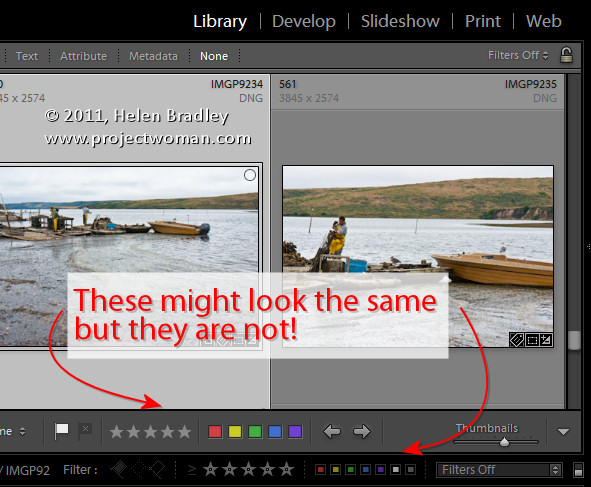
One gotcha that is a guaranteed disaster in the making for new Lightroom users is the apparent duplication of rating, color and flags on the Toolbar and on the bar across the top of the Filmstrip. These are NOT duplicates and instead they are each very different options. The tools on the Toolbar are used to apply a flag, color and rating to images in the Grid or Loupe views. Those above the filmstrip are filters that you use to filter your images based on the flags, colors and ratings you have applied to them. It is important to understand the difference. If you get into trouble and some of your images disappear, selecting Filters Off from the dropdown list above the filmstrip will display all your images again.

Helen Bradley
Friday, September 30th, 2011

Secrets of the Lightroom toolbar

If you’ve seen items come and go in your Lightroom interface and if you’re confused about what exactly is happening chances are you hit a keyboard shortcut that displays or hides one of the interface features. When I was new to Lightroom it was the Toolbar – I could make disappear in a heartbeat – problem was it took a lot longer to work out what had gone and how to get it back.

As I soon learned, the toolbar can be hidden and displayed using the T shortcut or you can choose View > Toolbar. The toolbar is visible in Library, Develop, Slideshow, Print and Web view – but here’s the catch – there is a separate toolbar for each module and hiding one doesn’t hide them all – likewise displaying a toolbar only does so for the current module not all of them.

That said, you’ll want to have the toolbar visible in most of the modules most of the time because it has some handy features that you will use regularly.

The toolbars in the Library and Develop modules are customizable – those in the other modules are fixed in what they display. To add to the general confusion, the toolbar you see in Grid view and the one you see in Loupe view in the Library module are both toggled on and off as if they were the same toolbar but they are separately customizable so you can select which tools appear in which view and they can look very different in each view as shown in these images of firstly Loupe view then Grid view:

To customize a toolbar click the down pointing arrow at its far right and select the options to display and hide. When you are working on a laptop, for example, and where screen real estate is a valuable commodity, you’ll need to be judicious about what tools are visible and which are not.

One option on a laptop that I like to disable is the rotation tool in Grid view in the Library. The reason is that I can set the thumbnails in Grid view so they show rotation icons so I don’t need the additional tool on the toolbar. However, in Loupe view this rotation tool doesn’t appear so I add it to the toolbar.

If you often resize your thumbnails then including the Thumbnail Size slider is a good idea – if you need the space it takes up for other tools then hide it and learn the = and – shortcut keys for managing the thumbnail size instead.

One gotcha that is a guaranteed disaster in the making for new Lightroom users is the apparent duplication of rating, color and flags on the Toolbar and on the bar across the top of the Filmstrip. These are NOT duplicates and instead they are each very different options. The tools on the Toolbar are used to apply a flag, color and rating to images in the Grid or Loupe views. Those above the filmstrip are filters that you use to filter your images based on the flags, colors and ratings you have applied to them. It is important to understand the difference. If you get into trouble and some of your images disappear, selecting Filters Off from the drop-down list above the filmstrip will display all your images again.

Helen Bradley
Saturday, July 9th, 2011

Copyright watermark your images in Lightroom 3

In Lightroom 3 Adobe built watermarking into the Export module (and it is available in the Print, Slideshow and Web modules as well).

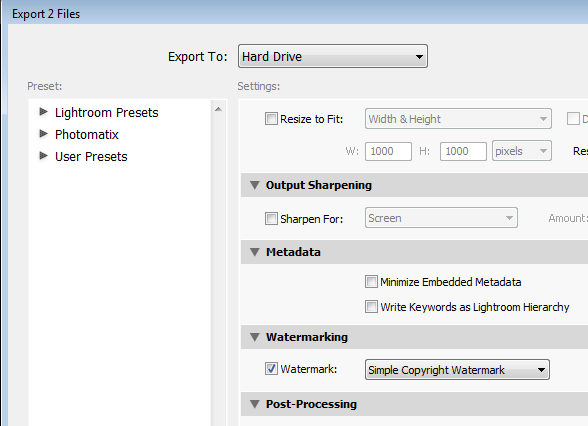
To watermark your images, select one or more images in the Library module, right click and choose Export > Export. In addition to choosing options such as the export location, file name and file type and sizing an image you will find the new watermarking option near the bottom of the dialog.

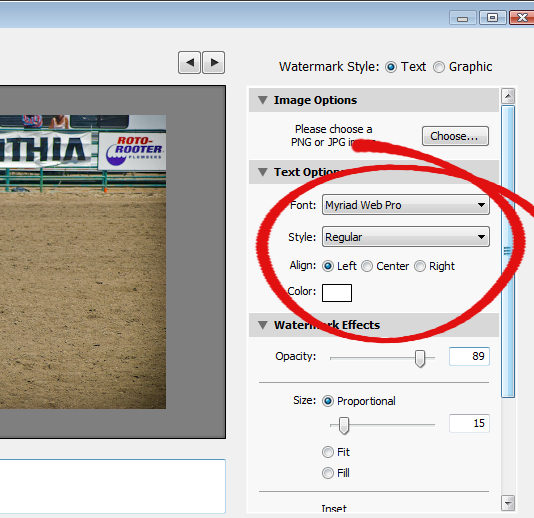
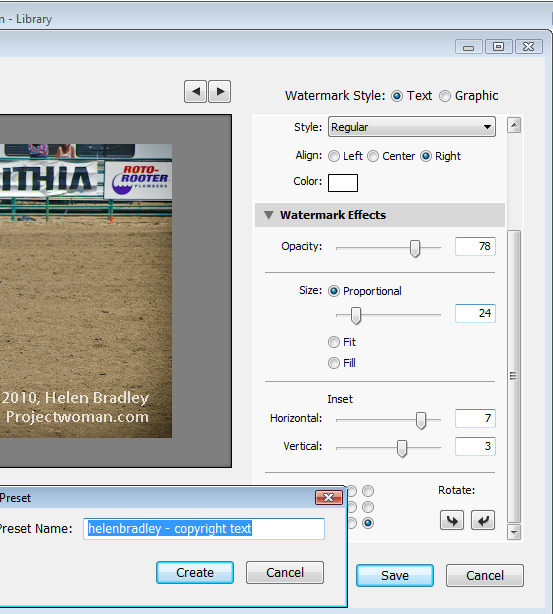
Enable the Watermark checkbox and from the dropdown list, select Edit Watermarks to display a watermark dialog. You can apply a text or a graphic watermark. For a text watermark, click the Text option button, then from the Text Options select your Font and Style.

Alignment controls the text alignment within the small box that it is placed inside so you will use this option if you have multiple lines of text. Color is the text color which you can select from a color picker – unfortunately there is no contrasting shadow added so you have to choose a text color that works on most images.

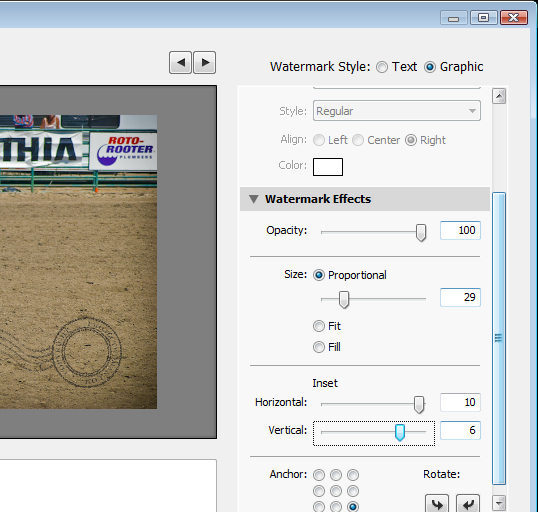
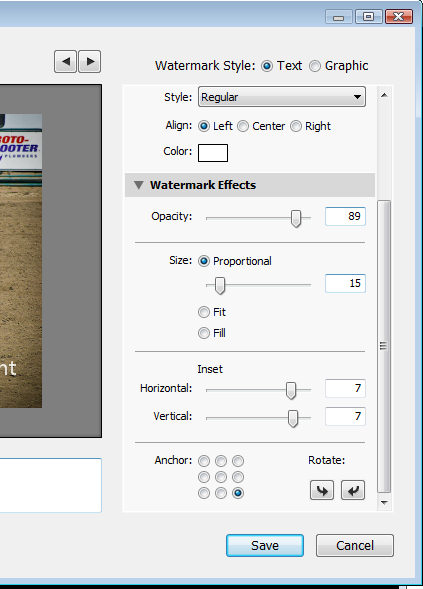
The Opacity setting adjusts the transparency of the copyright text and you can adjust this downwards to blend the copyright text in with the underlying image a little. Select Proportional size, Fit or Fill as desired. For my watermark I selected Proportional which is typically the option you will want to use.

The Anchor options allow you to place the copyright text within one of nine areas on the screen varying from top/left through center and to bottom/left.

Once you’ve selected the Anchor, adjust the Inset values to bring the text in from the vertical and horizontal margins so that it doesn’t sit at the very edge of the image.

You can rotate the text by clicking one of the Rotate options.

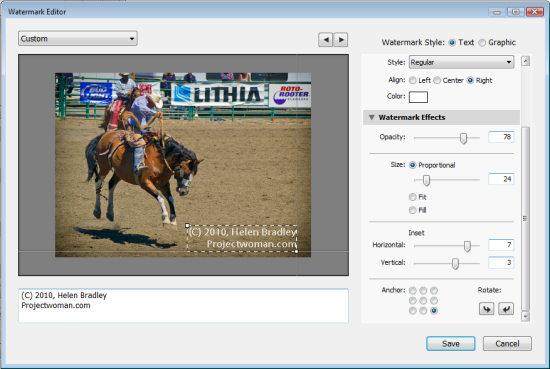
On the left of the dialog under your image is a text box with the word “copyright” in it. You can replace this with your own text – to create the copyright symbol type (C).

When you’re done, click Save and type a name to save the copyright data as a preset so you can use it again in the Export or any other module that supports watermarking of images.

If you are editing an existing watermark, click the down-pointing arrow in the top left of the dialog where it will show (edited) after the preset name and choose Update Preset or Save Current Settings as a New Preset depending on what you want to do.

Instead of a text watermark, you can use an image you have created. To do this, enable the Image option at the top of the dialog and click to select the image to use.

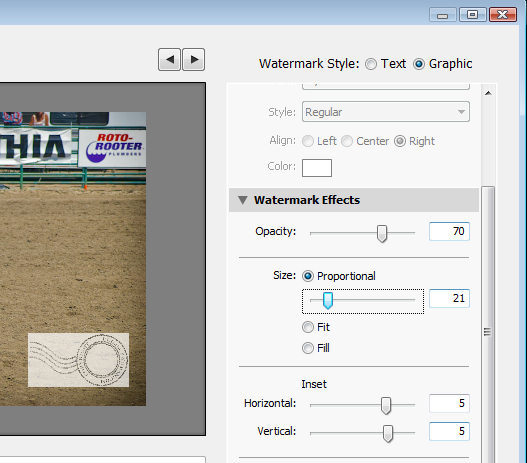
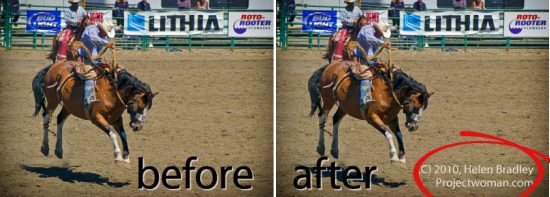
A watermark saved as a JPG image will not be transparent so the watermark will appear as a solid rectangle on your image, as shown here.

If you want to have a transparent background around your watermark, create the watermark as a PNG image with transparency in Photoshop or another editor, and import that as your watermark.

When you export your images, your watermark will be automatically added to them.

These same watermark options are also available, for example, in the Flickr Publish Services so you can automatically watermark images as you upload them to your Flickr account.

Helen Bradley
Tuesday, February 15th, 2011

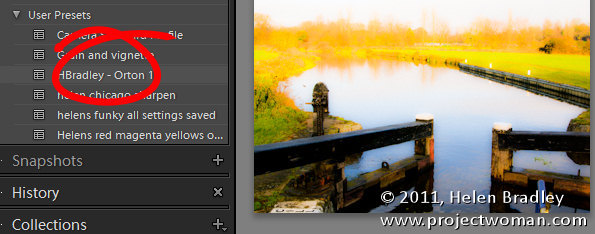
Create the Orton effect in Lightroom

The Orton effect is a process named after photographer Michael Orton. The process is a darkroom one where you take two negatives, both overexposed – one properly focused and one slightly out of focus. Sandwiching these together and processing them gives you an image with a slightly surreal look to it.

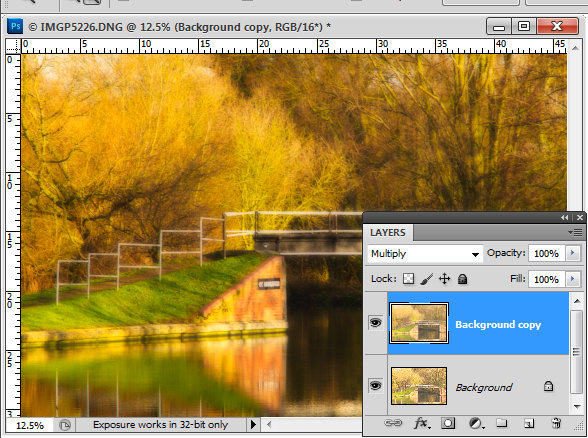
In Photoshop you can create a faux Orton look by duplicating your image’s background layer, set the layer’s blend mode to Screen and flatten the image. Duplicate this layer and set the blend mode to Multiply. Add a medium size radius Gaussian Blur to the topmost layer and, if desired, lighten the image and add some grain to it to give it a classic Orton look. I have a detailed blog post showing how to do this step by step here.

I’ve seen a few people who have said that you can’t replicate this effect in Lightroom because you don’t have layers in Lightroom. However, I’ve developed a workaround solution that gives a comparable result which I really like.

The advantage of this solution is that it can be saved as a Lightroom preset so you can apply it to other images at any time in future.

The process involves starting out with a well-adjusted image so process it as you would any image.

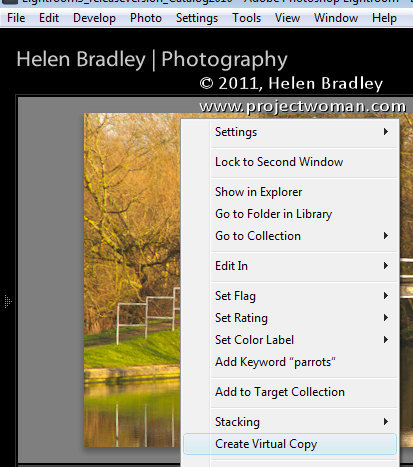
If desired make a virtual copy of the image by right clicking it and choose Create Virtual Copy.

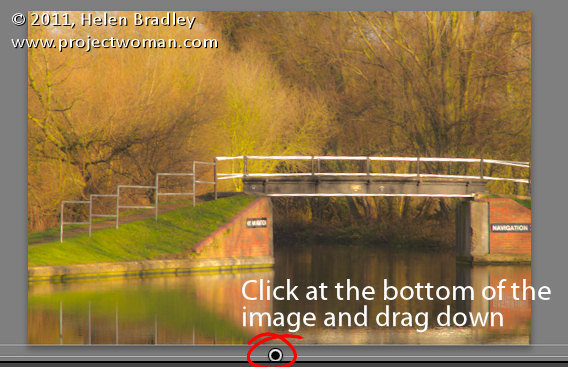
Add a graduated filter to the image. Start the filter just inside the bottom edge of the image and drag down until you are just over the edge. What you want is for the filter to be anchored to the top edge of the image and to extend all the way across the image at a full intensity.

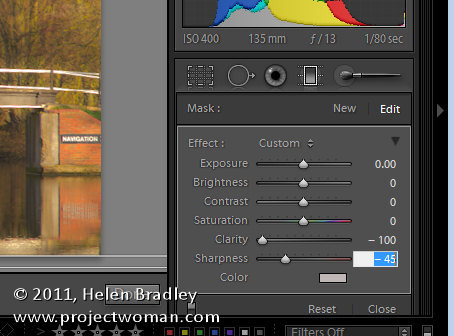
Set the Graduated filter so all values are zero except Clarity = -100 and Sharpness = -45. The combination of negative clarity and sharpness softens the image. Click the Done button under the image.

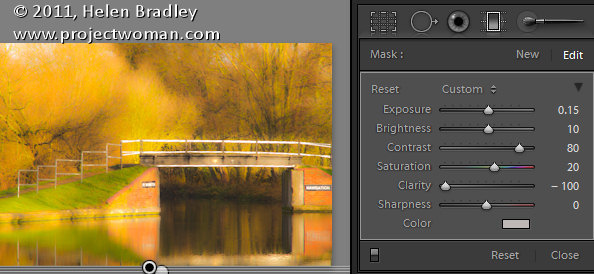
Now add a second Graduated filter over the top of the other one. Apply these settings to the image. Exposure +0.15, Brightness +10, Contrast = +80, Saturation +20, Clarity -100.

You can vary any of the settings on this last Graduated filter if desired to improve the image. What you’re looking for is an image with an ethereal glow.

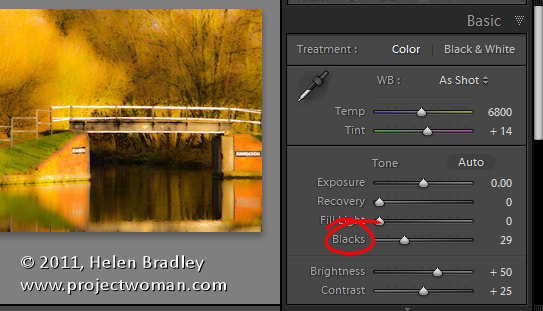
It will help you to get this effect if you boost the Blacks in the image in the Basic panel.

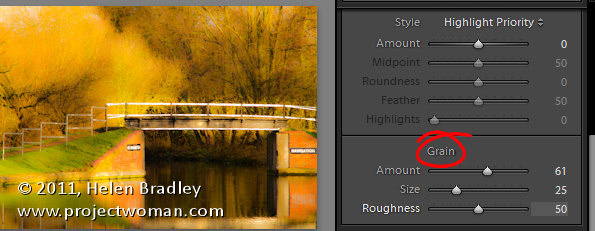
Finish off the effect by opening the Effects panel and add some grain to the image.

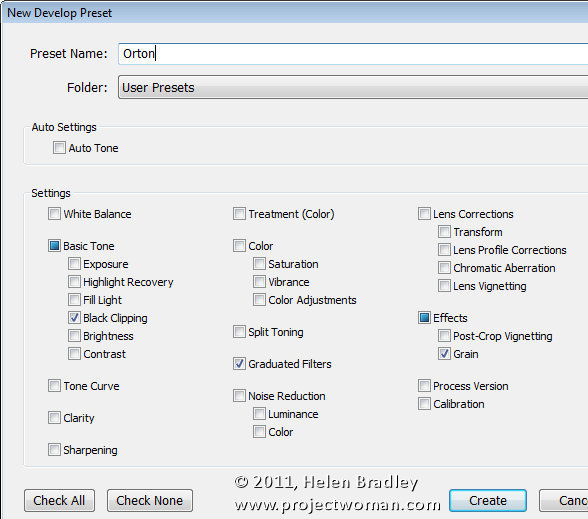
To save this as a preset, click the plus symbol opposite the Presets panel on the left – give the preset a name and disable all checkboxes and then select only the Grain and Graduated Filters checkboxes. If you want to add the increased Black to the preset, click the Black Clipping checkbox too. When you’re done, click Create to create the preset.

You can now apply this preset to another image. First make sure to properly expose the image and then, open the Presets panel and click your preset to apply it to your image.

You may need to tweak some of the settings for the image as a result of doing this but you should have an image that has a glow effect to it and with a good approximation of the classic Orton look.

Of course, you can achieve the same effect in Adobe Camera Raw.

If you want to avoid the work and use my preset instead – here’s a link to download my free Orton Lightroom preset.

Helen Bradley
Friday, February 11th, 2011

Lightroom – working with RAW and JPG

Lightroom how to handle raw and jpeg jpg images captured at the same time separately
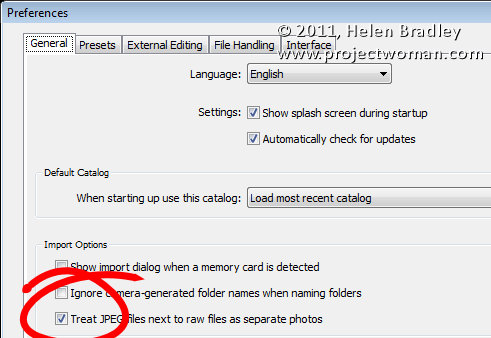
When your camera is set to capture in RAW+ so it is recording not only the RAW image but also a JPG image to match you may find that Lightroom shows you only the RAW version of the file.

This is because Lightroom, by default, treats the RAW version and the JPG images as one.

However, if you want to deal with them separately, choose Edit > Preferences (Lightroom > Preferences on the Mac) and select the General tab and select the option: “Treat JPEG files next to raw files as separate photos”.

Now Lightroom will treat the RAW and the JPG images as being different images so you’ll see both images in your Grid, Loupe and Filmstrip views.

Helen Bradley
Tuesday, February 8th, 2011

Lightroom Maximize, Minimize, Restore, Size, Move and Close buttons missing?

Lightroom maximize minimize close restore size title bar missing

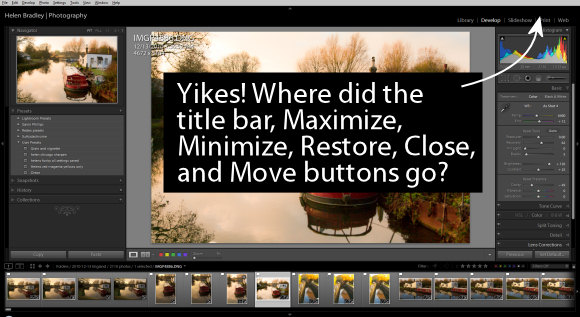
One of the most frustrating things that you’ll encounter with Lightroom is when your entire title bar for the application disappears. You’ll see your menu but everything else including the Close, Minimize, Maximize and other buttons will be missing.

The problem is that you’ve pressed the F key to get to full screen mode.

The solution is to press the F key repeatedly until the screen returns to normal. Too easy? Maybe but it sure is frustrating when you don’t know what happened and how to fix it.

Helen Bradley
Tuesday, December 21st, 2010

Lightroom: Embracing Brightness

In previous posts I’ve advocated using the Exposure slider to lighten an image but lately I’ve added the Brightness slider to my workflow. I’d encourage you, if you haven’t already done so, to experiment with it on your images.

However, before we begin a word of warning about Brightness/Contrast in general. Brightness adjustments in some programs aren’t as good as in others. If you’re using Photoshop CS2 or earlier, for example, use Curves or Levels to lighten an image not Brightness. In Photoshop CS3 the Brightness/Contrast tool was re-engineered and instead of adjusting all pixels equally as it used to do with the result that highlight areas were routinely destroyed in the process, it now protects the lightest pixels as it lightens the image. Before trusting your image to a program’s Brightness and Contrast tool, check your histogram before and after using it and make sure you aren’t blowing out highlights in your quest for a lighter/brighter image.

Now, back to Lightroom.


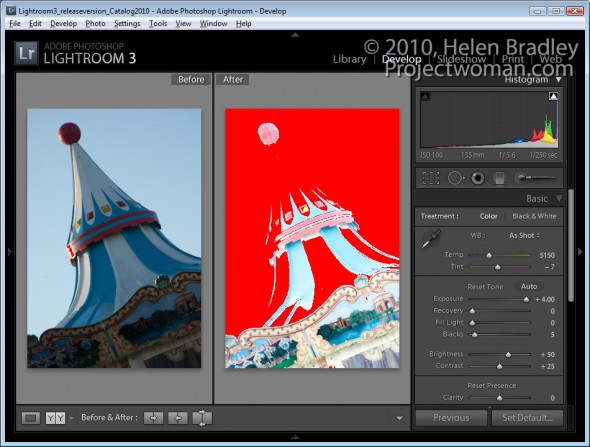
Take a look at the image shown here. If I leave Brightness at the default value – which for my camera is +50 but which may be different for yours, and if I crank up the Exposure to the maximum value, a lot of the lighter  pixels in the image get blown out.

Of course I would never adjust an image to this value but it’s a useful exercise to see how Exposure works.  


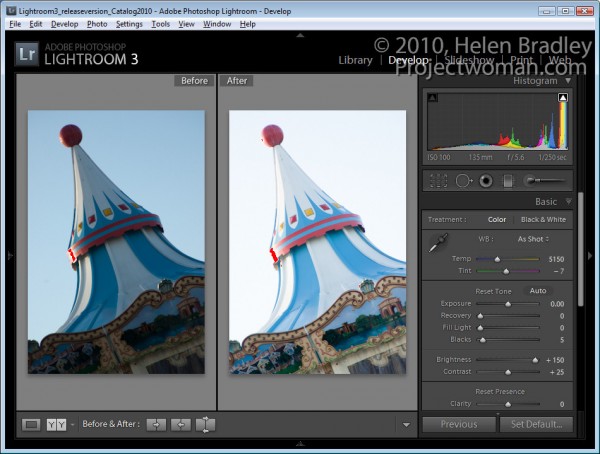
When I do the same thing in reverse and leave Exposure at its default value of 0 and crank Brightness up to its highest value only a small number of pixels are blown out.

Using the Brightness slider lightens the image while at the same time protecting the lightest pixels in the image from being blown out as a consequence.

So what does this knowledge mean to you in a typical Lightroom workflow? Well, my new Lightroom workflow for lightening and brightening an image involves using the Exposure slider first of all to adjust the overall exposure of the image but I stop short of where too many highlights get blown out.

Next I test the Recovery tool on the image. Hold the Alt key as you drag on the Recovery slider to check to see if there are blown out highlights (they show as varying colors on the black background). Drag to the right to see if they can be recovered . If they can’t be recovered ease off on the Exposure and check again.

If I have shadow areas in the image that are still overly dark I’ll adjust these using the  Fill Light slider. This tool helps recover detail hidden in shadows, but it’s not a tool I’d use for an overall brightening effect.

Finally, I use the Brightness slider to increase the overall image brightness. Somewhere between the Exposure slider and the Brightness slider is the sweet spot for lightening an image.

From there, I’ll adjust Vibrance and Clarity and sharpen the image.

While we’re on the topic of the Brightness slider, check out the default value on an unedited image so you know where your starting point is. For most raw images, Lightroom defaults to a Brightness of +50 and Contrast of +25 as its starting point.

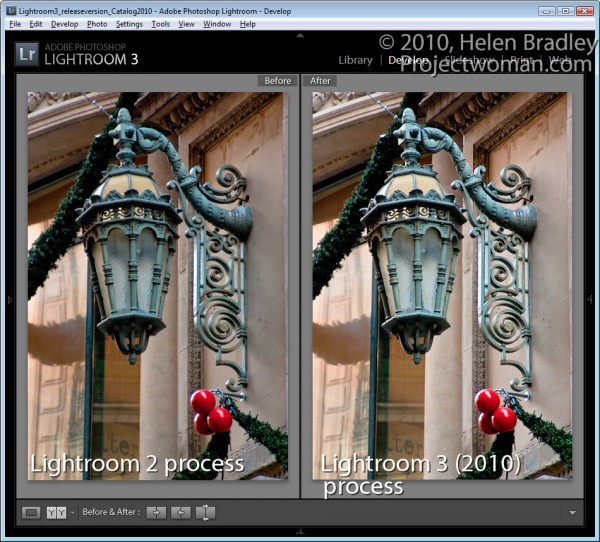
Also take care when working with images you had processed in Lightroom 2 with Lightroom 2 settings. When you upgrade to Lightroom 3, you’ll have a choice of Updating your images to the new Lightroom 2010 Process. My experience is that this can result in a significant lightening of images which were processed in Lightroom 2 so I apply this update on an image by image basis so I can reverse it or adjust for it as I go if necessary.

Helen Bradley
Page 10 of 11« First7891011