Friday, June 26th, 2009

Wrap text over an image in Publisher


Wrapping text around and over an image works differently in Microsoft Publisher to the way it works in Microsoft Word, and confusingly so. It is not possible to wrap text around an image in Publisher in such a way as to have your text actually overlap the image. You can do it in Word but not in Publisher – Go figure!

In Microsoft Word you can use the edit wrap points feature on an image to wrap text over an image so the text appears over the image. If you try to make Publisher work like Word and try to wrap text using the Edit Wrap Points feature, portions of the image will be cropped away when you move the wrap points inside the image. Frankly the process is stupid and it really shouldn’t work this way, particularly in a DTP program.

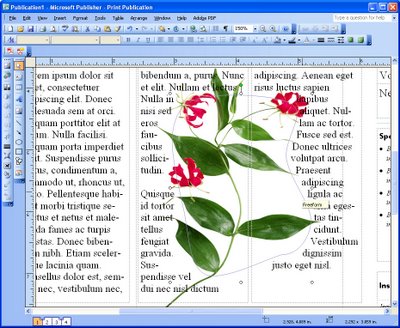
There is, however, a workaround for this limitation in Microsoft Publisher. So, if you need to wrap text across an image, insert your image into your publication and insert a freeform shape over the top of it. This shape should be the shape that you want the text to wrap along.

Then configure the shape’s wrapping option so that the text wraps tightly around it. Configure the image so that text doesn’t wrap it at all – so use an option like None. Then position the image so it appears under the text, set the fill for the text box to No Fill so you can see through it to the image underneath. Set the Fill and Line Color for the freeform shape to No Fill and No Line.

Note that text wrapping can be controlled this way in print publications but it does not work with web publications because of the limitations of HTML code.

Helen Bradley

Wednesday, June 24th, 2009

Publisher: Keep lines neat


If you look at just about any magazine you’ll see that the lines of text line up along the bottom of the page. Even if there are images in some columns and not in others, everything lines up very neatly along the bottom of the page.

Publisher 2003 included a new feature which has been carried forward into Publisher 2007 and which lets you create baseline guides so you too can get professional looking results with your text.

In Publisher, these baselines let you position text so that the baseline of the text in one column of text lines up with the baseline of the text in the columns adjacent to it.

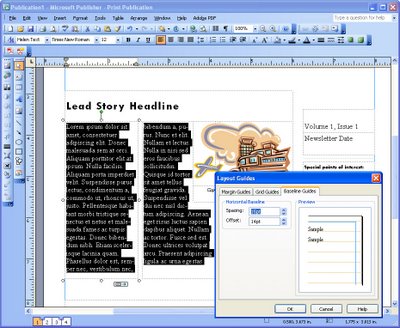
To configure the baseline guides for a series of columns, choose Arrange > Layout Guides > Baseline Guides and set the spacing and offset for your baseline. While you can create both horizontal and vertical baselines, horizontal baselines are those you’re most likely to use.

To get the best results, the Spacing setting which controls the spacing between lines of text aligned to the guides should be the same or larger than the line spacing between your lines of text. So, for example, if you are using 12 point text set the baseline to 14 points or more (typically line spacing is set to 2 points more than font point size).

Then, when you have created your text, select it and choose Format > Paragraph > Indents and Spacing tab and, under the Line Spacing options, select the Align text to baseline guides checkbox. This will re-align the selected text so that it lines up with the baseline guides throughout your paragraph.

Helen Bradley

Monday, May 25th, 2009

Publisher – Making Signs

Whether you need to make an open sign for your business or one to help find a lost pet, the basic premise is the same. You have a message you want to get across to your audience and you need to do this in the best and most effective way.

Signs pose difficulties not always present in other documents – you don’t have a lot of room to get the information across and often the sign will be placed where there is lots of other signage competing for attention.

Before you start
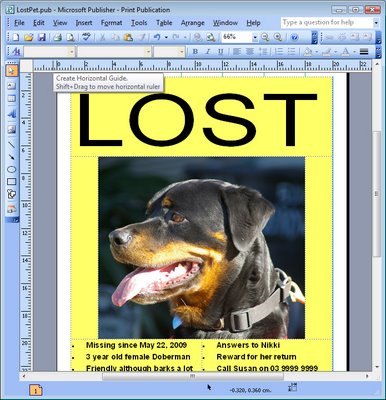
Before you make your sign, determine what you want to say and what information is most important for your audience to see. For example, for an Open sign, the word OPEN is critical and it will work without any other words very well. For a lost pet sign, the word Lost is important as it distinguishes the sign from others about pet grooming services, kennels etc.

Size of letters are important – a sign to be viewed from 3 yards/metres distance will need to have letters around 2.5cm/1 inch in height and you can add an extra 2.5cm/1 inch for every extra 3 metres/yards away your audience will be. The font size equivalent for letters 2.5cm/1 inch in height is around 72 points.

Colour is vital and it’s important that your sign be visible. The best colour combinations are high contrast ones such as black on yellow and white on black. Bad combinations are green on red or red on green – they’re indistinguishable to colour blind people and hard to read for the rest of us.

If you must use low contrast colours such as pale blue on white, add a black border around each letter to distinguish it from its surroundings.

When choosing fonts for your signs, stick to plain readable fonts and steer clear of script and other fancy typefaces. Fonts like Times New Roman and Arial and Verdana are good as they are clean and easy to read.

Capture interest
When you’re using photos to capture attention and to inform, make sure they are high quality and cropped to show the pet clearly. When typing information, group it logically so it’s easy to read. Include the details a person will need to have to contact you.

In the situation where immediate contact is crucial, creating tear off strips across the foot of the page is a good idea – a person can simply tear off the information they need and take it with them. However, make sure you also put the information on the sign as a person will need to have this available if the tear off strips are already removed.

Here’s how to create a sign with tear off strips.

Step 1
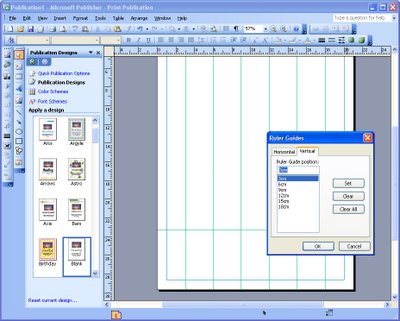
Start a new blank print publication. Choose File, Page Setup and set up full page printing and Letter or A4 paper size depending on the paper you will use. Choose Arrange, Layout Guides and adjust the margins to match your printers margins – the defaults are generally too big. Choose Arrange, Ruler Guides, Format Ruler Guides, vertical and add them at equal intervals across the page. Add one horizontal ruler across the bottom of the page.

Step 2
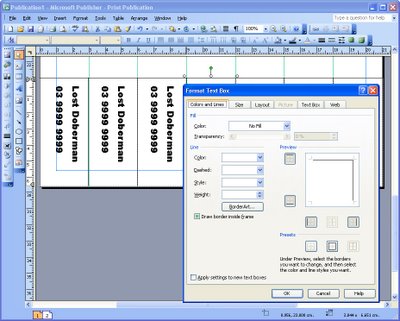
Create a text box and, in it, type the contact details for the tear off strip. Rotate the text by right clicking the shape, choose Format Text box, Text Box tab and check the ‘Rotate text within AutoShape by 90 degrees’ checkbox. Click the Colors and Lines tab and add a line to the top and right of the box. Drag the box into position and size it to fit. Hold Control as you drag a duplicate of the box to make the second box. Continue to complete all the boxes.


Step 3
Complete the rest of your sign by adding a large text message to attract a viewer’s eye. Add other explanatory text – make sure to include your phone number or contact details in the main notice in case all the tear off strips are removed. Focus on the important details someone will need to know. Add an image if desired to help attract attention.

Helen Bradley
Friday, October 3rd, 2008

Borderless printing in Microsoft Publisher – Yay or Nay?

Before you go looking for borderless printing and margin settings in Publisher 2003 – give up – they’re not there.

Simply put, Publisher does not do borderless printing.

While on the face of it this is a nuisance, to say the least, there is a workaround that will get you going. Here’s how:

1 First of all set up your Publisher document so that it has everything on it that you want to print borderless. For example, I like to, when I’m using a template for a calendar, for example, stretch the background filled shape to fill the entire document so that there is color all the way to the border.

2 Save the document as a publication (*.pub) file so that you can come back to it later on if necessary and edit it.

3 Now create the print version – to do this, save the document as an image. Choose File > Save As and from the Save as Type dropdown list choose an image format such as Tagged Image File (*.tif) and give the file a name.

4 Now crank up your graphics software, set up your printer using the printing options for borderless printing and print the image.

Not pretty but it works!

Helen Bradley

Wednesday, September 19th, 2007

Wrap text around an image in Publisher

Text wrapping in Publisher works a little differently to how it works in Word. To configure how text wraps around an image in Publisher, click the picture and choose Text Wrapping from the Picture toolbar.

If you’re creating a Web publication this won’t be an option – it is only possible to do this with a Print publication. Choose a wrapping option from those shown. To configure text to wrap tightly around an image choose Tight and then choose Edit Wrap points option to create the exact shape for text to wrap around the image.

When you do, if you drag the wrap points inside the image, that part of the image will be cropped away – this is not the behaviour you might expect if you’re use to working in Word. You’ll need to do a workaround if you want text to wrap irregularly around an image but not so as the image is lost.

To do this, place the image below the text and set its wrapping to None. Draw an irregular shape over the image and set its wrapping to tight. This uses the shape to manage the text wrapping and thus avoids damaging the image. Format the shape by right clicking it and choose Format AutoShape, Colors and Lines tab, set the Line Color to No line and the Fill Color to No fill so you won’t see it in the final presentation.

Helen Bradley

Friday, March 9th, 2007

Cool moves in Publisher

Here are some of my favorite tips for getting things lined up in Publisher 2003:

To move a number of objects together, select them and choose Arrange, Group from the menus or click the Group button which appears when the objects are selected. You can now move and size the objects all at once. Choose Arrange, Ungroup to ungroup them again.

The Nudge and Measurement menus help you move objects in small increments. Choose Arrange, Nudge and tear off the Nudge menu to have access to the buttons. The measurement toolbar (View, Toolbars, Measurement) helps you position objects with pinpoint accuracy.

To create a ruler guide, position your mouse over the horizontal or vertical ruler bar and, when the mouse changes shape, drag the ruler guide into position. To display rulers, choose View, Rulers. Use these guides as an aid for lining up objects on your page. Right click the guide to access other options.

Helen Bradley

Thursday, March 1st, 2007

Set the style of Publisher objects

When you repeatedly use a Publisher shape or text box and when you always need to make changes to its format to meet your needs, set the shape so it always looks how you want it to look.

To do this, insert the shape or the text box for which you want to configure the defaults and right click it and choose Format AutoShape or Format Text Box as desired and make your changes. Switch to the Colors and Lines tab and enable the “Apply settings to new AutoShapes” (or “Apply settings to new Text Boxes) checkbox and click Ok. New objects of this type will now take on the selected formatting options.

Helen Bradley

Monday, February 26th, 2007

Smarter editing in Microsoft Publisher

When you’re working with large pieces of text in Microsoft Publisher, you may find it easier to work in Word rather than Publisher. This way you can concentrate on your text without having to deal with layout issues.

Then, when you have finished settling your text, import it into a Publisher text box by clicking in the text box and choose Insert, Text file and browse to locate and import your file.

On the other hand, you can edit a piece of text in Word from inside Publisher if you right click a text frame in Publisher and choose Change Text, Edit Story in Microsoft Word to export it to Word. When you’re done, choose File, Close & Return to return to Publisher.

Helen Bradley

Tuesday, February 13th, 2007

Make room for graphics in Publisher

When you’re working on a Publisher document, chances are you may not have all the final images in hand. If you’re waiting on graphics, you can add a placeholder for each image to your Publisher file so you can allocate the space for the images and so everything else can be finalized in the meantime.

To do this, click Picture Frame and choose Empty Picture Frame then drag a frame into your document. Size it to the size required. Later, when the image comes in, you can add it to your placeholder by right clicking the placeholder and choose Change Picture, From File and locate the file to use.

Helen Bradley

Sunday, February 11th, 2007

Viewer for Publisher Files

I wish! You wish! We wish.. but no go..

We’d all love to see one of these but, unfortunately Microsoft hasn’t deigned to give us one. There are, however some options you can use. If you can ask the person who created the PUB file to open and save it in a different format you can then view that – for example it can be saved as a Tiff format file.

If you have a PUB file but no access to Publisher, try one of the free online PDF file conversion tools that can handle Publisher files. I like PDFOnline, it handles PUB files up to 2Mb in size and all you need to do is to browse to upload the file to their server, type a name for the PDF file they’ll send you in return and type your email address. In minutes you’ll have a PDF version that you can read using Adobe’s free Acrobat Reader software.

If you’re wanting to share your Publisher files with others who don’t own publisher then try a program like the free PDF converter PrimoPDF which installs as a printer driver allowing you to create your own PDFs as easily as printing from Publisher.

Perhaps best of all is your option to download and install the trial version of Microsoft Publisher 2007. It works for a limited time to allow you to open, read and edit Publisher documents. After the trial period is over, you can only open, view and print existing Publisher documents – pretty much what a viewer program would do in my book!

Helen Bradley