Saturday, July 13th, 2013

Create a reusable layered image effect in Photoshop

Learn how to create a layered image effect that can be reused any time. The process can be done in most versions of Photoshop and it uses smart objects, simple to create clipping masks and some layer blending. It is pretty easy to create and can be used over and over again.

Transcript:


Hello, I’m Helen Bradley.

Welcome to this video tutorial. In this tutorial I’m going to show you how you can create a quick cut and layer image effect that’s sure to turn any image into something that looks just a little bit more spectacular.

Before we get started with this project let’s look and see what it is that we’re aiming at. Here is my original image and this is the effect we’re going to create. We’re going to create a number of layers or what look like layers of the image and we’re going to blend them together. Now this effect is customizable.

It’s really easy to select one of the shapes and to move it so that everything gets rearranged and it’s also really easy to replace the base image. So let’s get started. And I have a new image to work with here. I’m going to start by converting the image to a Smart Object.

So I’m going to right click the background layer and choose Convert to Smart Object. And now we’re going to start adding our layers of shapes. So I’m going to click to add a new layer. Let’s get my tool bin. I’m going to select the Rectangular Marquee tool. And let’s create a shape. I’m going to create this big rectangle here.

With this layer selected I’m going to make white my foreground color and Alt Backspace, Option Delete to fill the shape with white. Now in each case I need the layer and the image so I need multiples of this pair of image. So I’m going to right click and choose Duplicate Layers and click Ok. Now I’ve got my second shape up here.

I’m just going to turn off my images so that we can see the shapes alone. And I’m going to move this shape out of the way and I’m just going to resize it to a different size shape here. I’m going to select these two layers, right click and duplicate them again. And now I’m going to this top version and I’m going to again alter it a little bit.

You don’t have to alter it. You can leave it exactly the same shape if you want to. Select the two layers, right click, Duplicate Layers, click Ok, again selecting this top one and just moving the shape into position and resizing it to suit. Now that we’ve done this we can start to create the effect.

And what we’re going to do is we’re going to crop these images. So I need one more of this Smart Object layer so I’m just going to duplicate this layer once more and drop it on the top. Now I’m going to create a clipping mask. So with these layers all visible and all selected first of all I’m going to select the topmost layer and I’m going to choose Layer > Create Clipping Mask. And what that does, let’s just have a look, is it clips the top layer to the shape and size of the layer below.

So when we turn these two on and create a clipping mask here, Layer > Create Clipping Mask, we’re going to get a built up effect. Let’s do that again here and create a clipping mask. First of all we need to turn these two layers on and then with the picture layer selected we can choose Layer > Create Clipping Mask or you can do it using the keys.

What I do is hold down Ctrl and Alt, which is Command and Option on the Mac, and just hold my mouse over the intersection between these two layers until I get this icon and then click once. Now I find that a whole lot easier and you may too if you create a lot of clipping masks. It’s really important that the clipping masks are filled with white.

Now in normal circumstances it doesn’t matter too much what you fill your clipping mask layer with but in this case it’s going to because we want to reduce the opacity of the layers a little bit so that we can see some of the background through. And so when we add two layers together, when we overlap two layers, we’re going to get a darkening in the area where they overlap.

So first of all I’m going to adjust the opacity down a little bit and now I’m going to select all of these layers by Ctrl or Command clicking on each of them in turn and set their blend mode to multiply. And what that does is it multiplies the fill layers so that the layers are built up so that we get some overlap between these layers so we can start seeing where they’re overlapped.

And from here you can just tweak the effect to darken or lighten the individual layers as you want to so that you get the effect that you’re looking for. And you can also fill in the background. So we can add a new layer, drag it to the very bottom of the layer stack and then fill it with whatever we like. I’m actually going to sample some of the yellow color from this leaf and with the layer selected I’ll Alt Backspace on the background layer to fill it with that.

But I could also fill it with a gradient. I could do all sorts of things. Now the important thing to know is that once you’ve created this effect it is fully customizable. So it’s very easy to replace this image with another image. All we need to do is to right click the layer, one of these layers that is a Smart Object, any one of them will do, and choose Replace Contents. So now what I’m looking for is an image to replace the contents with.

The image doesn’t have to be in the exact same proportions. We were using a landscape image but these are square images. But they do need to be good size images. So I had a really large image that I was working with so I want this image to be nice and big. And this one is 3,100 pixels so it’s pretty big. So I’ll select it and click Place and when I do it’s replacing the original image.

And I may want to adjust the opacity of these so that I get the effect that I’m looking for. For example, I mightn’t get enough of a layering effect without adjusting the opacity. And I may also want to adjust the background of this image to give it a darker background in these circumstances.

But it’s very easy to just reuse all of the basic work that you’ve done with this image and just replace it with another image. So I’m just sampling a color to use, Alt Backspace to fill the background. And there we have our effect. You could also use a color for these clipping mask layers but be aware that any color that you use is going to come through the images.

So let’s just make black our foreground color. Let’s just target this particular layer here and I’m going to Alt Backspace to fill it with black. Well you can see that the multiply effect has totally blackened that out. But if I use a sort of fairly light color here, well this is sort of a pale blue, but you’ll get the same effect, and fill it here you’ll see that we get a slightly darker look.

So we can darken this and have an effect on the image. The darker the color we use we’re going to not only see the color itself or example if we use pink we’re going to see the color through the image but we’re also going to darken up the effect.

Now it would be possible for example to choose different colors. So I’ve got some pastel colors that I’m filling these with. Let’s go for a sort of pastel blue here. And you can see the effect that it’s having, well I chose the wrong layer there. Let’s just undo that. Let’s go to this one and actually select the layer and fill it with a pastel blue.

So you could do that as well. And of course any time you choose to replace the image these color layers are going to stay in place so that you’ll get the effect on the new image that you’re replacing this one with. So there’s plenty of creative possibilities here in creating a layer image effect in Photoshop.

I’m Helen Bradley.

Thank you for joining me for this video tutorial. Subscribe to my YouTube channel so you’ll be advised when new videos are released.

And visit my website at projectwoman.com for more tips, tricks and tutorials on Photoshop, Lightroom, Illustrator, Photoshop Elements and a whole lot more.

Helen Bradley

Monday, July 8th, 2013

Recolor clip art in Microsoft Office 2013 and earlier

Learn to recolor clip art using theme colors so it is not only the color that you want it to be but it also matches the theme and it changes color when the theme changes.

This works with pretty much all versions of Office and all apps including Word 2013, PowerPoint 2013, Excel 2013, Publisher 2013 and older versions of Office including 2010, 2007, 2003 and earlier.

Transcript:

Hello, I’m Helen Bradley.

Welcome to this video tutorial. In this tutorial I’m going to show you how you can easily recolor clipart in Microsoft Office and how you can use theme colors so that your clipart changes when your theme changes.

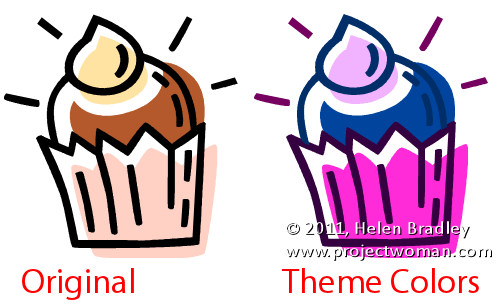
Before we get started with this tutorial let’s have a look and see what it is that we are trying to achieve. This is the same piece of clipart and I just made a duplicate of that clipart image and I recolored it in the way that I’m going to show you how you can recolor your clipart. But let’s have a look and see the impact of the recoloring.

I’m going to choose the Colors tool here and watch as I arrow over all of these colors in turn. And you’ll see that the clipart image that I have recolored I have recolored this time with theme colors. And the beauty of this is that the clipart image is going to change colors in accordance with the theme that is in use.

The only thing that hasn’t been recolored is the black and the little yellow light in the candle. Everything else is a theme color and it’s going to change color using the new theme colors whenever the theme or the design of this PowerPoint presentation changes. So this is the concept that we’re going for here.

Now I have a slightly simpler image here. All I did to find these images was I chose Insert and then Online Pictures and I went looking for cake. And I particularly wanted wmf files as that’s Windows metafile and that is an illustrative file most of which can be recolored inside of PowerPoint or Word or Excel or any of the Microsoft applications.

And you don’t have to be using Microsoft Office 2013. You can choose any version of Microsoft Office. I’ve been doing this for years in Microsoft Office. It’s just that the way that you add images is a little bit different in this new version. Now before I start let’s just take a copy of this image and let’s paste it so that we’re working on a duplicate.

We can see then how far we’ve come later on. I’m just going to get rid of these images. Now with the image that I’m working on selected I’m going to choose Picture Tools, Format tab and I’m going to choose Group and then Ungroup.

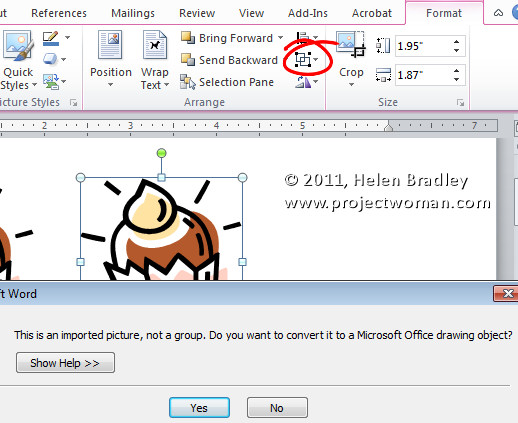
Now you’ll see that the group option sometimes is not available from this dropdown menu but it will always be available from the Picture Tools, Format tab if the image is able to be ungrouped. You’ll get a message showing that this is an imported picture and not a group and asking you if you want to convert it to a Microsoft Office drawing object.

The answer to that is yes. And then you’ll go and repeat the process. You’ll right click and choose Group, Ungroup or from the Drawing Tools, Format tab you’ll choose the Group button here and choose Ungroup.

That ungroups the object so it’s now a whole lot of smaller objects. I’m just going to click outside it and then we’re going to start selecting individual pieces of this object. And I suggest that you start with a nice color scheme. So I’m just going to go to the color schemes and let’s choose something relatively colorful.

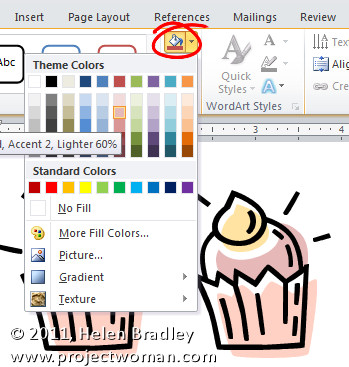
I found slip stream was a good option to use but any of these such as red violet that is fairly colorful is a good choice. Drawing Tools, Format tab and now from the shape filled dropdown list we’re going to make sure that we recolor all of the shapes using the fill colors that are theme colors.

So, again, I’m going to select here, this is on this sort of turquoise bit, and I’m going to color it a darker version of that same blue. I’m going to click on the candle light and see if I’ve got something I can use for candle light. I think I’m going to choose one of these colors because I would really like my candle light this time to be a theme color.

To select multiple colors or multiple shapes at a time I’m just selecting the first and then Ctrl clicking on the last. And again, I want these to be colored the same color as the candle light. Now I’m going to click here. There’s a shape here.

If you ever want to see what the shape is that you’re working on just press the Delete key and it will disappear and then you can undo it to be able to work on it. Or of course you can just fill it and see what it is that you are actually filling.

So I’m going to select that color. And now we’re going for this shape over here and I want a slightly darker or lighter version here. I think I’m going for a darker version. And here we have the shadows. Again, I’ll want a darker color for the shadow. I think I’ll go back for these blues. I’m going to stick to the turquoises and this sort of purple color.

So I’m going to now select these smaller items here and when I’ve got them selected I’m going to fill them as well. And when I’m pretty happy with my shape that has been recolored I’m going to select over the entire shape because now what I want to do is to stick it all back together again because I don’t want lots of little pieces.

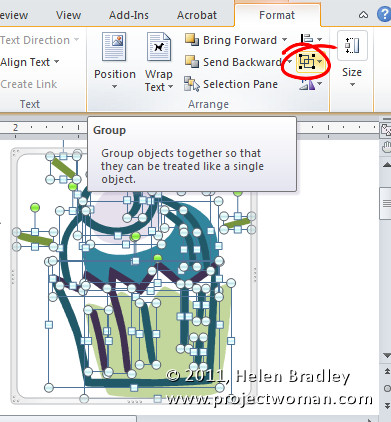
Drawing Tools, Format tab, Group and this time I want to Regroup. And I’ll just test this by moving the object and it should all move as one. And now let’s look and see that this object is going to recolor unlike the original object if we change the color of this particular design that we’re using in PowerPoint.

So I’m going to choose the colors dropdown list here and as I choose a different color scheme you can see that my clipart shape is changing color. And as I said this works exactly the same way in any of the Office applications and in pretty near any version of these. You can do this in Word 2003.

You can do it in PowerPoint, Excel, Publisher, any of the applications and you can create clipart so that it not only matches the current theme but also looks the colors that you want it to look but which will change colors as the theme colors change.

I’m Helen Bradley.

Thank you for joining me for this video tutorial. Look out for more of my PowerPoint and Microsoft Office tutorials on this YouTube channel.

And visit my website at projectwoman.com for more tips, tricks and tutorials on a range of Microsoft Office applications as well as Photoshop, Lightroom, Illustrator and a whole lot more.


Helen Bradley

Wednesday, June 29th, 2011

DIY Color Changing Clip Art

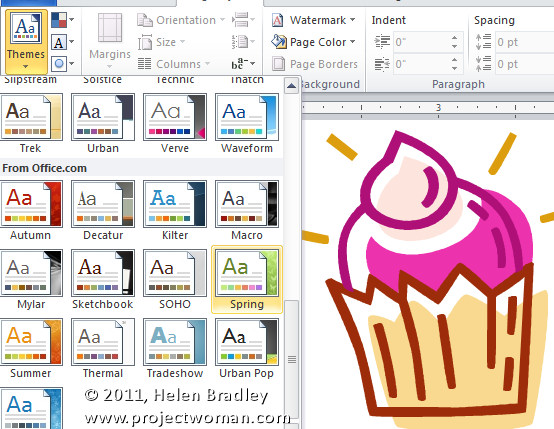
Much of the illustration Clip Art in the Microsoft Clip Organizer can be edited by changing its colors. By doing this you can not only recolor the art to match the look of your document but, if you use Theme colors then the art will change color when the Theme or Color scheme changes.

Now you won’t need information technology degrees to learn this – but maybe you’ll be so good at it, you just might consider graphic design college.

So, let’s see how the recoloring is done. First select the Clip Art and from the Picture Tools -> Format tab click the Group > Ungroup button. Answer Yes if you are prompted to convert the image to a Microsoft Office Drawing Object. In some applications  such as Publisher you’ll need to repeat the process and select Ungroup again.

Now click on individual parts of the object and either remove them or recolor them by selecting a Shape Fill Color from the Drawing Tools > Format tab. If you use Theme colors then the colors will change later on when the theme changes.

When you are done and you have recolored all the pieces you want to recolor, select all the pieces, right click and choose Group.

Change the document theme or Color Scheme to see the image change color to match the look of the theme.

Helen Bradley