Tuesday, October 6th, 2009

Placeholders in PowerPoint 2007

One new feature of PowerPoint 2007 is that you can now add your own placeholders to PowerPoint slide layouts.

In past versions of PowerPoint each slide could have only one text placeholder that would behave as a PowerPoint text placeholder – you could add text boxes but the text couldn’t be formatted in them the same way as it could when you used a placeholder. Now you can have multiple text placeholders on a slide.

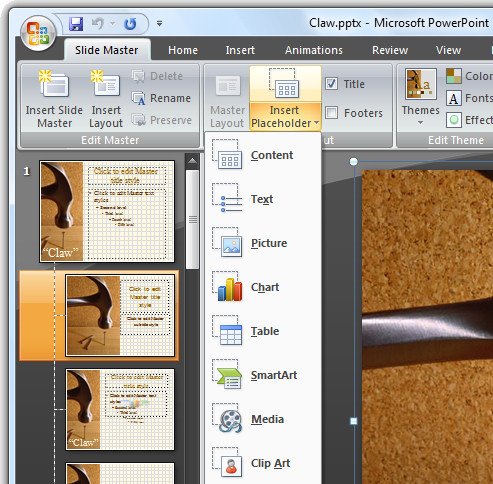
To see these at work, choose View > Slide Master to move to the Slide Master View and then click the Slide Master tab at the left of the Ribbon.

Select the master that you want to add an additional placeholder to and select Insert Placeholder from the ribbon.

From the list, select the type of placeholder to use – these include placeholders for text, picture, chart, table, SmartArt, media and clipart. You can, if desired, add multiples of these placeholders to a slide so you can have a slide layout that has all the elements on it that you need.

For example, you may wish to have a text placeholder next to a chart or text and a picture located side by side. Each placeholder can be sized and positioned anywhere on the slide.

Helen Bradley

Thursday, July 2nd, 2009

PowerPoint: Custom slide navigation with Action buttons


While many people make their presentations in the presence of an audience and they move from one slide to the next, not all presentations are delivered this way. Many slide shows are viewed by people at their desk and when you are creating presentations for display this way, you can create a custom navigation scheme for the user to use to progress through the show.

To do this, start by choosing View > Master > Slide Master to move to the Slide Master view. In PowerPoint 2007 select the topmost slide in the layout pane. Choose Slideshow > Action buttons and select the Action Button: Back or Previous. Click and drag the Action button on the slide – the Action Settings dialog shows Hyperlink To: Previous Slide – click Ok.

Repeat and this time add the Action Button: Forward or Next. This Action button is hyperlinked by default to the next slide.

Add an Action button that goes to the first slide by choosing Slideshow > Action buttons > Action Button: Home.

To size the Action buttons Control + Click on each of them in turn, right click and choose Format AutoShapes. Select the Size tab and adjust the width and height for all at the one time.

Click the Draw button on the Drawing toolbar, choose Align or Distribute > Distribute Horizontally to create even spacing between each button. Drag the shapes into the footer area so they are clear of the area covered by the slide content. Click Close Master View to return to your presentation.

Any shape can be configured to perform like an Action button. Add the shape to the slide, right click and choose Action Settings from the menu. You can hyperlink the shape to any slide, Office document or web page.

Helen Bradley

Thursday, December 4th, 2008

Yes Master…


I love it when folks call me or email to pose questions. It’s hard when you work with apps every day to remember there are folk out there for whom Word and Excel are a daily challenge and not necessarily in a good way.

Today’s came from my partner, a PowerPoint file with a serious case of bloat. Now, if it were a cow, you’d do something rather disgusting with a knife between the ribs – no it doesn’t kill them, it cures them – lets all the nasty gasses out. In PowerPoint, the solutions are different. One cause in this file was the lack of use of a Slide Master. You see the person (not my partner, she’s better at PP than that) put a wonderful but very large image on all the slides – each one had its own version of the image – instant bloat.

The solution, next time would be to build the file properly and put that image on the background layer of the Slide Master – when you do this it automatically gets added to all slides – if you have 100 slides you still have only one image – instant slimming for your file.

If you need a plain slide – no image, you create two masters – one with an image and one without – use the master you need for the slide you’re creating. Pretty easy stuff and makes a presentation much easier to email – that was the problem here – at 7Mb it was too big for most folk’s email inbox so it bounced right back and something that big doesn’t bounce so much as go splat!

The solution I used on this file was different. I didn’t want to go rebuild someone else’s file at no charge – so I grabbed a great app called PowerPoint Minimizer – it shrinks PP files really really small so folks like me can look good by solving a problem that everyone else has spent hours on in a matter of minutes.

Find PowerPoint Minimizer here for download. Best thing is you can trial it and see how it works.

Helen Bradley