Sunday, July 20th, 2014

Illustrator – Create Curly Shapes

Curly Bracket Style Frames in Illustrator

Learn how to create curly frames in Illustrator – the sort that resemble curly brackets that you use in your word processor.

You will see how to take a bracket or brace character from a font, add it to an Illustrator file and turn it to Outline type so you can work with it. You will then break it apart to get the curly shape, copy it, rotate, reflect and join it to make a curly bracket frame shape.

You can then do with it anything that you can do with a regular shape in Illustrator.

This technique is handy for scrapbookers and graphic designers and it looks great on invitations including wedding invitations. It is a fun and easy to create effect.

Helen Bradley

Tuesday, April 8th, 2014

Create a stepped edge gear shape in Illustrator


Here’s how to easily create a shape with a stepped edge much like a steampunk gear, in Illustrator

I love steampunk and I’ve even been known to create and give away a set of free steampunk brushes here on Projectwoman.com. Today, however I’m talking about  how to make your own steampunk shapes. A reader approached me and kindly drew out the shape he was interested in achieving and this is what he wanted:

Here’s how to do it easily using the Stroke options in Illustrator.

Draw a circle by clicking the Ellipse tool and holding Shift as you draw out a circle. I filled mine with black and added a thick grey stroke around the circle. You can make your stroke and fill the same, I’ve made them different so you can see what is happening.


Click the underlined word Stroke on the Tool Options bar to open the Stroke panel. Set the Cap to Butt Cap, enable the Dashed line checkbox, set the Dash and Gap values to your preferred values.  A good place to start is to set the Dash and Gap to the same (or nearly the same) value as the point size of your stroke. Then alter the Dash value to change the length of the dashes and the Gap value to change the gap amount. Click away when  you are done.


Now, with the shape still selected choose Object > Expand Appearance, then Object > Expand, leave Fill and Stroke checked and click Ok.


Now, with the shape still selected, in the Pathfinder palette (view it by choosing Window > Pathfinder), click the Unite icon (top row, far left). This creates a single shape with the edges you have described.


And that does it – there is your circle with a stepped edge and gear-like shape:


Helen Bradley

Friday, December 20th, 2013

Where to Install Photoshop Brushes on the PC and Mac

Curious or confused about where brushes go? Here’s the info you need and how to do it

It’s pretty easy to find the wrong place to install brushes on the PC and the Mac. The Adobe program file folders are more accessible than the user areas where you really should be installing your brushes. So, to help you out, here is where the brushes should go and a couple of tips for showing the hidden and hard to find folders on the PC and the Mac:

In Mac OS X:

Photoshop CS4
~/Library/Application Support/Adobe/Adobe Photoshop CS4/Presets/Brushes

Photoshop CS5
~/Library/Application Support/Adobe/Adobe Photoshop CS5/Presets/Brushes

Photoshop CS6
~/Library/Application Support/Adobe/Adobe Photoshop CS6/Presets/Brushes

Photoshop CC
~/Library/Application Support/Adobe/Adobe Photoshop CC/Presets/Brushes

The tilde (~ ) indicates your hidden user library.

You can open it this way:

1 Launch Finder
2 Choose Go > Go to Folder
3 Type ~/Library and click Go
4 This opens the ~/Library folder and you can now navigate to the appropriate folder listed above.

On a Windows PC:

Follow these instructions to install the brushes where they can be found by both 32 and 64 bit versions of Photoshop (this is the prefered method of installing downloaded brushes):

Photoshop CS4
C:\Users\<your name>\AppData\Roaming\Adobe\Adobe Photoshop CS4\Presets\Brushes

Photoshop CS5
C:\Users\<your name>\AppData\Roaming\Adobe\Adobe Photoshop CS5\Presets\Brushes

Photoshop CS6
C:\Users\<your name>\AppData\Roaming\Adobe\Adobe Photoshop CS6\Presets\Brushes

Photoshop CC
C:\Users\<your name>\AppData\Roaming\Adobe\Adobe Photoshop CC\Presets\Brushes

To locate your c:\users\<your name>\AppData folder, launch Windows Explorer and type this in the address bar :

%USERPROFILE%\AppData

This automatically opens the AppData folder for you so you can now navigate to the desired folder as detailed above.

Helen Bradley

Friday, August 7th, 2009

Cool Photo Apps #3 Create a life poster


Not all good applications come in big shinny boxes like Photoshop and Photoshop Elements. Many cool photo apps are available on the web and they’re free.

These apps do things that other programs don’t. They are fun to use and practical. In this Cool Photo Apps series I’ll show you some of these.

Popularized by the Mac and its iLife software, life posters are a collage of images arranged in a grid layout. Life posters look best when you use square images. On the PC you can create a life poster using the tools built into Picasa which you can download from http://picasa.google.com.

Here’s how to do it:

Step 1
Start with a new album by selecting File > New Album and give the album a name like Life Poster.

Step 2
Add the photos to the album that you want to use for the life poster. The order in which the images appear in the album are the order in which they will be arranged into your life poster so the first images appear across the top line of the poster and the next series of images will appear through the next row etc.. If you predetermine how big your grid will be, such as 4 x 4 images or 5 x 5 images you can determine which photos will be next to which other photos.

Step 3
When you create the poster, Picasa will automatically crop the images to a square format. If there are images that you would prefer to crop yourself, double click the image to open it and crop it to a square shape before beginning.

Step 4
To create your life poster, right click the album name and choose Select all pictures. Click the Collage button at the bottom of the tray area and choose Picture Grid from the Type list. From the location dropdown list choose a folder in which to save the finished collage image. Check the preview and, if you’re happy with the result, click Create to create the poster.

Step 5
You’ll find the image ready for printing in the folder you selected. Of course, having created your poster, you could convert it to a wall size poster ready for downloading and printing. Here’s a blog post that will show you how to do it: Cool Photo Apps #2 big huge photo prints

Helen Bradley

Monday, May 25th, 2009

Publisher – Making Signs

Whether you need to make an open sign for your business or one to help find a lost pet, the basic premise is the same. You have a message you want to get across to your audience and you need to do this in the best and most effective way.

Signs pose difficulties not always present in other documents – you don’t have a lot of room to get the information across and often the sign will be placed where there is lots of other signage competing for attention.

Before you start
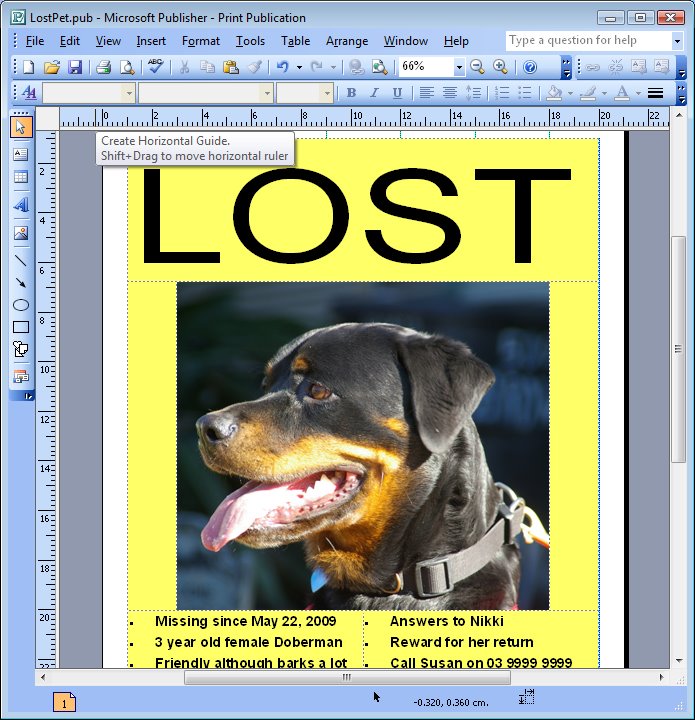
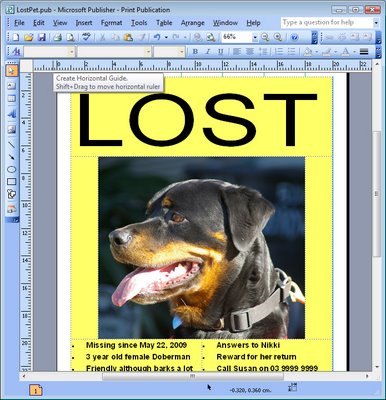
Before you make your sign, determine what you want to say and what information is most important for your audience to see. For example, for an Open sign, the word OPEN is critical and it will work without any other words very well. For a lost pet sign, the word Lost is important as it distinguishes the sign from others about pet grooming services, kennels etc.

Size of letters are important – a sign to be viewed from 3 yards/metres distance will need to have letters around 2.5cm/1 inch in height and you can add an extra 2.5cm/1 inch for every extra 3 metres/yards away your audience will be. The font size equivalent for letters 2.5cm/1 inch in height is around 72 points.

Colour is vital and it’s important that your sign be visible. The best colour combinations are high contrast ones such as black on yellow and white on black. Bad combinations are green on red or red on green – they’re indistinguishable to colour blind people and hard to read for the rest of us.

If you must use low contrast colours such as pale blue on white, add a black border around each letter to distinguish it from its surroundings.

When choosing fonts for your signs, stick to plain readable fonts and steer clear of script and other fancy typefaces. Fonts like Times New Roman and Arial and Verdana are good as they are clean and easy to read.

Capture interest
When you’re using photos to capture attention and to inform, make sure they are high quality and cropped to show the pet clearly. When typing information, group it logically so it’s easy to read. Include the details a person will need to have to contact you.

In the situation where immediate contact is crucial, creating tear off strips across the foot of the page is a good idea – a person can simply tear off the information they need and take it with them. However, make sure you also put the information on the sign as a person will need to have this available if the tear off strips are already removed.

Here’s how to create a sign with tear off strips.


Step 1
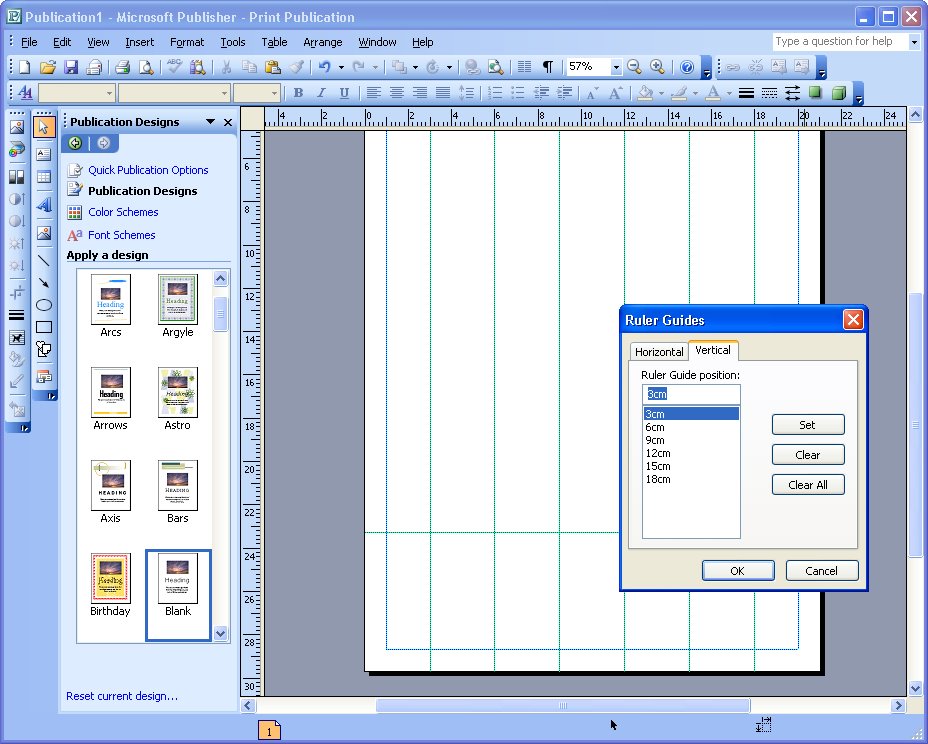
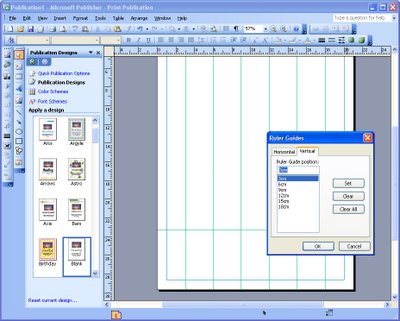
Start a new blank print publication. Choose File, Page Setup and set up full page printing and Letter or A4 paper size depending on the paper you will use. Choose Arrange, Layout Guides and adjust the margins to match your printers margins – the defaults are generally too big. Choose Arrange, Ruler Guides, Format Ruler Guides, vertical and add them at equal intervals across the page. Add one horizontal ruler across the bottom of the page.


Step 2
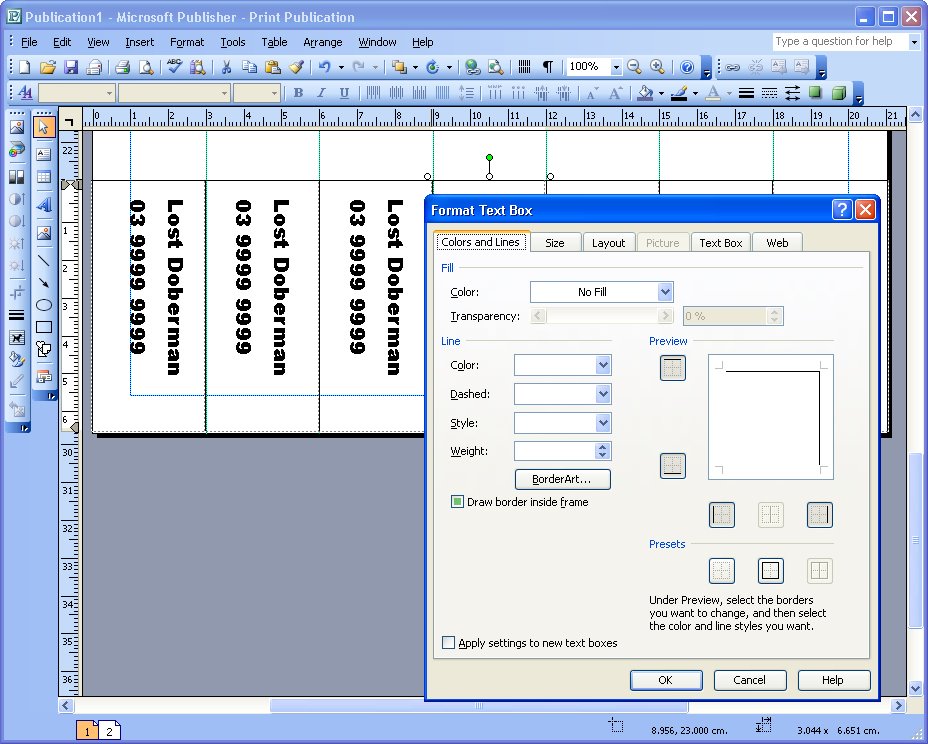
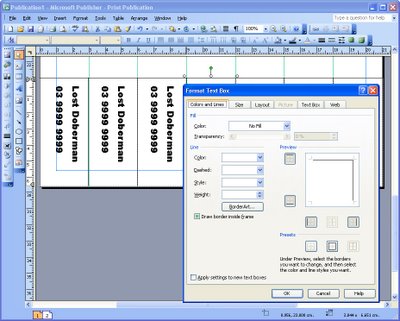
Create a text box and, in it, type the contact details for the tear off strip. Rotate the text by right clicking the shape, choose Format Text box, Text Box tab and check the ‘Rotate text within AutoShape by 90 degrees’ checkbox. Click the Colors and Lines tab and add a line to the top and right of the box. Drag the box into position and size it to fit. Hold Control as you drag a duplicate of the box to make the second box. Continue to complete all the boxes.


Step 3
Complete the rest of your sign by adding a large text message to attract a viewer’s eye. Add other explanatory text – make sure to include your phone number or contact details in the main notice in case all the tear off strips are removed. Focus on the important details someone will need to know. Add an image if desired to help attract attention.

Helen Bradley

Saturday, August 16th, 2008

DIY Visual Basic audio player


I’ve been programming with Basic for years, more than I ever want to admit to.

Recently I’ve been using Visual Basic Express edition, 2005 & 2008. I’ve made a heap of wonderful projects to show how to use the language to do things from creating status bar programs to a sketch application and a music player.

Over the next few months I plan to add some of these projects to my web site. For now, the first of these is up – a simple audio player created in VBE2005.

You can find it here, there is a second part which will be added very soon. It adds more functionality to this player application.

Helen Bradley