

Go from red to green – Find and Delete Big Files in Windows
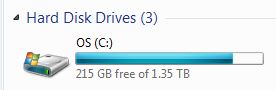
I admit it – My computer is a huge mess of files. Which wouldn’t be so bad except that I have little or no room left on my hard drive – when I check it in my C: drive is red! So, I need to get rid of files by deleting them or moving them to an external backup.
All very well but I’ll get the best ‘bangs for my buck’ if I can find and manage the really big files. But how to do this and please don’t tell me I need to install a new program to do that! Well, luckily in Windows, you don’t.
Here’s how to find your biggest files:
- -Press Windows key + F to launch Windows search dialog.
- -In the top right corner type size:gigantic and press Enter
- -Wait
- -Wait some more

Because I don’t index my drive it takes a little while but the result is an ordered list of your biggest files from biggest to a little less big. You can now delete or move any files you no longer need. BUT beware! If you don’t know what a file is – DON’T delete it! If it is a Windows file you could wind up with a computer that no longer works.
I was really surprised what I found. Heaps and heaps of old backups that I make before I go on holidays each year and which were just sitting there. And a full 22Gb in a single screen recording that I had already edited and rendered and certainly did not need! In just a few minutes my disk is back to a happy green color and, once I’ve finished telling you all about my success, I’m off back to work.
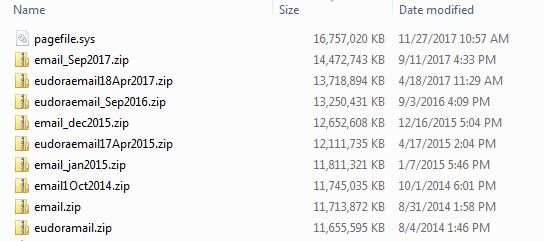
Be careful, if you didn’t create a file, don’t delete it. Files like Pagefile.sys shown here belongs to Windows and SHOULD NOT BE DELETED.


