Thursday, November 28th, 2013
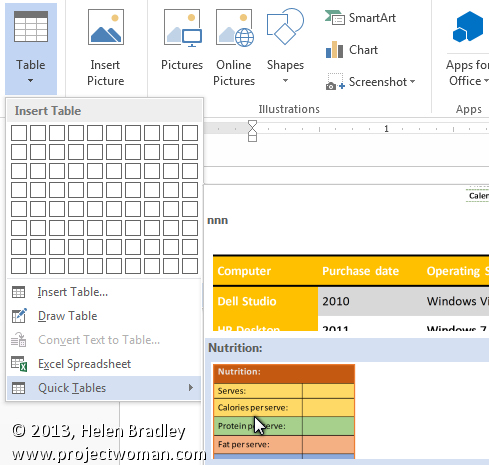
Learn to insert a table in a Word document with a single click
When you need to repeatedly create the same type of table in a Word document you can do so using the new Word Quick Part feature.
This technique works well when you use the same table layout repeatedly. Your inserted table will be the same size, have the same number of columns and rows and contain any preset formatting that it had when you created it as a Quick Part entry. Once created, you can insert it quickly whenever you need it.
To do this:
- Create a new table with the number of rows and columns you want all your tables to have.
- Include any text in the table that needs to always be in this type of table – if there is none, leave the cells blank.
- Format the cells in the way you wan them to be formatted every time – including text formats and cell background colors and borders.
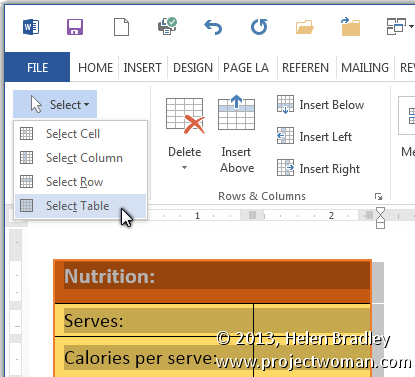
When you are done, select the table by clicking in it and choose Table Tools > Layout > Select > Select Table.
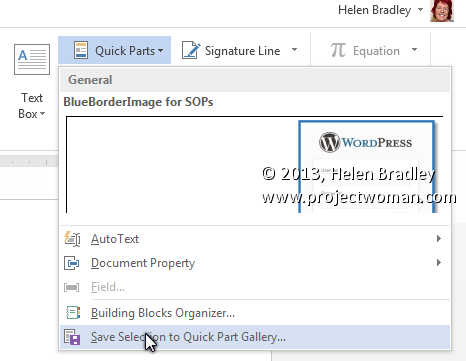
Choose Insert > Quick Parts > AutoText > Save Selection to AutoText Gallery.
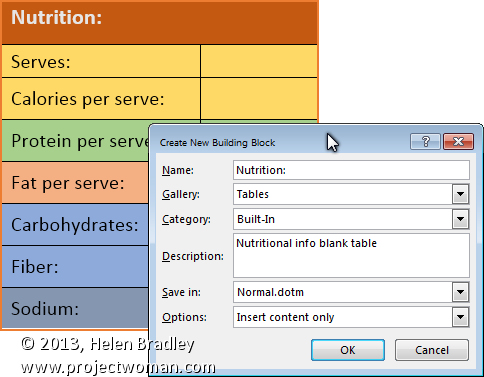
In the Create New Building block dialog set the Gallery to Tables and type a description of the table and click Ok.
In future, to create a table to these exact specifications choose Insert > Tables > Quick Tables, locate the table in the list and click it to insert it into the document.

This feature is the successor to the AutoText feature in earlier versions of Word. It looks a little more cumbersome but it is more easily discovered so you don’t have to remember where the table was saved as it appears automatically on the Insert Table menu.
Helen Bradley
Labels: Auto Text, AutoText., Building Blocks, gallery, insert table, Microsoft Word, table, Word 2007, Word 2010, Word 2013
Categories:office
posted by Helen Bradley @ 9:56 amNo Comments links to this post
Wednesday, November 13th, 2013
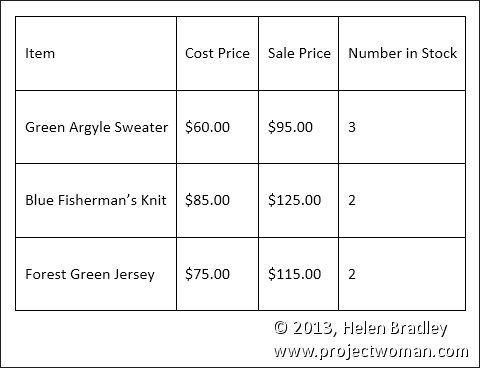
Learn to quickly add extra spacing above and below the contents of a Word table cell
When you enter text in a Word 2013 table you may want more space above and below your text than appears by default.
While you can make the table cells larger and vertically centre the text in the cells this is a cumbersome solution and there is better and faster way.
To add extra spacing you can change the table’s cell spacing values.
To do this, first select the table, right click choose Table Properties.
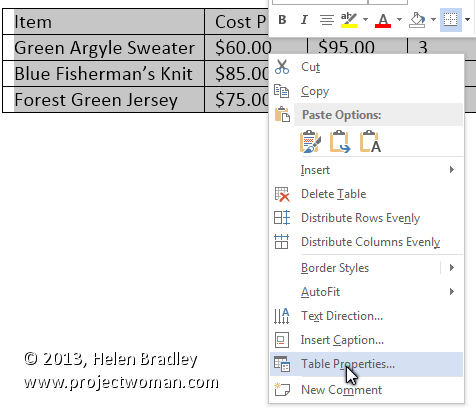
Click the Table tab and click Options.
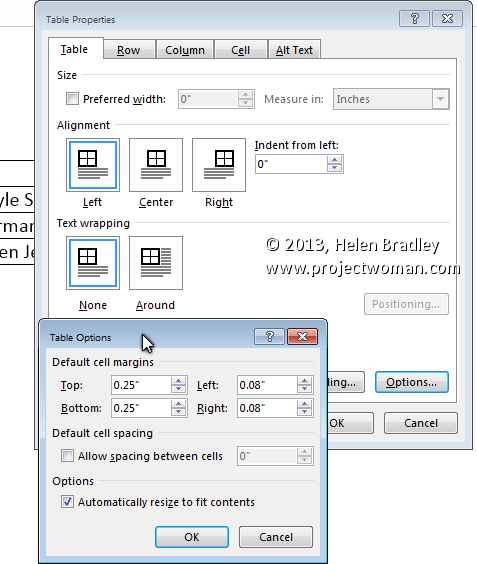
Here you can set the Top, Bottom, Left and Right cell margins for all cells in the table. Set the Top and Bottom values to 0.25″ to add a little extra space above and below the text in the cells.
Helen Bradley
Labels: cell spacing, space, table, vertical and horizontal space, Word 2007, Word 2010, Word 2013
Categories:Uncategorized
posted by Helen Bradley @ 12:11 pm1 Comment links to this post
Thursday, November 7th, 2013
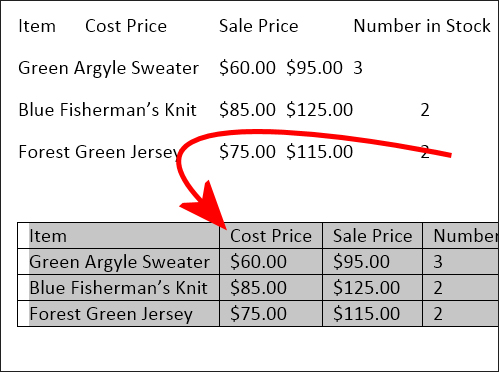
Quickly turn text into a Microsoft Word table
It is possible to convert text from a Word document into a table.
However, to do so requires the text to be correctly laid out – if it is not, it is worth a few minutes work to reformat the text so it can be easily converted to a table.
To convert the text each column’s content needs to be separated by a single tab and you need to have a paragraph marker at the end of each line. To check your text is correctly formatted, click the Home tab and click the Show/Hide¶ button to see the tab marks in the document (they are small right pointing arrows).
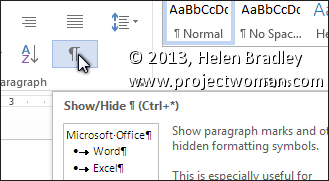
Make sure there is only one tab marker between each item in the list. If you don’t have data for a particular column add two tab marks to indicate that one column is empty.
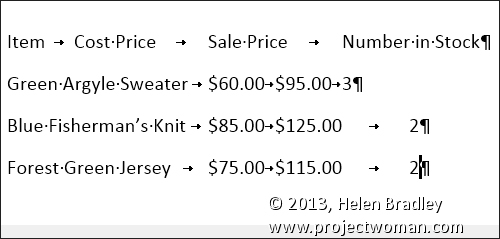
Click the Show/Hide¶ button again when you are done.
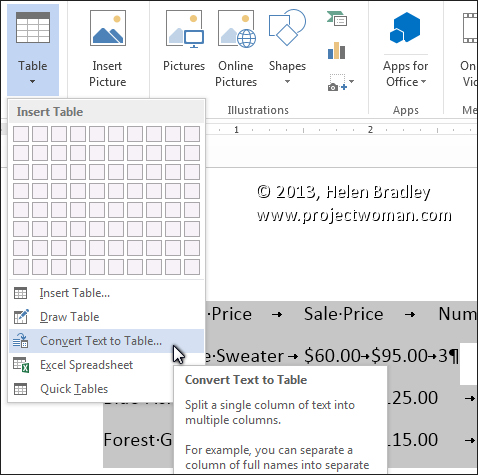
Select the list and choose Insert > Table > Convert Text To Table.
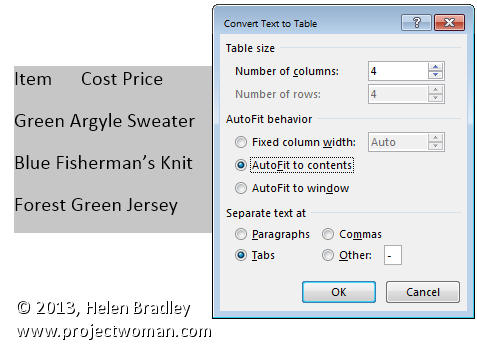
Word should automatically suggest the correct number of columns. From the Separate text at options select Tabs, set the AutoFit behavior to AutoFit to contents if the items are short like ours are and click Ok.
The text will be automatically placed in a new table ready for you to continue to work on it.

Helen Bradley
Labels: Autofit, convert text to table, Microsoft Word 2013, tabs, Word 2007, Word 2010
Categories:Uncategorized
posted by Helen Bradley @ 11:42 amNo Comments links to this post
Thursday, April 12th, 2012
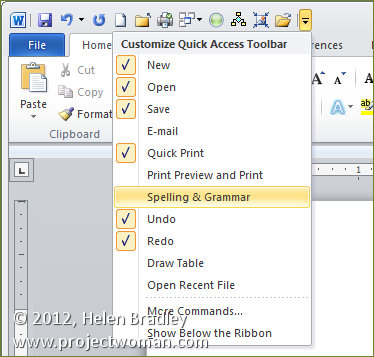
The Quick Access Toolbar or QAT runs across the top left edge of the Word 2007 and 2010 window. It also appears in other ribbon compatible programs like Excel 2007 & 2010, PowerPoint 2007 & 2010.
The QAT is a handy place to put icons that you use all the time. It can be customized through this Quick Access Toolbar option.
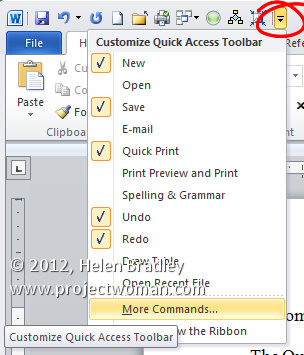
Click this icon to show the QAT editing options. Click Show Below the Ribbon to place the Quick Access Toolbar below the ribbon – I think most people will find its current position acceptable but if you want to move it that’s how to place it elsewhere.
Choose More Commands to add more commands to the Ribbon. From the Choose Commands From list you can select commands to view. These include Popular Commands, Commands Not In The Ribbon, in other words commands that are available in Microsoft Word but for which you have no other easy way of accessing, All Commands or Macros. The remainder of the dialog gives you access to the individual tabs in Word so that you can get access to icons listed there.
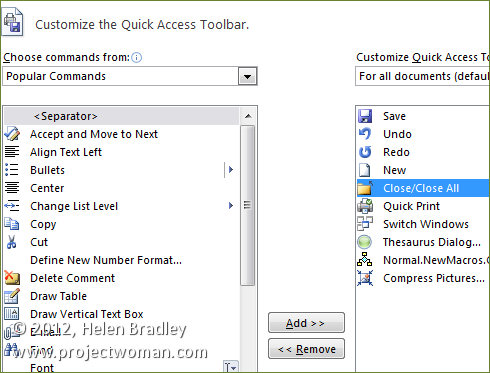
Some options you may want to add to the Quick Access Toolbar include the Close/Close All Button, Quick Print and I like to add Switch Windows which is available from the All Commands list. Other tools that you use frequently can be added to the Quick Access Toolbar making them instantly accessible.
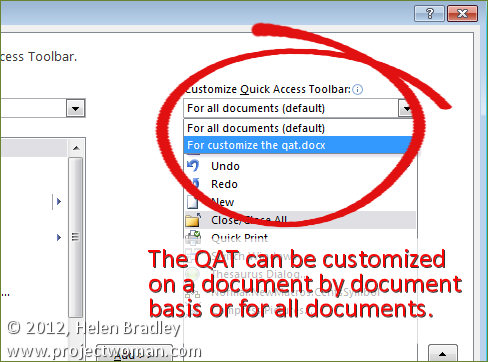
You should note that you can set the features for all documents or for just an individual document so that you can, for example, set a different toolbar for a specific document. When you choose this option the specific document will get all the tools on the standard quick access toolbar plus those that you’ve added to just its toolbar.
Helen Bradley
Labels: Excel 2007, Excel 2010, Helen Bradley, mini toolbar, OneNote 2010, Outlook 2010, PowerPoint 2007, PowerPoint 2010, Qat, quick access toolbar, Ribbon, Word 2007, Word 2010
Categories:Uncategorized
posted by Helen Bradley @ 8:00 am1 Comment links to this post
Thursday, November 17th, 2011
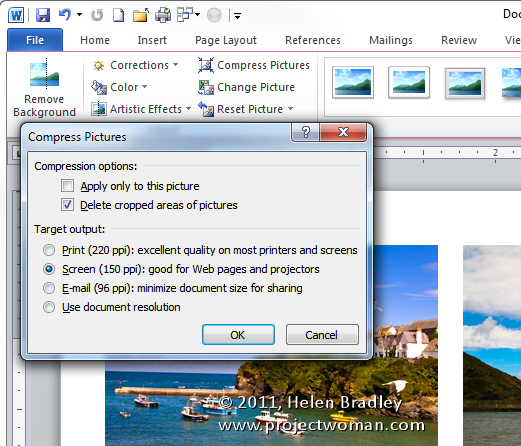
A reader just asked if they added 50 images to a Word file would that blow out the file size when they send it to their colleagues. Answer: Yep! big time.
Most specially if you use your your beaut iPhone to capture the images, or a good compact camera or if you just insert big pictures. You see, unless you do something those big pictures will be inserted in the file and included in it when you save it – you can end up with a monster Word file (think 5Mb x 50!)
The solution to the problem is to compress the images. To compress all the images in your Word 2010/2007 file so that they take less room, click on any image and choose Picture Tools > Format tab. Locate the Compress Pictures button and deselect Apply only to this Picture so all images will be compressed.
If there is an Options button click it to see the sizing options (this appears in Word 2007 but not in Word 2010). Then choose the Target output – typically Screen or Print are good options as they will view well and print just fine. Check the Delete Cropped Areas of Pictures checkbox so cropped data won’t be saved. Click Ok. Then save the document.
This compression feature will reduce your file to a better size for sharing without compromising the quality of the document. And the changes affect only the images in the document not the originals on your disk.
Helen Bradley
Labels: compress images, Picture, reduce file size, reduce size of files, shrink, squash, Word 2003, Word 2007, Word 2010
Categories:Uncategorized
posted by Helen Bradley @ 9:59 amNo Comments links to this post
Thursday, October 6th, 2011
Hmmm … I am fussy, I want my cake and I want to eat it too!
I want to have a clean task bar so I don’t want to see lots of files lined up there so I love Windows 7 and its clean task bar. But I find the new panel that opens when I right click an icon on the task bar to be just a little bit too free with information. I really want it to show me a list of currently open files – not everything that I have open or have recently opened. Actually I could live with the information it gives me if I didn’t have to actually use it to switch windows.
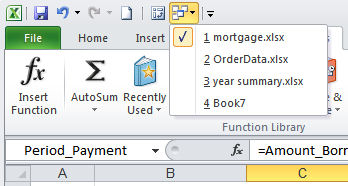
So, problem is… how can I switch between open documents in Excel or Word, for example, without having to use the Windows task bar? Solution is to use the Switch Windows button. I add it to the QAT (Quick Access Toolbar) and it totally makes sense to me.
In Excel or Word, click the Customize Quick Access Toolbar button and choose More Commands. From the list which currently shows Popular Commands choose All Commands and scroll to find the Switch Windows button and click Add.
Now it is on the QAT and it will show you all your open files and you can use it to switch between them by just clicking on the one to go to. Repeat the process for both Excel and Word and you’ll be happy – at least until something else bugs you!
Helen Bradley
Labels: Excel 2007, Excel 2010, filenames on task bar, Switch between open documents, switch between open worksheets, Windows 7, Word 2007, Word 2010, workbooks
Categories:Uncategorized
posted by Helen Bradley @ 8:58 am3 Comments links to this post
Tuesday, September 27th, 2011
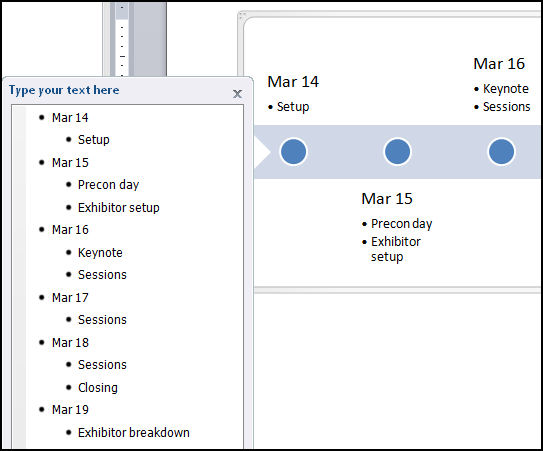
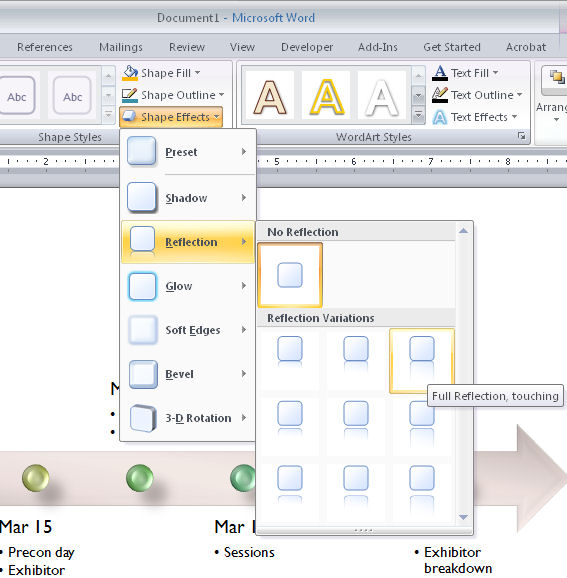
The new SmartArt feature in Word 2007 and 2010 helps you create timelines very easily:
Step 1
Choose Insert -> SmartArt -> Process and select one of the process options such as Basic Timeline and click Ok. Type the text into the textboxes in the SmartArt object. Alternately, click the arrows at the far left of the object and add text via the dialog.
Step 2
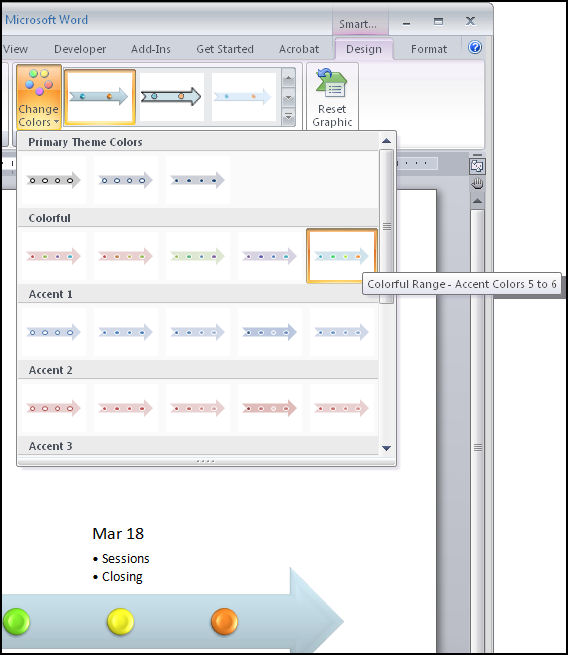
To format the timeline SmartArt, select the object and choose Format -> Design on the Ribbon and then select one of the SmartArt Styles. Click Change Colors to alter the colours used in your SmartArt object.
Step 3
From the Shape Effects list you can customise an effect such as reflection or shadow for the art. In addition, as the look of a SmartArt object is controlled by the document theme you can choose Page Layout -> Themes and select an alternate theme for your document.
Helen Bradley
Labels: how to, Microsoft Word, smart art, SmartArt, timeline, Tutorial, Word 2007, Word 2010
Categories:Uncategorized
posted by Helen Bradley @ 8:01 am2 Comments links to this post
Wednesday, June 22nd, 2011
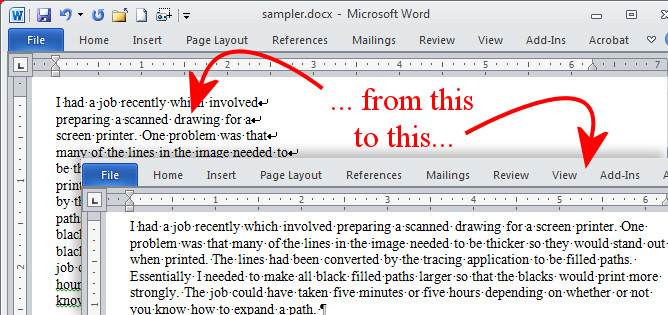
One of my readers – Joe – recently asked for some help regarding removing spaces in Word. He thought that the problem with the text was additional spaces, but when I looked into it, it appears that something else is causing the issue.
Here is a piece of sample text and you can see that it is a series of short lines which my reader wants to make into one continuous paragraph.
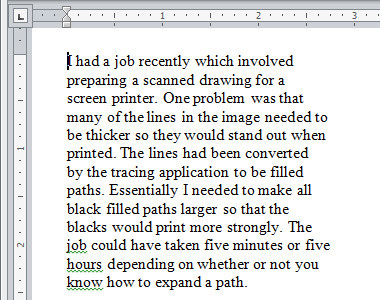
To see what is causing him issues click the Show/Hide¶ button on the Home tab of the Word Ribbon.
At the end of each line you will find either a Paragraph Marker or a Manual Line Break – each is different and you need to work out which you have at the end of each line. Also determine if there is a space before each of the markers. If there is not a space you will need to add it yourself. Here is a mix of both markers but no spaces:
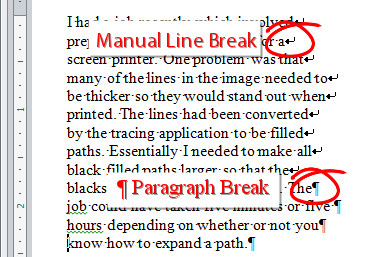
To make the lines flow into each other, from the Home tab on the Ribbon click the Replace option. If you need to replace Paragraph Markers, enter ^p into the Find What box. If you need to replace a Manual Line Break then enter ^l (lower case L) into the Find What box.
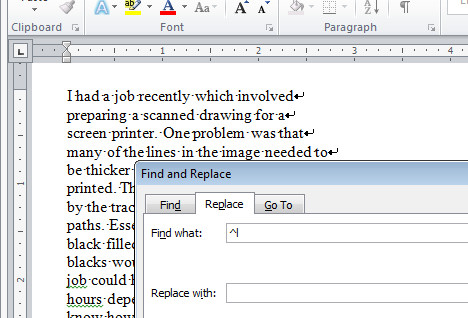
If you need to add a space, click in the Replace With box and press the Spacebar once – if you don’t need to add a space, then leave the Replace With box empty.
Click Find Next and then click Replace. Check to make sure the replacement is working as expected. If it is, click Replace All and lines will be joined together into a single paragraph of text.
Typically you only have to replace one type of marker and not both, but if you have both, then you will need to find and replace each individually.
When you’re done click Show/Hide¶ again to hide the extra characters from view.
Helen Bradley
Labels: find and replace, remove spaces, Word 2003, Word 2007, Word 2010
Categories:Uncategorized
posted by Helen Bradley @ 7:45 pm5 Comments links to this post
Tuesday, April 26th, 2011
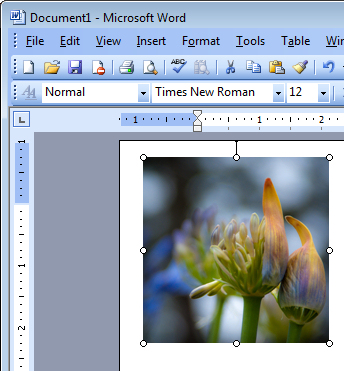
I was at dinner the other night and talking computers with some friends. We were joking about Excel not being a word processor when the subject of images came up. And Lo! and behold someone suggested that Excel was a much better option to use than Word so far as images are concerned.
This has been a particular issue for me for years. You see Word inserts all images, by default as in line with text which is the option you’d probably never want to use.
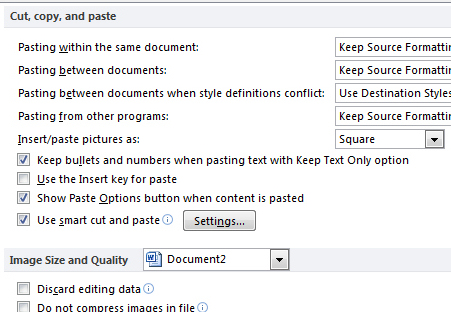
I promised my friends to show them how to fix Word – permanently – so images get inserted as you’d want them to be – with a square wrap around. It’s a good starting point and my recommended default for Word. You can change the wrapping if you want but 99.9% of the time this is the setting you’ll want to use.
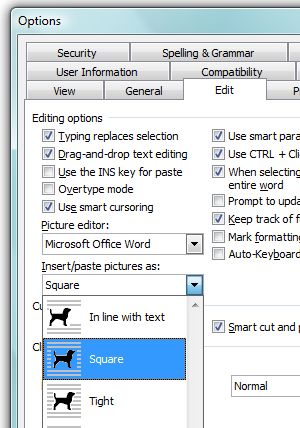
In Word 2003, choose Tools > Options > Edit tab and from the Insert/Paste Pictures as dropdown list choose Square and click Ok.
In Word 2007 choose File > Word Options > Advanced tab and locate the Cut, Copy and Paste group. From the Insert/Paste Pictures as dropdown list choose Square and click Ok.
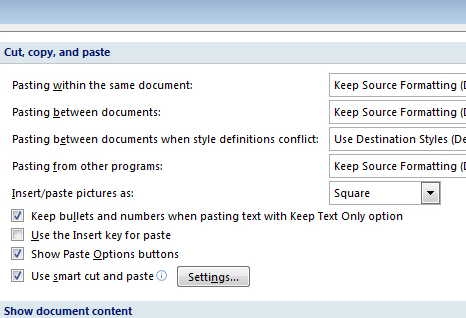
In Word 2010 choose File > Options > Advanced tab and locate the Cut, Copy and Paste group. From the Insert/Paste Pictures as dropdown list choose Square and click Ok.
Now you know how to fix it … spread the love and tell a friend!
Helen Bradley
Labels: image, insert, square, Word 2003, Word 2007, Word 2010
Categories:Uncategorized
posted by Helen Bradley @ 11:40 am3 Comments links to this post
Wednesday, February 2nd, 2011
I love working with Microsoft apps and finding cool things to do with them. I hate it when Microsoft messes with my head.
While I love Microsoft Word 2010, Word 2007 was never my favorite application so I didn’t use it as my day to day tool preferring to stick with Word 2003 which really was a great program.
Now that Word 2010 is here, I have bitten the bullet and I’m turning all my production work over to Word 2010 – it is just such a wonderful program and a fitting successor to Word 2003.
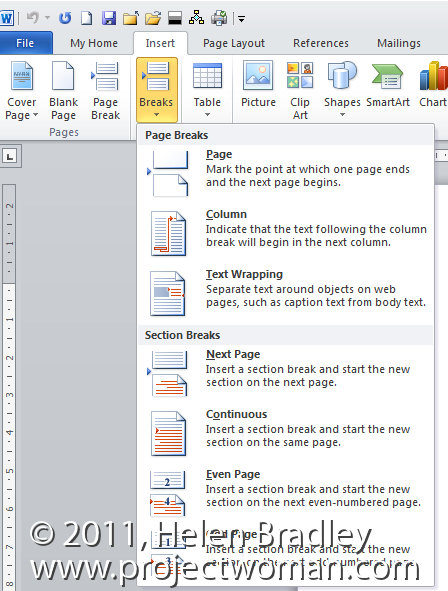
But, wonderful as it is, it has some annoyances. One is when you come to insert a section break into a document. For years I’ve used the Insert menu in Word 2003 to add Breaks of all types to my documents. In Word 2007, 2010 – no go! You can insert a cover page, a blank page or a page break and any other number of smart document objects from the Insert tab – but you can’t insert a section break.
Instead the Breaks feature has been moved to the Page Layout tab – select it and then choose Breaks. Why it wasn’t placed on the Insert tab along with page breaks or why page breaks was added to the Insert tab and also duplicated in the Page Layout tab, I don’t know, but there it is.
So, when you need to add a section break to a Microsoft Word 2007 or 2010 document use the Page Layout tab, select Breaks and then, for example, Next page to create a section break that immediately opens a new page in the document.
You may not like it, but if you’re using Word 2007 you have to accept it’s Microsoft’s world and we just get to live in it.
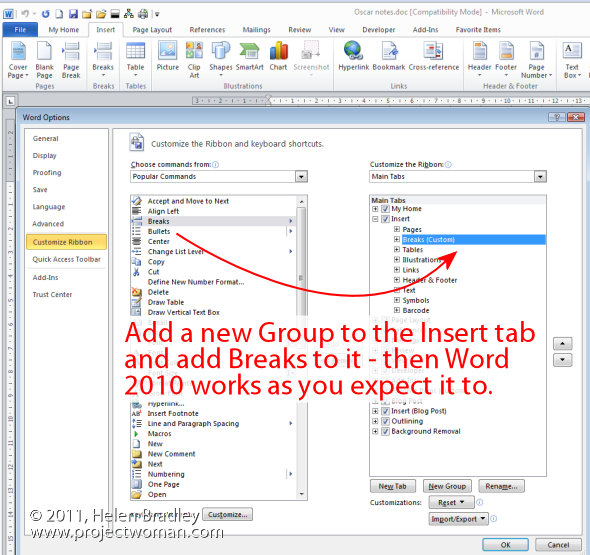
If you’re using Word 2010 – Yeah! life is good. Thanks to the new customizable ribbon you can add your own Group to the Insert tab, move it up so it’s alongside the built-in Pages group then add the Breaks command to it – it’s a great solution and quick and easy to do and it makes such good sense.
Helen Bradley
Labels: customizable ribbon, customize the ribbon, insert page break, Page Layout, section break, Word 2007, Word 2010
Categories:Uncategorized
posted by Helen Bradley @ 11:50 am3 Comments links to this post


