Articles | Photoshop blog | Photography blog | about me | e-mail

Helen Bradley - MS Office Tips, Tricks and Tutorials

I'm a lifestyle journalist and I've been writing about office productivity software for a long time. Here you'll find handy hints, tips, tricks, techniques and tutorials on using software as diverse as Excel, Word, PowerPoint, Outlook, Access and Publisher from Microsoft and other applications that I love. My publishing credits include PC Magazine, Windows XP mag, CNet, PC User mag, SmallbusinessComputing.com, Winplanet and Sydney Morning Herald.

Tuesday, October 30, 2007

Making Columns in Word

There are lots of ways to create text in columns in Word but the easiest is to type the text (or at least some of it) and select it or position the cursor where the columns should begin. Then choose Format, Columns and select the number and spacing of columns.

From the Apply To dropdown list choose what to apply the columns to. If you have text selected, you'll typically select Selected text. If you haven't selected text you can apply them to the Whole Document or This Point Forward. Using This Point Forward lets you create a heading on the page with the text in columns under it.

Labels: , ,

Add to Technorati Favorites

Thursday, October 25, 2007

Plotting little and big data


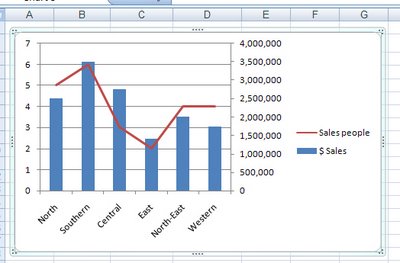
Disaster will strike your Excel charts if you try to plot very large data values and very small values on the one chart. You'll see the big values but the little ones will blend into the x-axis of the chart so you won't even see them.

To include both sets of data on the one chart, add a second axis and plot the smaller values against it. Now you'll be able to see them alongside the very large values.

To add your second axis, select the chart, select the series you can't see (click on one you can see and use the tab key to move until you have it selected). Right click and choose Format Data Series. Select Series Options, Secondary Y Axis. With the data series that should be plotted against the secondary axis still selected, right click and choose Change Series Chart Type and select a different chart type such as Line.

Labels: , ,

Add to Technorati Favorites

Wednesday, October 24, 2007

Reduce the size of your PowerPoint 2007 images


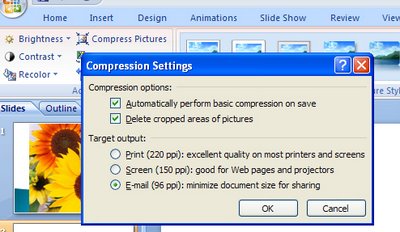
When you're emailing PowerPoint presentations or displaying them on a computer screen you don't need or want overly large images. To avoid this, compress the images in your presentation.

Click any picture in your presentation and then, from the Ribbon choose the Picture tools tab and then the Format tab. Locate the Adjust group and click the Compress Pictures button. Disable the Apply to selected pictures only checkbox (you want to resize all of them), and click Options and select 96dpi (the smallest resolution on offer) and click Ok and Ok again to compress them.

Labels: , ,

Add to Technorati Favorites

Tuesday, October 23, 2007

Burn baby burn - troubleshooting burning audio CDs

If you've never had problems burning CDs, please feel free to continue surfing past this blog entry and go somewhere else. Also buy a lottery ticket because you are a very lucky person.

To those still here and struggling, here's a link to a list of troubleshooting tips that might help solve the problems. While it says Apple and Mac all the way through the list, the solutions are equally as valid for working on the PC.

The biggest gottchas I have found is buying the wrong disk type for your drive and trying to burn too fast. I crank down my writing speed to a slow crawl. It takes a lot longer but I have a lot fewer drink coasters around the house. Also, if you're prompted, always specify Audio CD for playing in an audio player if that's what you want to do with the disk. And, if closing the disk is an option - select it - most players won't play disks that aren't closed.

I've also had problems with Vista burning a DVD of photos which is a data DVD. I haven't solved the problem in its entirety but I have found Windows Media Player is the best burning tool to use for the task. Simply create a burnlist of photos to burn to the disk. You will have to close the DVD if you plan to read it in a Windows XP machine but it does work.

Labels:

Add to Technorati Favorites

Sunday, October 21, 2007

Image Autoentry - Word 2003

If there is an image that you typically use in a document such as your company logo you can create it so that it can be automatically inserted into your documents.

To start, first place the image into the document and size it and format it to suit your needs - this will include setting its Text Wrapping properties.

Now select the image and choose Insert > AutoText > New and type a descriptive word to describe the image such as logo. Click Ok.

In future, type the word logo and press F3 and the image will automatically appear in the document. This saves you from having to insert it and format it manually each time you need it. It's a big time saver.

Labels: , ,

Add to Technorati Favorites

Friday, October 19, 2007

Word 2007 - Tracking Moving changes

The new Office 2007 is packed full of great features and I'm finding that the more I work with it the more I like it.

Take Tracked Changes, for example. The Reviewing pane can now be placed vertically along the edge of the page (or horizontally, if you insist). I just find the vertical arrangement so much easier to work with.

Also Word now tracks moved text! Yes, you can grab a sentence or paragraph or more and move it from A to B in your document and Word knows you've done it and marks it with double strikethrough (where it has been removed from) and double underlining in the position it has been moved to. Neat stuff!

If you later Reject the move step Word checks to see if the moved text has been altered, and if it has it tells you this and asks you what version of the text you want to undo to. It's smart and a much better solution than marking the text as being cut and inserted.

To use the feature, make sure you're in Word 2007 mode and not Compatibility mode where you're working on an older 2003 format document.

Labels: , , ,

Add to Technorati Favorites

Wednesday, October 17, 2007

Keep Outlook trim, taught and terrific!

To ensure your Outlook .pst file stays trim and doesn’t get bloated with old and outdated emails, configure its AutoArchive options so that older messages are automatically removed or filed away. To do this, right click the folder to archive (such as your InBox) and choose Properties, AutoArchive tab and select the Archive this folder using these settings option. Now enable the Clean out items older than and set the appropriate time period. Only select to Permanently delete old items if you really don’t want them saved. Enable, instead, Move old items to default archive folder and Click Apply.

If you haven’t got AutoArchive configured to run periodically, you’ll get a warning to this effect and Outlook will set it to 14 days by default. You can change the timing by choosing Tools, Options, Other, AutoArchive. Now, every 14 days (or when you specify), AutoArchive will run and the old items will be moved to your archive folder. Your archive file will appear in your folders list so you can drag and drop messages from it back into your regular Outlook folder if there are archived messages you need to refer to.

The reason you need to do this is two-fold. One is that Outlook stores everything in its PST file - emails, contacts, appointments and worst of all - email attachments. So the file can get very large indeed. At or near 2GB in size the file becomes unstable and you risk losing everything - permanently - can we just say "Don't put all your eggs in one basket"? Archive now - before your computer does the deed for you - permanently and with little or no chance of recovery.

Labels: ,

Add to Technorati Favorites

Tuesday, October 16, 2007

OOPS! I didn't mean to send THAT!

If you too often send an email message and then think "Oh no! I forgot to say xyz" or "Oops, I shouldn't have been that blunt", then build a delay into Outlook so the messages aren't sent right away. It just might save you having to write a second email or save you grovelling to your boss!

To do this use a rule to delay sending emails. Choose Tools, Rules and Alerts and click on New Rule. Choose the Start from blank rule option and then select Check messages after sending and click Next. Click Next as all messages will be delayed (but you can set an exception shortly) and click Next and Ok again to confirm the rule will apply to all sent messages. Choose Defer delivery by a number of minutes and set this to the number to wait – say 2 minutes and click Next.

Now, set an exception for messages that just have to be sent immediately, for example, select Except if it is marked as importance and set this to High. Click Next, type a name for the rule such as Delayed Send, enable the Turn on this rule checkbox and click Finish.

Now, whenever you click Send, your messages will be held for 2 minutes before being sent except if you make them High importance.

No more grovelling!

Labels: ,

Add to Technorati Favorites

Thursday, October 11, 2007

Set Outlook as your default email program


It's handy to be able to click an email address on a web page and have your email software launch automatically with a new message ready for you to type. It's a nuisance if you do this and the wrong email software opens.

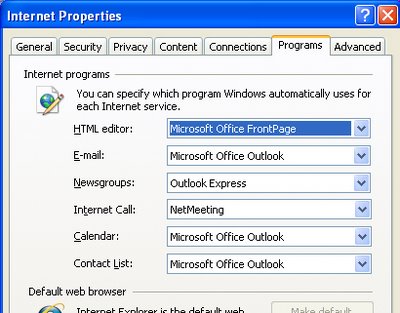
It is, however, quite easy to set any email software to be the default program to use in these circumstances. To do this, choose Start, Control Panel, and then click Internet Options. Click the Programs tab and, from the Email list, select the email program to use as the default. Click Ok and you're done.

Add to Technorati Favorites

Tuesday, October 9, 2007

Quickie calculations in Word 2003

Older versions of Word included a Calculate option on the Tools menu which let you make quick calculations.

If you're using Word 2003 you can add the tool back by right clicking any toolbar and choose Customize. Select the Commands tab and, from the Categories list choose All Commands and scroll the Commands list to locate ToolsCalculate. Drag this onto the Tools menu and hold your mouse there until the menu opens and then drop the option into place. If desired, right click the new entry and remove the word Tools from its name so it simply reads Calculate.

Now test your new menu item by typing some values eg 24, 25 & 26 and select them. Choose Tools, Calculate and the status bar will display "The result of the calculation is 75". If you later click Control + V you can paste the result of the calculation (75) into your document.

To sum a column of numbers, hold Alt as you drag over the column with your mouse then choose Tools, Calculate. It also works inside tables and you can type a more detailed calculations such as 25*25 and it will calculate the result for you (answer: 625)

So, put away the calculator and let Word to the work for you.

Labels: ,

Add to Technorati Favorites

Friday, October 5, 2007

Toolbar buttons..

Last post I showed you how you can compress the font in a document to give it a classier look. Today, now that you have the font compression value sorted out, I'll show you how to make a toolbar button for it so you can apply it with a single click.

Right click any toolbar in Word 2003 or earlier and choose Customize then select the Commands tab and, from the Categories list choose All Commands. Scroll to locate the Condensed: item and click it. At the foot of the dialog a box appears from which you can select a point size to adjust to, for example, if you use 0.3 pt the type that. Now drag the Condensed option onto the toolbar and close the Customize dialog.

In future to condense your type, select it and click your toolbar button.

Labels: , ,

Add to Technorati Favorites

Wednesday, October 3, 2007

Smaller and better looking fonts

When you're writing newsletters, company reports and other documents in Word you may find that they look more professional if you condense your font slightly. Even a reduction as small as .3 points changes the look of the font significantly and makes it look, well just a little more classy.

To do this, select the text to alter and choose Format, Font, Character Spacing tab and set the Spacing to Condensed and the By value to, say, .3 points.

If it's too tight, loosen it up a bit, if not, try a little more compression until you get something you like.

Labels: , ,

Add to Technorati Favorites

Monday, October 1, 2007

Take a snap - Excel 2003 and earlier.


Need a copy of part of an Excel worksheet? Too easy!

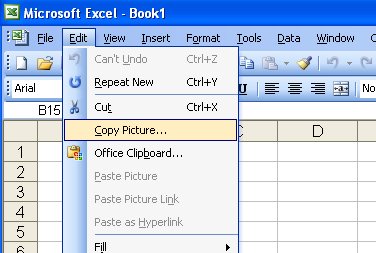
You can take a picture of a range in Excel and, for example, insert into Word as a picture or place it an image in another area on a workbook. To do this, first select the area to snap and hold Shift as you open the Edit menu. Choose Copy Picture, select As shown on screen or As shown when printed and click Ok.

Now go ahead and paste the image wherever you desire. This Shift + Edit menu option also works for copying a clip art or other type of image inserted into an Excel workbook.

Labels: , ,

Add to Technorati Favorites