Articles | Photoshop blog | Photography blog | about me | e-mail

Helen Bradley - MS Office Tips, Tricks and Tutorials

I'm a lifestyle journalist and I've been writing about office productivity software for a long time. Here you'll find handy hints, tips, tricks, techniques and tutorials on using software as diverse as Excel, Word, PowerPoint, Outlook, Access and Publisher from Microsoft and other applications that I love. My publishing credits include PC Magazine, Windows XP mag, CNet, PC User mag, SmallbusinessComputing.com, Winplanet and Sydney Morning Herald.

Friday, November 28, 2008

Getting Vista's Windows Media Player to play videos

Vista's Windows Media Player will play audio and video files, only if it has the codecs for them. Codecs are like translation programs, without the codecs you get exactly zip, nada, zero on the screen. Sucks huh?

Unfortunately not all the codecs you need are included in Vista so you might try to play a video and find you have no visuals although the sound might play just fine, or vice versa. The solution is to download the codecs you need to play the range of media files you're likely to encounter.

To locate the codecs you need, visit softpedia.com and search for the Vista Codec package. At the time of writing the latest version is 5.0.3 and it can be found here.

Download it and install it and you should be right to play just about any media file around.

This is the file which Microsoft should have provided. These codecs should be supplied with the player, after all, what use is a DVD or audio player if it doesn't play disks? If you buy a physical DVD player you don't expect to have to go out and buy something extra to make the player and your disks compatible. Just because the player is software doesn't excuse the lack of compatibility.

So, yes, it sucks you have to go find and download this file, but kudos to the guy who did all the work so we don't have to.

Labels: , , ,

Add to Technorati Favorites

Friday, November 21, 2008

Smarter Photoshop Crop


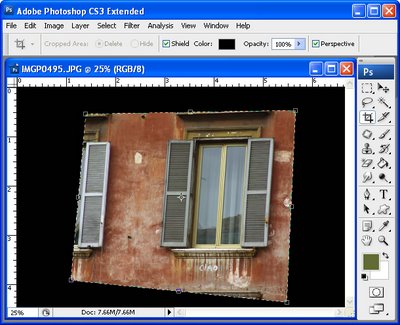
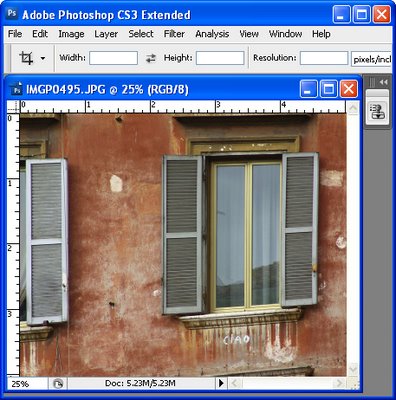
Before (above), After (below)


There is more to Photoshop's crop tool than meets the eye! Read on to learn everything you didn't know about using it:

Shield color and opacity
When you click the crop tool and drag the crop marquee over an image in Photoshop you will see a shield around the area of the image that will be removed when you commit the change. You can change this shield color from the Tool Options bar to make it any color you want. For example, click in the color selector and make it white, gray, black. You can also Adjust the opacity of this shield to make it, for example, 100% so it totally masks out the unwanted area of the image. This lets you see more clearly the portion of the image you have selected.

Rotate your crop
Rotate the crop marquee by dragging on one of its handles to change the angle of the rectangle and make an angled crop from your image. This way you can make a diagonal crop without having to first rotate the image.

Perspective crop
This option is way too cool! Click the Perspective checkbox on the tool options bar and you can crop an image in perspective. So, drag the corner handles into any four sided shape you like - each corner operates independently of the others when this option is enabled. Then click the Commit button and the unwanted part of the image will be discarded and what remains will be reshaped and deliciously distorted to a rectangle.

You can use this feature to fix keystone perspective problems with images such as tall buildings (which tend to be wider at the base and narrower at the top) or you can use it for creative purposes.

So, next time you select the Crop tool, check out these features and put them to work on your images.

Labels: , ,

Add to Technorati Favorites

Find Office Documents faster


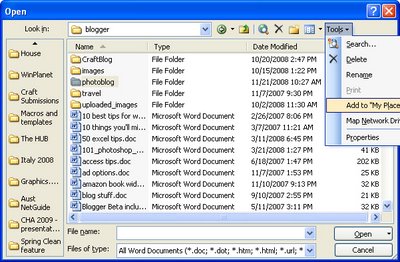
The My Places feature in Microsoft Word and other Office applications makes it easy for you to find documents quickly by adding the folder that they're stored inside as a link on the left hand bar of the File Open and File Save dialogs.

So, when you’re working on a project even a short-term one, navigate using the File Open or File Save dialog to the folder that the files for the project will be stored in. With the folder selected (don’t open the folder), in Office 2003 and earlier click the Tools button on the toolbar and choose Add to My Places. In Office 2007, right-click the left sidebar and click Add folder name.

This adds the folder at the bottom of the list in the left sidebar making it easy for you to navigate to that folder by simply clicking its name in the list.

If you’re using a combination of Office 2003 and Office 2007 you will notice that the left hand panel of each of the File Open and File Save dialogs are different. However, if you're working in Word 2003, for example, the same sidebar appears in Excel 2003.

If you have lots of links in the sidebar - I have around 20 - right-click the panel and select Small Icons to make the links smaller so that everything fits better.

Labels: , ,

Add to Technorati Favorites

Monday, November 17, 2008

10 ways to Go Green with Microsoft Office

Saving paper is easy with Microsoft Office. Here are some cool ways you can save paper when printing (other than the very obvious option to not print in the first place!)

1 Use Shrink to Fit in Word's Print Preview to size your document down so it takes one less page.

2 Use the options in Excel's File > Page Setup dialog to select the number of pages wide and tall to print onto - the document will be scaled down to fit.

3 Use Print Preview - every time - before you print. Check your document thoroughly to make sure there aren't errors in layout or design before you waste paper finding out!

4 Print in duplex (double sided) where possible and if your printer allows.

5 For documents which you're printing for archive or reference purposes - print 2 up so you get 2 "document" pages on each sheet of paper - if you duplex this you'll get 4 pages per sheet.

6 Use Internet Explorer's Send to OneNote 2007 feature to save web pages for reference to a OneNote notebook rather than printing them.

7 Install the Office 2007 PDF writer and save documents as PDFs to email instead of post. Find it at: http://tinyurl.com/2v77sn


8 Instead of printing Slides in PowerPoint one per page, use the Handout option to print up to 9 per page.

9 Email documents to other users when working on documents as a team. Use the Track Changes feature in Word to mark up changes so they can be seen, shared and evaluated.

10 To print only part of a worksheet, select the area to print and choose File > Print > Selection.

Labels: ,

Add to Technorati Favorites