Articles | Photoshop blog | Photography blog | about me | e-mail

Helen Bradley - MS Office Tips, Tricks and Tutorials

I'm a lifestyle journalist and I've been writing about office productivity software for a long time. Here you'll find handy hints, tips, tricks, techniques and tutorials on using software as diverse as Excel, Word, PowerPoint, Outlook, Access and Publisher from Microsoft and other applications that I love. My publishing credits include PC Magazine, Windows XP mag, CNet, PC User mag, SmallbusinessComputing.com, Winplanet and Sydney Morning Herald.

Thursday, May 28, 2009

Make your own font character - FREE!


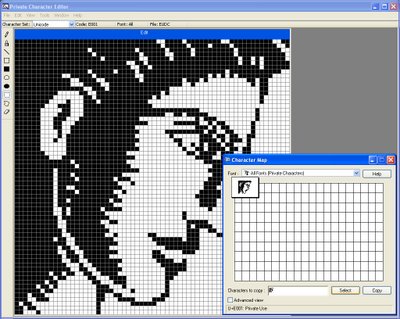
If you've ever wanted to create a special font character for your company logo or a favorite shape you can create it using the Windows Private Character Editor utility which is available in Windows XP and Vista.

To run it, choose Start > Run > type eudcedit and click Ok.

When the character grid appears, double click any one of the empty boxes to open up a 64 x 64 pixel grid where you draw your character.

You can also copy an existing font character and edit that by choosing Window > Reference > Font and choose a font to copy a character from. Select the character, make a selection around the it and drag it onto your work area. You can now edit it using the tools on the toolbar.

You can also import any black and white image. Open your graphics software, open an image and size it down to 64 x 64 pixels in size and convert it to black and white.

Now copy and paste it into the Private Character Editor.

When you're done editing, choose Edit > Save Character to save your character to your font collection.

To use your new character, open the Character Map tool by choosing Start > All Programs > Accessories > System Tools > Character Map. Choose All Fonts (Private Characters) from the font list.

To use your new character, click it, then click Select and then click Copy. Switch to your application, for example, a Word document and choose Edit > Paste.

Labels: , ,

Add to Technorati Favorites

Monday, May 25, 2009

Publisher - Making Signs


Whether you need to make an open sign for your business or one to help find a lost pet, the basic premise is the same. You have a message you want to get across to your audience and you need to do this in the best and most effective way.

Signs pose difficulties not always present in other documents – you don’t have a lot of room to get the information across and often the sign will be placed where there is lots of other signage competing for attention.

Before you start
Before you make your sign, determine what you want to say and what information is most important for your audience to see. For example, for an Open sign, the word OPEN is critical and it will work without any other words very well. For a lost pet sign, the word Lost is important as it distinguishes the sign from others about pet grooming services, kennels etc.

Size of letters are important – a sign to be viewed from 3 yards/metres distance will need to have letters around 2.5cm/1 inch in height and you can add an extra 2.5cm/1 inch for every extra 3 metres/yards away your audience will be. The font size equivalent for letters 2.5cm/1 inch in height is around 72 points.

Colour is vital and it's important that your sign be visible. The best colour combinations are high contrast ones such as black on yellow and white on black. Bad combinations are green on red or red on green – they're indistinguishable to colour blind people and hard to read for the rest of us.

If you must use low contrast colours such as pale blue on white, add a black border around each letter to distinguish it from its surroundings.

When choosing fonts for your signs, stick to plain readable fonts and steer clear of script and other fancy typefaces. Fonts like Times New Roman and Arial and Verdana are good as they are clean and easy to read.

Capture interest
When you're using photos to capture attention and to inform, make sure they are high quality and cropped to show the pet clearly. When typing information, group it logically so it's easy to read. Include the details a person will need to have to contact you.

In the situation where immediate contact is crucial, creating tear off strips across the foot of the page is a good idea – a person can simply tear off the information they need and take it with them. However, make sure you also put the information on the sign as a person will need to have this available if the tear off strips are already removed.

Here's how to create a sign with tear off strips.

Step 1
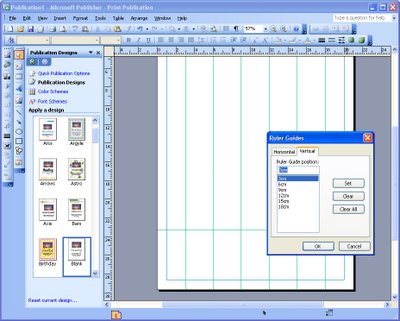
Start a new blank print publication. Choose File, Page Setup and set up full page printing and Letter or A4 paper size depending on the paper you will use. Choose Arrange, Layout Guides and adjust the margins to match your printers margins - the defaults are generally too big. Choose Arrange, Ruler Guides, Format Ruler Guides, vertical and add them at equal intervals across the page. Add one horizontal ruler across the bottom of the page.

Step 2
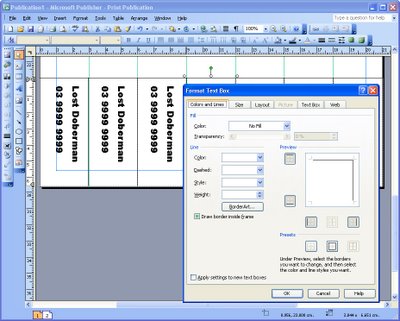
Create a text box and, in it, type the contact details for the tear off strip. Rotate the text by right clicking the shape, choose Format Text box, Text Box tab and check the 'Rotate text within AutoShape by 90 degrees' checkbox. Click the Colors and Lines tab and add a line to the top and right of the box. Drag the box into position and size it to fit. Hold Control as you drag a duplicate of the box to make the second box. Continue to complete all the boxes.


Step 3
Complete the rest of your sign by adding a large text message to attract a viewer's eye. Add other explanatory text – make sure to include your phone number or contact details in the main notice in case all the tear off strips are removed. Focus on the important details someone will need to know. Add an image if desired to help attract attention.

Labels: , , , , ,

Add to Technorati Favorites

Friday, May 22, 2009

Excel - print charts in black and white


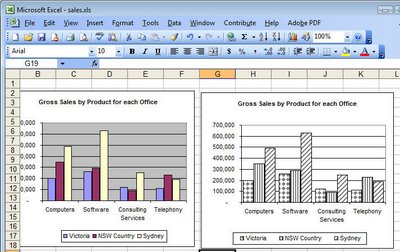
Although your Excel chart might look great in color on the screen, if you're printing to black and white or printing in color and planning to reproduce the charts in black and white you might be disappointed with the final result. Light green, light blue and light orange all look very different on the screen but are indistinguishable in black and white.

So, when your chart is destined for reproduction in black and white, set it up so it is guaranteed to be readible. To do this, select each series or data point by clicking on it, right click and choose Format Data Series (or Format Data Point)> Patterns tab > Fill Effects > Pattern and use a grey or a black and white pattern. Repeat for all the series and save before printing. The chart is guaranteed to look good when printed.

Labels: , ,

Add to Technorati Favorites

Wednesday, May 6, 2009

What cell is that? Identifying table cells in Word

When you're working with Word and doing math in your tables, you need to know the name of each table cell. In a largish table it can be difficult to keep track of everything.

Back in the days of Word 97 a macro shipped with Word that would tell you the name or cell reference of a given table cell. Here's how to take a step back in time and get that macro, install and use it, with later versions of Word:


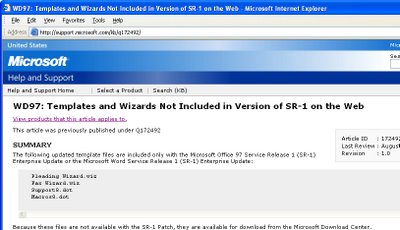
Visit http://support.microsoft.com/kb/q172492/ and download the file Wdtlupd.exe which is referred to on this page. This is a self-extracting zip file which includes various documents, the one we're using is not version specific. Run this file and select a location to save the extracted files into.


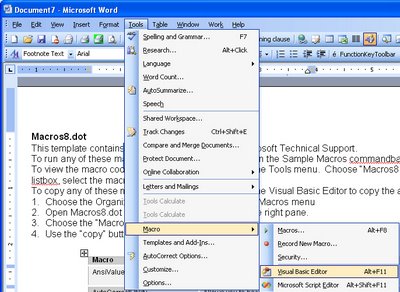
Open the folder containing the extracted files and double click the file macros8.dot to open it in your version of Word. If prompted to do so, click the Enable Macros button and the file will open automatically in Word. Now choose Tools, Macros, Visual Basic Editor if you are using Word 2003 or earlier. In Word 2007, make sure the Developer tab is visible (Office button > Word Options > Popular > Show Developer tab in the Ribbon). Choose Developer tab > Visual Basic.


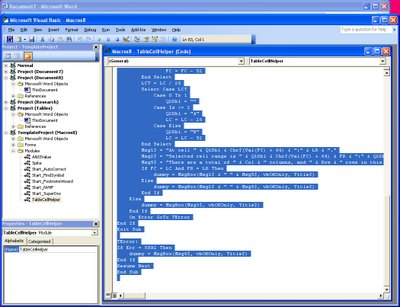
Locate the Macros8.dot file in the Project list on the left of the screen and click to open its Modules collection. Locate the module called TableCellHelper and double click it open the code window. Select the code and copy it by choosing Edit, Copy.


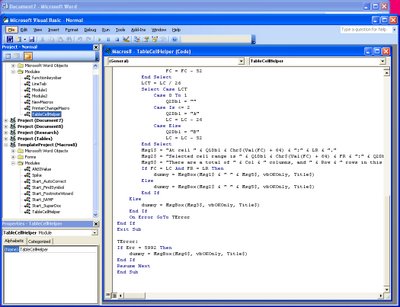
Locate the file Normal in the Project collection and click its Modules collection. Choose Insert, Module to add a new module, double click to open this new module and choose Edit, Paste to paste the copied code into the module. In the Properties area (choose View, Properties Window to display this if needed), alter the module name to TableCellHelper and, when you're done, close the Visual Basic editor and close the file created using Macros8.dot.


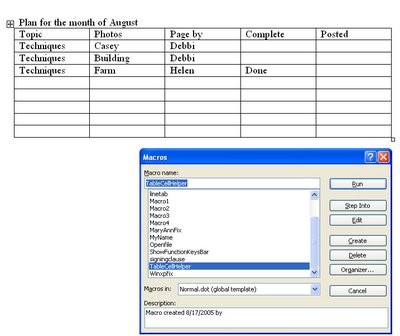
In Word 2003 and earlier, run the macro by clicking somewhere inside a table and choose Tools > Macro > Macros from the Macros in list choose Normal.dot and locate and run the macro called TableCellHelper. In Word 2007 click the Developer tab > Macros and from the Macros in list choose Normal.dotm and locate and run the macro called TableCellHelper. The macro will report the cell address and the total number of rows and columns in the table.


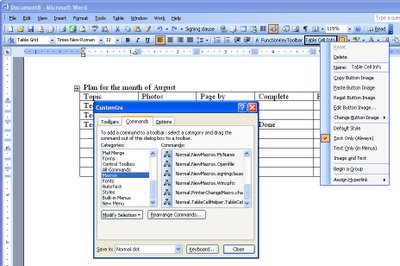
If you'd use this macro repeatedly, add it as a button to your Word 2003 (and earlier), toolbar by right clicking a toolbar and choose Customize. Click the Commands tab, select Macros from the Categories list and locate and drag the macro TableCellHelper on to the toolbar. Right click the new button and edit the name so it is shorter and more helpful. Close the Customize dialog.

Labels: , , , , , , ,

Add to Technorati Favorites

Monday, May 4, 2009

Word does Math - in tables!


Lots of folk do things like use Word for invoices simply because it's easy to do. When it comes to laying out data for an invoice a table makes a good choice as everything looks very neat.

It is also a good choice because, once your data is in place, you can get Word to do the calculations for you.

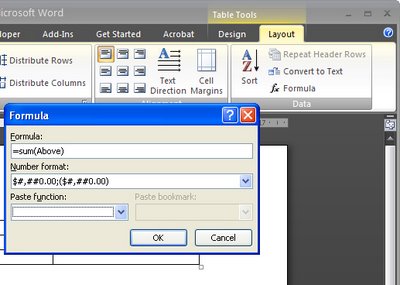
So, for example if a column contains a series of numbers that you want to add up, click in the blank cell at the bottom of the column of numbers and choose Table > Formula (in Word 2007 choose the Table Tools > Layout > Formula button). Make sure the formula reads =sum(above) and click Ok. Now the total is in place in the cell.

If you change the numbers in the cells above, you'll need to recalculate the formula. To do this, click in the cell containing the formula and press F9.

The Table Formula dialog also includes an option for formatting the numerical result so it looks the way you want it to - with numbers after the decimal point and even a leading $ or £ symbol.

Labels: , , , ,

Add to Technorati Favorites