|
|
|
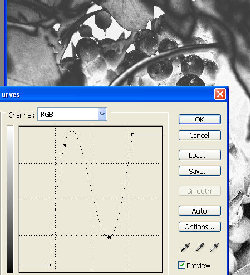
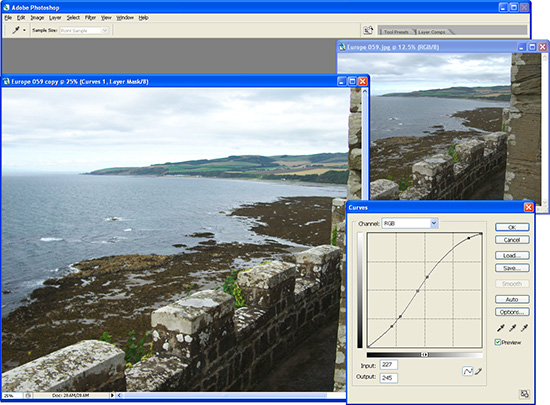
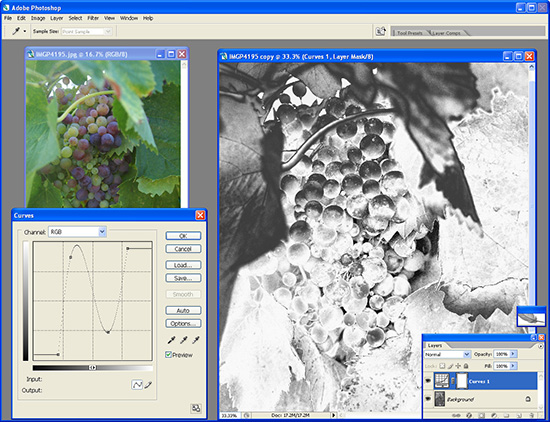
Photoshop: Cool effects with curves Helen Bradley The Photoshop Curve tool has a serious role in photo fixing but it has a fun side to it's nature too.The Photoshop curves tool is probably one of the most powerful and best ways to correct an image in Photoshop. It is also a tool that can look complex a first glance. However it isn't difficult to understand and use and I'll show you how to put it to work. The curves tool also has a fun side to its nature and it can be used to create interesting art effects for your images as you'll see. The curves tool lets you adjust the tones in an image. Find it by choosing Image, Adjustments, Curves or you can apply it using an adjustment layer. A dialog appears displaying a grid with a line going from bottom left to top right. The horizontal axis of this grid represents the tones in the image from darks on the left to lights on the right. The vertical axis on the left shows the mapping of those tones – from darks on the bottom to lights on the top. By default, all tones are mapped to the same tone so dark colour 255 is mapped to 255 and mid grey colour 128 is mapped to 128 etc. Alter the mappings by altering the line, for example, drag it upwards to lighten the image (map each tone to a lighter value) or drag it down to darken the image by mapping each tone to a darker value. Darken the darks in an image with CurvesIt is also possible to darken all the darks in an image by dragging the line in a horizontal direction at the bottom left edge. You can lighten all the lights by dragging the top right point inwards in a horizontal direction. Having fixed the darks and lights you can then pull the midtones curve in an upwards or downwards direction to either lighten or darken the midtones. A typical photographer's fix for an image is to create an 'S' curve on the line – this darkens the dark areas and lightens the light areas of the image. Find the place to adjustIf you want to affect a particular place on the image, sample the point to alter by holding your mouse over the image. When you see the eyedropper appear, press and hold the left mouse button. The position of this colour on the line is indicated by a circle. To select that point on the line, press Control and click the appropriate place on the image. When you're making a correction with the curves tool be aware that a steep line creates more contrast whereas a flatter line reduces contrast reducing everything to a muddy grey. So, avoid creating a flat line in the middle of a curve unless you really want this effect. Top TipThere are two options in the Curves dialog, the default option which lets you drag on the line to alter the curve and a pencil option which lets you draw the curve you want – use this to create the horizontal lines required for a posterize effect. "S" shape curveStep 1 Here I've applied a typical curves fix to this image (the original is shown on the right). The gentle 'S' shape on the curve lightens the lights and darkens the darks to improve the tonal range in the image. Solarize with curvesStep 2 Here I've used curves to apply a solarization effect to a desaturated version of the image. Some of the tones in the image have been inverted and others are darkened or lightened. This mimics the photographic effect also known as the Sabattier Effect highly prized by photographers. It can be used on both colour and black and white images to great effect.
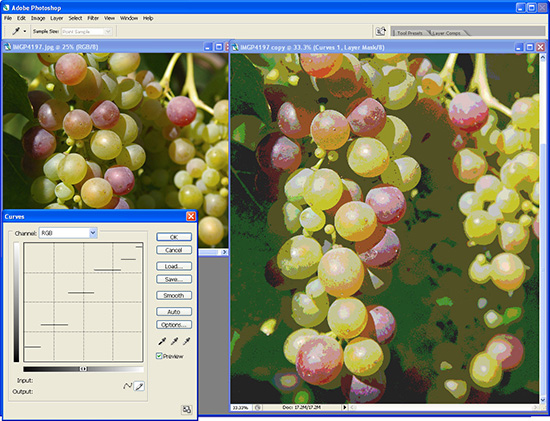
Posterize with curvesStep 3 This posterize effect is created using horizontal lines drawn in the curves dialog. These lines have the effect of mapping ranges of tones to a single value and reducing the colours in the image. Unlike the Posterize filter, you have more control on the final result using Curves.
|
|
|
(c) 2019, Helen Bradley, All Rights Reserved. |