

Thursday, November 15th, 2018
Let there be light! Testing out the amazing Benq ScreenBar
Benq ScreenBar Plus e-Reading lamp – the Screen Light you didn’t know existed (and that you will love)
You want to know why I did this review when I don’t do reviews on my site?
Story goes, that the folks at Benq offered me a Benq ScreenBar Plus e-Reading lamp to review. My first thought was “I don’t do reviews on this site”, but then I took a second look at their product and realized it would solve a huge problem that I have.
Like many people I have my computer set up in a room which was never intended to be used as an office. There wasn’t even an overhead light when I first set up my ‘home office’. I put in an overhead fan/light combo – which is a great fan but a really poor light source. Working at night is an issue because the light is so poor and winter days can be the same – it it’s raining and grey, I can’t find things on my desk or, much of the time, even see my keyboard clearly. I’ve tried desk lamps and floor lamps but they just don’t throw the light where I need it, on the desk in front of my screen and over my keyboards. Since I’m a sucky typist this is a big issue!
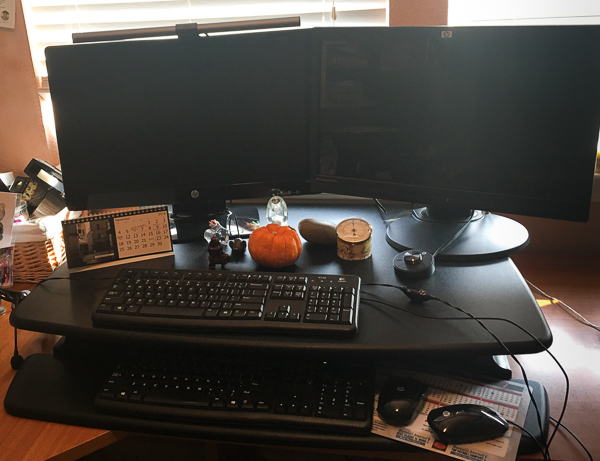
This is my desk without the Benq ScreenBar Plus turned on, you can see it’s hard to see the top keyboard and there is no light on the bottom one, even in daytime:
So, enter the Benq ScreenBar Plus e-Reading lamp. It arrived in a long shallow box:

packaged neatly and with some simple installation instructions:

Basically it’s a light bar about 18 inches long that sits on top of your monitor. It can fit monitors that are between 0.4 to 1.2 in wide (1-3cm) so it fits neatly on my HP monitor.
You assemble the light by slipping it into a small weighted bracket and plug in its USB cord.

This is one of the great features of this light, it gets its power from a USB socket so you can plug it into any USB port and so you don’t have to find a spare socket to plug it into. I run mine off my HP tower – I added a short USB extension cable to make this work with my sit/stand desk. Now the light turns on every time my computer turns on. Which is great because for the first time in around 12 years I finally can see what I’m doing any time of the day. The design of the light has it sitting on top of your monitor so the light falls directly onto the desktop in front of you. The casing around the light ensures that you don’t get glare from the light in your face it falls only on the desktop where you need it. It also goes up and down with the monitor when you adjust your sit/stand desk.
The light comes with a small control disk.

This lets you turn it on and off by pressing the big dial. Rotate the dial to increase or decrease the amount of light. This alone would be all I need but there’s more! Like the famous Ginsu steak knives the Benq ScreenBar Plus e-Reading lamp delivers extra functionality in the form of different temperature light.
Tap the button on the right of the controller and the dial becomes a temperature selector – you can choose anything from cool blue light to (my preferred) warm orange light. It’s a great feature and one you are sure to love.
This is the warm light (which is what I love):

There is one further button on the left side of the controller and that lets you set the light to auto select – so the light reads how much ambient light there is in the room and automatically adjusts its own brightness to suit. This shows the cooler blue light.

I have had the Benq ScreenBar Plus e-Reading lamp plugged in from day 1 and you’d have to fight me if you plan to take it away from me. I leave it turned on all the time and it’s made it possible for me to work comfortably even into the wee hours on projects with impending deadlines. It has a very small profile so I forget it’s there until I turn off my computer and suddenly it turns off and I realise just how dark it is. It is held sturdily in place by its weighted bar so I have no issues with it feeling insecure and it’s not chewing up precious desk space. It’s so good I’m seriously considering shelling out for one for my assistant’s desk which is even further away from the light source and darker still.
You can find the Benq ScreenBar Plus e-Reading lamp here on Amazon. Find more information about the Benq Screenbar Plus at the Benq Website.
Be sure to consider the one with the dial – it’s worth the extra spend.
Labels: Benq, benq screenbar plus e-reading lamp, computer light, desk light alternative, light bar, monitor light, screen light, screenbar
Monday, October 29th, 2018
Excel Templates To Make Marketing Easier
Marketing template shown here is a free downloadable template from Hubspot: https://offers.hubspot.com/monthly-marketing-reporting-template
Learn how Excel templates help you manage your marketing tasks
If you surveyed people about the tools that they consider among the most important in their software arsenal, there is no doubt that Microsoft Excel would be at or close to the top of that list.
In a world where just about every job requires reports, presentations, and budgets in spreadsheet format, Microsoft Excel is indispensable. It’s hard to imagine doing our jobs today without it. If the Gods of information technology didn’t create and develop Excel, our working lives wouldn’t just be tougher they would also be more chaotic, especially when you’re in marketing.
Nowhere is the need for Excel spreadsheets more evident than in the world of marketing, where tasks can be incredibly varied, and you’re expected to do them all. With its unparalleled ability to organize information and simplify tasks, Excel is an indispensable tool for marketers of all types.
If you’re a marketer, you would do well to check out at some of the ways you can use Excel templates to make your job easier.
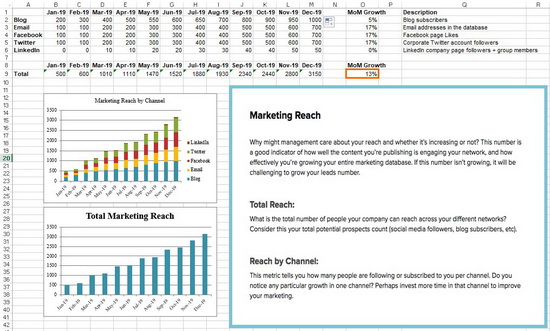
Reporting monthly marketing metrics
Monthly reports are par for the course in any industry workplace. Making them can be tedious, but they are always a great way to communicate to your boss how your marketing campaign is going.
For simplified reporting, you can use a monthly marketing metrics template that allows you to lay out data pertaining to monthly visits, leads, conversion rates, and customers. Once the layout is there, you can update the worksheet quickly and easily. Tracking and reporting on which channels are doing well also will also be more accurate when properly structured.
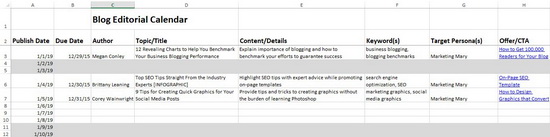
Blog editorial calendar
Creating a blog post that will help draw in visitors and leads to your website is easy enough. Managing that blog, however, is an entirely different story.
You need to keep track your blog post ideas and published posts. You also need to distribute them strategically. If there are contributions from other bloggers, you will need to monitor those too.
To keep track of everything you need a blog editorial calendar, and Microsoft Excel is an excellent tool for creating one.
With a blog editorial calendar, you can keep an eye on all your content. It can also help you when it comes to choosing topics, managing buyer personas, and aligning your calls-to-action, amongst other things.
On-Page SEO Template
When running an SEO campaign, there are so many things that a marketer needs to track. In addition, periodic algorithm changes will force you to rethink your SEO strategy and make the necessary adjustments.
If you don’t have an Excel template where you can see all the information you need to manage your SEO strategies, your life as a marketer is bound to be more difficult. An on-page SEO template will help guide your SEO strategy and remind you of SEO best practices that you need to employ for the best results.
Budget template
No marketing campaign will ever run effectively without a properly allocated budget. Preparing a budget could be complicated work, but if you use an Excel budget template, you will be able to organize your marketing spending better.
Aside from establishing a clear alignment between your spending and your goals, an Excel budget template can also help you keep track of your spending and help you ensure you don’t go over budget.
There are many other ways that you can use Excel templates to make your marketing job easier. You can create these special templates yourself, or you can avail of the many Excel templates being offered online.
Labels: blog editorial calendar, budget template, download excel templates, editorial calendar template, marketing budget, marketing templates, microsoft excel, Microsoft Office, monthly marketing metrics template, seo template, template, track blog posts with Excel
Tuesday, December 5th, 2017
SAVE yourself daily FRUSTRATION – Start Task Manager with one click!
Quickly Launch Task Manager with one keyboard shortcut
I have been helping people fix computers that aren’t behaving and moving from an old computer to a new one. It seems like I am spending half my time launching the Task Manager to fix issues. Eventually it dawned on me that I can save myself a lot of messing around with pressing Control + Alt + Delete and selecting Start Task Manager by quickly going direct to the Task Manager. It’s simply a case of learning a new shortcut. Imagine that? One keystroke shortcut to get direct to the Task Manager.
So, here it is – remember and use it!

Simply press Control + Shift + Esc
Why not try it out now, practice it and you’ll seldom need to use Control + Alt + Delete ever again.
Labels: keyboard shortcut, start task manager, task manager, windows
Monday, November 27th, 2017
Clean Up Time! How to find and remove big files
Go from red to green – Find and Delete Big Files in Windows
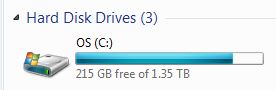
I admit it – My computer is a huge mess of files. Which wouldn’t be so bad except that I have little or no room left on my hard drive – when I check it in my C: drive is red! So, I need to get rid of files by deleting them or moving them to an external backup.
All very well but I’ll get the best ‘bangs for my buck’ if I can find and manage the really big files. But how to do this and please don’t tell me I need to install a new program to do that! Well, luckily in Windows, you don’t.
Here’s how to find your biggest files:
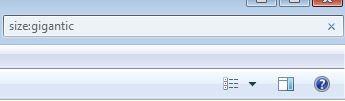
- -Press Windows key + F to launch Windows search dialog.
- -In the top right corner type size:gigantic and press Enter
- -Wait
- -Wait some more
Because I don’t index my drive it takes a little while but the result is an ordered list of your biggest files from biggest to a little less big. You can now delete or move any files you no longer need. BUT beware! If you don’t know what a file is – DON’T delete it! If it is a Windows file you could wind up with a computer that no longer works.
I was really surprised what I found. Heaps and heaps of old backups that I make before I go on holidays each year and which were just sitting there. And a full 22Gb in a single screen recording that I had already edited and rendered and certainly did not need! In just a few minutes my disk is back to a happy green color and, once I’ve finished telling you all about my success, I’m off back to work.
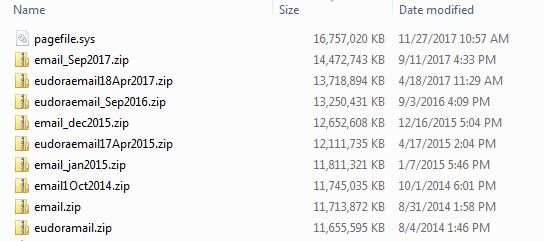
Be careful, if you didn’t create a file, don’t delete it. Files like Pagefile.sys shown here belongs to Windows and SHOULD NOT BE DELETED.
Labels: delete big files, disk cleanup, find big files, large files, remove files, search for big files, Windows 7
Saturday, October 10th, 2015
Move a Paragraph Up or Down in Microsoft Word (Mac)
")

When the Mac keyboard shortcut doesn’t work – here’s how to fix it!
In Word on the PC you can click in a paragraph or select a paragraph or two (or even a row in a table) and move it up and down the document using Shift + Alt + Up Arrow of Shift + Alt + Down Arrow.
Sadly on the Mac this doesn’t work the same. The Mac keystroke is a little different – press Shift + Control + Up Arrow or Shift + Control + Down Arrow. So far so good – problem is that these are the exact same keystrokes that display Mission Control and Application Windows on the Mac so they don’t work. That is until you fix them to work.
Now I don’t use Mission Control at all so I have no need to go backwards and forwards between Mission Control and Application Windows and, worse still, I often hit those keys by mistake so I can easily live without this shortcut. Turns out, if you disable that Mac default shortcut then the Word one works.
To do this, launch System Preferences and select Keyboard > Shortcuts. You need to disable two options here – Mission Control and Application Windows so deselect the two checkboxes and close the window. That’s all there is to it. Now the keyboard shortcuts Shift + Control + Up Arrow and Shift + Control + Down Arrow work just fine in Word for the Mac.

It’s the small things that put the biggest smile on my face. This is a small change but I use it every day and I love it – hope it works for you too!
Labels: disable mission control, keyboard shortcut, mac keyboard shortcuts, Microsoft Word, move paragraph, preferences, shift control down arrow, shift control up arrow, shortcut, word mac
Monday, August 3rd, 2015
Copy Excel Formulas Without Updating References
![]()
Copy formulas without the cells updating to their new location
I have had an ongoing problem with a worksheet I use to track data by date. Each month I need to copy a range of cells to start the data comparison for the next month. Problem is that you can’t copy cells in Excel without the cell references updating to their new location. And, guess what? That’s exactly what I need to do – copy cells, paste them into their new location without the formulas changing – at all.
One way you can do this is to copy each formula manually by double clicking the cell, copy the text in the Formula Bar, press Esc and then go to the cell to copy it to and paste it in. It works, but you can only do it one cell at a time. I have ten or more cells so that’s just a plain waste of time.
I could write a macro – and in future, I will – but there is a super neat solution that I am using for now.
First of all, press Control + ` (grave) to show formulas in cells (or choose to Show Formulas from the ribbon).
Next select and copy the cells containing the formulas.
Paste these as text into a document. I use Paste Special > Unformatted Text in Word but you can paste into any text editor.

Return to Excel and hide the formulas using Control + ` again.
Now select the text of the formulas from your document and copy it, then paste it into the appropriate cells in the worksheet. The Data Parse feature in Excel will automatically split the text containing the formulas and paste one formula into each of the cells.
It might sound complex, but you can do this really quickly, and it’s accurate and effective.
Labels: copy formula without changing, copy formulas, Excel, referencing
Friday, July 31st, 2015
Left Arrow to Get to the Bottom of a Word Document – Mac Only Stupidity

Move to the top or bottom of a Word Document on a Mac
From a file labelled stupid commands comes this one for getting to the top or bottom of a Word document on the Mac. You see simple commands like Page Up and Page Down which work on a PC fail spectacularly on a Mac so most hapless users just use the arrow key (a lot) or scroll bars to get around a Word document.
Smart users know there is a key combination that will do it, but it uses the Left Arrow and Right Arrow keys – I kid you not! How stupid is that? However, since it is useful (albeit stupid), I’ll tell you how. To get to the top of the document use Fn + Command + Left Arrow and to get to the bottom of the document use Fn + Command + Right Arrow.
So, now you know and you can move faster around your documents. Just try explaining that key combination to a friend and hold your tongue as they look at you like you’re nuts.
Labels: end of document, keyboard shortcut, mac, shortcut key, top of document, Word
Friday, May 29th, 2015
Print a List of Files in a Windows Folder

Learn how to quickly make a printable list of files in a folder (and how to import it into Excel)
Sometimes I need to get a list of files or folders inside another folder in Windows. I like to either print the results or take them to Excel to work on them. However, it isn’t self evident how to do this – there’s no print command in Windows Explorer that can do it for you. However, once you know how to do it, it’s easy to do.
Start by navigating to the folder whose contents you want to print. You want to have this folder visible in the right hand pane in Windows Explorer. Hold the Shift key as you right click this folder. A shortcut menu will appear, from it choose the Open Command Window here option.

This opens a MSDOS window inside the folder.
Now type this DOS command at the prompt and press Enter:
dir > filelist.txt
The name filelist.txt can really be any file name of your choice, I just like to use the .txt extension since its contents are plain text.
When the prompt reappears close the window.

If you now look inside this folder you will see a text file called filelist.txt. You can now print it by right clicking it and choose Print or double click to open it in Notepad and print it from there.

You can also open it in Excel and convert it to columns of text using the Text Import Wizard. The file is a fixed width file so it converts pretty easily into columns of text – you simply need to drag the lines in the preview to mark out how the text will convert to columns.

Then, when you are done, click Finish and you have the data in Excel – save it as an .xlsx file and you’re good to go.

Labels: command window, convert text file, Excel, print file list, windows
Wednesday, April 15th, 2015
Add Mac Keyboard Icons to Word documents (and other things)

Find the Mac keyboard icons for the Control & Command keys
I had a problem today in that I was writing about the Mac but using a PC. I needed to type the character for the Command key on the Mac keyboard which, as you might know, is this cute twirly shape. But since I was working on a PC I didn’t have fonts which contained the character. After an hour or so of research, I found the character.
As luck would have it, it was where I should have looked to begin with, in my Wingdings font. To get it, in any document or any application that supports fonts, click to use the Wingdings font and type the lowercase z – voila – the Command key character.

So far, so good. But what about the other keys, like the Apple key and the Alt key on older keyboards? In the interests of helping you get everything you need in one post, if not in one font, here’s how to get hold of the characters for the Apple key and the Alt key:
Turns out the Alt key symbol isn’t as easy to find as it might be. Probably the quickest way to locate it is to download the free font Virtue from the ScooterGraphics site.
Once installed the font contains a range of characters including the Mac Alt key symbol and the Apple icon. To get the Alt key select the Virtue font and type Alt + 0221 on the keyboard. The Apple symbol is a little more difficult as it is a hex value so, switch to Virtue font, type F000 into a Word document and immediately (don’t press space) press Alt + X. This little bit of keyboard magic creates the little Apple logo for you. If you need it elsewhere, make it in Word and copy and paste it to the application you need to use it in.

Labels: alt key symbol, apple key symbol, command key symbol, mac, Mac keyboard symbol, Mac keyboard symbol font, Mac keyboard symbols on a PC, virtue font, wingdings
Thursday, April 2nd, 2015
How to Open Winmail.dat files

Got a Winmail.dat file? Open it the easy way!
Winmail.dat is confusion in a very small package. It is a file attachment, usually from someone who uses Microsoft Outlook. They send you an attachment to an email and Outlook bundles it up in this little file that no other program can open. Handy isn’t it?
I am the kind of person who hates having to go back to someone and ask them to fix a problem however stupid it is. So, instead of sending the winmail2.dat file back where it came from, I sorted out how to open it.
Here’s the simple solution – head over to the site http://www.winmaildat.com and click Choose File to upload your winmail.dat file. Click Send File to send your file to the server which will then unlock the magic for you.
You will see a set of links for the things that were in the winmail.dat file so you can click to download those that you want.

Once you are done, you can click Delete to delete your files from the server. If you don’t – they are removed automatically after 2 hours.
The site is simple, it works and you don’t have to wait for someone to fix their Outlook so it stops doing this.
Labels: how do i open winmail.dat, what is winmail.dat, winmail.dat
Wednesday, April 1st, 2015
Must-Have Apps for Improving Your Personal Productivity

Image credit © Kaspars Grinvalds, Shutterstock Inc
It used to be that, aside from making calls, we could do little more with our phones other than using the built-in calculator function. Needless to say, things have changed quite a bit. Ever since the advent of smartphones, we’ve seen apps for just about any function that you can imagine. Scan through the iTunes App or Google Play Store on any given day and you’ll see dozens of brand new apps and more are developed and released every single day. With millions of apps to choose from, it makes finding one that’s useful like finding the proverbial needle in a haystack.
At the same time, productivity continues to be a daily struggle. We attribute some level of our unproductivity to procrastination and distractions, which — perhaps ironically — seem inevitable as our smartphones keep us connected and informed of what’s happening on social media, on the news, and at places where we cannot physically be. It seems natural, then, that we would turn to our smartphones for help, hoping that there were some way these devices that so often prevent us from attending to important tasks would be able to help us complete them.
Fortunately, there are a variety of tools that are meant to make us more productive, responsible members of society, and we can access them right on our smartphones. Here are some apps that will help improve your personal productivity.
It’s likely that you’ve at least heard of Wunderlist already, but if you haven’t, prepare to meet your new best friend. As the name implies, it’s one of the multitude of to-do list-making apps available for smartphones, but Wunderlist stands out for several reasons. First, Wunderlist isn’t just an app; while it’s available for free on Android and iOS devices, it’s also accessible on the web. This means that once you create and sign into your account, you can create and edit your to-do lists on one device, then access and continue them later on another. You can also create multiple lists, sorting tasks by their subject or some other label of your choosing.

Wunderlist via Google Play Store
Wunderlist also supports adding multiple users to a list, which offers great functionality both at work and at home. In the office, this means you could have a to-do list of tasks for a department that anyone in that department can access and work on, then have separate lists for individual people for projects and tasks assigned on an individual basis. At home, this translates as being able to create a master chore list, for example, then creating a grocery list for your spouse and assigning individual tasks to your teenager. Users need only to have an Android or iOS device, the app, and a Wunderlist account to be added to lists or create their own. Users added to a list can even exchange messages with each other right there in the app. As such, Wunderlist is an incredibly powerful app with great potential for not only your personal productivity, but also helping you to keep your employees or family more organized as well.
Do you find it difficult to keep track of your expenses anytime you’re traveling in the name of business? Do you not only lose receipts, but also hours of your time creating incomplete expense reports? Shoeboxed is the app you need because it can do all of the dirty work for you. Available for free on both Android and iOS devices, and offering web access like Wunderlist, Shoeboxed lets you scan receipts using your smartphone’s cameras, then collates and organizes all those business expenses for you. You can also do the same thing with all those business cards that associates were handing you; simply scan them into the app, then let Shoeboxed create a contact list by pulling the info from those business cards.

Shoeboxed via iTunes App Store
When you return from your business trip, Shoeboxed will have a detailed expense report ready for you to send, which you can also do right there in the app. Shoeboxed saves you time, the hassle of trying to hang onto all those receipts, and perhaps most importantly, is a free cloud-based service that you can access on all your connected smart devices. And even though it’s marketed for business trips, Shoeboxed can also be used by the thorough record-keepers among us, by entrepreneurs, and by those who freelance and need to keep track of expenses accrued in the line of duty. Having a detailed record of all business-related expenses will be an incredible relief come tax season.
If you’re not already using Google Docs, you probably will be eventually. Google Docs almost single-handedly brought word processing to the smartphone when probably just five years ago we all would have agree that we’ve never want or need to create and edit documents on a smartphone or tablet. However, Google Docs is a well-made, easy-to-use mobile word processor that can easily import and export files in the most essential document file types, such as Microsoft Word files and PDF files.

Perhaps the most useful feature of Google Docs is its seamless integration with Google’s free cloud storage service, Google Drive. When you open or create a document in Google Docs, it’s automatically saved to your Google Drive while you have the option to save it locally on the device you’re using. Google Docs also auto-saves your work after every change you make, even if that change is as trivial and small as a single letter or punctuation mark. This makes it essentially impossible to lose any unsaved changes, which is a godsend when it comes to word processing — anyone who has ever lost hours of progress after Microsoft Word crashed will agree — and also means the document you’re seeing will always be the most up-to-date version. Since you can share documents with other users to work on a project remotely and simultaneously, it’s good to know that you’re working on the most current version and not spending time making changes that were already made by someone else.
It’s also useful to be able to type up important documents right from your smartphone. You probably won’t want to use your on-screen keyboard to write a term paper, but it’s good to know that if you ever needed to make small changes while on the go, Google Docs certainly gives you the option. On the other hand, you could connect a Bluetooth keyboard while you sit in a coffee shop or library and type longer documents more comfortably. Google Docs is an incredibly capable mobile word processor that’s free for Android and iOS devices, accessible on the web, and proves that it’s not unrealistic to create and edit documents on the go.
For more information, head to Modernize.com.
Post by Guest Blogger Dane O’Leary
Labels: best apps for productivity, google drive, productivity apps, productivity on the go, shoebox, wunderlist
Friday, March 27th, 2015
Help! Excel Shows Columns as Numbers not Letters

What to do when Excel shows Column 1 not Column A
My Excel has been behaving stupidly lately. Instead of Column letters – A, B & C etc, the columns are numbered 1, 2, 3 and so on.
While I haven’t solved the fundamental problem I do have a short term solution. It all has to do with the Excel options. To change the column numbers back to letters chose File (the Office Button in Excel 2007) and choose Options > Formulas and disable the checkbox for R1C1 Reference Style.

On the Mac click Excel > Preferences > General and deselect the Use R1C1 Reference Style checkbox.

This setting kicks Excel back into the correct mode – much more to my taste!
Of course, if you prefer seeing numbers and not letters all you need to do is to click the checkbox and you are good to go!
Labels: change Excel columns to letters, change Excel columns to numbers, column letters, column numbers, columns as numbers, Excel, r1c1, troubleshooting
Saturday, January 17th, 2015
Open Recent Files Missing from Word (Mac)

If your Recent files list disappears from your Mac, here’s how to put it back
Word on my Mac doesn’t have a recently opened files list but Excel does. Turns out the feature was disabled (or perhaps it was never enabled). Whatever the reason, it wasn’t there and I wanted it to be accessible.
Lucky for me it is just a preference setting. Click the Word button, click Preferences and then General. Look for the Track Recently Opened Documents option and enable it. Set the number of documents to track and click Ok. Yeah! Now you can open a recently opened file like you expect to be able to do.
Labels: mac, mac word, ms word, open recent, recently opened files, Word
Thursday, October 23rd, 2014
Calendar Wizard in Word 2013 and Word 2016 – Yes!

Missing the Calendar Wizard in Word 2013? – no problem, here’s how to get it
Many years ago, Word had a wonderful Calendar Wizard that you could use to make calendar pages in Word. One really neat aspect of this Wizard was (and still is) that you can make calendar pages for any period of time – so you don’t have to wait till someone makes 2017 calendars for you to download – instead you can make your own and you can do it now! Hell you can make calendars for 2020 now if you want to really plan ahead!
In Word 2013 it might at first appear that the Calendar Wizard isn’t available – and it isn’t – that is, until you know how to make it accessible.
To start, download the WIZ file for the wizard from here: Microsoft Word Calendar Wizard Download for Word 2013 and Word 2016.
Alternately, if you have an older version of Word on your computer, search for Calendar Wizard.wiz as you may have it on your computer somewhere already.
If you find a .cab file for the Calendar Wizard and if it is a zipped archive format file then you will need to open it. If double clicking it doesn’t launch an unzip program that can handle it, then download Express Zip File Compression as it can handle .cab files easily.

Extract the .wiz file (or copy it) to a folder of your choice or, better still, put it into your custom templates folder C:\Users\‹Username›\Documents\Custom Templates. If you’re downloading from the Dropbox link above then you have the .wiz file and you just need to move it into position.

If you are doing this, then change its name when you do so – calendar wizard.wiz is (and was) a good name for it. If you found the wiz file on your own drive, make a copy to this folder.
T’hen double click the .wiz file to launch it in Word. If you put it in your Custom Office Templates folder then you can launch it from inside Word 2013 by choosing File > New, click Personal to view your personal templates and click to run it from there.

You can view my YouTube video on downloading and running and using the Calendar Wizard here: https://youtu.be/0HlnXxYIr7k
Note: Post updated November 2016 to include a new download location which was valid at this time.
Note: Post updated September 2017 – it still works! And to add video link.
Labels: Calendar Wizard, find the calendar wizard, make a calendar, Microsoft Word 2013, Word 2010, Word 2013 calendar wizard
Tuesday, September 9th, 2014
Find Your templates in Microsoft Office – Mac

Need to manage your Microsoft Office templates but can’t find them?
It’s not easy to find the templates folder on your Mac. You might know it is My Templates but a typical search in Finder won’t turn it up.
Luckily help is at hand. Launch Finder and choose Go > Go to Folder. Now paste this folder name into the search box to go to your My Templates folder where you can now see and manage your templates!
~/Library/Application Support/Microsoft/Office/User Templates/My Templates
Labels: mac, manage templates, Microsoft Office, Office, osx, template, template folder