Saturday, August 29th, 2009

Moving a Lightroom Catalog


I’ll explain how to successfully move Lightroom files and a catalog to a new disk.

One issue that stumps many people is how to successfully move a Lightroom catalog from one computer to another or from a local hard drive to a removable one.

Having just faced this situation head on and having made a right royal mess of my first attempt, here’s my take on the smartest way to do this.

The problem in moving the catalog and files for me was that I didn’t want to lose the editing history for any of my files so it was critical that everything moved correctly and, in the end, the ideal method was to make Lightroom responsible for the move so all along it stayed informed about what was happening.

Step 1
Start by backing up your Lightroom catalog and files – if everything goes pear shaped at least you’ll have your backups.

Step 2
Plug in your external drive (or fire up the new computer) and copy one photograph into the root folder on the drive, or if you want your photo folders to be stored inside a folder called Photos, for example, and not in the root folder, create this folder and copy one photo into it. There must be an image in a folder for you to import the image (and the folder) into the Lightroom Folders collection.

Step 3
Now locate your Lightroom folder which contains your catalog and preview images and move it onto the new drive. This has to be done with Lightroom closed.

Step 4
Launch Lightroom and it will report it can’t find the catalog – so far so good. Point Lightroom to the Lightroom folder on your new drive and click the catalog file (it has the lrcat extension) – Lightroom will open the catalog and find everything intact because you haven’t moved anything yet – except its catalog.

Step 5
Inside Lightroom, choose File > Import from Disk and import the single image that you copied into the folder on your new drive. This adds the root folder for your images on the new drive to the Lightroom Folders collection.

Step 6
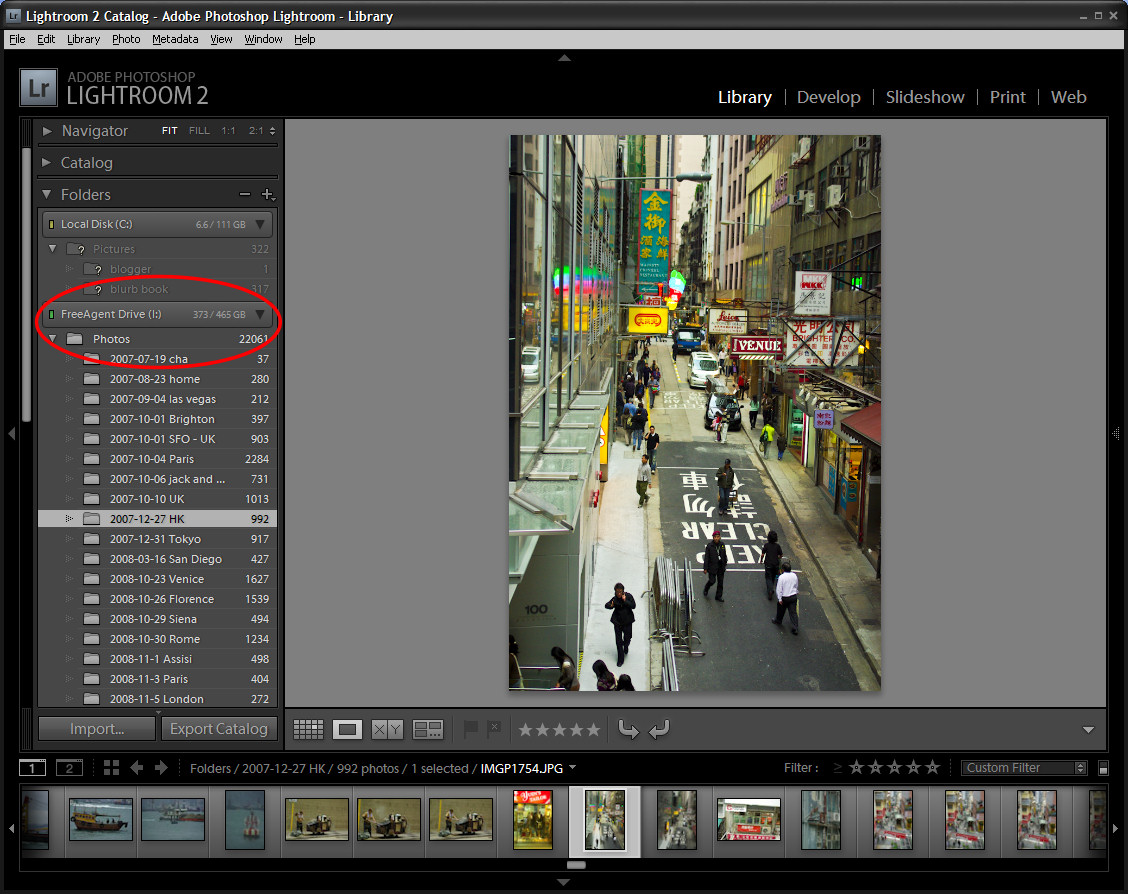
Make sure the Library is visible and the Folders area opened. Now drag and drop each folder of images from your local disk onto your new drive in the Lightroom folder view. I did this one folder at a time but you can, if you wish, drag the root folder from your old disk and drop the lot into your new folder on the new drive – it depends how you want everything organized. Lightroom works pretty fast when moving the files so it doesn’t take too long. The most inconvenient part of the move for me was that Lightroom can only move one folder at a time so the process had to be supervised manually – when one folder was moved, I dragged and dropped the next one and so on.

If you prefer to do so, you could move all the folders containing your photos outside Lightroom – this would be an easier process than doing it inside Lightroom if you want to retain the same overall folder structure. Then launch Lightroom and, in the Folders list, right click the old root folder and choose Update Folder Location and point to the new location for the files.

Once the Lightroom catalog and all your photo files and folders are on the external drive or on the new computer, your images will be instantly accessible anytime by simply opening Lightroom.

External drive letters issue
If you’re using an external drive to store your Lightroom catalog and files you may encounter problems when attaching the drive to a second computer as it may recognize it as having a different drive letter. If this happens, Lightroom will still show you previews for all your images but you’ll encounter missing file warnings if you try to edit one. The easiest solution at this point is to right click the root folder in the Folders list in Lightroom and choose Update Folder Location. Navigate to find this root folder on your external drive and, when you locate it, all the images in that folder will be immediately found.

Helen Bradley

Friday, August 28th, 2009

Cool Photo Apps #6 Create HDR images


Not all good applications come in big shinny boxes like Photoshop and Photoshop Elements. Many cool photo apps are available on the web and they’re free.

These apps do things that other programs don’t. They are fun to use and practical. In this Cool Photo Apps series I’ll show you some of these, today it will be how to create an HDR image.

Once of the limitations of digital cameras is that they are only capable of capturing an image with a fairly narrow dynamic range. You can, however, create images that have a higher dynamic range if you take a series of images at different exposures and combine them by selecting the best exposed pieces of each.

To do this, ideally, you need images shot using a tripod so there is no movement between images. In addition, the camera settings should not change from one image to the next – except, of course for the exposure settings.

While you can assemble the series of images manually, good software makes it much easier to do. Programs such as PhotoImpact and Photoshop have built-in tools to do this but you can also purchase standalone programs to do the work.

One specialty program is Photomatrix Pro 3 which you can find it at www.hdrsoft.com. Download and install the trial version and, if you don’t yet have suitable images to work with, download a set of sample images at the same time and unzip them.

Step 1
Launch Photomatrix, select Exposure Blending > Browse and load the images shot with different exposures.

Step 2
When the Exposure Blending dialog appears you will see the composite image appear and you can select fine tuning options such as Average, Highlights & Shadows – Auto, Highlights & Shadows – Adjust etc.. Select and compare the various options and adjust the sliders until you find a result you like.

Step 3
Once you’re done, click Process and the images will be compiled into a final HDR image.

Step 4
The program also includes a Generate HDR Image option which involves a more complex process than Exposure Blending.

Helen Bradley

Thursday, August 27th, 2009

Outlook: Create a New Contact from an Email


Adding a new person as a contact in Outlook is easy but not a self evident process.

To add an email address to your Contact list from the message window, right-click the address in the From: details at the top of the screen – it doesn’t look like this is clickable but it is.

Select Add to Outlook Contacts from the shortcut menu.

The Contacts dialog opens automatically with the email address in place, enter any other details you want to record and click Save & Close to end.

Helen Bradley

Wednesday, August 26th, 2009

Better Travel Photography #3 – Repetition – over and over again

Do your travel photographs look just like everyone else’s?

If you wonder why you lug your digital SLR half way around the world and still come home with postcard images, it’s time to revisit the way you photograph your travels. Here is part 3 in my new series of Better Travel Photography – a guide to getting great travel photos that don’t look like everyone else’s..

Here’s today’s tip – Look for repeated elements
When you’re photographing in tourist locations, look for repeated elements and focus on capturing them.

This can be as simple as a row of street lights or lights on buildings.

Our eyes love to see repeating elements and anything that you can find three or four of is a great topic for a photo.

Helen Bradley

Tuesday, August 25th, 2009

Multiple Outlook 2007 windows

Often it is easier to work with multiple windows in Outlook 2007 rather than having to switch between modules to show just one at a time.

You can open each different Outlook tool in its own window if you right click the icon (eg. Calendar) in Folder view and choose Open in New Window.

Each window will display on the task bar as its appropriate icon so it’s easy to switch between tools.

To ensure that each tool always opens in separate windows leave them open when you select File > Exit to close Outlook 2007. When you open the program again, all the windows will open automatically.

Helen Bradley

Monday, August 24th, 2009

Outlook Sticky Notes

Like electronic yellow stickies, Notes are useful for storing quick reminders and other information you need close at hand.

To create an Outlook note choose File > New > Note.

Type your text into the Note area. You can move the note so it’s visible, or hide it by clicking the close button in its top right corner.

To view a note, click the Notes button at the foot of the pane on the left of the Outlook window and click the Note to view it.

To delete a note, right click it and selecting Delete, or categorize it by right-clicking it, choose Categorize and select a category from the list.

You can send a Note to someone via e-mail by right-clicking the Note and select Forward. Outlook opens a New Mail Message window with the Note already in place as an attachment.

Helen Bradley

Sunday, August 23rd, 2009

Smart Dodge and Burn in Photoshop Elements


In the traditional darkroom, you could adjust the relative lightness or darkness of parts of an image using processes called dodge and burn. If you were dodging or lightening the image you would expose parts of the image for a shorter length of time to lighten them. If you wanted to darken a portion of the image you would expose it for a longer period of time so that more light would be applied to the photo paper with the result that you would be darker.

The terms dodge and burn continue to be used in software today and Photoshop Elements has a Dodge tool and a Burn tool which are both accessible from a toolbar position which they share with the Sponge tool. The disadvantage of using the Dodge and Burn tools as they are shipped with Photoshop Elements and, indeed Photoshop, is that these fixes are designed to be made to the original image and the cannot be made on a separate layer and then, for example, be blended into the image.

The result is that if you apply a Dodge or Burn fix and later determine that you do not like the result or want to adjust it, it will be difficult to undo the changes that you have made.

In post production, dodging and burning are best applied to a separate layer in the image so that they can be undone, edited or blended at a later date.

Here is a method dodge and burn an image in Photoshop Elements which works the same way in Photoshop. It involves creating a layer on which the dodge and burn process is performed. It also takes advantage of a special characteristic of the Soft Light blend mode. This is a different dodge and burn method to that which Food blogger Danny Jauregui used in his recent post.

Step 1
Open your image in Photoshop Elements (or Photoshop) and add a new layer by choosing Layer > New > Layer and click Ok.

Click on the foreground color swatch and set the R, G, and B values each to 128 and click Ok.

Step 2
Click the Paint Bucket tool in the tool list and click on the image to fill the layer with the gray color. You can also press Alt + Backspace (Option + Delete on the Mac) to fill the layer with the foreground color.

Step 3
Set the layer’s blend mode to Soft Light. The result will be that you will see your image just as it was when you opened it.

The Soft Light blend mode can be used to lighten or darken an image. If the color on the top layer is darker than neutral grey the image on the layer below is darkened and if it is lighter than neutral grey the layer below is lightened. When you blend with neutral grey, nothing happens. Here we have filled the layer with neutral gray (each of the RGB values are 128) so you see no change to the image.

So, if we now paint on this top layer with white the image will be lightened and if we paint with black it will be darkened. This is the equivalent of dodging and burning on the image.

Step 4
Select the Brush tool and select a circular soft edge brush adjusting its Opacity to around 25 percent. Adjust its size by pressing the [ or ] key on the keyboard. Set the foreground and background colors to white and black by pressing the D key and then the X key. Paint over the image on this top layer in white in those places that you want to lighten the image below.

For those parts of the image that you want to darken, paint over them with black.

If desired you can create one layer for burning and a second one for dodging. This will allow you to alter the opacity of each layer separately so you can subtly adjust the strength of the lightening or darkening applied.

To ensure that the fix remains changeable, save your image in a format that saves the image layers such as .psd.

Helen Bradley

Saturday, August 22nd, 2009

Cool Photo Apps #5 Making photos bigger


Not all good applications come in big shinny boxes like Photoshop and Photoshop Elements. Many cool photo apps are available on the web and they’re free.

These apps do things that other programs don’t. They are fun to use and practical. In this Cool Photo Apps series I’ll show you some of these.

Occasionally, you might want to resize an image by increasing its size – for example, when you need to make a cell phone photo large enough to print letter size!

While photos generally downsize well, upsizing them can be fraught with difficulties because you’re trying to create content that doesn’t exist.

One tool which does a good job is Reshade.com. You can use the program online or download an offline version to install on your computer.

Here’s how to use the online program:

Step 1
Click the Start Here button in the 4Online Image Resizer box.

Step 2
Click Browse to select the photo to upload from your computer. Click Open and then click Submit.

Step 3
Once the image appears on the sites elect the size to upsize the image to and you can also select to Smooth, Sharpen, Crop or Stretch the image although some of these require you to register on the site and high resolution resizing can be purchased for a small fee.

Step 4
When the process if complete you will see the resized image on the screen. Right click and select Save Picture As to save the image to disk.

Helen Bradley

Wednesday, August 19th, 2009

Better Travel Photography #2 – Glass and puddles are your friend

Do your travel photographs look just like everyone else’s?

If you wonder why you bothered lugging your digital SLR half way around the world and didn’t just settle for buying postcards, it’s time to revisit the way you photograph your travels. Here is part 2 in my new series of Better Travel Photography – a guide to getting great travel photos that don’t look like everyone else’s..

Today’s tip: Glass is your friend (not the lens type of glass either!)

If what you are photographing is in a busy location you can capture unusual detail by turning your back on it and find ways to capture it reflected in surrounding windows.

While the object’s details might be less well defined when reflected and while you’ll get a combination of the window detail and the object itself, the collage effect can make for a unique image.

If it rains as you travel, celebrate the opportunities available in shooting reflections in puddles. Capturing a popular tourist destination reflected in water is a way of seeing things that are there all the time but which few people ever really “see”.

When you shoot reflections, in windows or in puddles take care to make sure your camera is focusing on what it is that you want it to focus on.

You’ll want the detail in the reflection to be visible and in sharp focus with the surrounding area out of focus.

If you’re used to using a polarizing lens on your camera – which you should when shooting in sunlight conditions – remove it when you’re shooting reflections.

One of the roles of a polarizing filter is to cut out a lot of reflected light from entering your camera and, when you’re shooting reflections that’s exactly what you want to capture.

Helen Bradley

Tuesday, August 18th, 2009

An Adjustable Black and White Conversion

Most photo editing programs offer multiple ways to convert to black and white and Photoshop Elements is no exception. In fact it has a great Black and White conversion tool which is marred by the very small preview images you get to work with. Additionally, there is no zoom feature so you’re stuck with seeing your image in miniature (see image), or you find another way to make the conversion.

Here’s an alternative method of converting to black and white in Photoshop Elements which lets you work on the image at any size so you can see what you’re doing. It also works in Photoshop:

Step 1
Open your image Photoshop Elements and duplicate the background layer. Do this by first displaying the Layers palette by choosing Window > Layers, right-click the Background layer and choose Duplicate Layer.

Step 2
Select the topmost layer and choose Enhance > Adjust Color > Remove Color. This converts the image to a black and white image.

Step 3
From the Blend mode dropdown list in the Layer palette, select the Hue blend mode. This ensures the top layer’s hue (color) shows but uses the layers below to provide the lightness and saturation for the image. We can now adjust the bottom layer to change the black and white image.

Step 4
Select the bottommost layer in the image and select Enhance > Adjust Color > Adjust Hue/Saturation. This opens the Hue/Saturation/Lightness dialog. You can now select any of the sliders and drag them in either direction and you’ll see as you do so that the black and white image changes.

For example, adjusting Lightness will adjust the lightness and darkness of the image itself. Adjusting Saturation will also make the image darker or lighter. Use the Hue slider to change the colors in the underlying image with the result that different colors will tend towards being light and others tend towards being dark. For example, in this image, changing the Hue made a significant difference on some of the signs over the street – at one position the text was all the same shade of gray and in another position the text was lighter against a dark sign. Pick a slider position that works best for your particular image.

Step 5
To adjust the contrast in the image, with the bottom layer still selected, choose Enhance > Adjust Lighting > Shadows and Highlights. Drag on the sliders to adjust the tonal range in the image. You can darken the lighter areas, lighten the shadows and add some contrast to the midtones this way. With the preview option enabled, you will see the results at full size on the image as you work. You can also do the same with the Levels adjustment – again apply it to the bottom layer of the image.

When you are done, flatten the image by selecting Layer > Flatten Image.

This process allows you to convert an image to black and white while previewing the results at full screen size while you work and with quite a bit of creative control. I find it gives me a better appreciation of what my image will look like than using the very small dialog previews in the specialist black and white conversion tool.

Helen Bradley

Page 1 of 3123