Thursday, March 27th, 2008

Photoshop on the web – Yes, you heard right!

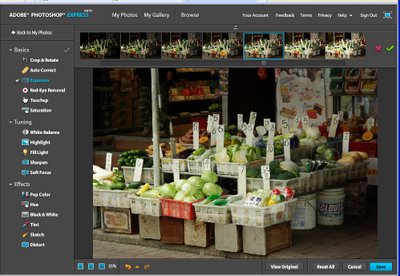
Ok, so it’s not the entire Photoshop program but it is edit to go Photoshop style and you can find it here – it’s called Photoshop Express and it’s the Beta release we’ve all been waiting for.

You register on the site then wait to get your email confirmed. Then login and upload your photos. There are heaps of great tools for adjusting your images. Of course, no layers or adjustment layers or any of the advanced stuff and you can whistle “Dixie” if you dream in LAB. However, these limitations aside there are plenty of good tools to use. These include Crop & Rotate, AutoCorrect as well as Fill Light, Sharpening and Soft Focus and even fun effects like Distort, Tint and Sketch.

The interface is dead easy to use – most options involve pointing and clicking at a display showing the effect applied at different levels, just like a linear version of the Photoshop Variations tool.

It’s well worth checking out and seeing that it’s so new, you get to snag a good URL for your gallery. But forget getting http://helenbradley.photoshop.com since I just grabbed that!

Helen Bradley

Friday, March 21st, 2008

Fixing with Luminosity masks

Luminosity (Luminance) masks are an interesting tool. Consider the situation where you need to apply a fix to an image but the lighter portions of the image are ok, it’s the darks that aren’t – or vice versa.

Start by duplicating the image layer and apply the fix to the top layer. Concentrate on the portion of the image that needs fixing, ignore the disaster that’s happening in the areas that don’t need fixing.

When you have the fix in place, it’s time for the fun stuff. Locate a channel which has the detail you want for your mask. You need a channel that is dark where you want the fix to be less and light where you want it more (or vice versa, as you can invert the mask). When you have your channel, Control + Click on the channel (Command + Click on the Mac) to load it as a mask. Now go back to the image and add a mask to the layer – it is automatically created as a luminosity mask based on the channel you used. So, your new mask is white where the channel is light and dark where the channel is dark. Of course, if you need it in reverse, add your mask, select it and press Control + I to invert it. Where the mask is lighter, the fix is more strongly applied and where the mask is darker, the fix is least strongly applied.

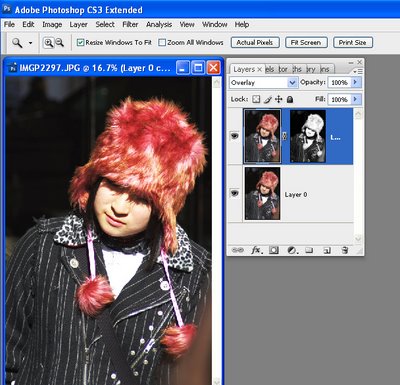
In the image above, shot in Harajuku, Tokyo on New Year’s Day, I’ve used a Luminosity mask based on the image’s own red channel to add some extra contrast and colour to the wonderful hat. I duplicated the image layer and applied a simple Overlay blend mode to that layer. Then I added the Luminosity mask to force the fix into the areas lightest in the red channel – ie where the reds in the image are located and less so in areas which weren’t red. (If this sounds wrong to you, remember that in RGB mode, the red channel is lightest where red is located and darker where it isn’t, ditto the green channel – it’s lighter where the green is and darker where it isn’t, etc..)

There’s also a handy shortcut you can use to make your masks if you know which channel to use. Use Control + Alt + 1 for the Red channel in a RGB image, Control + Alt + 2 for the Green and Control + Alt + 3 for the Blue. In LAB, the same shortcuts will get you the L, a and b channels respectively.

Helen Bradley

Friday, March 21st, 2008

What’s in a name? Auto_Open or AutoOpen

Sometimes you wonder if the folks up at Redmond are laughing at us behind our backs. Really, do they deliberately set out to confuse us or are they just that plain disorganised?

Today my quandary involves Auto_Open and AutoOpen. These are two special macro names. The first, Auto_Open is Excel’s special named macro that runs automatically when the workbook containing it is opened. AutoOpen is the Word equivalent. It makes no sense that one has an underscore and the other doesn’t – it just makes life for us VBA folk a little more confusing than it should be.

The other macros Auto_Close and AutoClose work the same way, Auto_Close is the Excel macro name – call a macro by this name and save it in your workbook and it will run whenever you close the workbook. In Word, the name is AutoClose.

To add to the confusion, PowerPoint doesn’t support either of the naming conventions, in fact, you can’t create auto running macros in PowerPoint the same way you do in Word and Excel. The workaround is cumbersome, you need to create a PowerPoint add-in that includes the Auto_Open subroutine. Load the Add-in and PowerPoint will run the code in Auto_Open it loads and ditto for subroutine called Auto_close – it runs when the add-in is unloaded – which happens automatically when you exit PowerPoint. Learn more about how to do this in this KnowledgeBase article.

Thanks Redmond, we are now officially confused!

Helen Bradley

Thursday, March 13th, 2008

Zap those hyperlinks

When you copy and paste text from the web into a Word document, typically the hyperlinks come too. If you don’t want them – if blue underlined nonsense peppering your text offends your sensibilities (as it does mine) – here are some thoughts for removing hyperlink formatting from your text.

One option is to select the link and choose Insert > Hyperlink (or press Control + K) and click the Remove Link button in the dialog. That’s the hard way in my book.

Easier still is to select the text and just press Control + Spacebar. That strips the formatting from the text – leaving it as plain text. It also works to strip formatting from any text, a handy shortcut to know.

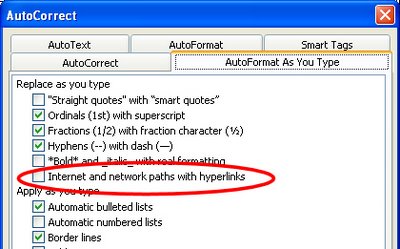
Now, if you get hyperlinks whenever you type a URL or email address you can stop this from happening by choosing Tools > AutoCorrect Options > AutoFormat as you Type tab and disable the Internet and network paths with hyperlinks option. Now you can type all you like and the AutoFormat won’t affect your text.

Helen Bradley

Wednesday, March 12th, 2008

PowerPoint to Go – on your mobile or iPod

You can put a PowerPoint presentation on almost any mobile device including your iPod.

Provided your mobile device supports JPEG format images – most will – open your presentation in PowerPoint and choose File, Save As and select the JPEG format, choose All Slides and PowerPoint will save the slides as JPEG format files that you can now upload to your mobile device as you do any other photos.

If your mobile lets you play images as a slideshow – voila! PowerPoint to go!

Helen Bradley

Saturday, March 8th, 2008

Microsoft offers free accounting

I found this recently and it’s a pretty smart offer for anyone who is used to using Microsoft products and who needs an accounting tool.

Microsoft Accounting 2008 Express Edition is free and you can download it here. It includes tools for creating quotes, invoices and receipts as well as tracking expenses and managing online bank accounts. It has two main attractions, one is that it’s free and second – with the look and feel of other Microsoft products its easy to get up and running.

Helen Bradley

Saturday, March 8th, 2008

No new line in PowerPoint

When you are entering text on a PowerPoint slide if you want to create a new line but not apply a bullet to it press Shift + Enter at the end of the preceding line.

This creates a new line but does not start a new paragraph which is the trigger for the bullet to be created.

This also works in Word – you can create a new line in a numbered paragraph but without adding a new number by pressing Shift + Enter.

Helen Bradley

Friday, March 7th, 2008

MS Publisher Viewer – workaround

One of the most active keyword searches that I have with my blog is for a Microsoft Publisher Viewer. If you’re familiar with Publisher you’ll know that the short answer is that there is no Publisher viewer application. If you’re familiar with my blog, you’ll know I post cool stuff too.

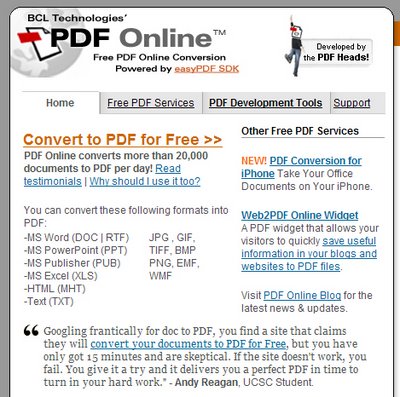
So, with this in mind, today I have a sort of solution for the Publisher viewer program. It’s a free online PDF document creator. Visit it at www.pdfonline.com. Here you can upload files in a variety of formats including Microsoft Publisher and files can be up to 2Mb in size – that’s the real limit here. The file will be converted into a pdf format file and emailed direct to you.

It’s simple and effective and a workaround for the Publisher Viewer problem – you get to see and read the contents of the file and that’s what you’re looking for.

Helen Bradley

Thursday, March 6th, 2008

Should be easy – but it isn’t

Ok, I got this question from someone asking how to print a very large pdf file (think measured in feet not inches). They can’t print onto letter or A4 without needing a magnifying glass to see the text. Solution? Well my head says tile it and it should be a feature of the Reader software.

Nice try but no cigar! It isn’t a feature of the software. Adobe if you’re listening, you so have to add this as a feature, it’s almost inexcuable that it isn’t there. You should be able to specify the number of pages tall and wide to print a single page onto.

Ok, so next thought is a poster program. One that takes an image/file and breaks it into pieces. I’d settle for one of two methods of operation – ideally it would open a PDF file and just print it for me – ok, enter fantasy land Helen! There are poster programs but they take images and not PDFs – not entirely unexpected but it was worth a look.

Other accepted method would be for the program to operate as a printer driver. I would print from Reader to the driver and then it would handle the tiling and final printing. Good concept and, as it happens there are a few options out there. Funny thing is, most I downloaded and installed and tried didn’t work. Very strange, frustrating and annoying. Final solution worked and did so pretty well. It’s called Click2Poster and it’s from Blue Squirrel. It installs as a printer drivers so you print to it from your applicaiton. This overcomes the file compatibility issues as, provided you can open a file in something and print it, this program will capture it. Then it opens automatically (I liked this feature), with your print job on the screen. You choose how many tiles and the printer and send it off to print. It works, which by that stage of the day put it in the “miracle software” category!

The trial version slaps its own stuff on the page but shell out a measly $19.95 and all your poster printing problems will be solved. I can see it would be useful for printing large versions of your images for wall art and all sorts of things. In the meantime, my happless reader can print and read his/her pdf files so I have another happy reader. I like those!

Helen Bradley

Tuesday, March 4th, 2008

MIA – Word 2007 loses Versions

There was a handy utility in Word prior to and including Word 2003 which disappeared without ceremony in Word 2007 called Versions. The premise was that you could save multiple versions of a document – like a snapshot of the document at different stages of its development – inside the one file. The document took with it a history of what it had looked like at various times in its past. To use it, choose File > Versions and then just save a version now or set it to save one automatically each time you close a file.

If you didn’t use versioning, you may not mourn its passing. If you did use it you are left wondering why it got axed. It was a handy tool, it worked, it did a job that meant many folk who might otherwise have lost work permanently actually had the backups of their work on hand when they needed it. Nice work Microsoft – NOT!

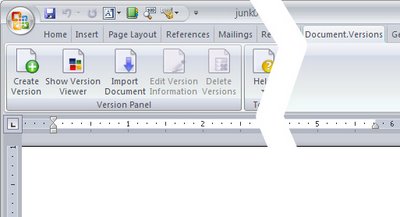
Anyway the clever folk at Edenic Software have created a neat little add-in which puts Versions back into Microsoft Word. The tool is called Document.Versions and it installs as a new Ribbon entry. It works pretty much like the old tool but this one is nice and visible and made by folks who care so it’s likely to be around for quite some time. I’ve been trialling a Beta version and the final release is out very soon.

If you loved versions and if you’re annoyed (I’m trying to be polite here) that Microsoft took away a great tool, then take yourself over to OfficeVersions.com and grab a trial version of the add-in. You can trial it for 30 days and then buy a licence for less than it will cost in your time to get back information you’ve lost when someone edits your document without turning on Tracked Changes, for example!

Oh, and look out for other .Version tools coming soon. Versions add-ins for Excel and PowerPoint are planned – called Spreadsheet.Versions and Slideshow.Versions. While versioning was never a feature of either Excel or PowerPoint that doesn’t mean these won’t be very handy additions to Excel 2007 and PowerPoint 2007 too.

Helen Bradley