A Quick Guide of Shortcut Keyboard Combinations to Accent Marks over Characters
Word allows you to create accented letters quickly using its inbuilt accent shortcuts. To do this, press the accent shortcut key combination, then release, and follow it up with the letter to accent.
Some of the more commonly used shortcuts are:
Circumflex – Ctrl+Shift+^ (caret/6) followed by (a, e, i, o, u)
Grave – Ctrl+` (accent/grave) followed by (a, e, i, o, u)
Acute – Ctrl+’ (apostrophe/quotation mark) followed by (a, e, i, o, u, y)
Cedilla – Ctrl+, (comma/less than) followed by (c)
Umlaut – Ctrl+Shift+: (colon/semi colon) followed by (a, e, i, o, u, y)
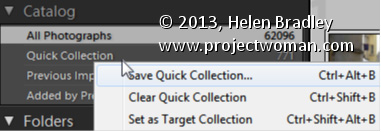
Understand what the Quick Collection is and how to use it
The Quick Collection is a temporary collection in the Catalog area of the Library in Lightroom. You can use it to manage your images.
You can drag and drop images into the Quick collection and use it to store images temporarily.
The Quick Collection doesn’t lose its contents when you close and reopen Lightroom.
When you right click the Quick Collection you can choose Set as Target Collection, Clear Quick Collection or Save Quick Collection to save its contents as a regular Collection.
Ok. so I have Office 2013 installed but I don’t use Lync – but the damn program launches each time I start my Windows 8 machine and that doesn’t suit me. I shut down my computer every time I use it to save battery life when I travel and for airplane safety. For this reason, the fact that Lync starts up with Windows 8 is a major inconvenience. Not so much so Windows Live Messenger but I don’t want that either – Microsoft is phasing it out and I never use it to communicate – haven’t done so for years. So, the question is – how to remove these annoying startups in Windows 8. Turns out the solution is simple – much simpler in fact than in earlier Windows versions.
Press Ctrl + Alt + Del once and click Task Manager. This is now not only the way you stop a program from running once but also how you axe it permanently. Click the Startup tab in the list and locate the application to stop – in my case, it is Lync. Then click the Disable button in the bottom right of the dialog. Repeat for any other program you want to stop running – of course never stop anything from running that you don’t understand the purpose of – you never know just how vital that program might be – but Windows Live Messenger and Lync are not needed.
When you’re done, click the close button and next time you start up your machine these programs won’t run. Yeah! No more annoyance – well, there are plenty of annoyances but these no longer count!
Learn three must know blend modes for Photoshop and in particular for editing photos in Photoshop. Covers how to use Screen, Multiply and Overlay blend modes.
Transcript:
Hello, I’m Helen Bradley. Welcome to this video tutorial. In this tutorial I’ll introduce you to the three must know blend modes in Photoshop. I’ll explain how they work and how you might put them to use.
There are three blend modes that it’s really handy to know how to use in Photoshop, and we’re going to look at those three blend modes in this video tutorial.
In this particular image I have a picture of a building in Darwin and over the top of it I have a second layer. And on the right hand side is the exact duplicate of the layer below. And on the left hand side is just the color pink because we’re going to have a look and see how these blend modes work not only with images where you’ve got two layers that are identical but also what happens when you have for example a layer that is different. And the three blend modes that are really handy to use are got to by clicking this blend mode dropdown list in the layers panel in Photoshop.
If you can’t see your layers panel choose Window and then Layers and that will show you your layers panel. When you’re using blend modes you’ll always use the blend mode on the topmost layer or the layer that you want to affect. And it will affect how this particular layer blends in with the layer or layers below.
The first blend mode we’re going to look at it is this one here. It’s Screen. Now you’ll see that the blend modes here are grouped together. The blend modes in this particular group are the lightening blend modes. They are lighten, screen color, dodge, linear dodge and lighter color. And we’re going to look at screen in this particular group. And screen always lightens an image. So you can see here that the image is lighter than it was in the original. Here it’s colored this sort of pink tone. And here we’ve just got the original image over again, but it’s a lighter version. This is a blend mode that you can use to salvage an underexposed image. If you’ve got an image that doesn’t have enough light in it, you could use the image on each of the layers and then blend the top one into the bottom using the screen blend mode. And that will lighten the image and bring detail out of it.
The next blend mode we’re going to look at is similar but works in the opposite way. This is a darkening blend mode. And it’s accessible from this darken group of blend modes: darken, multiply color burn, linear burn and darker color. And in this case the one we’re going to use is multiply. And multiply darkens the image. You can see that we’ve got a darker version of the image with this sort of pink overlay. But here where we had the image on the two layers, the exact same image on each of the two layers, you can see that we’ve got a darkening of the image. This would be useful if we had an overexposed image. If we put the overexposed image on two layers and then blend them together with the multiply blend mode, we’ll bring back some of the detail in the overexposed image.
The other of the blend modes that you’ll typically use in Photoshop is overlay. It’s in this group of blend modes, and it’s one of the contrasty blend modes. What this does is it lightens everything that is lighter than a mid-gray and it darkens everything that is darker than mid gray. So it’s a nice contrasty blend mode. Let’s have a look here at what it’s doing to the image on the right. You can see that this is a flatter sort of image. And when I turn on this layer we’re getting a lot more contrasty image. And that’s what’s happening on the left too is we’re getting a contrasty, a colored version, of the original image. Anytime you want to boost the contrast in an image you can use the overlay blend mode.
So the three blend modes that I suggest that you look at using with your photos in particular are multiply to darken, screen to lighten, and overlay to add some contrast and punch. Now if you find that a certain blend mode is too much let’s just get rid of this particular layer and let’s duplicate the image itself. And let’s go and use the overlay blend mode. And if this is too much of a contrast enhancement to the image all you need do is to back off the opacity of this layer. This will give you some of the layer below and some of this additionally contrasty layer so that your image gets more contrast but perhaps not as much as it would have if you’d had this layer at 100 percent opacity.
I’m Helen Bradley. Thank you for joining me for this video tutorial. Look out for more of my tutorials on this YouTube channel. Comment on the video and like it if you like it. And look out for more tips, tricks and tutorials on Photoshop, Lightroom, Illustrator and a whole lot more at my website projectwoman.com.
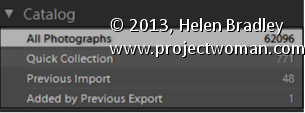
Undertand the Collections in the Catalog panel in Lightroom
Some collections are created and maintained by Lightroom. You will find these in the Catalog panel in the Library module.
One of these, All Photographs, is a collection of all the photos in your Lightroom catalog. If you need to search all your images, click this before creating a search or filter.
The Previous Import Collection contains the images added to the catalog during the most recent import. As soon as new images are imported, the older images disappear from the Previous Import Collection.
Added by Previous Export is a collection of images you recently exported from Lightroom. When you did so, you selected the option to import the exported images back into Lightroom.
Quick Collection is a temporary collection that you can use to store images temporarily.
I like Photoshop to open and “look the way I want to see it”. But sometimes ‘the way I want to see it’ is different than others. I’m fickle – but thankfully Photoshop plays nice with me – the secret is its Workspaces. These Workspaces let me preconfigure my Photoshop screen for various scenarios, to save them so I can reuse them, and to put everything back in its place when I mess them up.
If this sounds like something you could use – here’s how to give your Photoshop window a custom look with workspaces.
The first thing I do is to set up Photoshop the way you want it to look and that means hiding all the panels you don’t want to see and displaying those that you do.
Then arrange them on the screen exactly the way you want to see them. For me, I prefer my toolbar to be in two columns rather than one long one. I like my layers and paths palettes visible but not much else.
Once the screen is organized the way you want it to look, from the dropdown list in the top right corner choose Essentials > New Workspace and type a name for the workspace. Select the options for keyboard shortcuts and menus select and click Save.
You can repeat this process, if desired, and create other workspaces. You might make one for photo-editing, one for collage, one for illustration or one for videoing depending on your own personal needs.
In future you can set up your screen by choosing the workspace of your choice from the dropdown list.
If you move things around and things go a bit crazy it is easy to reset a workspace back to how it was when you last saved it.
To do this, first make sure you are viewing the workspace to reset and then open the Workspace menu and choose Reset .
Likewise you can return to Photoshop’s default workspace anytime by selecting Essentials then click Reset Essentials.
And one last word on workspaces…
If you want to see what’s new in Photoshop CS6 click the New in CS6 workspace and you can see what is new in Photoshop. Open a menu and any new options in it will show as blue on the menu.
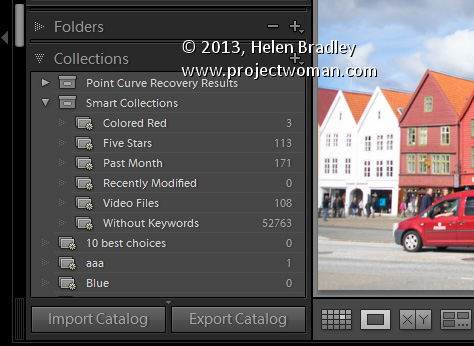
Understanding why you should use Collections in Lightroom
A Lightroom collection is different to a folder. A folder contains images but a Collection contains only pointers to those images, which exist somewhere on your disk. In Lightroom each image exists in just one folder but it might be in many different collections.
For this reason collections are a great way to organize your photos. For example, you can use collections to assemble images for printing or for creating a slideshow.
You can add images to a collection from one or many folders. So, collections are a great way to create a central location where you can view and work with a set of images that may be located in multiple folders on your disk. Because collections are merely pointers to your images they take up very little disk space.
If you have thousands of images to add a copyright watermark to, you can use Lightroom to do this very quickly. This video shows the workflow to use to import thousands of images into Lightroom and how to export them and create your own watermark to add to them. This is a minimalist workflow designed to process a lot of images very quickly.
Transcript:
Hello, I’m Helen Bradley. Welcome to this video tutorial. In this tutorial I’m going to show you how you can copyright in bulk the images as you export them from Lightroom. One of my blog readers recently contacted me and asked me how easy it would be to add watermarks to a series of images that they had. And so this video is for them and for anybody else who’s considering applying a watermark to a lot of images all at once. And my suggestion is, and she had something like two and a half to three and a half thousand images, is that Lightroom is the tool to use.
So I’m going to get started and I actually have a folder of images that I am going to import into Lightroom to show you exactly how it will work. So I’m going to click on Import and then I’m going to select the folder that contains the images that I want to import in. So this would be the folders that contain the two and a half thousand or so images that this particular reader has. So I’m just looking for my particular set of images. And I know they’re here. So all I’m going to do to start off with is just to select the folder of images. And it’s these Cornwall images that I’m going to import. Now I’m going to add them to Lightroom. And in this case because I want to do this very quickly because all I want to do is to add watermarks to them, I’m going to select Minimal as my previews because that’s going to render everything very, very quickly. And because I want lots of images I’m going to deselect Don’t import selected duplicates. So all I’m going to do at this stage is now to click Import and bring those all into Lightroom.
Now the images are coming into Lightroom and I can start getting ready as soon as they’re in to export them with their watermarks. Now some of these are portrait orientation and some of them a landscape. That may or may not be an issue. I’m going to select the first image and Shift click on the last so that we can export them. I’m going to Right click and choose Export and then Export again. And this takes me to the Export dialogue. So the first thing I need to do is to determine where I want to export them to. So I’m just going to put them into a folder in my My Documents folder. And I’m just going to create a brand new folder for them. But I’m going to select My Documents as the location, and I’m going to put in a subfolder called watermark. And then I will check if I want to rename my files. I don’t want to rename them. The idea of this is to get in and out as quickly as possible.
I can convert them if they were not JPGs and I could select the quality for them. Again 85 percent quality might be sufficient. If you’re that particular reader 100 percent quality might be your preferred quality. I can resize them or not. So if I want to leave them at the exact same size I just deselect everything.
What we’re most concerned about here is this Watermark option. So I’ve got it selected, and I’m going to click it, and I can choose Edit Watermarks. So this means that I can now create my own watermark. So I’m just going to delete what’s here. I’m going to press and hold the Alt key as I type out 0169 on the keyboard because that gives me the copyright symbol, and I’m going to type my copyright text. And I’m going to do two lines. And it’s Helen Bradley, projectwoman.com. And you can see it up here and it’s up there because that’s where I’ve got it positioned right
now. Here’s the anchor. If I wanted it down the bottom corner I could place it there. And then there’s an inset which is inset off that option.
So I could push it further down into the corner if I wanted to or not. It looks like it’s also centered right now. And no it isn’t. It’s right justified. So we could left justify it or center it if we wanted to. And we can also resize it either by dragging on its sides or we can drag it just to make it bigger if we wanted to. So I’m going to inset this a little bit horizontally and a little bit vertically. But you could see that we have a lot of power in where we place it.
Its opacity is 100 percent. And I always suggest that you do apply a shadow to your text because the shadow will help its readability if it’s over a lighter background. So I would normally put a very, very small shadow. And you can change the angle so that you can make the shadow come from whatever angle that you want it to come from. I prefer mine to come from about 30 to 45, something like that, so it’s coming in from this angle here. And if you’re happy with that that’s all you need to do. So you click Save. And we’re going to save this. And we’ll call it test watermark, you can call it whatever you want your watermark to be called, and I’ll click Create. And it’s now being selected as the watermark for my images.
I’m going to select to after export to show in Explorer. But literally at this point we could have two and a half or three and a half thousand images selected and they would all be ready for export. And all I do is click Export and now they’re going out. They’re exported out of Lightroom. And when they appear in that folder in My Documents, which we’re going to see in a minute, here it is now, they’re all going to have the watermark on them. So if I double click on this image we’re going to see that the watermark is in place.
So that’s how easy it would be to apply a watermark. If that were all you wanted to do and you had thousands of images to do it with, that’s all you need do to watermark your images. Bring them into Lightroom, don’t even bother rendering big previews, just use the minimal, select to export them, click and create your watermark and then just click Go and Lightroom will just go and do it all for you.
I’m Helen Bradley. Thank you for joining me for this video tutorial. Please if you have any questions feel free to pose them to me. I’m quite happy to make videos to answer questions. Look out for more of my videos on this YouTube channel. And follow me at projectwoman.com where you’ll find more tips, tricks and tutorials for Lightroom, Photoshop, Illustrator and a whole lot more.
Learn more about the formatting applied to text in your document with this handy Keyboard Shortcut
If you want to quickly find out what formatting has been applied to any piece of text, click in the text and press Shift + F1. A task pane will open in the right of Word window. This Reveal Formatting task pane displays details about the text format being used for the word that your insertion point is closest to.
With this task pane open you can click on any piece if text to learn more about its formatting.
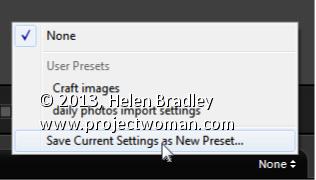
Save Time when importing photos by Creating an Import Preset
If you use the same options every time you import your images into Lightroom, you can create an Import Preset to speed up this task.
Start by selecting Import to open the Import dialog and go ahead and select those options you generally want to use and then locate the Import Preset option at the foot of the Import dialog. Click the drop-down list and choose Save Current Settings as New Preset. Type a name for the preset and save it.
In future you can select this preset when you are importing images. This gives you, at the very least, a starting point for your import as it sets up the import dialog to match the settings you saved. If you wish, you can make changes to the settings without altering the preset, allowing you to use it anytime.
You can create multiple import presets for different situations so you can select the most appropriate one to use each time you import photos.