I recently imported a heap of stock images into Lightroom so I could easily find images I wanted to use for various projects. When I added keywords to the images I ended up removing a lot of the images’ own keywords before replacing them with my own.
The problem I then encountered was that I had a heap of Keywords in my Keyword list with 0 images associated with them. In short my keyword list was bloated with useless keywords.
While you can right click a keyword and click to Delete it – this was an impossible task it would have taken hours. Instead you can clean up the list instantly with one simple command. In the Library in Lightroom click Metadata and choose Purge Unused Keywords – instantly all the keywords that aren’t associated with images are deleted. Simple!
Save Time in Lightroom when Resizing and Cropping Large Amounts of Output Images
If you’re working on a large shoot and need to output a lot of images at a fixed size then Lightroom can do the work for you. It isn’t obvious how you can crop all your images to a fixed size and output them at a certain set of pixel dimensions but it is easy to do when you know how. Here’s how to do it:
Step 1
First locate the folder with your images in it. I prefer to make virtual copies of my images and put them in a new collection but you can do whatever makes sense to you.
Step 2
Select all the images in Grid view in the Library module in Lightroom.
Open the Quick Develop panel on the right and, from the Crop Ratio dropdown list, select the crop ratio that you want to crop to. For example you can crop to fixed ratios such as 1 by 1 or printing sizes such as 5×7, 4×6 and so on.
Here I’ve selected 5×7 and when I do so all the selected images are automatically cropped to this 5 x 7 ratio.
Lightroom is smart enough to understand that some images are portrait orientation and others are landscape. Portrait images are cropped to 5 x 7 and landscape orientation images to 7 x 5.
Step 3 (optional)
If desired, you can now move to the Develop module and check the crop for all the images. By default, Lightroom will center the crop rectangle on the image and this may not be exactly what you want for some images. However, it is easy to go to the Develop module, click the first image and click on the Crop Overlay Tool so you see the crop marquee in position on the on the image.
Now from the filmstrip you can click on each image in succession to preview it in the crop window and you can easily identify if any of them need an adjustment to the crop rectangle. If they do simply drag on the crop rectangle to reposition it. When you’re done return to the Library view.
Step 4
As the images are now all cropped to size, press Ctrl + A to select them and then click Export. Choose a folder to export the images into or click New Folder to create a new folder.
You can now set your desired preferences in the Export dialog.
To control the output size – in pixels wide and tall – of the images easily because you already know the crop ratio. To do this, select the Resize to fit checkbox and choose Long Edge from the dropdown list. Then type a pixel dimension for the long edge. So, for example, to prepare 5 by 7 ratio images for printing at 300 dpi the longest edge will need to be 2,100 pixels (7 x 300) so type 2100 and set the resolution to 300.
Step 5
Click Export to export your images and they will be exported to a folder at the chosen size and resolution.
This process allows you to quickly and effectively prepare a batch of images for printing. It manages portrait and landscape images so that you don’t have to separately handle each type. It’s a simple workflow and a fast way to prepare images from a large shoot.
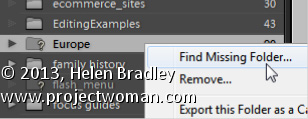
How to solve the problem of Lightroom reporting a folder as missing
If a folder is missing, it will have a question mark beside its name in the Lightroom library.
You can sort out Lightroom’s problem by locating the missing folder – to do this, right click the folder name in Lightroom and choose Find Missing Folder.
Now navigate on your disk to find the folder that Lightroom can’t find. When you have done this all the contents from that folder will be added back into the Lightroom catalog automatically.
The reason that Lightroom can’t find your folder is because you have done something to it outside Lightroom. In future, move and rename folders from inside Lightroom and this problem won’t occur.
Learn how to create and use the Lightroom Target Collection feature
Lighroom’s target collection feature makes it easy for you to add images to a collection. If you make a collection the target collection you can add an image to that collection by simply pressing the letter B on the keyboard. But, be warned, once it is added if you press B again you will remove the image from the target collection.
To make a Collection the Target Collection: right click it and choose Set as Target Collection.
Any Collection (except a Smart Collection) can be designated as the Target Collection but there can only be one Target Collection at the one time.
If you deselect the current Target Collection: by right clicking its name and disabling Set as Target Collection, then the Quick Collection becomes the Target Collection, by default.
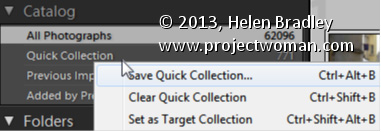
Understand what the Quick Collection is and how to use it
The Quick Collection is a temporary collection in the Catalog area of the Library in Lightroom. You can use it to manage your images.
You can drag and drop images into the Quick collection and use it to store images temporarily.
The Quick Collection doesn’t lose its contents when you close and reopen Lightroom.
When you right click the Quick Collection you can choose Set as Target Collection, Clear Quick Collection or Save Quick Collection to save its contents as a regular Collection.
Undertand the Collections in the Catalog panel in Lightroom
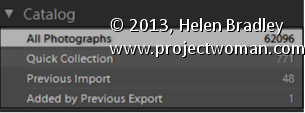
Some collections are created and maintained by Lightroom. You will find these in the Catalog panel in the Library module.
One of these, All Photographs, is a collection of all the photos in your Lightroom catalog. If you need to search all your images, click this before creating a search or filter.
The Previous Import Collection contains the images added to the catalog during the most recent import. As soon as new images are imported, the older images disappear from the Previous Import Collection.
Added by Previous Export is a collection of images you recently exported from Lightroom. When you did so, you selected the option to import the exported images back into Lightroom.
Quick Collection is a temporary collection that you can use to store images temporarily.
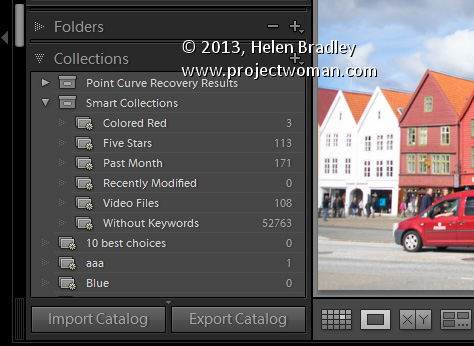
Understanding why you should use Collections in Lightroom
A Lightroom collection is different to a folder. A folder contains images but a Collection contains only pointers to those images, which exist somewhere on your disk. In Lightroom each image exists in just one folder but it might be in many different collections.
For this reason collections are a great way to organize your photos. For example, you can use collections to assemble images for printing or for creating a slideshow.
You can add images to a collection from one or many folders. So, collections are a great way to create a central location where you can view and work with a set of images that may be located in multiple folders on your disk. Because collections are merely pointers to your images they take up very little disk space.
Learn how to crop and resize in bulk in Lightroom. If you have a lot of images you need to, for example, crop to 5 x 7 and then save at a particular pixel size and resolution, you can learn how to do this quickly and effectively in Lightroom. This makes use of the tools in the Quick Develop panel in the Library module.
Transcript:
Hello, I’m Helen Bradley. Welcome to this video tutorial. In this tutorial I’m going to show you how you can bulk crop and resize images and export them from Lightroom.
A reader recently posed a question to me and that was what do I do if I need to crop all my images to 5 by 7 in size and get them out as 500 by 700 pixel images. In Lightroom that’s not that difficult to do. What I suggest you do is you do it from the Library in Quick Develop mode. So I’m going to select the images here and then I’m going to select Crop Ratio and I’m going to choose 5 by 7. And that will crop all of these images to 5 by 7 images. But look what it’s done with the verticals. It’s cropped them to 5 by 7 but it’s kept that same vertical alignment.
So now let’s go to the Develop module and just see what we’re seeing here. This is the crop marquee. And you can see that this image, each one of these images in fact has been cropped to 5 by 7. And let’s go and find a vertical crop and see how it’s been cropped. Again, it’s been cropped to 5 by 7 but in a vertical direction. So this means that all of these images have automatically been cropped.
All we would do is have a quick look and make sure that important parts of the image have not been cropped off. If these were people we’d have a quick check to make sure that somebody’s head hasn’t been chopped off for example. And having done that now knowing that everything is cropped to 5 by 7, to export these images at 500 by 700 pixels in size or 700 by 500 we would select all of them by clicking on the first and Shift click on the last. I’m going to right click and choose Export and then Export again and we would just set up the Export option. So here I’m going to put this in a folder called 5 by 7.
I don’t want to rename these files. All we want to do is to resize them. But what I do want to do is I want to select Resize to Fit. And the longest edge since I know that these are all 5 by 7s is going to be 700 pixels and the resolution I can set to 100 pixels per inch. So these are then going to be 5 by 7 images at 100 pixels per inch resolution. And all I need to do is to click Export and Lightroom is going ahead and it is cropping and resizing all of those images so that they are all going to be the exact right size that we chose. And here they are including the ones that were verticals. You can see that these are 500 by 700 pixels in size. This one is 700 by 500 because it’s a landscape image.
So in Lightroom you could batch resize and export these images in just a matter of a few seconds by just choosing the right option. And that is here in the Quick Develop module setting a crop ratio for those images. This is not something you can do easily in the Develop module, but it’s something that you can do very, very simply here in the Quick Develop area of the Library in Lightroom.
My name is Helen Bradley. Thank you for joining me for this Lightroom video tutorial. If you liked the tutorial please comment, press the Like button, consider subscribing to my YouTube channel. You’ll also find more of my tutorials, tips and tricks on my website at projectwoman.com.
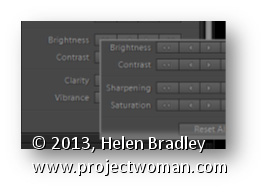
Learn to find some hidden options in Lightroom by using the Alt (Option) key
Some buttons and other features in Lightroom change depending on whether the Alt key (Option on the Mac) is pressed. For example in the Quick Develop panel in the Library module the Clarity and Vibrance options change to become Saturation and Sharpening when you hold the Alt (Option) key.
Also in the Library module the Import and Export buttons become Import Catalog and Export Catalog when the Alt (Option) key is selected. As you work in Lightroom, occasionally press the Alt or Option key to see if any useful options become visible when you do so.
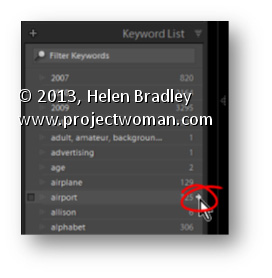
In the Library module in Lightroom the Keyword List panel tells you how many images are keyworded with a particular keyword. It can also find these images for you so, open the Keyword List panel, and click the arrow to the right of a keyword to view images that have that keyword associated with them.
These arrows appear only when you are hovering over a keyword in the list.