Friday, November 25th, 2011

Craft great Black and white images in Lightroom

Most of us know we can convert and image to black and white in Lightroom by simply pressing the letter V. However, for the exact same image, your version of Lightroom might give a very different result to my version of Lightroom. The explanation is that there are two settings available for black and white conversions in Lightroom.

I’ll show you what these are, how to configure the one you want to use and how to quickly switch between them.

With a color image on the screen in Lightroom’s Develop module, press the letter V to convert it to black and white.

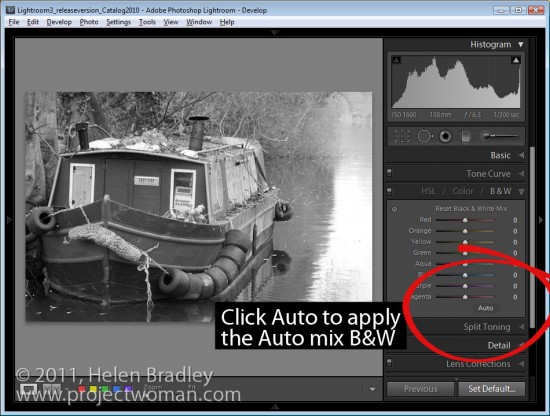
Open the B&W panel – it’s called Greyscale in Lightroom 2 – and check out the color sliders.

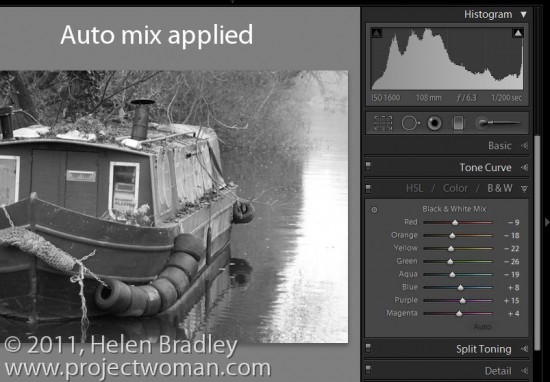
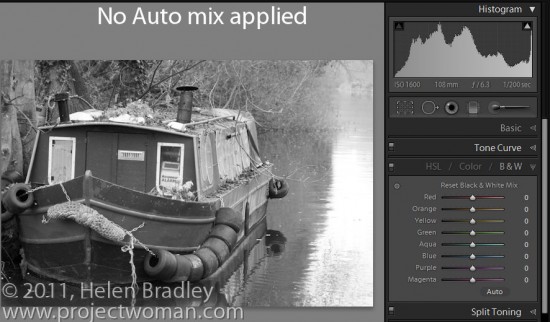
Depending on the preferences that you have set, the sliders might all be set to zero or they might show a black and white adjustment tailored to the image itself which Lightroom calls Auto mix.

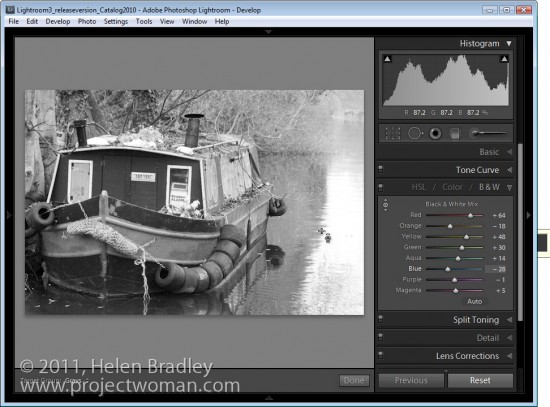
The auto mix adjustment applies an auto exposure adjustment to the image as well as a conversion that maximizes the distribution of the grey tones in the image. This is customized for the image so every image will be given a custom adjustment much as you will get if you click the Auto Tone button in the Basic panel. Notice the subtle differences in the histograms in each of the adjustments here.

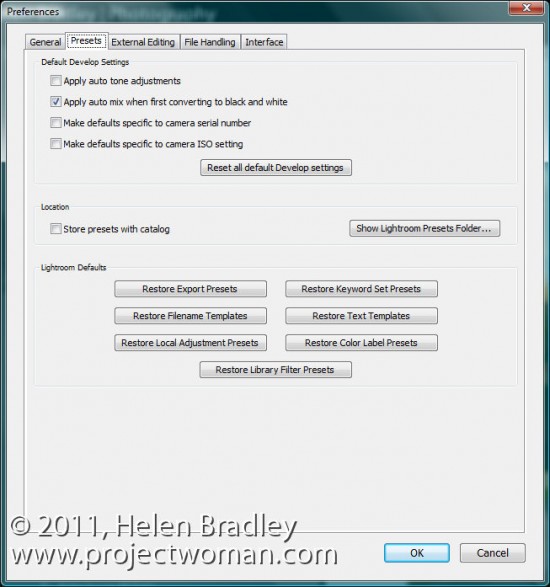
Whether or not you see this Auto mix applied to a black and white image is controlled by your Lightroom preferences. To see these, choose Edit > Preferences (or Lightroom > Preferences on the Mac), select the Presets tab and there’s an option there which reads “Apply auto tone mix when first converting to black and white”.

If this is checked you will get the auto tone mix applied to the image, if not, you will see a black and white adjustment where each color is given the same adjustment value of zero.

Regardless of which setting is in place you can switch between the two in the B&W panel.

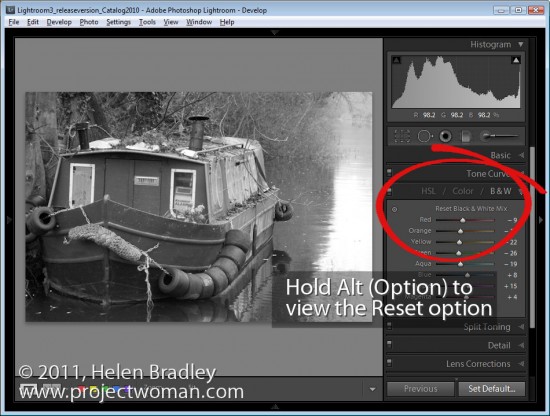
If an Auto mix has been applied, hold the Alt key (Option on the Mac) and you will see an option Reset Black and White Mix. Click this and all the sliders will be set back to zero.

On the other hand, if your sliders are all set at zero, click Auto to apply the auto mix adjustment to the black and white image.

Step 5

You can further adjust the black and white regardless of whether you have an auto mix applied automatically to it or not by adjusting the sliders.

You can also select the Target Adjustment Tool and drag on an area of the image to adjust whether it is light or dark. Dragging downwards will darken it, dragging upwards will lighten it.


Helen Bradley

Wednesday, November 23rd, 2011

Lightroom’s Selected and Most Selected Images

One of confusing things when you’re getting started in Lightroom is understanding the concept of selected images and the most selected image in Lightroom.

Step 1

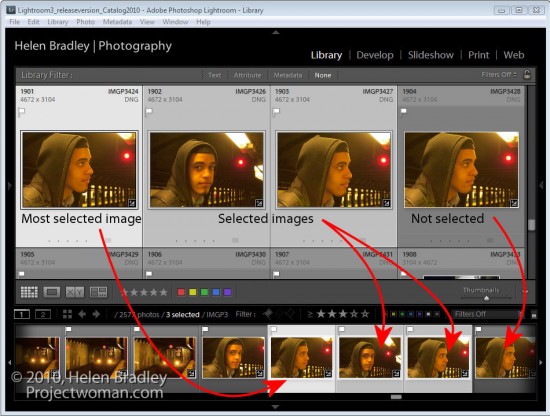
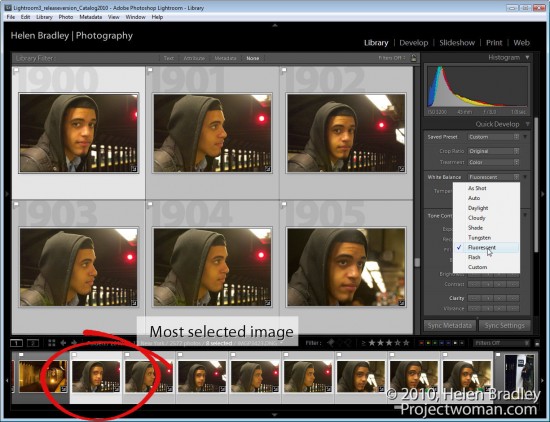
To see this at work, start in the Library module and press G to move to Grid view. Click on any image to select it and Shift + Click on another image. You’ll now have a sequence of images selected.

Notice that in both Grid view and on the Filmstrip the first image that you selected has a lighter border around it than all of the other selected images and notice that the unselected images have darker borders.

The image with the lightest border is the most selected image and it is the image that will be affected by changes that you make to various settings, in particular when you are working in Loupe view with multiple images selected.

Step 2

What you have selected in Lightroom and the view you are in impacts how changes are applied to an image.

In Grid view if you select the Quick Develop panel and choose a different white balance setting then all the selected images that are selected will be altered.

Step 3

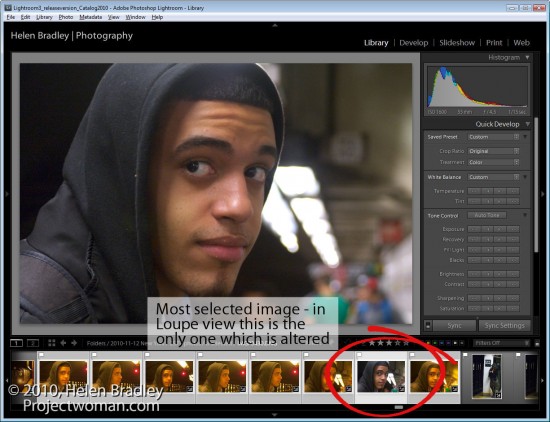
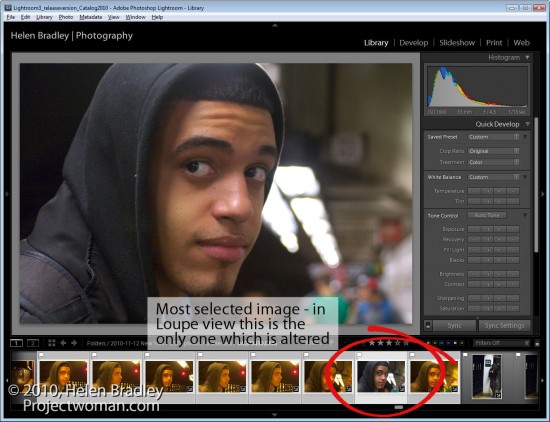
However, if you are in Loupe view and if you make the same change only the most selected image will be altered and not all the selected images.

Grid and Loupe view work very differently and it’s important to understand, particularly in Loupe view, that when you have multiple images selected, there is one that is most selected.

Step 4

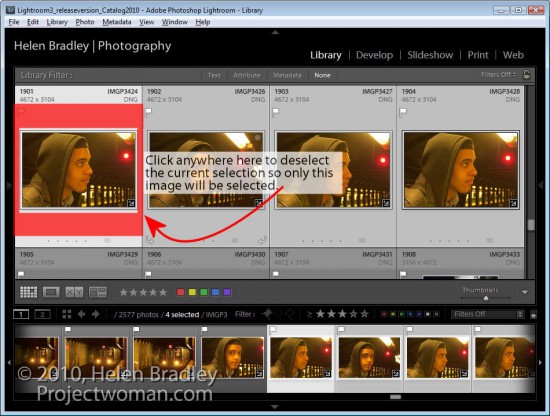
When you have all images in a folder or collection selected it can be difficult to see just how to deselect the images. To deselect a selection, click outside the thumbnail area of any of the selected images in an empty area of the cell it is in. This deselects the current selection so only the image that you just clicked will be selected.


Helen Bradley

Thursday, November 17th, 2011

Save space – Compress your images in Word

A reader just asked if they added 50 images to a Word file would that blow out the file size when they send it to their colleagues. Answer: Yep! big time.

Most specially if you use your your beaut iPhone to capture the images, or a good compact camera or if you just insert big pictures. You see, unless you do something those big pictures will be inserted in the file and included in it when you save it – you can end up with a monster Word file (think 5Mb x 50!)

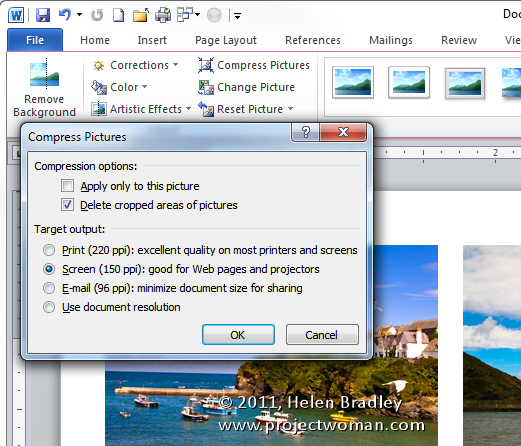
The solution to the problem is to compress the images. To compress all the images in your Word 2010/2007 file so that they take less room, click on any image and choose Picture Tools > Format tab.  Locate the Compress Pictures button and deselect Apply only to this Picture so all images will be compressed.

If there is an Options button click it to see the sizing options (this appears in Word 2007 but not in Word 2010). Then choose the Target output – typically Screen or Print are good options as they will view well and print just fine. Check the Delete Cropped Areas of Pictures checkbox so cropped data won’t be saved. Click Ok. Then save the document.

This compression feature will reduce your file to a better size for sharing without compromising the quality of the document. And the changes affect only the images in the document not the originals on your disk.

Helen Bradley

Monday, November 14th, 2011

Photoshop – convert a black background to white

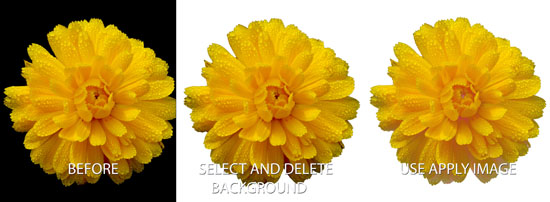
I was recently asked how to convert the background of an image from black image to white. It isn’t a trivial task so it got me thinking. One of the problems is that things shot against a black background actually pick up black or dark reflections so it’s not enough to merely remove the black – you also have to solve some of the reflection problems as well.

This method won’t work on every image but provided the subject is well lit so there are minimal dark reflections to deal with, it is quick and effective.

Step 1

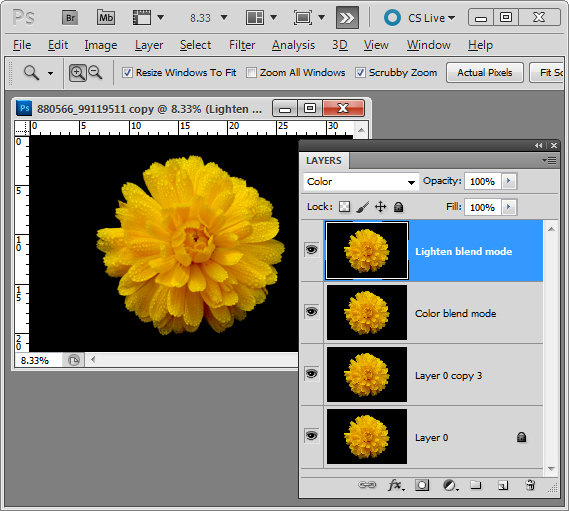
Start by making three copies of the background layer of the image by right clicking it and choose Duplicate Layer three times.

Set the top layer’s blend mode to Color and the second top layer’s blend mode to Lighten.

Step 2

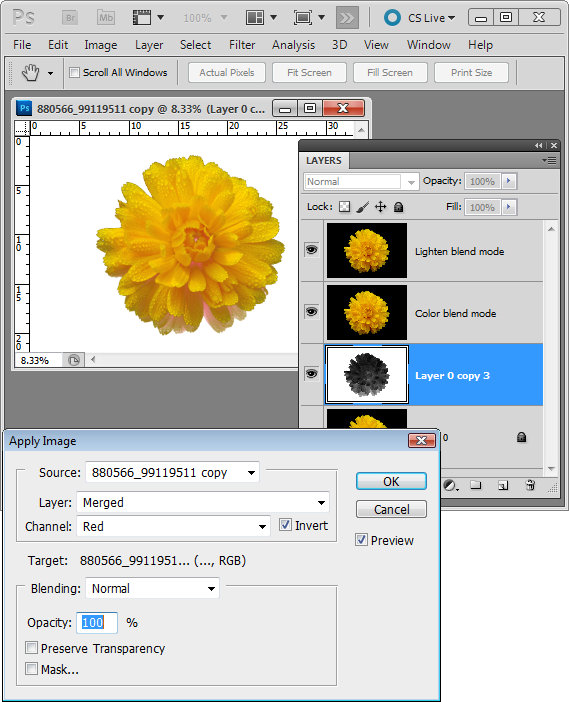
Target the third top layer and choose Image > Apply Image. Set the Channel to Red as it is typically lightest in the areas where the data is that you want to retain. Select Invert and make sure the Blend mode is set to Normal. You will see the image now with the background removed. Click Ok.

Step 3

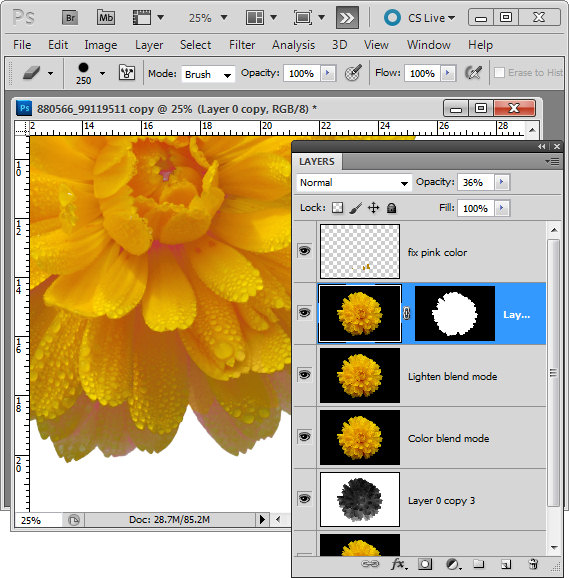
Now all you have to do is to tidy up the problems. Typically this is problems with color or the edges. For this I make yet another duplicate of the background layer and drag this to the top of the layer stack. Make a rough selection of the background using a tool like the Quick Selection tool and then hold Alt (Option on the Mac) as you click the Add Layer Mask icon at the foot of the layer palette. You can now use this layer to add color or to fix other problems.

In this image I reduced the opacity of this layer to around 30% to bring back some missing detail in the flower.

I also added a new layer, set its Blend Mode to Color, sampled some color from the flower and painted over some of the petals where they showed pink once the black was removed.

The image is © Lars Sundstrom from sxc.hu


Helen Bradley

Wednesday, November 9th, 2011

Personalize Lightroom with identity plates


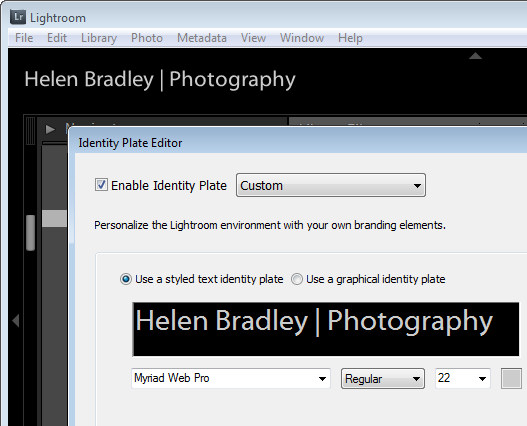
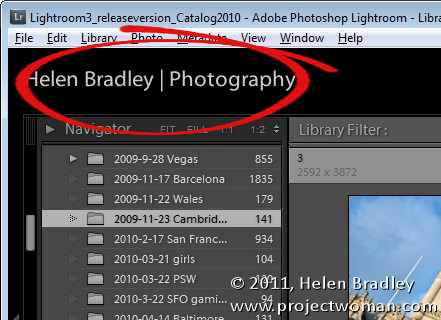
If you’re a professional photographer, teacher, someone who routinely shows off images in Lightroom or if you just like the personal touch, why not personalize your Lightroom interface? The Lightroom branding which appears in the top left corner of the screen is customizable using the Lightroom Identity Plate feature. Identity Plates are usable throughout Lightroom to brand your prints, slideshows and some web sites but what suits one of these modules won’t necessarily work for customizing the interface.

The Identity Plate that appears in the top left of the Lightroom screen is configured by selecting Edit > Identity Plate Setup (on the Mac choose Lightroom > Identity Plate Setup).  To create a simple Identity Plate, choose Use a Stylized Text Identity Plate and type the text into the text area. You can select and format the text in the font, font size and color of your choice. Click the Enable Identity Plate checkbox and the changes you make will appear in place so you can check how they look. You may need to size the text to fit the space – Lightroom won’t scale it to fit automatically.

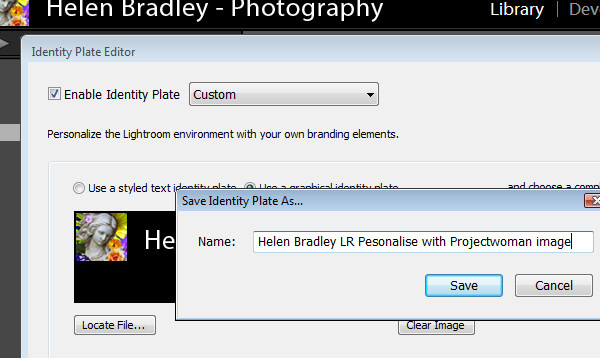
To save the Identity Plate, choose Save As from the dropdown list and type a name for the Identity Plate. You can then select and use it in one of the modules later on – for example you can add it to a print layout.

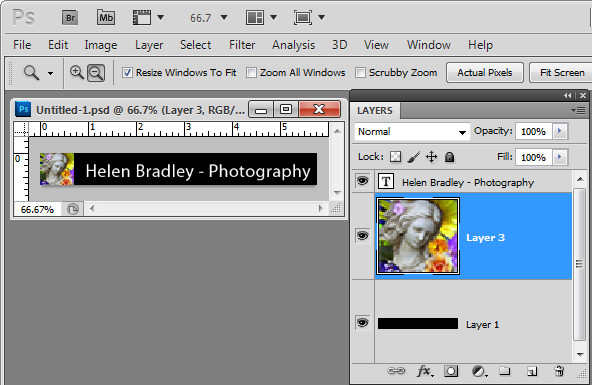
If you prefer to use graphics in your design such as your signature or a graphical design element you can create a graphical Identity Plate in another application such as Photoshop. The file you use should be no more than 60 pixels in height so it fits in the space available – there is no option to scale it to a smaller size, for example. For this reason, if you plan to use a Graphical Identity Plate such as this for more than just customizing your Lightroom interface you will need two of them – one small image for customizing Lightroom and another one sized appropriately for printing at a high resolution.

When creating your Identity Plate in an application like Photoshop, build it in a layered file and make sure the bottom layer of the document matches the color of the Lightroom interface – ie make it black. This way you test the Identity Plate to make sure it will look good when placed on a black background. Then turn off the visibility of the black background layer and save the file as a .png, .psd or another format that maintains transparency (not jpg). If you save as a .jpg image the transparent background will be white and you will probably also have small unsightly artifacts in your design.

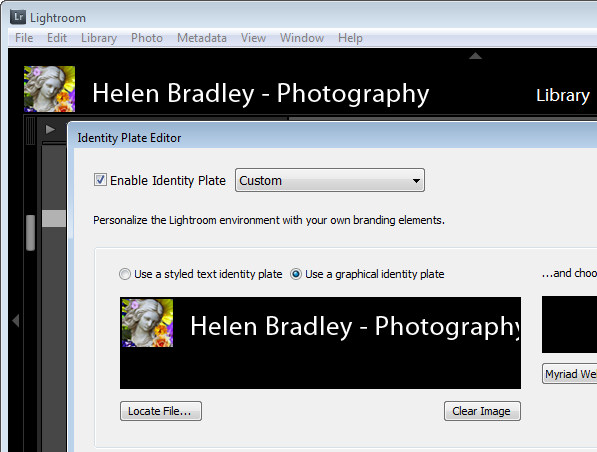
Back in Lightroom, open the Identity Plate Editor and choose Use a graphical Identity Plate, click Locate File and browse to find the file on disk.

Save this Identity Plate so you can always reuse it if you change the Identity Plate in future.

You can use this same process to create a transparent image in your graphics program to use as a graphical Identity Plate for the other modules. In that case make sure that the Identity Plate is created at an appropriate size for printing. Crop closely around the image so that it can be easily sized and moved into position later on. You need to do this because it is not possible to size an Identity Plate any larger than the screen or page size and you cannot skew an Identity Plate out of shape when resizing it – its proportions will be constrained as it is sized up or down.


Helen Bradley

Thursday, November 3rd, 2011

Photoshop CS5: Oil Painting with Pixel Bender

One of the cool new tools from Adobe Labs is Pixel Bender. This free extension lets you apply any one of a series of filters that comes with the extension to your images in Photoshop CS5. But that’s not all – Adobe also provides a simple interface for Pixel Bender that lets you create your own filters. As a result a community is building around Pixel Bender with users sharing custom created filters with others. In this post I’ll show you how to get started with Pixel Bender.

You will find the Pixel Bender extension here for download: http://labs.adobe.com/downloads/pixelbenderplugin.html this is the version for Photoshop CS5 and CS5.5. Go to this site to find the Pixel Bender download for Photoshop CS4 you will see the link in the top right of the page. Make sure to download the version that matches your operating system and your version of Photoshop CS4, or 5/5.5 (32 or 64 bit). The extension is an .mxp file and you need to install it using the Adobe Extension Manager.

You can install the extension by double clicking on the file to launch the Adobe Extension Manager. If you’re using Windows Vista or Windows 7, you should run the Adobe Extension Manager as an Administrator. So, from the Start menu, locate the Adobe Extension Manager entry, right click it and choose Run as Administrator. The reason for this is that the extension needs to be placed in a folder that you can only access if you have administrator privileges. If you launched the program manually choose File > Install Extension and locate and select the extension that you just downloaded.
Accept the license terms and the extension will be automatically installed inside the appropriate Photoshop CS5 program folder.
When you’re done, close the Extension Manager, close Photoshop and reopen it.

Pixel Bender won’t work on images larger than 4096 x 4096 so start by resizing your image if necessary. If desired, you can convert an image to a Smart Object before applying a filter.

To run Pixel Bender open an image and choose Filter > Pixel Bender > Pixel Bender Gallery. You’ll see a list of filters in the dropdown list which currently displays CircleSplash. Select the OilPaint filter and then adjust its settings. Using Stylization, you can adjust the length and bend of the brush strokes – the larger values look best.

Cleanliness will adjust the smoothness of the effect and typically looks good at around 7 or 8. Colorization allows you to apply more or less color to the image. BrushScale changes the size and length of the darker brush strokes – a small value gives thin long lighter brush strokes and a larger value gives shorter thick very dark brush strokes. BrushContrast will adjust the contrast of the brush strokes and is probably better left at a value approaching 1.

In short, adjust the sliders until you get a result you like. If you are unsure how a slider is affecting the image drag it all the way to the left or right to see the effect. Then adjust from there.

When you’re done, click Ok to apply the result to the image. Unlike most filters which convert images to look like an oil painting, this one does well at identifying edges in the image so the painting looks more realistic.


Helen Bradley