Friday, January 31st, 2014

Mac lock and display dimming timing

Memo to my Mac – Don’t go to sleep on me!

Hmmm me and my MacBook Air are getting along pretty well but some things still bug me from time to time.

One is the display dim time. You see it seems like I just look away and all of a sudden the Mac has gone elsewhere – the screen turns off and I have to wake it back up and enter my password.

Right now I am trying to download some software so this is getting pretty annoying. I want to be able to see the progress without having to the Mac up all the time. This constant jiggling the touchpad and entering  a password is becoming frustrating.

Seems like there are a couple of settings needing changing. One is in Settings > Security & Privacy. If I set the Require Password value to something more than Immediately I will get some leeway in having to enter my password all the time. I set this to 1 hour. But, the screen is still dimmed after only a minute or so. That setting is in Settings > Energy Saver – there you can set the Display Sleep – mine was set to 1.5 minutes – I ramped that up to 1 hour.

So now my Mac doesn’t go to sleep when I am downloading stuff on it and working on another computer and I don’t have to enter my password like every few minutes. In short, life is a lot simpler.

Hope this helps you and your Mac to be friends again?

Helen Bradley

Wednesday, January 29th, 2014

Vintage inspired shape in Illustrator

Learn to add multiple fills and strokes to a single shape in Illustrator

Illustrator can be a challenge to learn and once you get hold of the basics you may be so relieved that you have progressed this far that you forget to dig deeper for better and smarter ways to create designs.

One feature of Illustrator is the ability to add multiple strokes and fills to a single shape, to order them so they appear on top of each other correctly and even to blend them using Blend Modes.

This video shows how to turn a star into this vintage inspired free pattern filled shape in Illustrator. It’s simple to do when you know how – just a few minutes of video can open up a wealth of opportunities for being creative in Illustrator – Enjoy!

Helen Bradley

Saturday, January 25th, 2014

Illustrator – reverse the twirl tool

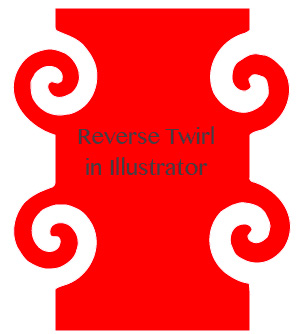
Click the Twirl tool and it twirls your path – but how to you twirl the other way?

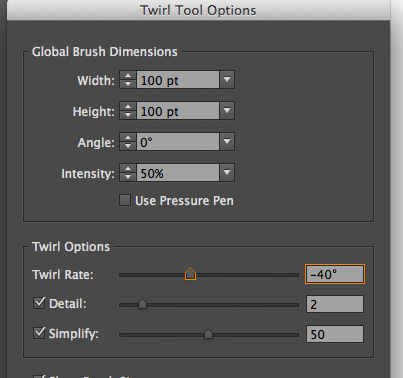
To reverse the twirl tool in Illustrator so you can twirl clockwise double click the Twirl tool in the tool panel and just set the Twirl Rate to a negative value – so if you love the twirl rate amount but want it to go the other way just add a minus in front of the current value – so go from 40 degrees to -40!

Click Ok and then twirl away to your heart’s content.

Easy when you  know how!

Helen Bradley

Tuesday, January 21st, 2014

Illustrator for Photoshop Users

Learning Illustrator is different and easier if you already know Photoshop

So, you’re pretty handy with Photoshop but Illustrator is different – isn’t it? It is not easy to understand when you first start and you might be scared off by an interface that looks both familiar and foreign at the same time. I certainly was when I started out. Illustrator was like a foreign language and it took a lot of time to learn it.

But learning Illustrator when you already use Photoshop can be simplified. You see you already know a lot about Illustrator so we can start out with that knowledge and build on it. You need to know what is the same and what is different between the two programs and you need to know what is important and what you can ignore for now.

So, to help you, I created this video. It’s for anyone who knows Photoshop and who wants to learn Illustrator. I will build on your knowledge so we don’t waste time on things you already know but so you learn quickly how Illustrator is different and how to get started with it.

No laborious “how to use the Pen tool” stuff here. Just quick and fun and interesting stuff guaranteed to get you on your way to loving the creative potential of Illustrator.


Helen Bradley

Sunday, January 19th, 2014

Create a Perfect (Archimedes) spiral in Illustrator

Create Archimedes spirals with evenly spaced lines in Illustrator

Illustrator’s Spiral tool creates quick and easy spirals but they aren’t Archimedes spirals – the latter have evenly spaced lines. Now it is possible to create an Archimedes spiral in one of a few ways. Here is what I have discovered.

Multiple lines make a spiral (well they did once, they don’t any longer)

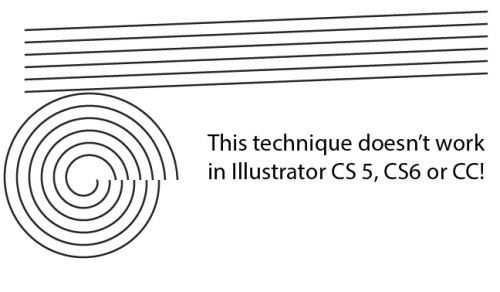
Ignore the multiple line solution. There are a few posts on the web that suggest you create a spiral by making a series of parallel lines, move them so they are on a slight angle and then save as an Art Brush. You then use them to stroke a circle and voila! a spiral. Well no. Sorry, it just doesn’t work. It used to work but it doesn’t seem to work in later versions of Illustrator. There is a video here on YouTube that shows some of the problem – for now just ignore what looks to be the simple (if inexplicable) solution.
Deke’s offering

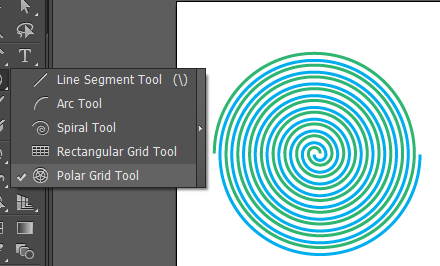
I like Deke McClelland’s stuff if you ignore that he calls some Illustrator tools by made up names like black arrow and white arrow tool (seriously?) but if you can put this technicality aside, see his approach by visiting this Lynda.com tutorial video. It’s a somewhat complex approach but you can use it to create two interlocking spirals or just a single one. Once you’ve done it a few times  it’s pretty easy to do. It also introduces the Polar Grid tool which is interesting and which you may have use for in other circumstances. I just don’t like the middle of this spiral so I prefer some other solution.
The best solution – a Spiral Script

Now let’s step into voodoo territory and talk scripting. While it might sound difficult it is so totally ridiculously easy that I can’t recommend it more highly. Better still, once you see how easy it is to run scripts you may be tempted to find and use more of them from time to time.

So, start by visiting this page where you will find the script to use. Copy the script from the box and paste it into a text editor – not Word, but WordPad or Notepad. Save it as a text file and give it a .jsx extension. You can save it anywhere, but if you want to be able to find it easily in 6 month’s time I suggest you save it in the Presets/Scripts folder for your Illustrator installation (ie in the Programs folder in Windows). Then restart Illustrator so it will find it easily.

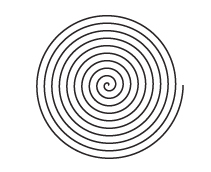
Regardless of where your script is stored, start a new document and choose File > Script and select your script from the list (if you installed it in Presets/Scripts) or browse to find it. Click it and it runs and creates your spiral. Now I like this one a lot as the middle is awesomely cute and curly. It’s my favorite and once you’ve created the script file and saved it all you need to do to make one in future is to run the script. It is awesomely easy and look at how cute the middle is…

Now that you are a scripting guru – here’s more scripting fun

The script above makes great spirals but I’ve found another script set here that you can explore now that you’re a scripting guru! Well nearly one, anyway.

These scripts are zipped so all you need do is to download and unzip and place the scripts into your Presets/Scripts folder. Then run them. Some will need objects to act on but you will find information on how they work on the script page itself. I suggest you copy it to a document or print it out so you have it for reference.

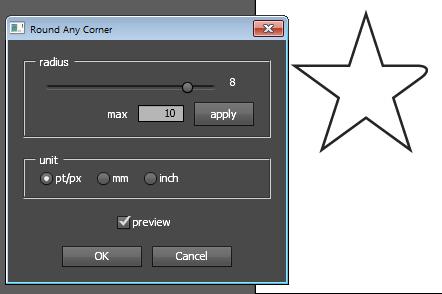
One of my favorites is the Meatball script which joins two circles into a sort of meatball shape. There is a spiral which makes a nice Archimedes spiral and one called Round Any Corner which lets you select one or more points or an entire shape and round the corners – this gives a different result to the Round Corners Effect so might be of interest to you.
Another script in the zip is one that creates trees automatically for you.

Finally – create a rectangle the size of the artboard

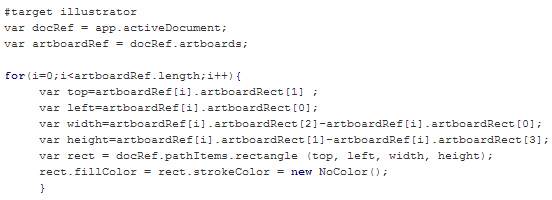
Over at the Adobe forums there is a short script from a user called moluapple which creates a rectangle the size of the artboard. It’s a winner! I use this all the time! I suggest you copy and paste the code from the forum into a text editor and make a script file from it so you have it handy to use anytime you need it. The code below is just a screenshot of the code, I captured it just in case the forum thread ever disappears because this is one awesomely useful script:
So, now it is over to you to enjoy your new ability to download, unzip, locate and run scripts in Illustrator.


Helen Bradley

Monday, January 13th, 2014

Dotted edges in Illustrator


Learn to add multiple strokes to a shape in Illustrator

One way I force myself to extend my knowledge of Illustrator is to take an existing illustration and to try to reproduce it. I don’t use these for anything but for learning and improving my skills. It’s a great tool because, when you try to copy someone else’s illustration you have to work out how to do things you may not typically do. You can’t just fluff yourself off and do the same old thing – if you don’t know how to achieve an effect you have to think about the problem and work it out using your existing skills or go research solutions.

Today I’ve been working on shapes that have neat edges and, in particular shapes with solid edges and dots – all in the one shape!

Start by drawing your shape – mine was a speech bubble but you can do it with anything. Then add a fill color and a stroke – this stroke is the thick band around the shape so make it the right size for the edge effect.

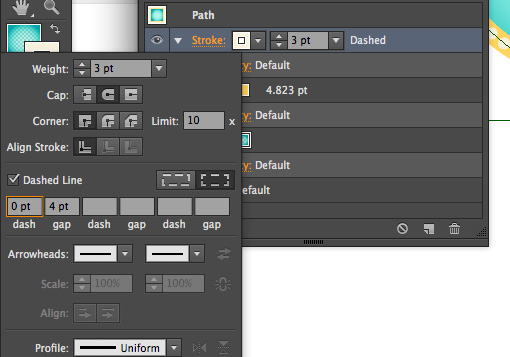
Now open the Appearance panel and add a second stroke by choosing the Add New Stroke icon. Make sure this is the top stroke – if not you can drag it up as if it were a layer. In the Appearance panel select a different color for this stroke and size it smaller than the previous one. You can now make it dots by setting up the panel so it looks like this – just note that your gap value should be the same or just larger than the stroke to make dots and that the cap shape is rounded – to get dots!


Helen Bradley

Saturday, January 11th, 2014

Hide everything and show the Mac desktop

How to display your desktop – hiding all open programs on the Mac

I am in ‘traveling with my Mac mode’ – I have a MacBook Air and it is so light and thin that it makes a great traveling companion – sort of like having an oversize iPad that runs Illustrator, Photoshop and Lightroom.

BUT, and there are some big buts! I use a desktop PC so little things on the Mac bite me because I simply don’t have the knowledge at my fingertips. In the last couple of days the issue has been the desktop – I need to get to some files saved there but there is all this stuff in the way. Turns out there is a shortcut key you can use – F11 – if you’re on a notebook you’ll need to use the Fn function key with this so it is Fn + F11 but that’s all you need to hide everything and show your desktop.

Now I can take my screenshots Command + Shift + 3 then hide the junk so I can see the image to drag and drop it into a Word document or into Photoshop.

Yeah! Me and my Mac are friends again.


Helen Bradley

Thursday, January 9th, 2014

Format Painter missing in Word on the Mac

It’s actually not missing but it’s not where you expect to find it either.

I use Word on the PC every day and on the Mac only when I am traveling – I love my MacBook Air with its solid state drive – it’s light and an easy traveling companion.

What I don’t like is having to work out all the curly questions you have when things work differently in one operating system to another. Cue today’s issue. I was copying and pasting content from my website into Word on the Mac and I needed to remove the formatting – well I found the Clear Formatting button sort of where I expected it to be on the ribbon.

But when it came to copying a format from one piece of text to another I got stumped. You see the Format Painter isn’t on the ribbon where you expect it to be if you’re used to using Word on the PC. In fact Word on the Mac is a totally different animal.

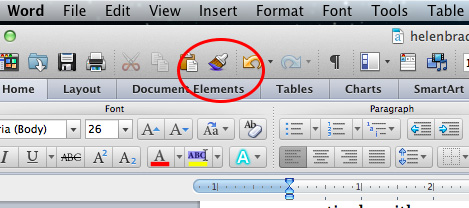
To find the Format Painter look upwards – up from the ribbon, up from the ribbon tabs and up to what we Windows folk would call the QAT or Quick Access Toolbar. On that toolbar of tools in Word on the Mac is the Format Painter. Click the text to copy the format from, click the Format Painter and then click the text to paint it onto. It’s a simple process BUT you have to find the Format Painter button first!

Hopefully this helps you!


Helen Bradley

Monday, January 6th, 2014

Multicolor Sunburst in Illustrator

So, you know how to make a sunburst in Illustrator – here’s how to color it

Some time ago I wrote a post and created a YouTube video to show how to make a sunburst in Illustrator. This is one of my most popular posts and the video has been popular too – seems like it really hit a spot with a lot of readers.

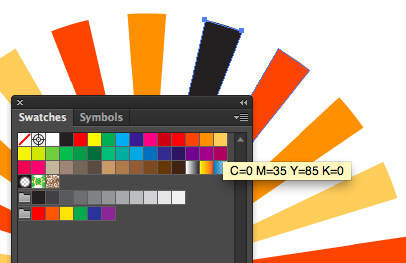
Now, today I received an email from a reader asking how to make the sunburst multicolored. Turns out it isn’t as simple as selecting a ray and recoloring it – because when you select one ray you select them all. However, once you know how to break them up, it works just fine.

To do this, follow the instructions to create the circle, add the dashed line, expand it, select the inside anchors and choose Path > Average. This gets the sunburst made.

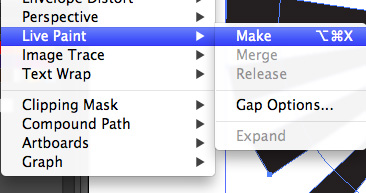
Now, to break the shape up, select it and choose Object > Live Paint > Make.  Now you can use the Live Paint Bucket tool to color each piece of the sunburst – or not. You see the Live Paint > Make command breaks up the shape (in a way that Object > Expand does not) so you can now select each ray in turn and color it.

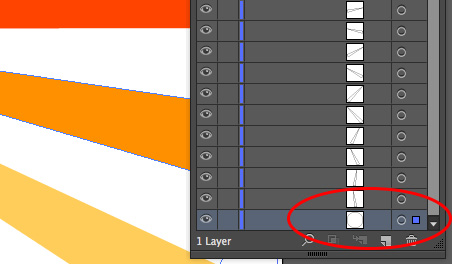
If you want to see the change happen, watch the Layers palette when you do the Live Paint > Make command – it turns the compound path into a set of individual vector objects – just what you need to have to be able to recolor them. The plus is that once the shape is broken up like this you can recolor it in the usual way by selecting each shape and color it or you can use Live Paint. You get to choose which works best for you.

Now, one side effect of this is that the spaces between the rays is filled with color – typically white. So you can’t put a solid color behind the rays and have it show through. There is a solution – open the Layers palette and locate the filled white circle shape at the bottom of the expanded sunburst shapes and delete it. Once it is deleted you can add your own background filed shape behind the sunburst.

It’s one of those things that is simple when you know how but not immediately obvious how you do it.

Thanks to the reader who asked the question!


Helen Bradley