Learning Illustrator is different and easier if you already know Photoshop
So, you’re pretty handy with Photoshop but Illustrator is different – isn’t it? It is not easy to understand when you first start and you might be scared off by an interface that looks both familiar and foreign at the same time. I certainly was when I started out. Illustrator was like a foreign language and it took a lot of time to learn it.
But learning Illustrator when you already use Photoshop can be simplified. You see you already know a lot about Illustrator so we can start out with that knowledge and build on it. You need to know what is the same and what is different between the two programs and you need to know what is important and what you can ignore for now.
So, to help you, I created this video. It’s for anyone who knows Photoshop and who wants to learn Illustrator. I will build on your knowledge so we don’t waste time on things you already know but so you learn quickly how Illustrator is different and how to get started with it.
No laborious “how to use the Pen tool” stuff here. Just quick and fun and interesting stuff guaranteed to get you on your way to loving the creative potential of Illustrator.
See how to turn simple shapes in Photoshop into ornate circles. The process is simple and you can source the elements to use from the web as free shapes – I tell you where to get them from.
Transcript:
Hello, I’m Helen Bradley.
Welcome to this video tutorial.
In this tutorial I’m going to show you how you can make circular ornaments in Photoshop.
Before we get started with this tutorial let’s have a look and see what we’re aiming for.
This is one of the floral ornament shapes that I’ve created and I’m going to show you how you can create this quickly and easily in Photoshop.
And I’m using Photoshop CS6 for this technique.
If you’re using an earlier version you may need to adapt parts of the tutorial but you can still do it.
So let’s just close this down and let’s create a new document, File, New.
And it doesn’t really matter too much.
I’ve just got a 600 x 600 RGB document with a white background.
You can create pretty much anything.
Now before we actually start making our shapes we’re going to need to find some things to make them with and what I’ve done is I’ve located some places on the web that you can get these from.
So I’m going to this particular site here which is all-free-download.com.
It’s all-free-download.com.
And if you go searching for vector floral clipart you’ll be able to find this file here.
And this is the one that I’ve used so you just click it and then go ahead and download it.
And once you’ve downloaded it you can open it.
And I’ve got it open here now in Windows Explorer and I’ve actually gone ahead and extracted all the files.
And in this particular file there’s a floral clipart AI which is an Illustrator file and there’s also a CSH file.
And the CSH file is a Photoshop one so you can use that.
And what I did was I put the shapes in Photoshop’s shapes collection.
So I’m going to show you how you can do that now.
I’m just going to size the Photoshop screen down so that I can see the Photoshop screen as well as my Windows Explorer screen here.
And I’m going to grab the tools and I want the Shapes tool because I want the Shapes panel here.
So I’m going to open this up here and click this icon here which opens up the Shapes fly out menu.
And I’m going to choose Load Shapes because when I do that Photoshop takes me to the custom shapes location.
So this is where it expects the custom shapes to be.
So what I’m going to do is show here my Windows Explorer folder and I’m just going to drag and drop floral clipart into here.
In fact I’ve already done it.
You can see it’s here so I’m not going to drag it in a second time.
But you would drag the floral clipart CSH or the shapes file which is a Photoshop file into this custom shapes folder.
And when you do the custom shapes are now available inside Photoshop.
So you can close everything down.
I’ll just close this for now.
Okay, let’s go back to our document untitled2.
I’m going to make this screen, Photoshop screen, the full screen size.
So now we’re ready to go to our shapes.
I’m going to click here.
This is the Shapes collection.
Usually you’ll see the Rectangle tool but we’re actually going for the Custom Shape tool.
And because my image is 600 x 600 in size I’m going to put a couple of guides in here.
So I’m going to choose View, New Guide and I’m going to put a vertical one at 300 pixels, that’s 300 px, and click Ok.
And I’m going to go ahead and put a horizontal one in, click Horizontal, type 300 px and click Ok.
So now I have my center point marked and that’s just going to make things a whole lot easier in a minute.
So I’m going to create a new layer by just clicking the Create New layer icon here at the foot of the Layers palette because I want to work on an empty layer.
Now I used Kuler a little bit earlier to get my color scheme and I have a video on using Kuler in Photoshop that you may want to look at on this YouTube channel.
But basically what I did was I went to Window Extensions, Kuler and I launched Kuler.
Well, that’s just hidden it, hasn’t it.
So here’s Kuler and I went looking for flowers and I searched for flowers and I located a flower color scheme that I really like.
So I just clicked here and choose Add to Swatches Panel.
And here are the flower colors added to my Swatches panel so I thought we’d choose a different color flower this time.
So I can just tuck Kuler away because I don’t need it anymore.
I do need my Layers panel.
I do need my tools and I will like my swatches to be open.
So with the custom shape selected I’m going to go and first show you how you would add these shapes in because I’ve already done that.
But you’ll click the fly out menu and you should see your shapes in here.
They should be listed.
If they’re not then you can click Load Shapes and go and load the floral clipart shapes and click Load and then they’ll be loaded into your panel.
So they’ll be here.
Now I’ve got two sets of them but that doesn’t matter too much.
Now the first thing I’m going to do is choose one of these shapes to work with and the ones that I worked with were the fairly small ones, things like this or this that had sort of nice floral elements.
But they were fairly simple.
So I think we’re going to start with something a little bit more complex this time.
So let’s select this one.
I’m just going to click it.
And on the toolbar here I want to be working in shapes so I want this to be shape not path or pixels.
In earlier versions of Photoshop you will need to select an icon here.
It won’t be on a dropdown menu and you won’t have these features here for fill and stroke.
But you’ll be able to select the fill color and I don’t want a stroke on this at all.
But I do want a fill color and I’m going to select one of my floral colors that I used or grabbed from Kuler.
So now I’m going to make a blue shape with no stroke and I’m just going to draw it out here.
And I’m going to hold the Shift key so it’s constrained to its original proportions.
I’m just going to let go.
So you can see now I have this shape on a new layer and it’s just a blue shape.
I’m going to drag it into position.
Now I think in actual fact that I would like the bigger end on the outside so I’m going to drop it down here because that means that this bigger end is going to be on the outside of the circle as I work.
And now I’m going to press Ctrl or Command T because this gives me my Transform tools.
And what I want to do first of all is find this little marker that’s in the very, very center of the image.
And I’m going to drag it around and I’m going to pop it just right over the middle the image.
And then I’m going to set this option here this angle option to how many degrees I want to transform this image in.
And there is 360 degrees in a circle so we need something that will divide into 360 equally.
So for example if we want 10 shapes around it we could do 36 degrees.
Numbers like 30, 60, 45, 10 are good values.
I’m going to choose 30.
So I’m going to type in 30 here and you can see that the shape has started to rotate.
And I’m going to click the checkbox.
So it’s started its rotation and to complete the rotation all the way around the circle I’m going to hold Ctrl and Shift and Alt all at the same time.
So I’m going to press Ctrl, Shift, Alt on the Mac, that would be Command, Shift, Option and then the letter T for Transform.
And every time I press the letter T because I have Ctrl, Shift and Alt held down you can see that it’s adding another shape.
So all I have to do is to press the letter T enough times that my shapes creates an entire circle.
And here is my shape here.
Now you can leave it as a shape layer if you want to.
You can resize it if you want to by holding Shift and Alt as you drag in or out on the handles.
I’m going to drag mine out a little bit.
I think this is going to be the larger of the shapes and I’m going to click the checkmark to confirm it.
Now so that my computer doesn’t get stressed out with having such a large shape I’m going to rasterize this.
So I’m going to right click and just rasterize the layer.
But you could leave yours as shapes if you wanted to.
Now I’m just going to click Create a New Layer.
And we’re just going to repeat this over and over again.
So I’m going to choose my Shape tool, my Custom Shape tool.
I’m going to choose a different shape this time.
So I’m looking for something interesting that will complement the shape that I have here.
And last time I used this shape as my final shape so I think I’m going to do that again.
So we’ll wait for a minute before we use that.
But let’s go and get this one that’s sort of like a leaf shape.
I’ll click on it.
And now on a new layer I’m going to turn this layer off for a minute so that I can see what I’m doing here.
I’ve got no stroke.
I’m going to change my fill this time to a green color and I’m going to just drag out my leaf shape.
I’m going to hold the Shift key so it’s constrained to its original size and dimensions and I’m going to position it pretty much over the center of the image.
And I’m doing that by holding the Spacebar down as I drag it into position.
And now I’ve got my green shape.
I’m going to select the Move tool so I can now rotate it and press Ctrl or Command T.
I’m going to drag this little indicator into the very middle of the intersection where those two gridlines are.
So I’m going to rotate around that location and I’m going to select the amount of rotation.
And I’m going to use 30 degrees again so I’ll type 30 and then I’m going to press the checkmark here to accept that transformation.
Now I’ll press Ctrl, Alt, Shift T to repeat that transformation and copy that shape.
And I’m going to do that until I get all the way around the circle.
So this is my second shape and if I click to show my first shape I can see the two shapes as they’re interacting.
I think I want to change the size of my top shape so I’m going to select that layer and with Shift and Alt held down I’m going to size it so that it appears as a much smaller shape here.
And I many also want to rotate it for example because I initially set 30 degrees as my rotation.
If I rotate this through 15 degrees it’s going to be slightly offset.
And I think that will be a good choice here.
So now let’s go ahead and make a third shape, again creating a brand new layer, selecting the Custom Shape tool and this time I’m going to go for this sort of filler shape.
I think this one here is going to be a good choice although this leaf could be used as well.
I’m going to select it and select a different color to use.
This time I think I’m going to choose this very light green color.
I’m on a new layer.
I’m going to drag out my shape.
I’m going to hold the Spacebar to move it into position and perhaps even hold the Shift key so that it’s constrained to its original proportions the way it was drawn originally.
And then I’m going to let go the Mouse button and then let go the Shift key so that it is now drawn on this new layer.
Now this is really quite a big element so I’m not going to need to have too many of them.
I’m just going to use the Move tool to line it up very neatly here.
I’m going to press Ctrl or Command T to get into free transform mode.
I’m going to move its little indicator all the way down to the middle here so that it is going to rotate around the circle and this time I only want a small number.
So if I rotate it through 90 degrees I’m going to get four of these shapes on the screen.
And that will be plenty.
I’m going to press the checkmark here to confirm this transformation and then let’s go back and press Ctrl, Alt, Shift T to make the additional shapes.
I’m going to press that three times so that we get this finished shape.
Now I’m thinking this particular shape might look better with a border on it so I’m going back to the Shape tools and this time I’m going to select a stroke.
And I’m going to add a lighter green stroke around it.
I’m going to make it a single line stroke and I’m just going to make sure that the size of the stroke is correct or sufficient for my needs.
I’m thinking probably about a 2 point stroke will be nice.
And I’m going to again make this into a rasterized layer by right clicking and choose Rasterize Layer.
And so there’s my additional shape.
I’m now going to drag on my greenery layer and move it on top of the original layer and I can also resize this layer if I want to make it smaller or larger or even moving it behind everything else.
Now one of the things that you can do then is to make the background layer a different color such as black.
I’ve selected the background layer and I’m pressing Alt Backspace to fill it with black.
I can also add effects to these layers.
Let’s go to this greenery layer and let’s add an outer glow.
So I’m choosing the Add Layer Style icon here and I’m going to add an outer glow.
At the moment it’s a white glow.
So I’m just going to increase its spread a little bit.
You can see it’s some dimension and a little bit of a glowing effect here.
And then let’s go and get a green color from the underlying image and use that as our glow.
Now we may not want it to be quite as feathered and we may just want it to a more harsh sort of glow which is quite possible and just click Ok.
And then we can do the same for this shape here and we could add a glow to it, again, Outer Glow.
Again, I’m going to sample a color.
I’m actually going to sample this blue color and then use something in that sort of same color range perhaps a bluey green for my outer glow.
I’m going to increase the spread and also soften it up a little bit so it really looks like a glow.
Perhaps we could use a different blend mode such as lighten or we could play with overlay or color dodge.
Some of these will work and some of them may not.
But you can certainly experiment with how these interact with not only the black layer but also the green sort of colored layer below.
And I’ll click Ok and then I’m going to press Ctrl and the semicolon to turn off the gridlines.
Now this shape is very different from the shape we saw earlier.
It’s created in exactly the same way but you can see the color scheme and the actual elements that I used to create these shapes are quite different.
But I’ve got two very interesting shapes that I could now use as backgrounds or elements in a collage or for some other purpose.
It’s very easy to create these rotated shapes and lots of fun.
I’m Helen Bradley.
Thank you for joining me for this video tutorial.
Look out for more tutorials on this YouTube channel and follow me at projectwoman.com where my blogs include tips and tricks on Lightroom, Photoshop, Illustrator, Photoshop Elements and a whole lot more.
Learn how to download and install free fractal tree brushes and a texture and see how to use these to create your own Photoshop art.
Covers how to install brushes in Photoshop. How to add new layers, how to use masks and a gradient fill. Also shows how to add a drop shadow and an outer glow layer style. The land is created using a filled shape and made more organic using the Warp transform feature.
Transcript:
Hello, I’m Helen Bradley.
Welcome to this video tutorial.
In this tutorial I’m going to show you how you can download and install the fractal tree brushes from projectwoman.com and how you can use them to make art in Photoshop.
Before we get started with this project let’s look and see what we’re going to do.
We’re going to create an image that’s something like this.
It uses one of the fractal tree brushes and also uses part of the brush to create a sort of highlight effect that is the result of the sun going down.
So we’re going to add our tree and then we’re going to make this sort of background look with this blue fill background and we’re going to use the texture that we’ve downloaded.
So I’m going to show you how you can put it all together using the brushes and a texture file.
I’m just going to tuck this away for now and let’s have a look and see where we’re going to get the bits and pieces that we need.
Well first of all we’re going to flicker to some images that are offered by a gentleman called Skeletal Mess and we’re going to download this image.
And it’s in his 2009 texture of the day.
So here it is, texture of the day 2009, and this is the one that you want.
So just click on it, from Actions choose View All Sizes and then you can just go and download the largest size of this image or the original.
It doesn’t really matter too much.
I’m just going to work on the larger size one for now.
So I’m going to open the folder that it has been stored in and its here.
And I’m just going to open it in Photoshop so I’m going to right click and I’m going to open with Photoshop CS6.
Well it’s not in the list there so I’m just going to go and grab Photoshop and we’ll just drag and drop it in there.
Okay, so the image is now in Photoshop and now we need to get our brushes.
And they’re available on my website so that is at projectwoman.com.
So you’re going to projectworman.com and click here on the Free Photoshop Brushes option and just scroll down because the ones we’re looking for here are the rendered fractural tree brush set.
So click on that and then click here to download the brush set and that’s going to download to your Download folder.
And what you’ll do then is just double click on the file so that you can locate and expand the fractal tree brushes file.
And you need this in Photoshop so again I’m going to tuck this just out of the way for now and open Photoshop because there’s a quick and easy way of installing brushes in Photoshop that I want to show you.
So the way I install brushes in Photoshop is to first go and get the brushes option here.
So I click on Brushes and I’ll choose the brush dropdown list here and then click here and go to Save Brushes.
And what that does is it shows me the folder where Photoshop brushes are saved and you can see here that it’s a long string of folders that you need to go through.
But it’s easier if you just open this up in Photoshop and then what you’ll do is you’re go and get your file, your brushes file that you downloaded and then just drag and drop it.
Now my machine is playing games with me right now so I’m just going to make Photoshop a little bit smaller and bring up my brushes file at the same time which is hiding all the way around here.
So let’s just go and get the brushes again and we’re going to open this up.
I’m going to go to Save Brushes.
So I open this folder.
Here are my fractal tree brushes and I’m just going to drag and drop them in there.
So that’s done now.
The brushes are installed where Photoshop can find them.
So what I need to do now with my brushes palette is to go and open that set of fractal tree brushes.
So here are the fractal tree brushes and when Photoshop asks me if I want to replace the current brushes, cancel or append I’m just going to select append because that’s going to add them to the very end of my brushes collection.
Now, I’ve added them twice but they’re here now.
So we’re ready to get started and create the effect that we had on this image here.
So any time that we work with an image like this we’ll want to be working on a new layer to paint our tree so I’m going to add a new layer.
I’m going to go and get my tree.
I’m just going to choose a tree to use.
I think this one this time.
I’m going to size it up using the open square bracket key and I’m going to select black.
So I want to be looking at my swatches.
So I’m going to select black as my foreground color and let’s also go and get our tools so that we can see what we’re doing here.
So I’m going to paint with black on this layer and I’ll probably press it a couple of times in the same place so I make sure I get a really dark tree there.
Now what I’d like behind the tree is some sort of a sort of land mass if you like so I’m going to select the Rectangular Marquee tool here and on a brand new layer I’m just going to drag out a rectangle behind the tree.
I’ve add a new layer below.
And I’m going to select a sort of dark reddish color as my foreground color.
That’s a sort of maroon.
Let’s go a bit more for dark red.
And I’m going to fill that layer with this.
Since it’s my foreground color I can press Alt Backspace, Option Delete to fill that layer.
To blend it in I’m just going to use the multiply blend mode because that gives me a darker sort of effect.
Now this is probably not dark enough for me so I’m just going to open the color up and let’s select a much darker version and again Alt Backspace, Option Delete.
So now I’ve pressed Command D to deselect the selection.
Now the land mass is a little bit too regular for me so I’m going to Ctrl Click on this layer and choose Edit and then Transform and then Warp because warp allows me to create a sort of a bit more organic land mass.
So I’m just going to do that very, very simple, not very much happening there at all.
Now we need our setting sun so again a new layer.
I’m going to select a sort of lighter color.
Let’s go for a sort of lighter orange color.
I’m going to use the Elliptical Marquee tool and drag a circle by holding the Shift key to constrain the ellipse to a circle.
I want to move it into position so I’m going to hold the Spacebar as I move the circle down into position, let go of the Left Mouse button and then let go the Spacebar and the Shift key.
Again, this orange is my foreground color so Alt Backspace, Option Delete on the Mac will fill the shape with this orange color.
Again, I think it’s way too light so I’m just going to redo that with a darker color.
Now I want my sun to be behind my land mass so I’m just going to drag on the sun layer and move it behind the land mass layer.
Now I think I’ll blend my sun in a little bit so I’ll probably select multiply as the blend mode to darken it.
And I also want to add a slight glow around the edge so I’m going to select the Add Layer Style option.
I’m going to add an outer glow here.
The white is not the color I want.
I really just want to grab the color that I had for the sun and maybe just go a little bit lighter than that as my outer glow.
Size is really the sort of ambit of the glow.
It’s not really how many pixels it is.
It’s a bit more feather than anything.
And spread is a bit more pixels.
So I’m just going to add that glow in.
And I can also multiply it if I want to so I can get a sort of darker glow.
Now I’m trying to keep things pretty light right now because I don’t want to be working on a totally dark image.
But what I do want here is I really want the tree all over.
Again, I want a sort of drop shadow for the tree.
So, one of the ways that I can do this is by just adding a light drop shadow layer.
2,368So I’m going to add a layer style.
I’m going to choose drop shadow but instead of doing a darker drop shadow I’m going to do a lighter drop shadow.
In fact let’s just sample the color from the sun for this and maybe just go a little bit lighter than that.
Maybe a little bit more yellow still, okay.
And this is going to be a drop shadow.
And we want it to look as if it’s coming from the sun so it’s going to be out this direction.
But we’re going to screen this because we want it to be lighter and we also don’t want it to be both sides of the tree.
So we’re going to just play around with the spread and the size until we get the slightest suggestion of lightening on this side of the tree but not too much, probably about 4 pixels.
Something like that looks pretty good to me so I’m going to click Ok to select it.
Now what I want is to be able to work on this shadow independent of the tree itself so I really want to move the shadow to a new layer.
So I’m going to right click that and choose Create Layer.
And what that does is it creates the drop shadow as a new layer so I’m just going to click Ok.
So here’s my drop shadow on a new layer.
And because it’s on a new layer I can add a mask to it by clicking the drop shadow layer and click the Add Mask icon.
I’m going to select my brushes.
Let’s just go and grab a brush.
And this time I’m going to select a soft, round brush, something like this, make it a bit larger.
I want to be painting with black because I want to paint out this shadow area and make sure I have the mask targeted and on this side of the tree I’m just going to remove the shadow.
Now because this is a mask layer I can switch and paint with white and I can bring the shading, the highlighting back anywhere I want it.
So I can just paint it on or off as I wish.
I think too I’m going to soften this edge because I think it’s a bit harsh.
And again a mask will do that.
Just click on the layer, click on the layer mask, click on black paint.
This time I’m going to reduce my opacity way down and just gently tip over the edge here, press X to go back.
So I can make that as dark or as light as I want and I can just sort of blend that in to the background by just switching colors, painting with black on the mask to blend it, painting with white to bring it back again.
Now what I did on the original image that we haven’t done right now is to add a blue to white layer over the top of this background layer to just blend everything in so I’m going to that now.
I’m just going to add a new layer.
I’m going to select the Gradient tool and then I’m going to select a sort of darkest blue.
I’m thinking it needs to be a bit darker and a big grayer than that.
So that sort of color blue to white.
So I’m just going to select white here or a light blue.
It doesn’t really matter too much.
And then we’re going to use the gradient to apply that.
So let’s just have a look.
We’re on this foreground to background gradient.
We have linear gradient selected.
We have the layer here and I’m just going to drag to fill it with the gradient.
And I’m holding the Shift key down as I do so my gradient goes in nice and level.
Now it’s going in blue at the top, white at the bottom and I’m just going to blend it using the multiply blend mode.
You can see that my edge here is way too much but we can go back and fix that, again with brush and again, painting with white this time.
I’m just going to be painting on this mask and just bring back that edge a little bit and then we could fix the tree up.
So there you have a small project that you can do using the fractal tree brushes to create a sort of sunset landscape image in Photoshop.
You now know how to download and install the brushes.
And you can find this interesting texture online at Flickr to use and you can go and create your own art in Photoshop.
I’m Helen Bradley.
Thank you for joining me for this video tutorial.
Look out for more of my video tutorials on this YouTube channel.
And visit projectwoman.com for more tips, tricks and tutorials on Photoshop, Lightroom, Illustrator and a whole lot more.
Photoshop CS6 has new tools for working with Paths and Shapes. Learn how to use these and how to turn shapes into paths and how to fill and stroke paths and shapes.
Check out all our tutorials on our YouTube channel.
Complete transcript of this video:
Hello, I’m Helen Bradley. Welcome to this video tutorial. In this tutorial we’re going to look at the new vector tools in Photoshop CS6. And we’re going to answer questions like what’s a path, how do I find it, how do I turn a path into a selection, how do I make a path from a selection, and how I can work with the new vector tools.
Photoshop CS6 has some new vector tools and we’re going to have a look at those in this video. And we’re going to work out how you can use those tools to do exactly what you want to do.
Now the Custom Shape tool is in the position it always used to be and it’s sharing a toolbar position with things like the Rectangle, Rounded Rectangle, Ellipse, Polygon and Line tool. And all of these are Path tools. But we’re going to select the Custom Shape because it’s a little bit of an interesting tool.
And here are my Custom Shapes so I can select any of these custom shapes to draw on my space. Now I’m going to choose a filled shape such as this one here and just click it so it is selected. Now I can draw it on my workspace, but the way I draw it depends on what I have chosen here.
And I can choose a shape, a path or pixels, and we’re going to look at the shape and path options. So let’s start with shape. And let’s select some colors for this shape because when you’re working with shapes color is important. Now I have a shape selected I’m just going to drag this flower shape into my workspace.
If I hold the Shift key it’s going to be constrained to the shape of a flower that was originally drawn. If I don’t hold the Shift key you can see that I can make it wide or tall. And if I draw it with the Alt key pressed it’s going to be drawn around my initial starting point. Let’s just let go of that for now and let’s click and drag here to start drawing my flower.
Now if I want it placed around the initial starting point I’m going to press the Alt key and you can see that it jumps back into position. If I add the Shift key I can get it constrained to the right shape. And only when I let go the left mouse button does anything happen.
So what’s happening is I’m getting a filled flower. And we can see up here that the fill is the current foreground color, but it can be changed. While this shape is selected we can select a different fill for it. You can see that blue is now its fill but that’s not the foreground color for our workspace. And you can see that it has no stroke but we can add a stroke if we want to.
So let’s add a pink stroke to this shape. At the moment the Stroke is 3 points but we can increase that so we can make it thicker or thinner. And we can also change the nature of the stroke. For example we could have a dashed stroke or a dotted stroke. And there are other options that we’ll look at in future videos. But this shape is a path, so we can actually make changes to it.
I’m going to grab here the Direct Selection Tool because that allows me to select points on this path. And you can see by dragging over these points I can select anyone of these points. I’m just going to turn the stroke off for the moment because I think it might be easier to see the points without the stroke in the way.
When one of these points is filled and the others are empty this is the one that we’re going to affect. So let’s just drag out on that. And you can see that my shape has now changed shape because I have altered that point. So it is a path that is able to be adjusted. But still we can change the fill. And when we change the fill the fill of the entire shape is affected.
When we add a stroke back onto this the stroke of the entire shape is being affected by our choices. Now there are some other things that we can do with shapes. I’m just going to add a new layer to this image, just put it at the top, and I’m going to fill it with the red.
Now let’s consider the situation where we may want to for example cut out a shape from inside this red selection. So let’s go back and grab our custom shape tool. And we have our same flower shape selected. And I’m going to draw the shape onto my area. And because I was working with a red fill it has a red fill. But let’s just color it green so that we can see it clearly.
Now let’s consider the situation where really what we wanted to do was to create a path from this. Well, we don’t have to undo it and start all over again, particularly if this is a complex shape because what we can do is go to the paths palette. And here is our shape path, and we can do with that anything that we could do with a path originally in Photoshop.
One of the things that we can do is click on it and load that path as a selection. Now if that path is a selection then we can do things with it. For example we could come down to this red filled layer and we could poke a hole in this layer by just pressing Delete. And that will delete the contents of the layer where this selection is made.
One of the other things that we can do, I’m just going to Ctrl Z to undo that, one of the other things that we can do with selections is we can stroke them. So we could choose Edit Stroke and we could stroke this selection with a different color. So let’s stroke it around its inside.
Let’s press Ctrl D to undo the selection, and you can see that now we have a stroked flower because we’ve been able to stroke that selection. I’m just going to undo this again. And let’s go back to our shape up here. I want to just make sure that we just have a red filled layer here and we have our shape up here.
And here it is as a shape. And it can be moved around because it is a shape. So we can move it around the workspace. Let’s go back to the Path’s tool and there’s something else that we can do with shapes. What we can do in addition to loading the path as a selection is that we can stroke it with a brush. But to do this we’re going to have to make a work path out of the shape.
So what I’m going to do is with the shape selected I’m going to choose Edit Copy so I’ve copied the shape onto the clipboard. And now I’m just going back to this layer here and I’m going to do Edit Paste. And look what happens in my Paths palette. This time I have a Work Path. And a work path not only can be turned into a selection and not only can be filled with a foreground color, but I can also stroke it with a brush.
Let’s go and get my Brush and let’s go and get a brush to use. Now I’ve got lots of brushes here, but let’s create something like this particular little leaf brush. And I’ve got it at a fairly small size. I’m hoping that this is going to work just fine here for this particular image.
We’ve got a foreground color so I’m going to click Stroke Path With Brush. And what that does is it applies that brush to the current path. But we need to of course make that into a work path before that’s going to work. Now let’s have a look at how we can turn a selection into a path. Let’s just go and get another filled layer. I’m just going to get rid of everything that I have here right now.
Let’s fill this with white, and then we’ll just get rid of the Work Path as well. So I’m going to press Alt Backspace on the PC, Option Delete on the Mac, and I’m going to make up a selection here. So I’m going to make a rectangle, and then I’m going to go and grab the elliptical marque, and with Shift held down I’m going to add to that. So this is now my selection.
Now let’s say I want to make this into a shape that I can use over and over again. Well with the Paths palette open I can create a work path from this selection. So I’m just going to click to Make Work Path From Selection. And now this is a path. Now because it’s a path we can do all sorts of things with it.
For example we can click on it to select it and we can change its points. And we can also do things like turn it back into a selection, stroke it with a brush and fill it, and we can make it a shape. Let’s choose Edit and then Define Custom Shape. And this now becomes a custom shape in my shapes collection. I’m going to call that a Tab shape and just click Ok. Let’s get rid of our Work Path.
And now let’s go back into our shapes collection. So I’m going to click on Custom Shapes. And this time I’m going to make it a shape and I’m going to give it a fill and I’m going to give it a stroke. And let’s go into our shapes collection and let’s go and grab our new custom shape.
And now when I drag it onto the workspace it’s going to behave like any of the custom shapes inside Photoshop. It has this stroke and we can adjust the stroke size. We can adjust the type of stroke that it has. We could fill it with everything that we can fill a regular shape with.
So there’s the basic introduction to some of the new shape and path features of Photoshop CS6. My name is Helen Bradley. Thank you for joining me for this video. You’ll find more of my video training sessions on my YouTube channel.
There is a healthy range of free clip art available from Microsoft and it includes some photos including content from iStockPhoto.com. However, the process of getting them into your document any other way than by choosing Insert > Clip Art is not always obvious.
Here’s how to add a clip art image to a circle shape:
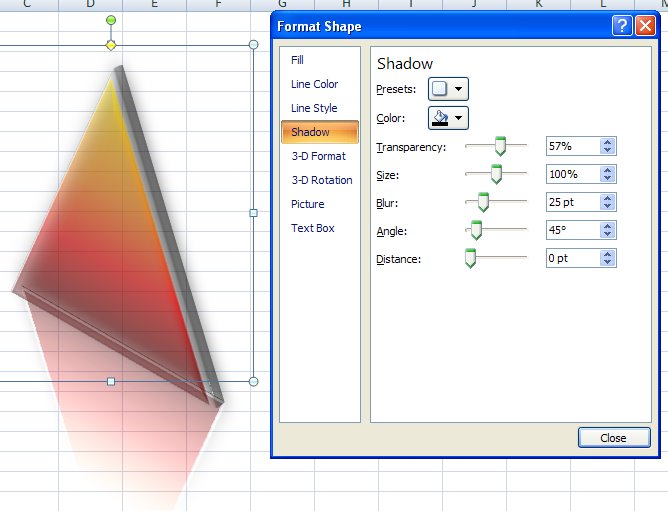
Choose Insert > Shape and select the Oval. Hold Shift as you draw to create a circle on the screen. If you choose Drawing Tools > Format > Shape Fill you get the option of applying a picture to the shape but not clip art.
Instead, right click the shape and choose Format Shape to get access to the new to Word 2010 – Format Shape dialog. Choose Fill > Picture or Texture Fill and click the Clip Art button.
Browse or search for an image. You could also have placed a Clip Art image into your document using Insert > Clip Art and then selected it and cut it to the Clipboard. Here in this dialog you can choose Clipboard to add the image from the clipboard – in short you have more options here for using image than you have using the Shape Fill list.
If the image is skewed out of shape – and it will be if it is a portrait or landscape image inside a circle which is pretty much a square with the corners cut off – you can adjust it.
Select Crop and, for a landscape orientation image inside a circle, increase the Picture Position Width value. For a portrait orientation image inside a circle, increase the Picture Position: Height value.
Then adjust the Offset X or Offset Y values, if desired, to control which portion of the image shows up inside the circle.
I’ve been messing around in Photoshop this week making heart shapes. As a result I wrote a blog post to show you how to make these shapes yourself.
Just in case you want to take the easy way out, here is a free download with a collection of 14 hearts just in time for you to use for Valentine’s Day projects.
As with all my downloads, you are free to use them for non commercial purposes, they may not be given away, they may only be downloaded from this site. Commercial licenses are available by request.
One technique that has changed with Word 2007 is drawing in documents.
Instead of having a Drawing toolbar you now select shapes from the Shapes dropdown list on the Insert tab.
From this list you can select shapes such as lines and all the AutoShapes that you are used to using in earlier versions.
To create a drawing, for example, you can select and insert the shapes that make up the drawing and then format them using the Drawing Tools > Format options on the Ribbon.
Many of the color options that are available are connected to the theme colors so, provided you use a theme color in your drawn shapes, the colors will change automatically later if a different theme is applied to the document so the drawing stays consistent with the remainder of the document.
Find the shape formatting tools on the Drawing Tools > Format tab on the Ribbon.
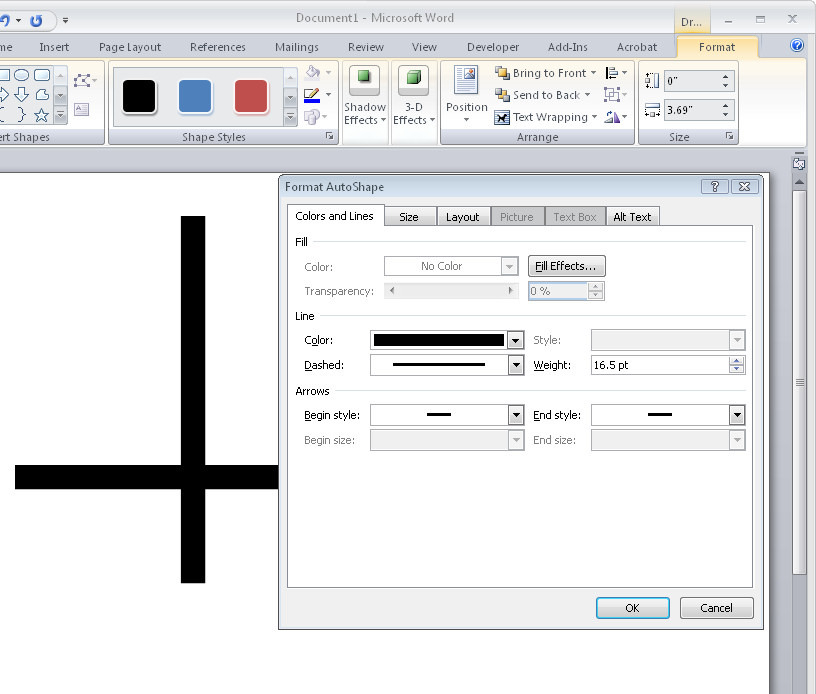
What is missing in Word 2007 is the ability to right click a shape and have the format AutoShape dialog appear as it does in Excel and PowerPoint.
The Format tab and the Format Object dialog in Word offer less features than are available in the new graphics engine in the other applications.
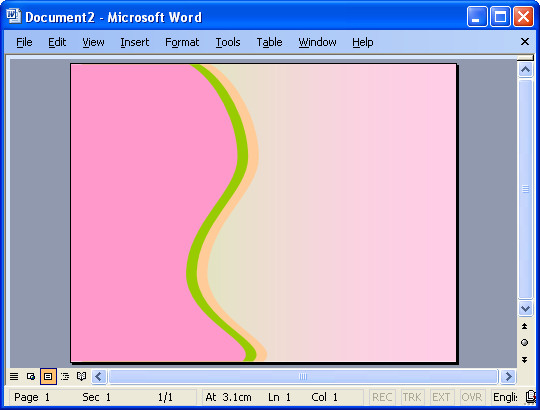
I needed something cute for a magazine sample the other day so I decided to create an organic shape. I needed three edges to be straight and one rounded.
Here’s how it’s done, it makes use of nodes and Bezier curves, fairly simple to do when you know how.
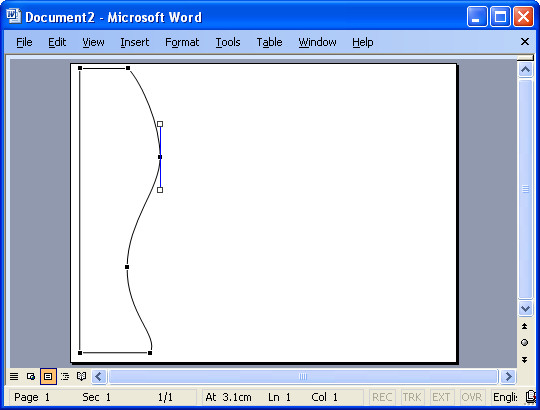
Start with a new Word document. Display the Drawing toolbar and choose AutoShapes > Lines > Freeform. Start in one corner and click once to begin. Click at each point around the shape so you’ll have a polygon shape. If you hold Shift as you click you’ll make a straight line and, if desired, it will be perpendicular to the previous one too. It’s important you get straight sides and square angles when you want your shape to butt up against a page edge.
Click the shape to select it, right click and choose Edit Points. Control + Click on a point to delete it if you don’t need it. Right click on a point that you want to be rounded and choose Smooth Point and then drag on the handles to shape it nicely.
When you’re done, click outside the shape to deselect it. click it again and right click, choose Format AutoShape. Choose Line Color > No Line and choose your Fill Color. Hold Control as you click and drag on the shape to duplicate it and set the Fill Color of this one a different color. Repeat if desired.
To arrange the shapes, click one to select it, right click and choose Order > Send to Back to send it below the others. Choose Order > Send Behind Text to send it below the text. The second command is used to move the shape to the bottom layer of the document below the text. Use the first command to change the layer order of the shapes so they are stacked as you want them to be.
When you’re done you should have a page that looks something like this, I sized the shape to fill the page and moved it to the edge of the page. I also added a gradient filled rectangle under everything just to finish it all off.
I’ve been working with shapes a lot in Office 2007 cause I’ve just written a huge article about them. It didn’t start out to be huge but that’s the way it ended up. You see there’s just so much to learn about them and it’s not all intuitive. The problem as I see it is that part of Office 2007 was just cobbled together (love that word cobbled!). Things aren’t consistent, far from it. One of the most interesting inconsistencies is how Shapes are implemented in Word and in Excel and PowerPoint.
In Excel and PowerPoint shapes work the same pretty much and, if you add a shape and right click it you can choose Format Shape and you get this snazzy new dialog to work with. Do the same in Word and life is very different indeed – there’s no new dialog just the old stuff.
What this means in practical terms is that you can’t fill a Word shape with an image from the clipboard or a clip art image – you can in Excel and PowerPoint and you can’t create your own custom multicolor gradient for a Word shape. The issue is that there’s a new graphics engine in Office 2007 called Escher graphics (presumably named after one of my favourite artists, MC Escher) which is implemented fully in Excel and PowerPoint but only partially in Word. So, don’t expect Shapes in Word to behave the same as they do in PowerPoint or Excel, cause they won’t – it’s that simple.
I love this tip. It’s so much fun and so unexpected that you can do it. In fact, I’ve been working a lot lately on funky graphics stuff in Word so expect to see more in future. It seems like the fewer tools they give us the more I want to make them work for me.
So, here we go. Open a Word document and, from the Drawing toolbar, click the Oval tool and draw a circle on the page. Click the shape, right click, choose Format AutoShape and click the Colors and Lines tab. From the Fill Color dropdown list choose Fill Effects then the Picture tab. Then click Select Picture and locate and open your image by clicking Insert. Click the Lock picture aspect ratio checkbox and click Ok twice. It sounds complicated but it’s really pretty easy to do and the results.. well they’re great.
Better still, you can use any shape – it doesn’t have to be a circle… any of the AutoShapes will do.