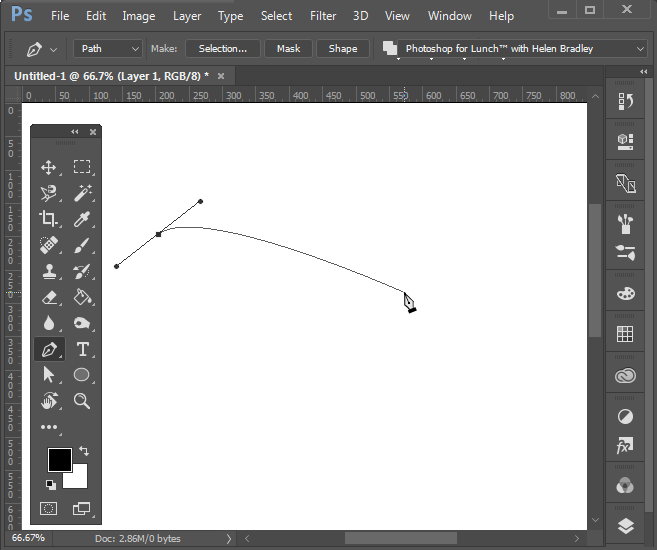
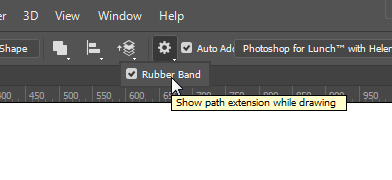
There is a feature for the Pen tool in Photoshop that makes it easier to see where the pen is headed when you are drawing. It is called the Rubber Band. So, if you don’t see a line following you as you draw with the Pen tool then chances are that that setting isn’t enabled. To configure it, with the Pen tool selected, click the Gear icon on the toolbar and check the Rubber Band option. You’ll find it easier to draw paths this way in future.
Whatever you call them, these rings are so cool and so easy to make in Photoshop
Learn to make hi-tech HUD rings (also known as geo circles) in Photoshop. Personally, I think these also look like crop circles and Aztec circles and they are a great element for collages.
Learn to draw simple shapes using the Pen tool in Photoshop
The Pen tool is far from the easiest tool to use in Photoshop but being able to use it will open up a world of possibilities. In this video I will show you how to use the Pen tool in Photoshop. Starting with how to find the tool, I’ll show you how to draw straight sided figures by clicking with the pen tool. You’ll see how to fill the shape and then how to stroke its edges using a Brush.
Then you will learn how to draw curved shapes such as a heart and how to draw S shape curves and M shape curves. You will also see how to draw a perfectly symmetrical shape by drawing half of it, duplicating it, flipping it and joining it all back together – it’s much easier than it sounds, I promise.
You will also see how to save a path you have drawn with the pen tool as a Custom shape in Photoshop so you can draw that same shape at any time in the future just as you would any of Photoshop’s own shapes.
You will learn all about anchors and how to add and delete them and about handles so you can drag on them to reshape a curve. By the time you have completed this video you will be able to confidently use the Pen tool in Photoshop to make shapes and fill and stroke them. This video is suitable for beginner Photoshop users as well as anyone who uses Photoshop a lot but who is not familiar with the Pen tool.
Sometimes I get so wrapped up in complex design solutions I forget the simple things. Like making patterns! So here is a quick and easy solution to turning any jpeg image (or indeed any image you can open in Photoshop) into a repeating pattern. These aren’t seamless repeats – but not everyone wants them to be seamless – sometimes all you need is to make a repeating pattern from something! So here’s how to do it – just make your selection – save it as a pattern and fill a new document with it – it is quick and easy.
I’ll show you how to do this with text and with a photo, they both work exactly the same.
Today I needed to make some text which is white where the layer below is black and black where the layer below is white.
I didn’t want the text to have to be made in two ways (for preference) and I did want it to remain editable. Turns out it is all very easy and it works like magic.
Start by creating your black and white layer. I used a zebra image but you can use anything. Type your text on a layer above and make it white. Then just set the blend mode for the text layer to Exclusion and the colors will flip – the white text will become black where the image below is black.
The wonderful thing about this effect is that the text remains editable and so too is your background. You can move or adjust the black and white layer and the text layer and everything just changes to match.
Learn to quickly turn a Shape into a Path in Photoshop
Sometimes you get caught in Photoshop working with a shape when what you really want is a path. Luckily it’s easy to convert from one to the other – even if it isn’t obvious how to do it.
Start with the Layers palette open and make sure you have at least one layer in the document in addition to your shape layer. If you don’t, choose Layer > New > Layer and click Ok.
Click on the Shape layer in the Layers palette and open the Paths palette.
You will see the shape path there – double click it and give the new path a new name such as path1 and press Ok.
Now remove the original shape layer by clicking it and press Delete and you will be left with just your path.
So there’s a simple but not obvious answer to the question “How do I convert a shape to a path in Photoshop?”
When you create a path but you want a shape, here’s how to make a path into a shape in Photoshop
1. First create your path – it should be a closed path. In most cases this will already be done because it is at this point you realise that you have a path but what you really want is a shape.
2. With the Path selected in the Paths palette, choose Layer > New Fill Layer > Solid Color, click Ok, choose a color and click Ok again.
3. If you now look in the Layers palette you will see that you have a Shape layer – the shape having been created from your original Work Path.
Switch between the Dodge and Burn tools with one key press
While you are making small photo edits one easy trick that could save you a lot of time is switching between pairs of editing tools like Dodge and Burn with one key press.
So to change from the Dodge to the Burn tool (or vice versa), hold down the Alt key (Option on the Mac).
While you have the Alt key (Option key) held you will be using the other tool. Let go the Alt (Option) key to return to the original tool you were using.
Now you can easily move back and forth between tools to speed up your edits.
Quickly change the brush size (without using the slider)
When you’re using any tool in Photoshop that uses a brush such as the Brush itself, Eraser, Dodge, Burn and many others, you can change the size of the brush using a keyboard shortcut rather than having to use the size slider. This fast and easy shortcut can save you a lot of messing around.
To change the size of the brush for any tool that uses it, press the opening square bracket key ([) to decrease the size of the brush and press the closing square bracket key (]) to increase the size of the brush.
Notice from the top image to this one the brush has increased in size (I pressed the keyboard shortcut ] to do this) and I can easily make my adjustments without having to mess around with the brush size slider.
Automatically put placeholder text in a newsletter mock up in Photoshop
If you are creating a mock up of a newsletter in Photoshop I suggest you use “Lorem Ipsum..” as your sample text instead of real text. One thing the human eye is always looking for is readable text, but when you use “Lorem Ipsum” because it makes no sense at all your reader’s eye will go to your design instead of tying to read the placeholder text.
To create a text box and fill it automatically with “Lorem Ipsum”, select the Type tool on your tool bar and click and drag where you wish your text box to go.
Select the font face, font size, and font color on the tool options menu.
To fill the text box with your placeholder text, click Type on your main menu then click Paste Lorem Ipsum on the drop down menu.
This fills your text box with the placeholder type.
Only make and fill one text box at a time, if you need more text then click in the text box and reselect Type>Paste Lorem Ipsum to refill it.