Thursday, January 21st, 2016
Know the filename or part of it? Here’s how to find it in Lightroom
When you need to find a file by looking up its name in Lightroom, here’s how to do so:
1 Go to the Library and on the left in the Catalog area, select All Photographs to search all the photos in your collection.
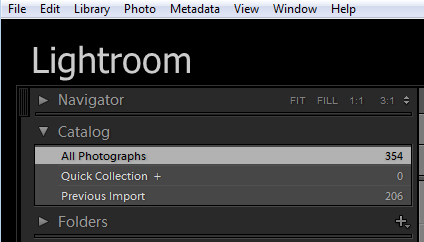
2 Press the Backslash key \ to display the filter bar (you can also select View > Show Filter Bar
3 Select the Text option
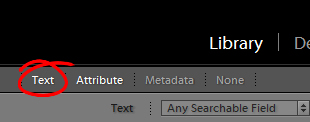
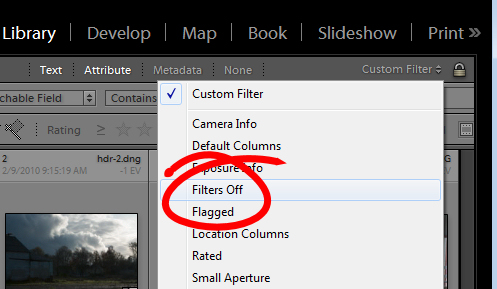
4 Type the filename into the box as shown here:
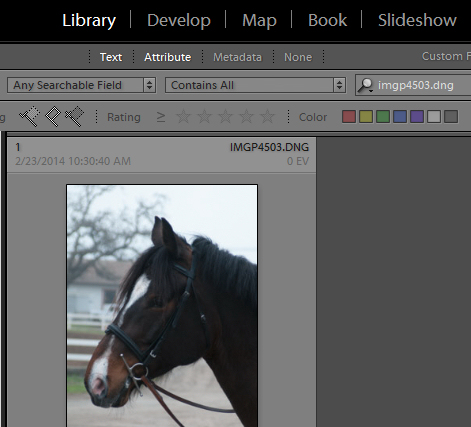
Lightroom will find the image if it exists in the catalog if it exists.
5 If you want to do so, you can type only part of the filename in the box – just make sure to select Contains from the list so you find all files whose names contain that text.
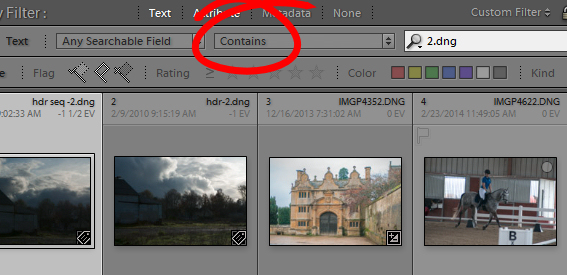
When you are done, select the Custom Filters dropdown and choose Filters Off to return to viewing all your photos.
Labels: all photographs, any searchable field, custom filter, filter, Lightroom, metadata, search by filename, text
Categories:Lightroom
posted by Helen Bradley @ 5:25 pmNo Comments links to this post
Tuesday, November 18th, 2014
Automatically put placeholder text in a newsletter mock up in Photoshop
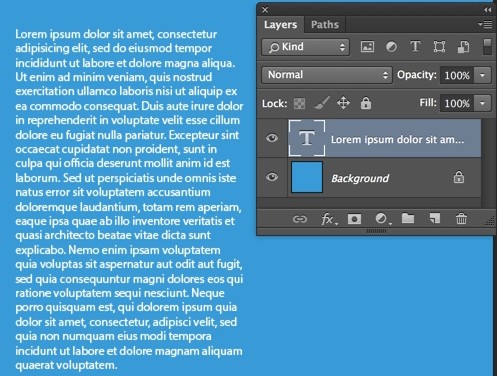
If you are creating a mock up of a newsletter in Photoshop I suggest you use “Lorem Ipsum..” as your sample text instead of real text. One thing the human eye is always looking for is readable text, but when you use “Lorem Ipsum” because it makes no sense at all your reader’s eye will go to your design instead of tying to read the placeholder text.
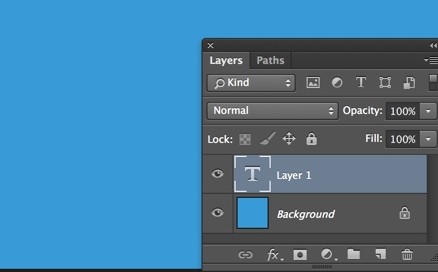
To create a text box and fill it automatically with “Lorem Ipsum”, select the Type tool on your tool bar and click and drag where you wish your text box to go.
Select the font face, font size, and font color on the tool options menu.
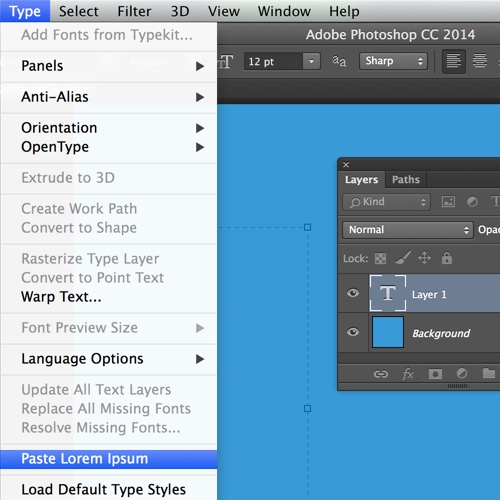
To fill the text box with your placeholder text, click Type on your main menu then click Paste Lorem Ipsum on the drop down menu.
This fills your text box with the placeholder type.
Only make and fill one text box at a time, if you need more text then click in the text box and reselect Type>Paste Lorem Ipsum to refill it.

Labels: dummy text, fill a text box, Latin text, Lorem Ipsum, lorum ipsum, mock up, mockup, newsletter, paragraph text, Photoshop, placeholder text, text, text tool
Categories:Mackenzie Tip, photoshop
posted by mackenzieerb @ 6:03 amNo Comments links to this post
Thursday, July 24th, 2014

You can quickly insert text from a file into your document using Word’s Text from File command. This used to be as simple as choosing Insert > File but the command got hidden behind an additional layer of the UI in Word 2007, making it almost entirely invisible to most users.
To insert text from a file in all recent versions of Word, open the Insert tab in the ribbon and, in the Text settings find the Object button. Click the small arrow to the right of the Object button, and choose Text from File…. Choose the file you want and click Insert. The file type selection here defaults to Word documents only, so if you wish to insert a .txt file or other non-Word document, you’ll have to change the file type to your desired type or All Files.

If you insert a Word document it will include all elements of the document such as images and special formatting. If you wish to include the file’s header or footer (if it has one), you should insert the file into a new section of your document. Be careful when inserting multiple files with different formats, since text from one file may take on another file’s format if the inserts aren’t separated properly.
Labels: change, file, insert, multiple, text, Word
Categories:office
posted by Helen Bradley @ 10:00 amNo Comments links to this post
Wednesday, October 30th, 2013

You’ll often discover that copy-pasted text from other parts of the web does not match the font styling of your document.
For example, you may copy a quote from an article and find it in 10 pt and a different font or color. Google Doc’s new paint format tool solves this problem by letting you instantly match foreign text’s style to your own by copying the formatting from one set of text to another.
To use it, select any of the text from your own document and select the paint roller icon from the left side of the toolbar. The selected text’s styling will be saved in the paint tool, and the next body of text you select will have the styling “pasted” onto it such that the foreign text now matches your own. So, with the template text and paint tool selected, select the text with incorrect styling and it will be fixed instantly.
Helen Bradley
Labels: font, format painter, google docs, google drive, match font, paint formatter, text, word processor
Categories:hunter, office
posted by Hunter Delattre @ 9:00 amNo Comments links to this post
Thursday, August 15th, 2013
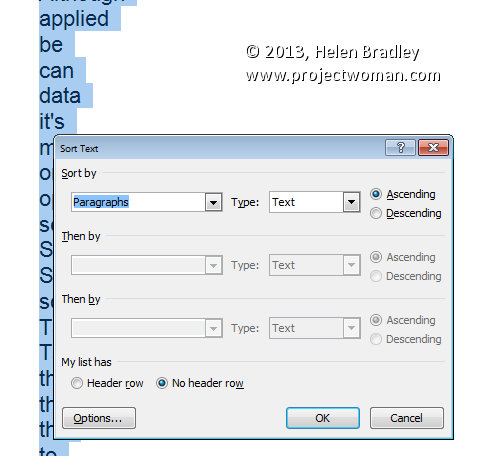
Sorting data in Word 2007, 2010 & 2013
In the pre-ribbon versions of Word you would use the Table commands to sort data in a Word document.
In Word 2007, 2010 & 2013 you can’t use the table sort options any longer for plain old text simply because you can’t select the table options if you don’t have a table – it’s a Catch 22 situation.
Luckily, Word now includes a proper sort option for any text – not just table text. To use it, first select the text to sort and then click the Sort button on the Home tab of the Ribbon.
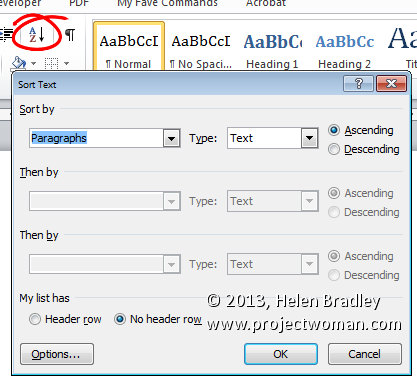
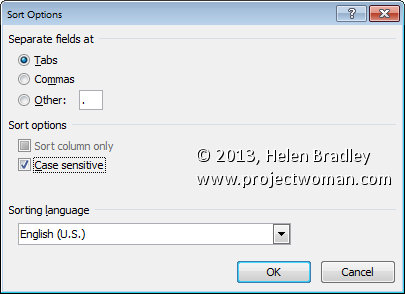
When the Sort Text dialog opens you can choose what to sort such as Paragraph or Field and the type of sort. If you want a case sensitive sort so A is treated differently to a then click Options and check the Case Sensitive checkbox.
Once you are done select the sorting options, click Ok to perform the sort.
Helen Bradley
Labels: 07, 2007, 2010, 2013, Command, data, Microsoft Office, Microsoft Word, sort, Sort Options, Sort Text, table, Table Command, text, tip, trick, Tutorial, Word, Word 2010, Word 2013
Categories:office
posted by Helen Bradley @ 5:57 am1 Comment links to this post
Friday, August 9th, 2013
How to use linked text boxes to flow text throughout a document automatically
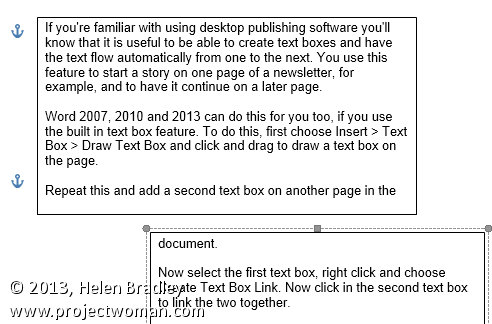
If you’re familiar with using desktop publishing software you’ll know that it is useful to be able to create text boxes and have the text flow automatically from one to the next. You use this feature to start a story on one page of a newsletter, for example, and to have it continue on a later page.
Word 2007, 2010 and 2013 can do this for you too, if you use the built in text box feature. To do this, first choose Insert > Text Box > Draw Text Box and click and drag to draw a text box on the page.
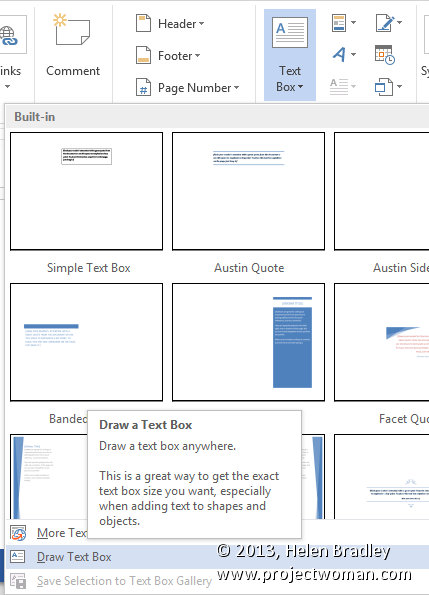
Repeat this and add a second text box on another page in the document.
Now select the first text box, right click and choose Create Text Box Link.
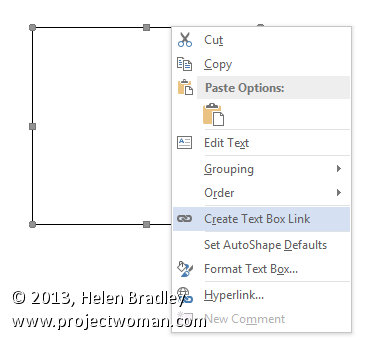
Now click in the second text box to link the two together.

In future, any text which you type into or paste into the first text box and which won’t fit because the box is not large enough to accommodate it, will flow automatically into the second text box.
Helen Bradley
Labels: 2010, 2013, automatic, Create Text Box Link, Draw Text Box, flow, insert, Microsoft Office, Microsoft Word, text, text box, tip, trick, Tutorial, Word, Word 2010, Word 2013
Categories:office
posted by Helen Bradley @ 6:09 am1 Comment links to this post
Friday, July 26th, 2013
I’ve been working on a project which involves adding shapes to a PowerPoint slide using VBA.
One big big problem with PowerPoint is that there is no longer any macro recorder. This means you can’t get information about methods and properties by recording the steps you perform to, for example, add a shape to a slide. In other programs you can get a lot of useful information from recorded macros – in PowerPoint – nada!
So, if you, like me are struggling to make sense of a language that uses such wonderfully nonsensical properties like TextFrame.TextRange then here is the benefit of my research.
Here, in no particular order, is a grab bag of MSDN articles and references for adding and formatting (and adding text to) shapes in PowerPoint using VBA. Enjoy! and if you have any additional useful resources, please add them to the comments to keep us all from going crazy!
Constants to use with the SchemeColor property
http://msdn.microsoft.com/en-us/library/office/bb230611(v=office.12).aspx
ColorFormat object
Properties you can use to color an object – eg its fill, font, outline and so on:
http://msdn.microsoft.com/en-us/library/office/bb265494(v=office.12).aspx
TextRange.font property
How to configure a font for a shape:
http://msdn.microsoft.com/en-us/library/office/ff744240.aspx
LineFormat object
How to configure the line and arrowhead for a line or shape with a border
http://msdn.microsoft.com/en-us/library/office/aa220968(v=office.11).aspx
Shapes Object
How to create a shape on a PowerPoint slide
http://msdn.microsoft.com/en-us/library/office/ff746621.aspx
Shape.height property
Measured in (Oh so helpful) points (72 to the inch)
http://msdn.microsoft.com/en-us/library/office/ff744642.aspx
Shapes members
Some things you can add to a slide:
http://msdn.microsoft.com/en-us/library/office/ff745286.aspx
Shapes.AddShape method
How to add a shape to a PowerPoint slide:
http://msdn.microsoft.com/en-us/library/office/ff744336.aspx
An explanation of working with text in a shape
aka Microsoft’s attempt to explain why you need to use TextFrame.TextRange to add text to a shape!:
http://msdn.microsoft.com/en-us/library/office/aa198526(v=office.10).aspx
The MsoAutoShapeType Enumeration
ie how you can find what a shape is called so you can add it to a slide:
http://msdn.microsoft.com/en-us/library/aa432469(v=office.12).aspx
ParagraphFormat.Alignment property
How to align text in a shape in PowerPoint – :
http://msdn.microsoft.com/en-us/library/office/ff744029.aspx
Info on the TextFrame.TextRange property in PowerPoint:
http://msdn.microsoft.com/en-us/library/office/ff744793.aspx
Info about the TextFrame members in PowerPoint:
http://msdn.microsoft.com/en-us/library/office/ff745830.aspx
Helen Bradley
Labels: align, mspowerpoint, PowerPoint, schemecolor, text, VBA, vba for shapes in powerpoint slides
Categories:office
posted by Helen Bradley @ 4:41 pmNo Comments links to this post
Wednesday, July 3rd, 2013
Use a text box in Word to control text wrap around a table
In a previous tip I showed you how to place a table inside a text box so you could put two tables side by side. You can use the same process to make the text on your page wrap around a table.
Click here to learn how to place a table inside a text box
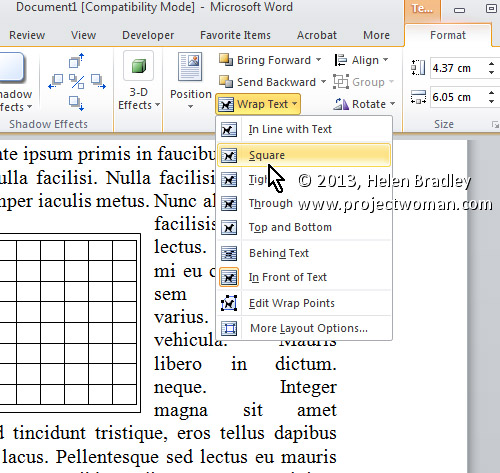
To control the way text wraps around a table, first create a text box and place a table inside it.
Then click to select the text box and, from the Ribbon, select the Format tab > Text Box Tools. Click the Wrap Text dropdown menu and choose the desired wrapping option from those in the list – typically you will use Square to wrap text round the text box with its inserted table.
Helen Bradley
Labels: 2010, 2013, format, insert, Microsoft Office, Microsoft Word, option, part 2, table, text, Text Box Tools, tip, trick, Tutorial, Word, Word 2010, Word 2013, wrap, Wrap text, wraparound
Categories:office
posted by Helen Bradley @ 6:05 am1 Comment links to this post
Tuesday, May 21st, 2013
Learn more about the formatting applied to text in your document with this handy Keyboard Shortcut
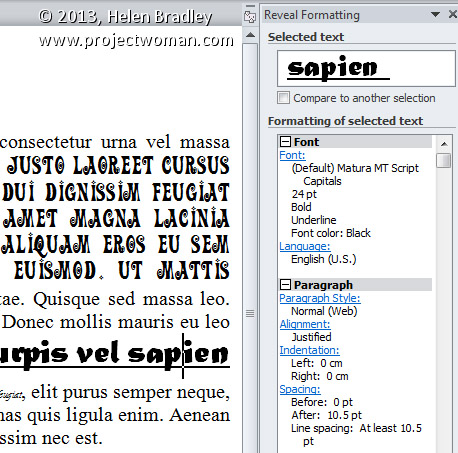
If you want to quickly find out what formatting has been applied to any piece of text, click in the text and press Shift + F1. A task pane will open in the right of Word window. This Reveal Formatting task pane displays details about the text format being used for the word that your insertion point is closest to.
With this task pane open you can click on any piece if text to learn more about its formatting.
Helen Bradley
Labels: 2010, 2013, Combination, F1, format, formatting, insertion, key, keyboard, Microsoft Office, Microsoft Word, pane, point, Reveal, Reveal Formatting, right, shift, shortcut, task, text, tip, trick, Word
Categories:office
posted by Helen Bradley @ 5:53 am1 Comment links to this post
Saturday, January 26th, 2013
You can easily change your default font settings in Google docs using styles.
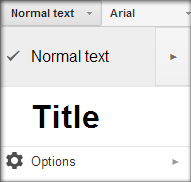
To change your default text style for all future documents, you must first update the Normal text style. Highlight some text with the formatting you want to adopt as your default, open the styles dropdown menu, and click the arrow next to Normal text. In the resulting menu, select Update ‘Normal Text’ to match. This redefines the Normal text style to match the selected text. To make this change permanent, open up the style menu again and select Options > Save as my default styles. This means that the new Normal text style will be used for all future documents. In this way you can set, for example, 12-point Times New Roman as your default font for Google docs.
If you ever want to undo all style changes, return to the options menu and select Reset styles. This will reset them to the original default settings, but only within that document, so you must then choose Save as my default styles again if you wish to make the reset permanent.
Helen Bradley
Labels: default, font, formatting, google docs, style, styles, text
Categories:hunter, office
posted by Hunter Delattre @ 9:00 am2 Comments links to this post


