Sunday, March 23rd, 2014

When pasting large data tables from your web browser into an Excel file you’ll probably be displeased to find that they do not match the formatting of the worksheet.
By default Excel will paste the data with the formatting it used on the source web page instead. This is rarely useful, since it’s very unlikely the web page had formatting that is compatible with your document. As you can see in the image above, using the source formatting can result in the inclusion of links, improper font and font size, and a number of other formatting issues.
To make Excel paste the data with destination formatting (i.e. the formatting of the destination Excel worksheet), you’ll need to add a special command to your quick access toolbar. To do this, select File > Options > Quick Access Toolbar. Above the left column, select the Choose commands from dropdown and choose All Commands. Scroll down the list and find Paste and Match Destination Formatting. Select it and click Add, then OK.

Now whenever you wish to paste web data into Excel, click the Paste and Match Destination Formatting button in the Quick Access Toolbar instead of using the standard paste tool. This will result in the data being automatically formatted to match the look of the rest of your worksheet.
Helen Bradley
Helen Bradley
Labels: default, destination, Excel, fix, formatting, Paste, worksheet
Categories:office
posted by Helen Bradley @ 9:00 am1 Comment links to this post
Tuesday, May 21st, 2013

Learn more about the formatting applied to text in your document with this handy Keyboard Shortcut
If you want to quickly find out what formatting has been applied to any piece of text, click in the text and press Shift + F1. A task pane will open in the right of Word window. This Reveal Formatting task pane displays details about the text format being used for the word that your insertion point is closest to.
With this task pane open you can click on any piece if text to learn more about its formatting.
Helen Bradley
Labels: 2010, 2013, Combination, F1, format, formatting, insertion, key, keyboard, Microsoft Office, Microsoft Word, pane, point, Reveal, Reveal Formatting, right, shift, shortcut, task, text, tip, trick, Word
Categories:office
posted by Helen Bradley @ 5:53 am1 Comment links to this post
Saturday, January 26th, 2013

You can easily change your default font settings in Google docs using styles.
To change your default text style for all future documents, you must first update the Normal text style. Highlight some text with the formatting you want to adopt as your default, open the styles dropdown menu, and click the arrow next to Normal text. In the resulting menu, select Update ‘Normal Text’ to match. This redefines the Normal text style to match the selected text. To make this change permanent, open up the style menu again and select Options > Save as my default styles. This means that the new Normal text style will be used for all future documents. In this way you can set, for example, 12-point Times New Roman as your default font for Google docs.
If you ever want to undo all style changes, return to the options menu and select Reset styles. This will reset them to the original default settings, but only within that document, so you must then choose Save as my default styles again if you wish to make the reset permanent.
Helen Bradley
Labels: default, font, formatting, google docs, style, styles, text
Categories:hunter, office
posted by Hunter Delattre @ 9:00 am2 Comments links to this post
Tuesday, October 16th, 2012

If you are having second thoughts about the look of your document you can remove the formatting. Select the text that you want to strip of its formatting and and press Ctrl + Space Bar to remove its formatting. If you press Ctrl + Shift + N you’ll apply the default Normal style to the selected text.
Helen Bradley
Labels: formatting, Microsoft, remove formatting, style, trevor office, trevor payne, Word
Categories:office, trevor tip
posted by Trevor Payne @ 8:00 amNo Comments links to this post
Monday, July 19th, 2010
 If you’ve added an email link or a website URL to a PowerPoint slide, you’ll know that PowerPoint 2007 and PowerPoint 2010 automatically format the hyperlinks for you.
Because PowerPoint doesn’t use styles, it’s not obvious exactly how the formatting gets applied and how you control it.
The first thing to know is that you simply can’t control the underlining, it’s there and it’s there to stay. You can, however, change the colors used.
Click the Design tab > Colors > Create New Theme Colors, locate the Hyperlink color and change it to something different if desired. To control the Followed Hyperlink color, select that option and change it.
You now need to save your changes as a custom color scheme, so type a name for your color scheme and click Save.
Now the chosen hyperlink color and followed hyperlink color will be used to format the hyperlinks in your PowerPoint presentation.
Helen Bradley
Labels: formatting, Hyperlinks, PowerPoint, PowerPoint 2007, PowerPoint 2010
Categories:Uncategorized
posted by Helen Bradley @ 1:30 pm13 Comments links to this post
Wednesday, January 14th, 2009
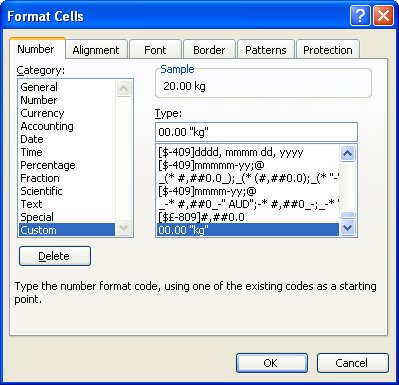
Ok, so here’s the scenario, you want to enter a value like 20Kg (or 44 lb) into an Excel cell. All goes well until you try to multiply the value. Instant disaster. Your number isn’t a number it’s a piece of text and you can’t multiply or add text. You can’t divide or minus text or find the 4th power of it either – you get the idea.. it’s basically a useless entry – pretty but useless.
SO, how do you format a cell so it displays the Kg after the number but so it still treats the entry as a number? I’m so glad you asked!
The answer is to create a custom number format. Click the cell or a range of cells and choose Format > Cells > Number tab. Select the Custom entry and type something like 00.00 “kg” in the text box and click Ok. Now, enter the numbers again as 20 or 40 etc and the kg will appear automatically after the number courtesy of the format – and the number, well it’s still a number so you can add, multiply, divide and do all sorts of other wonderful things to it as you like.
You can also add the text before a number. So, for all those lovely Canada dollars I get paid by the folk at Hub Digital Living where I write a monthly Office column, I type a Custom format like “CAN” 00.00 in my sheet where I record my payments. It’s all so easly when you know how.. and now – you do too..
Helen Bradley
Labels: custom formats, Excel, formatting
Categories:Uncategorized
posted by Helen Bradley @ 11:47 pm7 Comments links to this post
Wednesday, September 19th, 2007
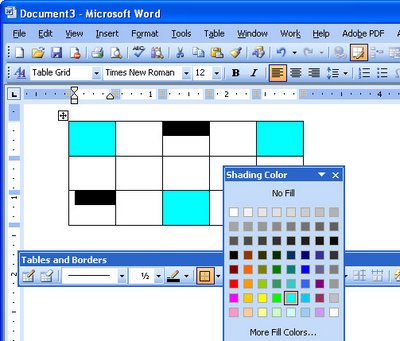
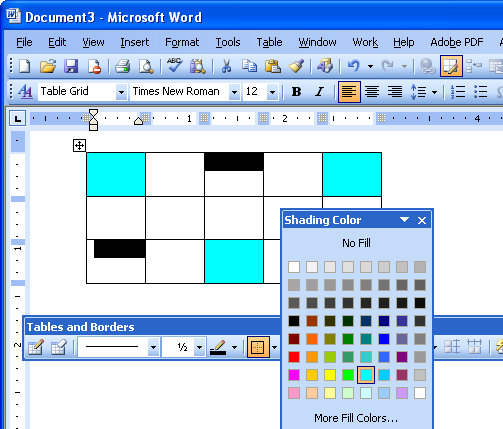
Since Microsoft Word 2002, it has been possible to format a series of cells in a table all at the one time, even if they are not contiguous (a lovely word that means not side-by-side).
To do this, select the first cell then Control + click on the other cells that you want to share the same formatting. Once all the cells are selected you can apply a formatting such as a shading to those cells. Note, that the Shading button on the Tables and Borders toolbar in Word 2002/2003 is the one to use, the one on the Drawing toolbar is the Fill button – it looks the same but doesn’t work the same!
Selecting and formatting non contiguous cells all at ones makes it a quicker process to format a table than it would be if you selected and formatted each cell individually.
However, of course, the F4 key still works in cells in a table so you can, for example, fill a cell with a shading color or a format option and then click in another cell and press the F4 key and have that format applied to this cell too. The F4 key is a repeat key which repeats the previous command and it’s a great key to learn to use anytime you’re working with Word.
Helen Bradley
Labels: formatting, table, Word 2003, Word 2007
Categories:Uncategorized
posted by Helen Bradley @ 4:01 pm1 Comment links to this post