Sunday, March 23rd, 2014

Easily Paste Web Content into Excel with Destination Formatting

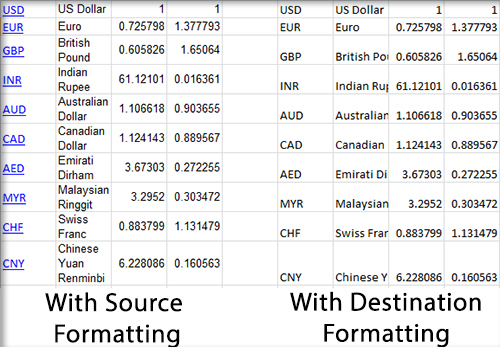
When pasting large data tables from your web browser into an Excel file you’ll probably be displeased to find that they do not match the formatting of the worksheet.

By default Excel will paste the data with the formatting it used on the source web page instead. This is rarely useful, since it’s very unlikely the web page had formatting that is compatible with your document. As you can see in the image above, using the source formatting can result in the inclusion of links, improper font and font size, and a number of other formatting issues.

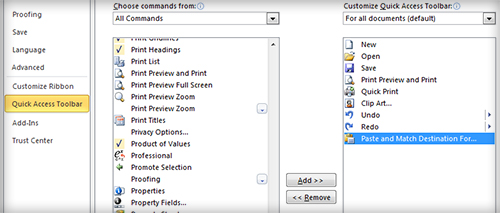
To make Excel paste the data with destination formatting (i.e. the formatting of the destination Excel worksheet), you’ll need to add a special command to your quick access toolbar. To do this, select File > Options > Quick Access Toolbar. Above the left column, select the Choose commands from dropdown and choose All Commands. Scroll down the list and find Paste and Match Destination Formatting. Select it and click Add, then OK.

Now whenever you wish to paste web data into Excel, click the Paste and Match Destination Formatting button in the Quick Access Toolbar instead of using the standard paste tool. This will result in the data being automatically formatted to match the look of the rest of your worksheet.

Helen Bradley

Helen Bradley

Saturday, May 25th, 2013

Photoshop Tip – Custom Workspaces

How to Create a Photoshop Workspace Just for You

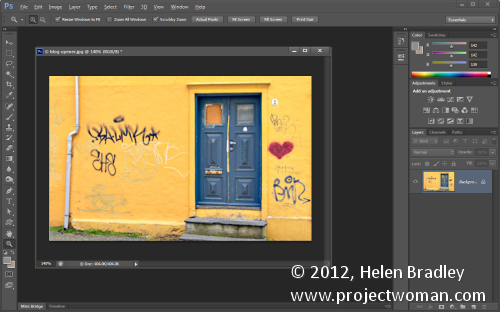
I like Photoshop to open and “look the way I want to see it”. But sometimes ‘the way I want to see it’ is different than others. I’m fickle – but thankfully Photoshop plays nice with me – the secret is its Workspaces. These Workspaces let me preconfigure my Photoshop screen for various scenarios, to save them so I can reuse them, and to put everything back in its place when I mess them up.

If this sounds like something you could use – here’s how to give your Photoshop window a custom look with workspaces.

The first thing I do is to set up Photoshop the way you want it to look and that means hiding all the panels you don’t want to see and displaying those that you do.

Then arrange them on the screen exactly the way you want to see them. For me, I prefer my toolbar to be in two columns rather than one long one. I like my layers and paths palettes visible but not much else.

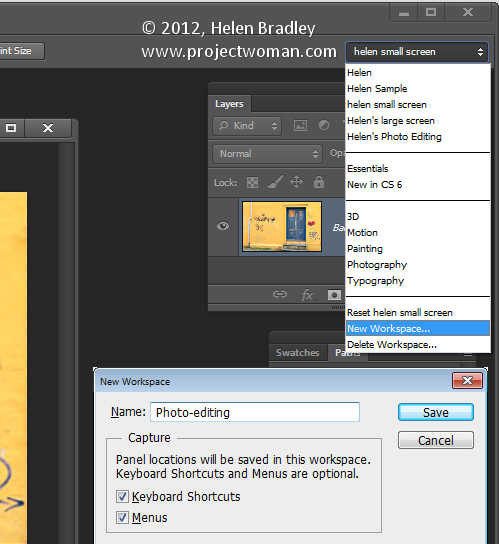
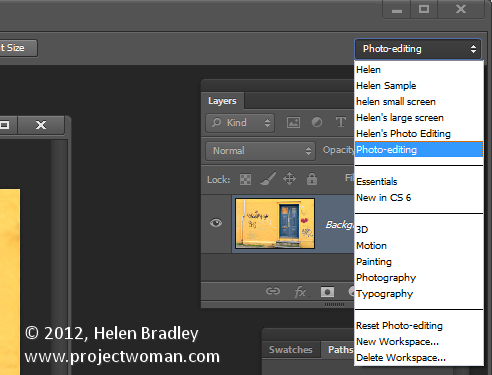
Once the screen is organized the way you want it to look, from the dropdown list in the top right corner choose Essentials > New Workspace and type a name for the workspace. Select the options for keyboard shortcuts and menus select and click Save.

You can repeat this process, if desired, and create other workspaces. You might make one for photo-editing, one for collage, one for illustration or one for videoing depending on your own personal needs.

In future you can set up your screen by choosing the workspace of your choice from the dropdown list.

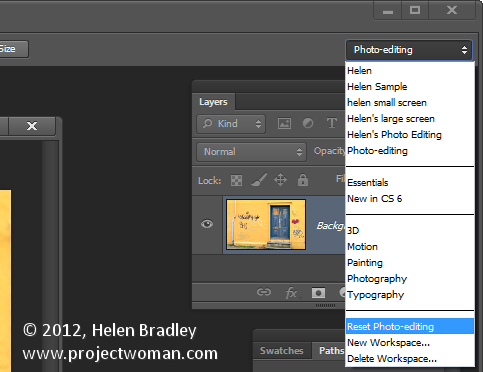
If you move things around and things go a bit crazy it is easy to reset a workspace back to how it was when you last saved it.

To do this, first make sure you are viewing the workspace to reset and then open the Workspace menu and choose Reset .

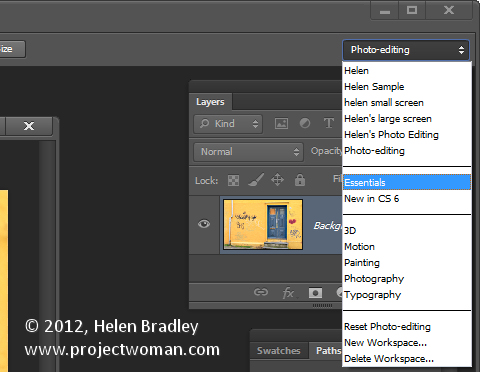
Likewise you can return to Photoshop’s default workspace anytime by selecting Essentials then click Reset Essentials.

And one last word on workspaces…
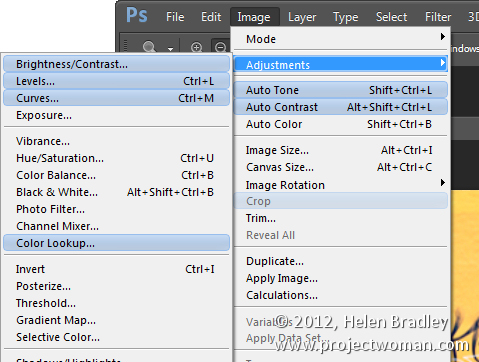
If you want to see what’s new in Photoshop CS6 click the New in CS6 workspace and you can see what is new in Photoshop. Open a menu and any new options in it will show as blue on the menu.

Helen Bradley

Friday, March 15th, 2013

Motion charts in Google Docs

Gadgets allow you to do things with Google Docs that would be time consuming if not beyond most people’s skills to create in a program like Excel. In this article I’ll demonstrate how to create a motion chart in Google Docs spreadsheet.

Prepare the data
In the first column of a new worksheet type the name of the item you’re charting such as office locations – we’ll use City and Bayside. In the next column, type the period that the data is for – this needs to be a time field such as year, week or quarter. The data needs to conform to ISO8601 so use 2011 for a year, 2011W08 to enter week eight of 2011 or 2011Q2 for second quarter 2011.

In the next column, type the data to plot such as Profit. The next columns are optional but we’ll add one which records units sold. To have some data to work with, add at least five years of data for the two offices.

Add the Gadget
Select over the entire range (including headings), and choose Insert > Gadget > Charts and scroll to find the Motion Chart and click Add to Spreadsheet. In the dialog which appears, the range should already cover the selected range, leave the Default State empty for now and type a title for your chart such as 5 Year Office Comparison and click Apply & Close.

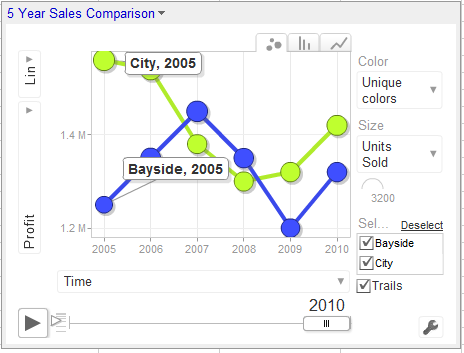
The chart appears on the screen but requires some customisation to  work. From the fly out menu of Y axis options on the left select Profit and then from the X axis dropdown list select Time so you plot Profit against Time.

From the Color dropdown list, select Unique Colors and from the Size dropdown list, select Units Sold.

Click the Play button and the chart will play showing the change in your data over time. The Y axis movement shows movement in Profit and the size of the bubble shows change in Units Sold.

The tabs change the chart from a Bubble to a Column or Line (this is not a motion chart).

If you click the office checkboxes and Trails you will see additional labels on your data and to the right of the Play button is a slider which controls playback speed.

Save the default
Wind the play button back to the beginning. Click the Settings button and click Advanced and Advanced again. Double click the state string to select it, right click and choose Copy. Click the chart title to display the chart menu, click Edit Gadget and paste the string into the Default State textbox. Save the worksheet and the chart will appear whenever the worksheet is viewed and it will be configured as you set it up to look.


Helen Bradley

Saturday, January 26th, 2013

Change your default font settings in Google Docs

You can easily change your default font settings in Google docs using styles.


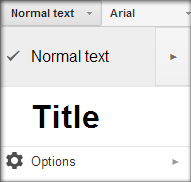
To change your default text style for all future documents, you must first update the Normal text style. Highlight some text with the formatting you want to adopt as your default, open the styles dropdown menu, and click the arrow next to Normal text. In the resulting menu, select Update ‘Normal Text’ to match. This redefines the Normal text style to match the selected text. To make this change permanent, open up the style menu again and select Options > Save as my default styles. This means that the new Normal text style will be used for all future documents. In this way you can set, for example, 12-point Times New Roman as your default font for Google docs.

If you ever want to undo all style changes, return to the options menu and select Reset styles. This will reset them to the original default settings, but only within that document, so you must then choose Save as my default styles again if you wish to make the reset permanent.

Helen Bradley

Monday, January 18th, 2010

Restore a file association in Windows Vista


image

Don’t ask me how I did it – it has been one of those weeks! but I somehow associated zip files with Photoshop. So, every time I needed to extract the contents of a zip file Photoshop would open and gag on the file – not unsurprising but very annoying.

A fix was required. The solution is in the Registry but it’s not hard to find or to fix. You do need to have your wits about you and never touch anything you don’t understand. Oh! and back up your registry before you start playing with it.

Choose Start > Run > type REGEDIT and click OK and then, when the warning comes up, click Continue. You have to be an admin to use this tool.

Navigate to find this key:

HKEY_CURRENT_USER\Software\Microsoft\Windows\CurrentVersion\Explorer\FileExts\

and then locate the extension causing issues, in my case zip

Then find the UserChoice option under this, right click and choose Delete. This removes any custom choice and returns your association to what it was when Vista was first installed. Problem solved!

Finally, choose File> Exit to exit the registry editor.

Helen Bradley

Wednesday, July 8th, 2009

Word 2007 – Update Normal Style

The Normal style is applied to text by default if no other style is applied.

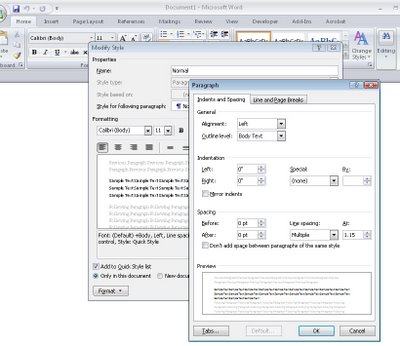
If the Normal style for any of the style sets is not to your liking, select it in the style list, right click and choose Modify.

You can now alter the style, for example you can reduce the inter-paragraph spacing by clicking Format > Paragraph and reduce the Spacing After value.

Click Ok and then, to apply this change to all new documents based on this template, select the New Documents Based on This Template option and click Ok.

By configuring the styles to suit your needs you can quickly format your documents to a consistent look without having to make all the format changes individually.

Helen Bradley