When pasting large data tables from your web browser into an Excel file you’ll probably be displeased to find that they do not match the formatting of the worksheet.
By default Excel will paste the data with the formatting it used on the source web page instead. This is rarely useful, since it’s very unlikely the web page had formatting that is compatible with your document. As you can see in the image above, using the source formatting can result in the inclusion of links, improper font and font size, and a number of other formatting issues.
To make Excel paste the data with destination formatting (i.e. the formatting of the destination Excel worksheet), you’ll need to add a special command to your quick access toolbar. To do this, select File > Options > Quick Access Toolbar. Above the left column, select the Choose commands from dropdown and choose All Commands. Scroll down the list and find Paste and Match Destination Formatting. Select it and click Add, then OK.
Now whenever you wish to paste web data into Excel, click the Paste and Match Destination Formatting button in the Quick Access Toolbar instead of using the standard paste tool. This will result in the data being automatically formatted to match the look of the rest of your worksheet.
Learn to use recursivedrawing.com to create a fractal tree that you can then use in a Photoshop collage. This video shows you step by step how to create the fractal tree and then how to copy and paste it into a Photoshop collage. Also, how to blend it seamlessly into the collage document.
Transcript:
Hello, I’m Helen Bradley. Welcome to this video tutorial. In this tutorial I’m going to show you how you can create fractal trees online that you can then use in collages and other images in Photoshop. This is the kind of recursive tree that we’re going to draw. And one of the benefits of this is that we can grab it and use it in a Photoshop image.
So let’s have a look and see how it’s put together. It’s put together with a single rectangle that’s a long rectangle and then we’re just going to draw it as a fractal tree. So I’m just going to click down here, this plus sign, to get started with a new image and let’s start with our first tree.
To create a tree we’re going to start with a rectangle or square and drag it to make a nice long thin rectangle which is going to be the trunk of the tree. And I’ll just place it in position at the bottom here. Then I’m going to go and drag this element which is the element I just created but this time I’ve got multiple versions of it. I’m going to push it so that I make this sort of recursive element.
Now it is really easy for this tree to get away from you. And if it does just stop it and just go and start again until you get really used to the tool and what it’s going to do it because it can behave really, really recursive and go everywhere really, really quickly. So I’ve now got that part of the tree. Now I’m going to go and grab the tree back again because I want it in here. And this is usually where if I’m going to lose it I’ll lose it at this point. But let’s call that good for our tree because that actually is quite a good tree. You’ll watch it until it’s finished drawing and when it’s finished drawing you won’t see any more changes around the edges.
So this is looking pretty good to me so I’m going to press the Print Screen key to take a screen print of it. And now I’m going to launch Photoshop. In Photoshop you can see I’ve already got a few trees hanging around. I’m going to choose File and then New and then click Ok because that is an image now the size of my clipboard. So all I have to do is do Edit Paste. And here is my tree.
So the first thing I’m going to do is make a selection around the tree itself and then I’m going to choose Select Inverse so the rest of the image is selected and I’m going to delete it just to get rid of it. I’m also going to get rid of the background layer so all I have right now is the tree itself. I’m going to select the magic wand tool and I can just click on the white and just press Delete and that will get rid of all the elements except the tree itself. And at this point I can just crop it down to size.
Now I would save it at this point because that means I’ve got a tree then I can use in anything in future. Now I have a texture image here and it’s a pretty big texture. And this image is pretty small so I’m probably just going to reduce the size of this down say 50 percent so that our tree is going to look a little bit better on it. With the texture image and the tree image both visible I’m just going to drag the layer of my tree image onto my texture. And here it is. I’m just going to make sure that I move the tree and not the background.
Now if you find that there’s a little bit of haloing around the edges of your tree so if you brought in a little bit of white that you want to get rid of you can do so. And the easiest thing probably is just to set this blend mode to darken because what that does is the white pieces on the tree anything that was a sort of legacy piece of white isn’t going to be brought in because it’s going to be lighter than the background.
So there are all sorts of trees that you can create using that tool. You can be successful and less successful depending on how you go. You can see I’ve got some really nice trees and I’ve got some pretty horrible ones as well. But that tool can be used to create fractal trees that you can then access to use in your images in Photoshop this way.
I’m Helen Bradley. Thank you for joining me for this video tutorial. I hope you enjoy the recursive drawing tool. Look out for more videos on my YouTube channel here and visit projectwoman.com for more tips, tricks and tutorials on Photoshop, Photoshop Elements, Illustrator, Lightroom and lots of other handy graphics techniques.
So, you’ve finished designing your presentation in PowerPoint and it’s time to you’re your final preparations.
One thing you will need is handouts for your participants. It is easy to use Microsoft Word to create custom handouts for your PowerPoint presentation.
First complete the presentation so the slides are all is complete select the Office button and choose Publish > Create Handouts in Microsoft Office Word.
When the Send to Microsoft Office Word dialog appears, select the layout for the slides and text. There are various combinations of slides, notes and blank lines that you can choose from.
Select either the Paste or the Paste Link button depending on whether you want to embed the slides in the Microsoft Word document or simply link to them.
When you are done, click Ok and wait as Microsoft Word opens and the slides, notes and blank lines are created automatically for you in a new Word document.
Once the handouts are complete, you can format the document as you wish and add a cover page, headers and footers as desired and then print your slide handouts for distribution at presentation time.
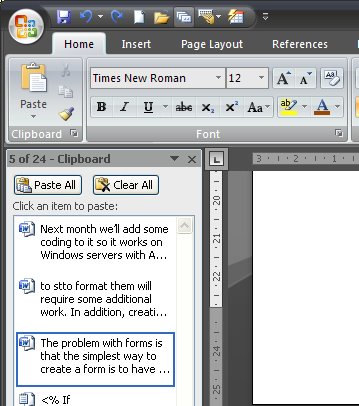
In previous incantations of Word it was fairly easy to see, and therefore to know, that the Office clipboard contains more than just the most recently copied or cut item. In Word 2007 this is not the case and you need to know where the clipboard is and to understand that it contains much more of your document history than you might think it does.
How it works is that it retains everything you copy and cut to the clipboard during the current session. As you copy or cut something, all the other items are moved further down the stack leaving the current item at the top. This is the item that is pasted in if you choose the Paste option. However, you can paste anything that is on the clipboard, provided you can find it.
In Word 2007 click the Home tab and, below the Paste button you will see a small entry for the Clipboard and a flyout indicator. Click it and the clipboard will appear and all the items in it will be listed. The clipboard stores up to 24 items and as each additional one is added the one at the bottom is lost. You can paste any of the items that display in the list into your document by just clicking on it.
So, next time you know you cut or copied something a while ago and you need it back, check the Clipboard, chances are it’s there waiting.