Sunday, September 6th, 2015

How black is Illustrator Black?

I’ve been working with glossy things in Illustrator recently and I’ve encountered an interesting situation in relation to black.

To create the glosses for the baubles I am making, I need to use a black to white gradient in screen blend mode. It turns out that there are different ‘grades’ of black and, although they look pretty much the same on the screen when you are looking at the black objects, they actually work differently when using with blend modes.

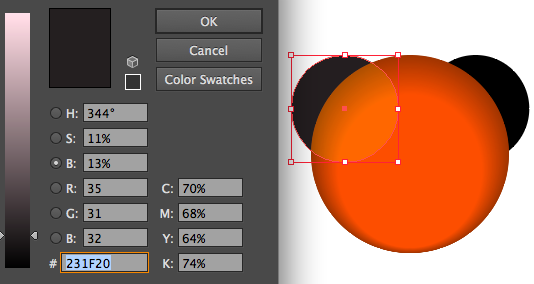
Here is the regular Illustrator black (from the Swatches panel) – I am working in RGB mode, and this is how a filled black circle looks when added over the underlying shape and blended using Screen blend mode. You can see clearly where the circle begins and ends. You can also see from the Color palette that the black isn’t truly black:

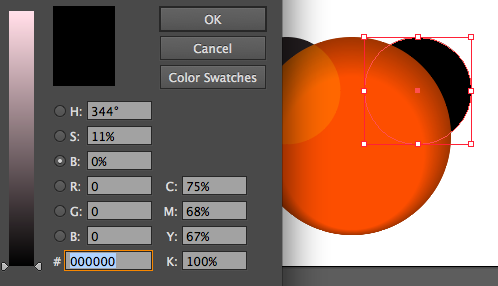
Here is the same shape, but this time I’ve set the K value in the CMYK specification for the color as 100% (RGB are all 0) and the result is very different and you can’t see the edges of the circle:

Even though I am working in RGB and even though I only plan to use the images on the web, nevertheless creating a more blacker black using the CMYK color specification makes for a different and better blend (at least in this situation). If you need to, it might be a good idea to add a black black to your swatches so it will always be available.


Thursday, March 26th, 2015

Quickly Open an Image in Photoshop

Did you know you don’t actually have to choose File > Open to open a document?

Yup! It is so!

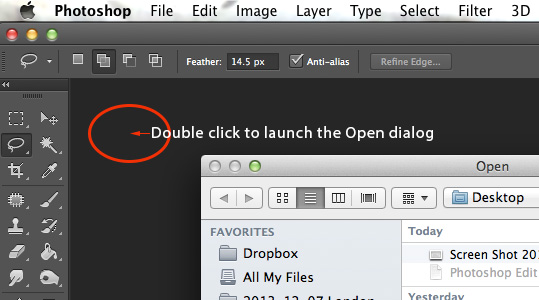
To avoid having to choose File > Open anytime you want to open a new image in Photoshop just double click on the workspace and the Open dialog opens automatically for you.

Simple and quick. What’s not to like about techniques like this?

Thursday, May 8th, 2014

Photoshop Basics: Learning About Layers

image credit © 2008 lockstockb, freeimages.com
Guest post

Understanding how layers work is crucial to being able to work effectively in Photoshop and in this post I will cover everything related to Layers including,

How to Create a New Layer

How to Duplicate a Layer

Add a Layer style

Using Adjustment Layers

How to Merge Layers

CREATE A NEW LAYER:

This is a very basic function in Photoshop which is elaborated further in this Photoshop tutorial. On the menus choose Layer > New > Layer to create a new empty layer right above your image. On that brand new layer, you can paint, create shapes, etc… all in a non-destructive way. This means that if you don’t like what you just did, hide or delete that layer on your image underneath will still look like it did at the start.

DUPLICATE A LAYER:

To duplicate a layer click on the layer you want to duplicate then go to Layer > Duplicate Layer and voila, you now have two identical layers!

ADD A LAYER STYLE:

Say you added a button or some text on your image and you’d like to add a shadow to it. To do this, choose Layer > Layer Style and choose Drop Shadow. Other popular options are Inner Shadow, Outer Glow, Inner Glow and Bevel & Emboss. I suggest you play with each of them to really understand how they can benefit you.

USING ADJUSTMENT LAYERS:

Adjustment layers are one of the most powerful tools in Photoshop. Use these to change the look of your image in a non-destructive way by, for example, adjusting the colors as well as the shadows, highlights and contrast. To add an adjustment layer to any image, go to Layer > New Adjustment Layer and choose the type of adjustment layer. Here is a list of the adjustment layers I use most frequently:

Brightness/Contrast: This lets you make simple adjustments to the tonal range of your image. In layman’s terms, when you move the Brightness slider to the right your image gets brighter, when you move it to the left the image gets darker. If you move the Contrast slider to the right, your image becomes more contrasty, you move it to the left, contrast is reduced and the image becomes more grayish.

Levels: A Levels adjustment allows you to adjust the intensity levels of shadows, midtones, and highlights in your image. Drag the slider on the left inwards to darken the shadows and drag the slider on the right inwards to brighten the highlights. If you drag the middle slider to the left you will brighten the midtones and drag it to the right to darken the midtones in your photo.

Curves: Use can use Curves to adjust the image tonality with more precision than by using Levels. By adding points on the curve, you’ll be able to adjust the brightness or darkness of the Highlights, Midtones and Shadows.

Hue/Saturation: This one is really helpful for adjusting colors. You can either adjust the saturation of all colors at the same time (this is the default and occurs when the Master channel is selected) or select individual colors from the dropdown menu to adjust the saturation of that color and also its Hue and Brightness.

In adjusting the hue you can, for example, with red selected, drag the slider to bring the red towards either pink or orange. The Brightness slider will either brighten or darken specific colors or the entire image – depending what you have selected in the dropdown menu.

Color Balance: Perfect for color correction, Color Balance changes the mixture of colors in a photo. You have the option here to adjust the colors in the Midtones, Shadows and Highlights. Let’s take the color blue for example, if you want to adjust the color of a blue sky, choose Highlights, a blue shirt, choose Midtones, a blushish shadow, choose Shadows. To color correct an image, I suggest you try each slider and move to the next slider once you like the look of the image.

Selective Color: This is another powerful tool for color correcting or color grading. Selective color will allow you in a very precise way to fine tune color. For every color (Reds, Yellows, Greens, Cyans, Blues, Magentas, Whites, Neutrals/Gray, Blacks) you’ll be able to fine tune them by adjusting the Cyan/Red, Magenta/Green, Yellow/Blue, Black/White found in each of those colors.

MERGING LAYERS:

Sometimes you want to duplicate a layer, other times you want to merge them together. To do this, from the Layer menu choose Merge Layers, Merge Visible, or Flatten Image:

Merge Layers: Use this option when you want to merge layers you have selected.

Merge Visible: Use this when you want to merge all the visible layers.

Flatten Image: Use this when you want to flatten the entire image/all the layers.

Helen Bradley

Wednesday, November 13th, 2013

Add Spacing to Word Table Cells

Learn to quickly add extra spacing above and below the contents of a Word table cell

When you enter text in a Word 2013 table you may want more space above and below your text than appears by default.

While you can make the table cells larger and vertically centre the text in the cells this is a cumbersome solution and there is better and faster way.

To add extra spacing you can change the table’s cell spacing values.

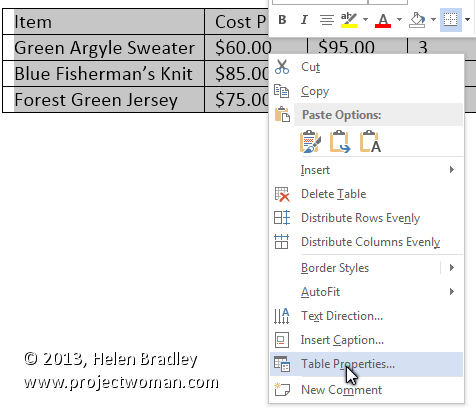
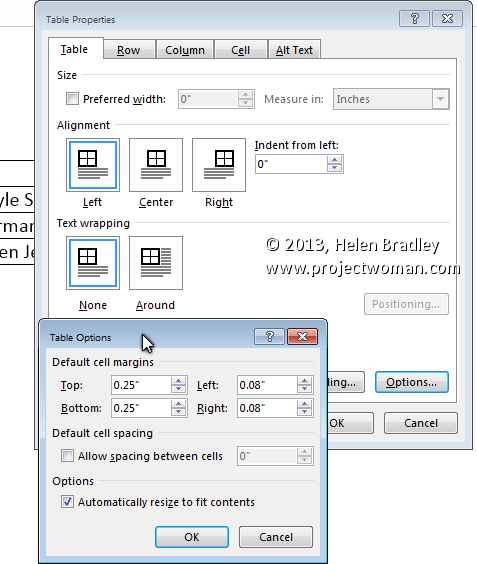
To do this, first select the table, right click choose Table Properties.

Click the Table tab and click Options.

Here you can set the Top, Bottom, Left and Right cell margins for all cells in the table. Set the Top and Bottom values to 0.25″ to add a little extra space above and below the text in the cells.


Helen Bradley
Thursday, November 7th, 2013

Convert text to a Microsoft Word table

Quickly turn text into a Microsoft Word table

It is possible to convert text from a Word document into a table.

However, to do so requires the text to be correctly laid out – if it is not, it is worth a few minutes work to reformat the text so it can be easily converted to a table.

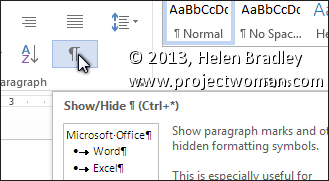
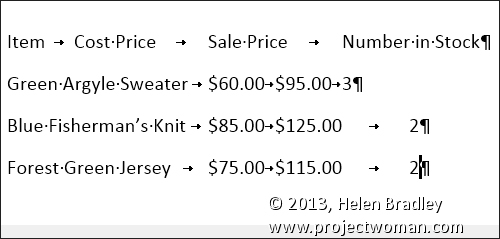
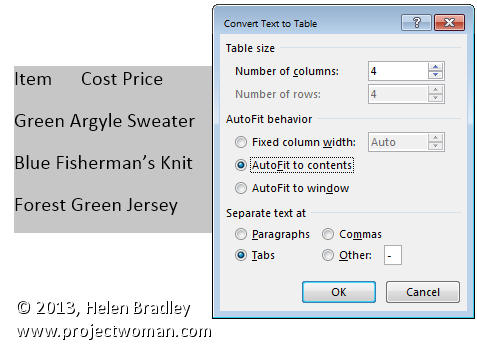
To convert the text each column’s content needs to be separated by a single tab and you need to have a paragraph marker at the end of each line. To check your text is correctly formatted, click the Home tab and click the Show/Hide¶ button to see the tab marks in the document (they are small right pointing arrows).

Make sure there is only one tab marker between each item in the list. If you don’t have data for a particular column add two tab marks to indicate that one column is empty.

Click the Show/Hide¶ button again when you are done.

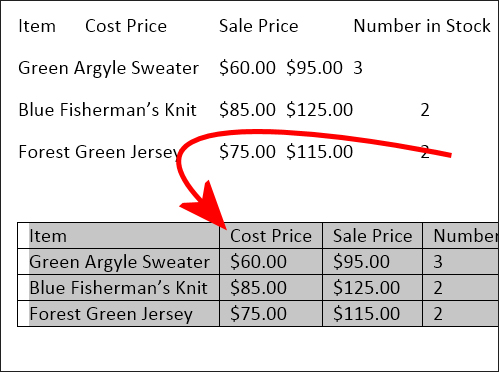
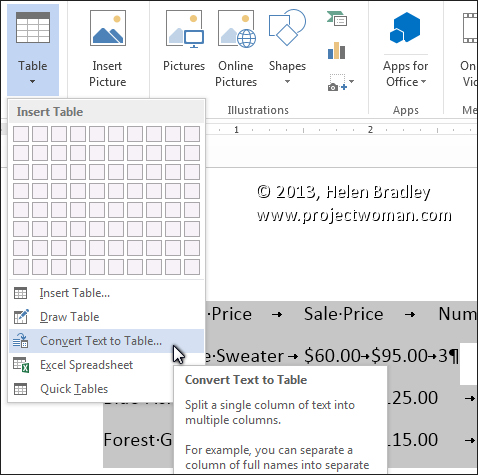
Select the list and choose Insert > Table > Convert Text To Table.

Word should automatically suggest the correct number of columns. From the Separate text at options select Tabs, set the AutoFit behavior to AutoFit to contents if the items are short like ours are and click Ok.

The text will be automatically placed in a new table ready for you to continue to work on it.

Helen Bradley

Wednesday, May 8th, 2013

Fix and perfect a portrait of Mum – Part 2


Image credit: UglyHero at www.sxc.hu

Once you have captured a great image of mum it’s time to fix it before sharing.

In a recent blog post I talked about how to take great photos of mum for Mother’s Day or any other occasion. Today I am going to explain how to process them.

Once you’ve downloaded and chosen the best shots – it’s time to fix the photos.

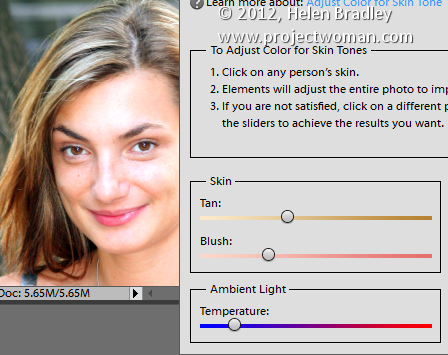
Start out with adjusting the white balance if the images need this. You might also want to warm the image if it is too cold so add a slight yellow/orange color cast to it to warm it a bit. This image is a little bit too blue for my taste and it will look better a bit warmer.

You can do this in Photoshop Elements – a good fix there is to adjust the skintones as explained in this blog post http://projectwoman.com/2010/03/step-8-photo-editing-workflow-fix-skin-tones.html. Photoshop doesn’t have this fix but whenever I use Photoshop Elements I find it really useful. You can fix skintones and warm the image all in the one step.

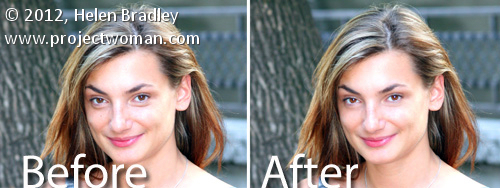
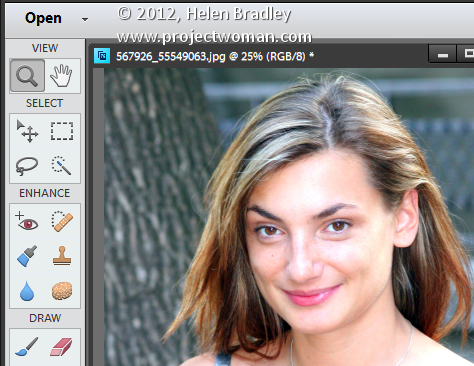
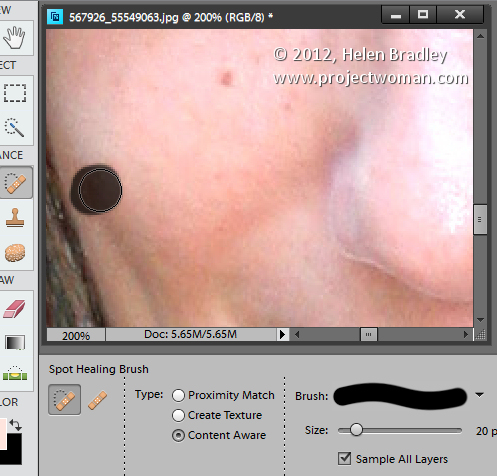
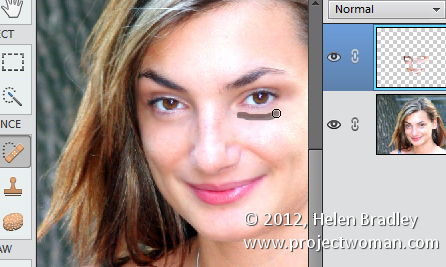
I will then fix any skin blemishes – if you’re using Photoshop Elements do that with the Spot Healing Brush Tool. The process is as simple as painting out the problem areas and the uneven skin tones will be smoothed.

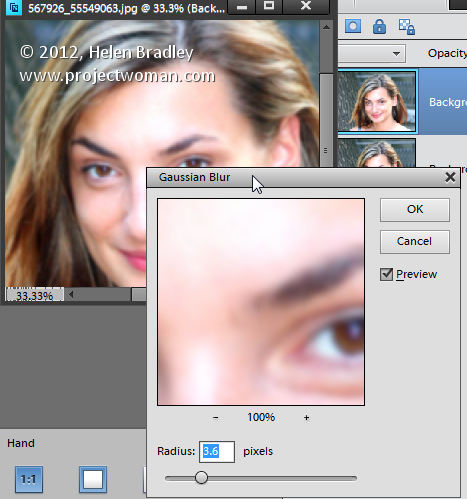
To lessen the effect of wrinkles a good fix is to make a duplicate of the image background layer (Layer > Duplicate Layer) and to blur this duplicate layer with a small radius Gaussian blur filter (Filter > Blur > Gaussian blur).

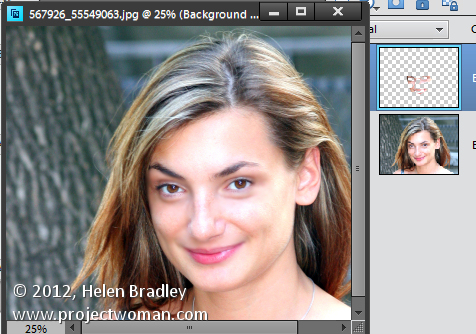
Then selectively erase the top layer to reveal the sharper features underneath leaving the blur over the wrinkles. You will want to erase pretty much all but the area under the eyes. Finally, reduce the Opacity of the top layer to blend the two layers together if desired. If you’re handy with using masks do it with a mask instead of the eraser.

If the fix is not enough, use the Spot Healing Brush Tool on the top layer to blend out the wrinkles and dark areas under the eyes even more.

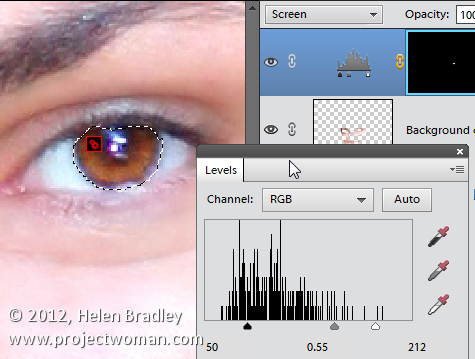
I like to use the Photoshop Elements Lightening Brush to lighten a person’s teeth slightly and I’ll often use the Saturation Enhancing Brush to brighten their eyes. Err on the side of caution though, the edits you make should be subtle and gently enhance the photo – you’re not applying Halloween makeup!

If your mum gets just one photo that she loves of herself from those you’ve taken – you’ve given her a wonderful gift. Best of all, you can bet she’ll be happy to pose for you again next year.

Helen Bradley

Wednesday, March 13th, 2013

Change your Windows 8 Lock Screen image

Change your Windows 8 Lock screen and other personal settings

It isn’t easy to find but you can change the images you see on your Lock screen and start screen in Windows 8 by pressing the Windows logo key and I and choose Change PC Settings.

Click Personalize and you can view different options for your Lock screen, Start screen and account picture.

Yeah! No more Seattle Space needle for me!

Helen Bradley
Tuesday, January 29th, 2013

NO DVD play back or DVD Burner in Windows 8


Image credit Pawel 231 sxc.hu
Are you searching Windows 8 for its  DVD player and DVD burner? Well stop wasting time – they aren’t there

Yep, that’s right. Windows 8 ships without a built in DVD burner and there is no installed DVD player software either. If you don’t have a DVD drive and I guess Microsoft thinks they are so “yesterday’s technology” you’re OK. But I still have a DVD drive and so do millions of others. The worst part of this is that Microsoft doesn’t warn you there’s no DVD burner or player – you have to work that out yourself.

So, all across the world, every day, thousands of man and woman hours are being wasted looking for something which, let’s face it, should be there, but isn’t. Gee, thanks a bunch for that Microsoft!

So, here’s what to do if you have a brand new Windows 8 computer or if you’ve upgraded to Windows 8 and you have a DVD drive.

1 Stop looking. There is no DVD burner and no built in DVD player. If you have either of these on your Win 8 machine it didn’t come with Windows 8 – your PC manufacturer (or tech savvy daughter or son), put it there.

2 Get the software. The best solution if you’re using Windows 8 Pro, although I hate to suggest it is to shell out $9.99 to Microsoft for the Media Center software. This isn’t included in Windows 8 but can be downloaded and installed. You use this to play DVDs on your PC. To get it, launch Windows 8, tap Windows + Q (Search) and in the box type Add Features and tap Settings. Tap Add features to Windows 8 and then click I want to buy a product key online and you can go ahead and buy Media Center.

Now, there is one caveat. If this option doesn’t appear (and it may not because Microsoft left it out of some versions of Windows 8 such as the UK version and other users have reported it as disappearing once it is used the first time – yeah! well done Microsoft!) you can try this. Click Windows + Q, type System and tap Settings and click System.  Now click View Details in Windows Activation. Once there you may find a link to add features or click Buy Windows for another computer to go to the website to buy Media Center – search for it when you get there. Until Jan 31, 2013 if you use Windows Pro you can get a licence code that lets you download it free of charge, otherwise it costs $9.99 if you’re using Windows Pro – it will cost a huge chunk of change if you’re using the Home version though.

3 If this all sounds like too much trouble, download the free opensource VLC Media player which is compatible with Windows 8 from http://sourceforge.net/projects/vlc/ all the open source folk love it.

4 To burn DVDs you need a DVD burner and the Windows DVD program no longer exists in Windows 8, so, you’ll need some burning software. There are plenty of programs around from folks like Nero but they can be pretty costly and not all are compatible with Windows 8 . If you just need a very simple burner, try Ashampoo Burning Studio Free 2013 – the Ashampoo products are great and the company does a good line in simple to use CD and DVD burners that don’t need a degree in computing to operate. Get the free version from Softpedia here or from CNET here.

Bonus Tip – where to find a list of features missing from Windows 8

If you’re searching for features that you think should be in Windows 8 but you can’t find, check this Wikipedia article: Features removed from Windows 8 for a handy list of what is missing from Windows 8 – it might save you some wasted time.


Helen Bradley
Tuesday, January 15th, 2013

Photoshop pen tool – change direction of curve

Learn to change the direction of the Curve that the Pen Tool draws.

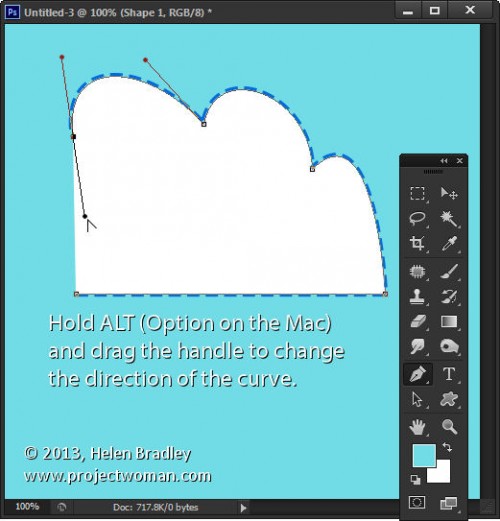
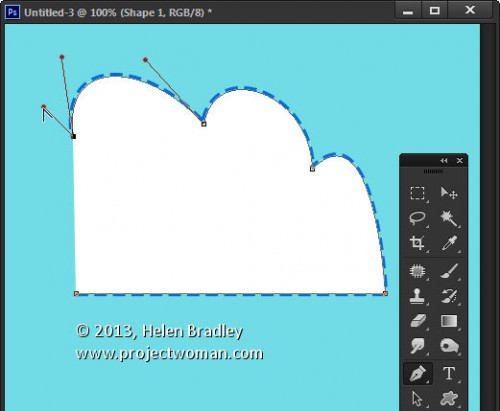
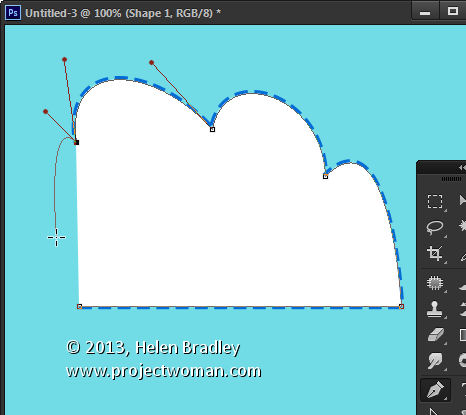
Sometimes when drawing with the Pen Tool in Photoshop you will find that the curve goes in completely the wrong direction. You can just leave it and come back later to fix it but you can also fix it as you go.


To change the direction that the curve goes in, take the mouse pointer back over the handles from the last point and hold the Alt (Option key on the Mac) as you drag on the handle that is causing the curve to go the wrong way until it goes the right way. You can then let go the Alt or Option key and continue to draw the curve. You can do this as often as you need to as you draw the shape.

Helen Bradley
Saturday, July 7th, 2012

Random text in Word 2010

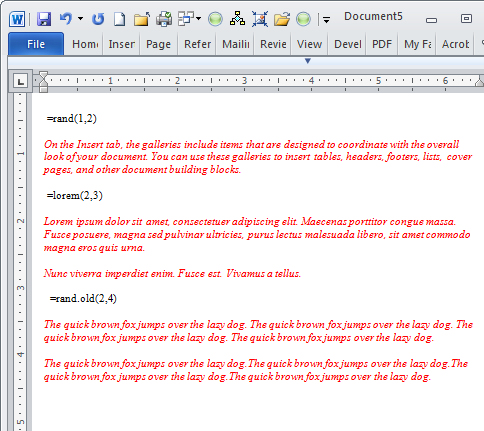
You may already know that typing =rand(1,2) on a new line in Word types one paragraph of two sentences in Word. The text is this random Word help style text:

“On the Insert tab, the galleries include items that are designed to coordinate with the overall look of your document. You can use these galleries to insert tables, headers, footers, lists, cover pages, and other document building blocks.”

But did you know there are other types of text you can type? Try =lorem(2,3)  and press enter to get two paragraphs of three sentences each of the Lorem ipsum dummy text.

“Lorem ipsum dolor sit amet, consectetuer adipiscing elit. Maecenas porttitor congue massa. Fusce posuere, magna sed pulvinar ultricies, purus lectus malesuada libero, sit amet commodo magna eros quis urna.

Nunc viverra imperdiet enim. Fusce est. Vivamus a tellus.”

If you type =rand.old(2,4)  and press enter you get the older Word dummy text – the Quick Brown fox..

The quick brown fox jumps over the lazy dog. The quick brown fox jumps over the lazy dog. The quick brown fox jumps over the lazy dog. The quick brown fox jumps over the lazy dog.

The quick brown fox jumps over the lazy dog. The quick brown fox jumps over the lazy dog. The quick brown fox jumps over the lazy dog. The quick brown fox jumps over the lazy dog.

So now you have plenty of random text options – of them all the Lorem one is the most  handy for when you really need large portions of dummy text in a document.

Helen Bradley
Page 1 of 8412345102030Last »