Editing your Image: Make your Image look as it did in you Camera
You may find that the Lightroom previews look different to those you’re used to seeing when you view the image in your camera.
To make them closer to the camera version, select the Camera Calibration panel in the Develop module and from the Profile list choose Camera Standard – this better matches more closely the image you saw on the back of your camera.
These profiles are a starting point for further adjusting your image so choose the one which works best for you.
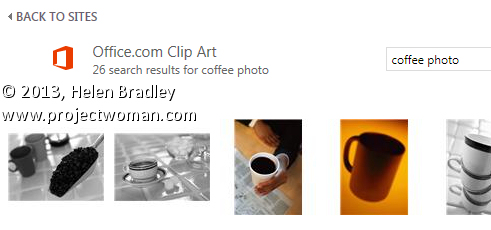
Learn how to find only photos or only illustrations when searching Office 2013 online images
In Office 2013 the old Clip Art feature was removed and now you can insert an image by searching for it online at a number of places. One of these is the Microsoft clip art collection which is now stored totally online and not partly on your computer.
So far, so good.
The problem is that the old task pane feature which let you determine the types of images you want to search for is now gone. So, on the face of it, when you search for something like coffee you get illustrations and photos. In many cases much more than you want or need.
Often, I know ahead of time I want a photo or an illustration so I want my search to return only one type of image. There’s no information at all as to how to do this but you can! Instead of searching for coffee, type coffee photo to find photos relating to coffee or coffee wmf to find just illustrations as these are generally wmf format images.
It isn’t a perfect solution and you will miss out on some images as well as get the occasional illustration with your photos or vice versa.
However, if you’re not too fussy about missing out on some imagery then using this search format will weed out a lot of the stuff you don’t want and serve up mostly the type of content that you do want.
This tip works in any of the Office 2013 applications – PowerPoint 2013, Excel 2013, Publisher 2013. Word 2013 and more.
Learn how to download and install free fractal tree brushes and a texture and see how to use these to create your own Photoshop art.
Covers how to install brushes in Photoshop. How to add new layers, how to use masks and a gradient fill. Also shows how to add a drop shadow and an outer glow layer style. The land is created using a filled shape and made more organic using the Warp transform feature.
Transcript:
Hello, I’m Helen Bradley.
Welcome to this video tutorial.
In this tutorial I’m going to show you how you can download and install the fractal tree brushes from projectwoman.com and how you can use them to make art in Photoshop.
Before we get started with this project let’s look and see what we’re going to do.
We’re going to create an image that’s something like this.
It uses one of the fractal tree brushes and also uses part of the brush to create a sort of highlight effect that is the result of the sun going down.
So we’re going to add our tree and then we’re going to make this sort of background look with this blue fill background and we’re going to use the texture that we’ve downloaded.
So I’m going to show you how you can put it all together using the brushes and a texture file.
I’m just going to tuck this away for now and let’s have a look and see where we’re going to get the bits and pieces that we need.
Well first of all we’re going to flicker to some images that are offered by a gentleman called Skeletal Mess and we’re going to download this image.
And it’s in his 2009 texture of the day.
So here it is, texture of the day 2009, and this is the one that you want.
So just click on it, from Actions choose View All Sizes and then you can just go and download the largest size of this image or the original.
It doesn’t really matter too much.
I’m just going to work on the larger size one for now.
So I’m going to open the folder that it has been stored in and its here.
And I’m just going to open it in Photoshop so I’m going to right click and I’m going to open with Photoshop CS6.
Well it’s not in the list there so I’m just going to go and grab Photoshop and we’ll just drag and drop it in there.
Okay, so the image is now in Photoshop and now we need to get our brushes.
And they’re available on my website so that is at projectwoman.com.
So you’re going to projectworman.com and click here on the Free Photoshop Brushes option and just scroll down because the ones we’re looking for here are the rendered fractural tree brush set.
So click on that and then click here to download the brush set and that’s going to download to your Download folder.
And what you’ll do then is just double click on the file so that you can locate and expand the fractal tree brushes file.
And you need this in Photoshop so again I’m going to tuck this just out of the way for now and open Photoshop because there’s a quick and easy way of installing brushes in Photoshop that I want to show you.
So the way I install brushes in Photoshop is to first go and get the brushes option here.
So I click on Brushes and I’ll choose the brush dropdown list here and then click here and go to Save Brushes.
And what that does is it shows me the folder where Photoshop brushes are saved and you can see here that it’s a long string of folders that you need to go through.
But it’s easier if you just open this up in Photoshop and then what you’ll do is you’re go and get your file, your brushes file that you downloaded and then just drag and drop it.
Now my machine is playing games with me right now so I’m just going to make Photoshop a little bit smaller and bring up my brushes file at the same time which is hiding all the way around here.
So let’s just go and get the brushes again and we’re going to open this up.
I’m going to go to Save Brushes.
So I open this folder.
Here are my fractal tree brushes and I’m just going to drag and drop them in there.
So that’s done now.
The brushes are installed where Photoshop can find them.
So what I need to do now with my brushes palette is to go and open that set of fractal tree brushes.
So here are the fractal tree brushes and when Photoshop asks me if I want to replace the current brushes, cancel or append I’m just going to select append because that’s going to add them to the very end of my brushes collection.
Now, I’ve added them twice but they’re here now.
So we’re ready to get started and create the effect that we had on this image here.
So any time that we work with an image like this we’ll want to be working on a new layer to paint our tree so I’m going to add a new layer.
I’m going to go and get my tree.
I’m just going to choose a tree to use.
I think this one this time.
I’m going to size it up using the open square bracket key and I’m going to select black.
So I want to be looking at my swatches.
So I’m going to select black as my foreground color and let’s also go and get our tools so that we can see what we’re doing here.
So I’m going to paint with black on this layer and I’ll probably press it a couple of times in the same place so I make sure I get a really dark tree there.
Now what I’d like behind the tree is some sort of a sort of land mass if you like so I’m going to select the Rectangular Marquee tool here and on a brand new layer I’m just going to drag out a rectangle behind the tree.
I’ve add a new layer below.
And I’m going to select a sort of dark reddish color as my foreground color.
That’s a sort of maroon.
Let’s go a bit more for dark red.
And I’m going to fill that layer with this.
Since it’s my foreground color I can press Alt Backspace, Option Delete to fill that layer.
To blend it in I’m just going to use the multiply blend mode because that gives me a darker sort of effect.
Now this is probably not dark enough for me so I’m just going to open the color up and let’s select a much darker version and again Alt Backspace, Option Delete.
So now I’ve pressed Command D to deselect the selection.
Now the land mass is a little bit too regular for me so I’m going to Ctrl Click on this layer and choose Edit and then Transform and then Warp because warp allows me to create a sort of a bit more organic land mass.
So I’m just going to do that very, very simple, not very much happening there at all.
Now we need our setting sun so again a new layer.
I’m going to select a sort of lighter color.
Let’s go for a sort of lighter orange color.
I’m going to use the Elliptical Marquee tool and drag a circle by holding the Shift key to constrain the ellipse to a circle.
I want to move it into position so I’m going to hold the Spacebar as I move the circle down into position, let go of the Left Mouse button and then let go the Spacebar and the Shift key.
Again, this orange is my foreground color so Alt Backspace, Option Delete on the Mac will fill the shape with this orange color.
Again, I think it’s way too light so I’m just going to redo that with a darker color.
Now I want my sun to be behind my land mass so I’m just going to drag on the sun layer and move it behind the land mass layer.
Now I think I’ll blend my sun in a little bit so I’ll probably select multiply as the blend mode to darken it.
And I also want to add a slight glow around the edge so I’m going to select the Add Layer Style option.
I’m going to add an outer glow here.
The white is not the color I want.
I really just want to grab the color that I had for the sun and maybe just go a little bit lighter than that as my outer glow.
Size is really the sort of ambit of the glow.
It’s not really how many pixels it is.
It’s a bit more feather than anything.
And spread is a bit more pixels.
So I’m just going to add that glow in.
And I can also multiply it if I want to so I can get a sort of darker glow.
Now I’m trying to keep things pretty light right now because I don’t want to be working on a totally dark image.
But what I do want here is I really want the tree all over.
Again, I want a sort of drop shadow for the tree.
So, one of the ways that I can do this is by just adding a light drop shadow layer.
2,368So I’m going to add a layer style.
I’m going to choose drop shadow but instead of doing a darker drop shadow I’m going to do a lighter drop shadow.
In fact let’s just sample the color from the sun for this and maybe just go a little bit lighter than that.
Maybe a little bit more yellow still, okay.
And this is going to be a drop shadow.
And we want it to look as if it’s coming from the sun so it’s going to be out this direction.
But we’re going to screen this because we want it to be lighter and we also don’t want it to be both sides of the tree.
So we’re going to just play around with the spread and the size until we get the slightest suggestion of lightening on this side of the tree but not too much, probably about 4 pixels.
Something like that looks pretty good to me so I’m going to click Ok to select it.
Now what I want is to be able to work on this shadow independent of the tree itself so I really want to move the shadow to a new layer.
So I’m going to right click that and choose Create Layer.
And what that does is it creates the drop shadow as a new layer so I’m just going to click Ok.
So here’s my drop shadow on a new layer.
And because it’s on a new layer I can add a mask to it by clicking the drop shadow layer and click the Add Mask icon.
I’m going to select my brushes.
Let’s just go and grab a brush.
And this time I’m going to select a soft, round brush, something like this, make it a bit larger.
I want to be painting with black because I want to paint out this shadow area and make sure I have the mask targeted and on this side of the tree I’m just going to remove the shadow.
Now because this is a mask layer I can switch and paint with white and I can bring the shading, the highlighting back anywhere I want it.
So I can just paint it on or off as I wish.
I think too I’m going to soften this edge because I think it’s a bit harsh.
And again a mask will do that.
Just click on the layer, click on the layer mask, click on black paint.
This time I’m going to reduce my opacity way down and just gently tip over the edge here, press X to go back.
So I can make that as dark or as light as I want and I can just sort of blend that in to the background by just switching colors, painting with black on the mask to blend it, painting with white to bring it back again.
Now what I did on the original image that we haven’t done right now is to add a blue to white layer over the top of this background layer to just blend everything in so I’m going to that now.
I’m just going to add a new layer.
I’m going to select the Gradient tool and then I’m going to select a sort of darkest blue.
I’m thinking it needs to be a bit darker and a big grayer than that.
So that sort of color blue to white.
So I’m just going to select white here or a light blue.
It doesn’t really matter too much.
And then we’re going to use the gradient to apply that.
So let’s just have a look.
We’re on this foreground to background gradient.
We have linear gradient selected.
We have the layer here and I’m just going to drag to fill it with the gradient.
And I’m holding the Shift key down as I do so my gradient goes in nice and level.
Now it’s going in blue at the top, white at the bottom and I’m just going to blend it using the multiply blend mode.
You can see that my edge here is way too much but we can go back and fix that, again with brush and again, painting with white this time.
I’m just going to be painting on this mask and just bring back that edge a little bit and then we could fix the tree up.
So there you have a small project that you can do using the fractal tree brushes to create a sort of sunset landscape image in Photoshop.
You now know how to download and install the brushes.
And you can find this interesting texture online at Flickr to use and you can go and create your own art in Photoshop.
I’m Helen Bradley.
Thank you for joining me for this video tutorial.
Look out for more of my video tutorials on this YouTube channel.
And visit projectwoman.com for more tips, tricks and tutorials on Photoshop, Lightroom, Illustrator and a whole lot more.
Learn how to darken the edges of an image using a Vignette in Lightroom
Vignettes are a darkening or lightening of the edges of an image – they can make an image look very attractive.
To add a vignette, open the Effects panel, set the Style to either Highlight Priority or Color Priority – Paint Overlay is the least attractive option. Drag to the left on the Amount slider to add a dark vignette and to the right to add a light one.
The Midpoint slider adjusts how the effect is applied to the edges of the image. Increase it to remove the vignette from the edges leaving it mainly in the corners.
Roundness controls the roundness of the vignette, drag to the left to make it more square, to the right to make it more circular. Feather controls the softness of the edges so use 0 for a hard-edge and 100 for a very soft edge.
Highlights applies when you use a negative Amount to create a darkened vignette. Zero gives no change and larger values preserve highlight contrast when you select Highlight Priority or Color Priority.
Word’s Reviewing tools make it easy to show someone the changes you’ve made to a document.
You can set Word to record the changes before you make them by selecting the Review tab on the ribbon and click Track Changes > Track Changes.
Now, in Word 2007 & 2010, every addition to your document will be underlined and every deletion will be marked with strikeout. Word 2013 defaults to Simple Markup so you will need to choose All Markup to see the changes marked up.
These changes are retained when you save the document.
You can apply the changes permanently at any time by selecting Review > Accept or Reject and choose Accept All Changes (or Reject All Changes).
Word 2013 has a new feature which lets you force Track Changes to be enabled. Choose Review > Track Changes > Lock Tracking to enable this feature. Now if you save the document and send it to someone, any changes they make to the document will be recorded in the document. They cannot disable this feature without having the password to unlock the setting and disable it.
How to use the Masking Slider to limit image sharpening to only the edges in the image
The Masking slider in the Lightroom Detail panel allows you to control the areas of the image that are sharpened and those that are not.
Hold Alt (Option on the Mac) as you drag on the Masking slider. As you do you will see a black and white overlay on the image. The areas that are black are not sharpened, those that are white are sharpened. The farther you drag to the right the more the sharpening is limited to just the edges in the image where you want it to be applied to.
Drag on the slider to control just how much of the image you want to have sharpened. When you’re done, adjust the Amount to a value that makes sense for the image.
Learn how to suppress halos with the Detail Slider when Sharpening in Lightroom
The Detail slider in the Detail panel in Lightroom lets you suppress the haloes you create with the Radius slider.
At zero position you will fully suppress any halos and at 100 you will have no halo suppression so you will see all the halos added using the Detail slider.
This means that a low value for the Detail sider sharpens only the largest edges in the image and a large value for Detail will tend towards sharpening everything.
Hold Alt (Option on the Mac) as you drag on the Detail slider to see the effect on the halos around the edges in the image.
Typically if you use a high Radius value then you will want to use a low value for Detail and vice versa.
In the pre-ribbon versions of Word you would use the Table commands to sort data in a Word document.
In Word 2007, 2010 & 2013 you can’t use the table sort options any longer for plain old text simply because you can’t select the table options if you don’t have a table – it’s a Catch 22 situation.
Luckily, Word now includes a proper sort option for any text – not just table text. To use it, first select the text to sort and then click the Sort button on the Home tab of the Ribbon.
When the Sort Text dialog opens you can choose what to sort such as Paragraph or Field and the type of sort. If you want a case sensitive sort so A is treated differently to a then click Options and check the Case Sensitive checkbox.
Once you are done select the sorting options, click Ok to perform the sort.
Learn how to fine tune sharpening with the Amount and Radius Sliders
The Detail panel in Lightroom controls sharpening on the image. Use the Amount slider to manage the intensity of the sharpening – set this to a high value to begin.
The Radius slider adds halos around the edges in the image which is what gives the sharpening effect.
For an image with lots of fine lines and detail such as a building select a low radius. For a portrait or an image with softer detail, use a high radius value.
Hold the Alt key (Option on the Mac) as you drag on the Radius slider to see the halos.
How to prepare your image for sharpening so you can make a good adjustment
To sharpen an image, first make sure that the main image is visible at a 1:1 ratio in size so you can see the resulting sharpening effect more clearly.
To control what appears in the Preview window, click the indicator in the top left of the Detail panel and click an area of the image to preview. Choose a good position on the image as a preview – something that needs to be good and sharp.
You can also click on the image in the Preview – click once to see the preview filled with the image and again to zoom into the image.
Drag the image in the Preview window to see different parts of it.


