Thursday, August 29th, 2013

Editing your Image: Make your Image look as it did in you Camera
You may find that the Lightroom previews look different to those you’re used to seeing when you view the image in your camera.
To make them closer to the camera version, select the Camera Calibration panel in the Develop module and from the Profile list choose Camera Standard – this better matches more closely the image you saw on the back of your camera.
These profiles are a starting point for further adjusting your image so choose the one which works best for you.
Helen Bradley
Labels: Adobe Standard, Calibration, camera, Camera Calibration, Camera Standard, Develop, Develop Module, edit, Embedded, Lightroom, match, Photoshop, Profile, Standard, Start, tip, trick, Tutorial
Categories:Lightroom, photoshop
posted by Helen Bradley @ 5:58 amNo Comments links to this post
Thursday, May 9th, 2013
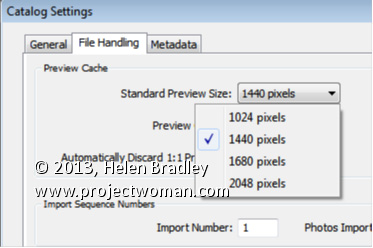
Set the size of your Standard previews to match your screen size.
When you choose to render Standard previews you can choose how large the previews will be. You should do this because setting the size to match your screen size maintains a good balance between disk space the previews take up, the time they take to render, and general usability.
To configure the image preview size for Standard size previews, choose Edit > Catalog Settings (or Lightroom > Catalog Settings on the Mac) and select File Handling.
From the Standard Preview Size drop-down list, you can choose from one of four sizes; 1024, 1440, 1680 and 2048. Choose the size that matches the size of your monitor or which is a little smaller.
This setting will be applied to previews that you create on Import or which you create from inside the Library module itself.
Helen Bradley
Labels: 1024, 1440, 1680, 2048, catalog, catalog settings, change preview size, file handling, Lightroom, monitor, preview, preview size, size, Standard, standard preview, standard preview size
Categories:Lightroom, photoshop
posted by Helen Bradley @ 8:03 amNo Comments links to this post
Monday, May 6th, 2013
How to choose the correct Preview option for your Lightroom images
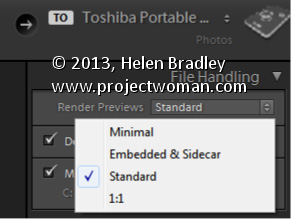
In the Import dialog’s File Handling panel, you have options for rending previews for your images as you import them. These previews are used later on when you move to the Develop module to edit your images.
Minimal preview size makes for quick importing of your images but later on, when you’re actually working on your files you will have to wait as larger size previews are created. So the time you save on rendering previews on import has to be spent later on in rendering previews when you want to work on the images.
Selecting Standard previews is a good choice – these previews can be used when editing your images so they don’t have to be created later on – so you can get to editing the image more quickly although the import process will take a little longer.
1:1 preview size is typically not a good choice as the previews are unnecessarily large and it takes time to render them. It might sound like they are the best but it’s a poor trade off in time and size – if you have time to spare when importing, then Standard previews are an ideal choice.
Helen Bradley
Labels: 1:1, 1:1 preview, Embedded & Sidecar, Embedded & Sidecar Preview, file handling, file handling panel, import dialog, Lightroom, minimal, Minimal Preview, preview, Standard, standard preview
Categories:Lightroom, photoshop
posted by Helen Bradley @ 7:54 amNo Comments links to this post

