If you have thousands of images to add a copyright watermark to, you can use Lightroom to do this very quickly. This video shows the workflow to use to import thousands of images into Lightroom and how to export them and create your own watermark to add to them. This is a minimalist workflow designed to process a lot of images very quickly.
Transcript:
Hello, I’m Helen Bradley. Welcome to this video tutorial. In this tutorial I’m going to show you how you can copyright in bulk the images as you export them from Lightroom. One of my blog readers recently contacted me and asked me how easy it would be to add watermarks to a series of images that they had. And so this video is for them and for anybody else who’s considering applying a watermark to a lot of images all at once. And my suggestion is, and she had something like two and a half to three and a half thousand images, is that Lightroom is the tool to use.
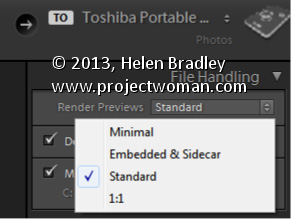
So I’m going to get started and I actually have a folder of images that I am going to import into Lightroom to show you exactly how it will work. So I’m going to click on Import and then I’m going to select the folder that contains the images that I want to import in. So this would be the folders that contain the two and a half thousand or so images that this particular reader has. So I’m just looking for my particular set of images. And I know they’re here. So all I’m going to do to start off with is just to select the folder of images. And it’s these Cornwall images that I’m going to import. Now I’m going to add them to Lightroom. And in this case because I want to do this very quickly because all I want to do is to add watermarks to them, I’m going to select Minimal as my previews because that’s going to render everything very, very quickly. And because I want lots of images I’m going to deselect Don’t import selected duplicates. So all I’m going to do at this stage is now to click Import and bring those all into Lightroom.
Now the images are coming into Lightroom and I can start getting ready as soon as they’re in to export them with their watermarks. Now some of these are portrait orientation and some of them a landscape. That may or may not be an issue. I’m going to select the first image and Shift click on the last so that we can export them. I’m going to Right click and choose Export and then Export again. And this takes me to the Export dialogue. So the first thing I need to do is to determine where I want to export them to. So I’m just going to put them into a folder in my My Documents folder. And I’m just going to create a brand new folder for them. But I’m going to select My Documents as the location, and I’m going to put in a subfolder called watermark. And then I will check if I want to rename my files. I don’t want to rename them. The idea of this is to get in and out as quickly as possible.
I can convert them if they were not JPGs and I could select the quality for them. Again 85 percent quality might be sufficient. If you’re that particular reader 100 percent quality might be your preferred quality. I can resize them or not. So if I want to leave them at the exact same size I just deselect everything.
What we’re most concerned about here is this Watermark option. So I’ve got it selected, and I’m going to click it, and I can choose Edit Watermarks. So this means that I can now create my own watermark. So I’m just going to delete what’s here. I’m going to press and hold the Alt key as I type out 0169 on the keyboard because that gives me the copyright symbol, and I’m going to type my copyright text. And I’m going to do two lines. And it’s Helen Bradley, projectwoman.com. And you can see it up here and it’s up there because that’s where I’ve got it positioned right
now. Here’s the anchor. If I wanted it down the bottom corner I could place it there. And then there’s an inset which is inset off that option.
So I could push it further down into the corner if I wanted to or not. It looks like it’s also centered right now. And no it isn’t. It’s right justified. So we could left justify it or center it if we wanted to. And we can also resize it either by dragging on its sides or we can drag it just to make it bigger if we wanted to. So I’m going to inset this a little bit horizontally and a little bit vertically. But you could see that we have a lot of power in where we place it.
Its opacity is 100 percent. And I always suggest that you do apply a shadow to your text because the shadow will help its readability if it’s over a lighter background. So I would normally put a very, very small shadow. And you can change the angle so that you can make the shadow come from whatever angle that you want it to come from. I prefer mine to come from about 30 to 45, something like that, so it’s coming in from this angle here. And if you’re happy with that that’s all you need to do. So you click Save. And we’re going to save this. And we’ll call it test watermark, you can call it whatever you want your watermark to be called, and I’ll click Create. And it’s now being selected as the watermark for my images.
I’m going to select to after export to show in Explorer. But literally at this point we could have two and a half or three and a half thousand images selected and they would all be ready for export. And all I do is click Export and now they’re going out. They’re exported out of Lightroom. And when they appear in that folder in My Documents, which we’re going to see in a minute, here it is now, they’re all going to have the watermark on them. So if I double click on this image we’re going to see that the watermark is in place.
So that’s how easy it would be to apply a watermark. If that were all you wanted to do and you had thousands of images to do it with, that’s all you need do to watermark your images. Bring them into Lightroom, don’t even bother rendering big previews, just use the minimal, select to export them, click and create your watermark and then just click Go and Lightroom will just go and do it all for you.
I’m Helen Bradley. Thank you for joining me for this video tutorial. Please if you have any questions feel free to pose them to me. I’m quite happy to make videos to answer questions. Look out for more of my videos on this YouTube channel. And follow me at projectwoman.com where you’ll find more tips, tricks and tutorials for Lightroom, Photoshop, Illustrator and a whole lot more.