Saturday, October 5th, 2013

Lightroom Tip – Batch Crop & Resize

Save Time in Lightroom when Resizing and Cropping Large Amounts of Output Images

If you’re working on a large shoot and need to output a lot of images at a fixed size then Lightroom can do the work for you. It isn’t obvious how you can crop all your images to a fixed size and output them at a certain set of pixel dimensions but it is easy to do when you know how. Here’s how to do it:

Step 1

First locate the folder with your images in it. I prefer to make virtual copies of my images and put them in a new collection but you can do whatever makes sense to you.

Step 2

Select all the images in Grid view in the Library module in Lightroom.

Open the Quick Develop panel on the right and, from the Crop Ratio dropdown list, select the crop ratio that you want to crop to. For example you can crop to fixed ratios such as 1 by 1 or printing sizes such as 5×7, 4×6 and so on.

Here I’ve selected 5×7 and when I do so all the selected images are automatically cropped to this 5 x 7 ratio.

Lightroom is smart enough to understand that some images are portrait orientation and others are landscape. Portrait images are cropped to 5 x 7 and landscape orientation images to 7 x 5.

Step 3 (optional)

If desired, you can now move to the Develop module and check the crop for all the images. By default, Lightroom will center the crop rectangle on the image and this may not be exactly what you want for some images. However, it is easy to go to the Develop module, click the first image and click on the Crop Overlay Tool so you see the crop marquee in position on the on the image.

Now from the filmstrip you can click on each image in succession to preview it in the crop window and you can easily identify if any of them need an adjustment to the crop rectangle. If they do simply drag on the crop rectangle to reposition it. When you’re done return to the Library view.

Step 4


As the images are now all cropped to size, press Ctrl + A to select them and then click Export. Choose a folder to export the images into or click New Folder to create a new folder.

You can now set your desired preferences in the Export dialog.

To control the output size – in pixels wide and tall – of the images easily because you already know the crop ratio. To do this, select the Resize to fit checkbox and choose Long Edge from the dropdown list. Then type a pixel dimension for the long edge. So, for example, to prepare 5 by 7 ratio images for printing at 300 dpi the longest edge will need to be 2,100 pixels (7 x 300) so type 2100 and set the resolution to 300.

Step 5

Click Export to export your images and they will be exported to a folder at the chosen size and resolution.

This process allows you to quickly and effectively prepare a batch of images for printing. It manages portrait and landscape images so that you don’t have to separately handle each type. It’s a simple workflow and a fast way to prepare images from a large shoot.

Helen Bradley

Wednesday, May 22nd, 2013

Lightroom – Copyright Watermark Bulk amount of Images

If you have thousands of images to add a copyright watermark to, you can use Lightroom to do this very quickly. This video shows the workflow to use to import thousands of images into Lightroom and how to export them and create your own watermark to add to them. This is a minimalist workflow designed to process a lot of images very quickly.

Transcript:
Hello, I’m Helen Bradley. Welcome to this video tutorial. In this tutorial I’m going to show you how you can copyright in bulk the images as you export them from Lightroom. One of my blog readers recently contacted me and asked me how easy it would be to add watermarks to a series of images that they had. And so this video is for them and for anybody else who’s considering applying a watermark to a lot of images all at once. And my suggestion is, and she had something like two and a half to three and a half thousand images, is that Lightroom is the tool to use.

So I’m going to get started and I actually have a folder of images that I am going to import into Lightroom to show you exactly how it will work. So I’m going to click on Import and then I’m going to select the folder that contains the images that I want to import in. So this would be the folders that contain the two and a half thousand or so images that this particular reader has. So I’m just looking for my particular set of images. And I know they’re here. So all I’m going to do to start off with is just to select the folder of images. And it’s these Cornwall images that I’m going to import. Now I’m going to add them to Lightroom. And in this case because I want to do this very quickly because all I want to do is to add watermarks to them, I’m going to select Minimal as my previews because that’s going to render everything very, very quickly. And because I want lots of images I’m going to deselect Don’t import selected duplicates. So all I’m going to do at this stage is now to click Import and bring those all into Lightroom.

Now the images are coming into Lightroom and I can start getting ready as soon as they’re in to export them with their watermarks. Now some of these are portrait orientation and some of them a landscape. That may or may not be an issue. I’m going to select the first image and Shift click on the last so that we can export them. I’m going to Right click and choose Export and then Export again. And this takes me to the Export dialogue. So the first thing I need to do is to determine where I want to export them to. So I’m just going to put them into a folder in my My Documents folder. And I’m just going to create a brand new folder for them. But I’m going to select My Documents as the location, and I’m going to put in a subfolder called watermark. And then I will check if I want to rename my files. I don’t want to rename them. The idea of this is to get in and out as quickly as possible.

I can convert them if they were not JPGs and I could select the quality for them. Again 85 percent quality might be sufficient. If you’re that particular reader 100 percent quality might be your preferred quality. I can resize them or not. So if I want to leave them at the exact same size I just deselect everything.

What we’re most concerned about here is this Watermark option. So I’ve got it selected, and I’m going to click it, and I can choose Edit Watermarks. So this means that I can now create my own watermark. So I’m just going to delete what’s here. I’m going to press and hold the Alt key as I type out 0169 on the keyboard because that gives me the copyright symbol, and I’m going to type my copyright text. And I’m going to do two lines. And it’s Helen Bradley, projectwoman.com. And you can see it up here and it’s up there because that’s where I’ve got it positioned right

now. Here’s the anchor. If I wanted it down the bottom corner I could place it there. And then there’s an inset which is inset off that option.

So I could push it further down into the corner if I wanted to or not. It looks like it’s also centered right now. And no it isn’t. It’s right justified. So we could left justify it or center it if we wanted to. And we can also resize it either by dragging on its sides or we can drag it just to make it bigger if we wanted to. So I’m going to inset this a little bit horizontally and a little bit vertically. But you could see that we have a lot of power in where we place it.

Its opacity is 100 percent. And I always suggest that you do apply a shadow to your text because the shadow will help its readability if it’s over a lighter background. So I would normally put a very, very small shadow. And you can change the angle so that you can make the shadow come from whatever angle that you want it to come from. I prefer mine to come from about 30 to 45, something like that, so it’s coming in from this angle here. And if you’re happy with that that’s all you need to do. So you click Save. And we’re going to save this. And we’ll call it test watermark, you can call it whatever you want your watermark to be called, and I’ll click Create. And it’s now being selected as the watermark for my images.

I’m going to select to after export to show in Explorer. But literally at this point we could have two and a half or three and a half thousand images selected and they would all be ready for export. And all I do is click Export and now they’re going out. They’re exported out of Lightroom. And when they appear in that folder in My Documents, which we’re going to see in a minute, here it is now, they’re all going to have the watermark on them. So if I double click on this image we’re going to see that the watermark is in place.

So that’s how easy it would be to apply a watermark. If that were all you wanted to do and you had thousands of images to do it with, that’s all you need do to watermark your images. Bring them into Lightroom, don’t even bother rendering big previews, just use the minimal, select to export them, click and create your watermark and then just click Go and Lightroom will just go and do it all for you.

I’m Helen Bradley. Thank you for joining me for this video tutorial. Please if you have any questions feel free to pose them to me. I’m quite happy to make videos to answer questions. Look out for more of my videos on this YouTube channel. And follow me at projectwoman.com where you’ll find more tips, tricks and tutorials for Lightroom, Photoshop, Illustrator and a whole lot more.

Helen Bradley

Wednesday, May 1st, 2013

Lightroom Tip – Bulk Crop and Resize Image

Learn how to crop and resize in bulk in Lightroom. If you have a lot of images you need to, for example, crop to 5 x 7 and then save at a particular pixel size and resolution, you can learn how to do this quickly and effectively in Lightroom. This makes use of the tools in the Quick Develop panel in the Library module.

Transcript:
Hello, I’m Helen Bradley. Welcome to this video tutorial. In this tutorial I’m going to show you how you can bulk crop and resize images and export them from Lightroom.

A reader recently posed a question to me and that was what do I do if I need to crop all my images to 5 by 7 in size and get them out as 500 by 700 pixel images. In Lightroom that’s not that difficult to do. What I suggest you do is you do it from the Library in Quick Develop mode. So I’m going to select the images here and then I’m going to select Crop Ratio and I’m going to choose 5 by 7. And that will crop all of these images to 5 by 7 images. But look what it’s done with the verticals. It’s cropped them to 5 by 7 but it’s kept that same vertical alignment.

So now let’s go to the Develop module and just see what we’re seeing here. This is the crop marquee. And you can see that this image, each one of these images in fact has been cropped to 5 by 7. And let’s go and find a vertical crop and see how it’s been cropped. Again, it’s been cropped to 5 by 7 but in a vertical direction. So this means that all of these images have automatically been cropped.

All we would do is have a quick look and make sure that important parts of the image have not been cropped off. If these were people we’d have a quick check to make sure that somebody’s head hasn’t been chopped off for example. And having done that now knowing that everything is cropped to 5 by 7, to export these images at 500 by 700 pixels in size or 700 by 500 we would select all of them by clicking on the first and Shift click on the last. I’m going to right click and choose Export and then Export again and we would just set up the Export option. So here I’m going to put this in a folder called 5 by 7.

I don’t want to rename these files. All we want to do is to resize them. But what I do want to do is I want to select Resize to Fit. And the longest edge since I know that these are all 5 by 7s is going to be 700 pixels and the resolution I can set to 100 pixels per inch. So these are then going to be 5 by 7 images at 100 pixels per inch resolution. And all I need to do is to click Export and Lightroom is going ahead and it is cropping and resizing all of those images so that they are all going to be the exact right size that we chose. And here they are including the ones that were verticals. You can see that these are 500 by 700 pixels in size. This one is 700 by 500 because it’s a landscape image.

So in Lightroom you could batch resize and export these images in just a matter of a few seconds by just choosing the right option. And that is here in the Quick Develop module setting a crop ratio for those images. This is not something you can do easily in the Develop module, but it’s something that you can do very, very simply here in the Quick Develop area of the Library in Lightroom.

My name is Helen Bradley. Thank you for joining me for this Lightroom video tutorial. If you liked the tutorial please comment, press the Like button, consider subscribing to my YouTube channel. You’ll also find more of my tutorials, tips and tricks on my website at projectwoman.com.

Helen Bradley

Monday, January 14th, 2013

Download All of your Google Docs at Once

You can quickly save all of your Google documents to your hard drive by Right Clicking on any one of your documents and selecting Download…. In the popup window select the All Items tab along the top. Google Docs will display the quantity of each document type and allow you to select the format you want to download each type in. Click Download and all of your documents will downloaded as a zip file.

Google compresses the files into a zip file for you, which can take some time. If you have many documents, you can have Google email you the download link once it finishes the zipping process so that you don’t have to sit and wait.

Helen Bradley

Wednesday, July 25th, 2012

Moo comes to Lightroom

Yeah! The folks at Moo have released a Lightroom plug in that makes it easier than ever to get photos to Moo.

Visit this page and grab the zip file – click the Zip button to get it.

Unzip the contents and rename the folder moo.lrplugin

Then launch Lightroom and choose File > Plug-in Manager and grab the plug in folder. That’s all you need to do. It will be installed and ready to be used.

Just select the images to send to Moo, choose Export and select the Moo Export Plug-in from the Lightroom Presets in the Export dialog.

Helen Bradley

Tuesday, May 15th, 2012

A “Happy Snap” Lightroom workflow

At Halloween last year I was asked to photograph some kids I’ve shot from time to time since they were born. Basically their mum likes to have some up to date photos of the kids and Halloween seemed like as good a time as any to get some shots.

When I’m shooting like this, my aim is to get some good shots but nothing formal and I prefer not to use a flash because I get a better response from the kids without one. I captured the images in raw and I chewed through three small size camera cards in about an hour and a half.

My deal with their mum is that I get to use the photos for my work and she gets a disk of pictures. To keep this fun – so it doesn’t feel like work for me – I need a fast and effective processing workflow.  I need to get the images off my camera, sorted, processed, burned to a DVD and delivered to mum in time for her to enjoy them.

Thanks to Lightroom the process was simple and, in all, I reckon I spent less than 2 hours getting the photos from the camera cards to a DVD. Here is what I call my Happy Snap Lightroom workflow – it’s what I do to quickly process casual snapshots:

Step 1: Determine a plan of attack

To begin with I have some criteria I work by. I never give away substandard photos so anything blurry, out of focus or over exposed gets permanently deleted. Then I sort out the best of the images intending to give mum around 50-60 photos of the kids – it’s a nice range of images for her to use to scrapbook and post to Facebook and it doesn’t over burden her with too many photos to choose from.

Step 2: Download the images

To begin, I download all the images from all three cards into a single folder on my hard drive (if there were only one card I would omit this step).

From there I import the images into Lightroom at the same time copying them to their permanent storage on my external photo drive and making a backup to a second drive. Copying rather than adding images to the Lightroom catalog lets me make backups and also add my metadata to the images so, when they popup on Facebook my copyright details are embedded in them.

Importing all the images in one step also means that when I’ve started the import process – which includes rendering standard previews – I can start working through the images and I don’t have to do it multiple times or switch out cards as I work – (the process works for me – your mileage may vary).

Step 3: Eliminating the duds

The first time I run through the images I am looking for images to delete as well as getting a general look at what I shot.

As I work through the images I’ll press X for images to delete and use the right arrow key to move past everything else. I’ll select to delete all out of focus images, anything where someone has their eyes closed or similar, and anything I don’t want to put my name to!

Once I’m done I choose Photo > Delete Rejected Photos to delete the images from my primary external photo drive. There are still copies on the backup drive and my hard disk but not on my main photo drive.

Step 4: Sorting the usable images

On the second run through the images I pick those I want to use. By now I have a rough idea as to what I have and what I might want to give mum. So this time I run through the images pressing P to pick an image and using the right arrow key to move past those she won’t be getting.

Step 5: Create a Collection

Once done, I isolate the picked images by clicking the first of the filter flag icons above the filmstrip. Then with only the picks visible I press Ctrl + A to select all of them and then click New Collection > Create Collection and type a name for it. Because the images are already selected, I leave the Include Selected Photos checkbox enabled and click Create.

Step 6: Apply initial processing to the images

Now I have a collection of the picks and it’s time to process them. I start out by selecting all the images in Grid View in the Library and from the Quick Develop panel I select Auto Tone. This gives me a head start on fixing them but, because of the lighting, pretty much all of them needed a white balance adjustment.

Step 7: Process in the Develop module

Switching to Develop module with the filmstrip visible I selected the White Balance Selector and then made sure that Auto Dismiss was disabled. This allows me to adjust the white balance on one image and then click on the next one in the filmstrip and continue to adjust the white balance from one image to the next without having to reselect anything. Basically all that most of these images needed was some white balance adjustment.

For those that needed cropping, I cropped as I finished with white balance adjustment and then moved on to the next image. This ensured that each image was dealt with only once as I progressed across the filmstrip.

Step 8: Make one off fixes

So, having fixed the worst of the problems I work backwards through the filmstrip to see if any of the images warrant special attention. If so, I make a call to fix them or simply remove them from the collection. To remove the image, right click it and choose Remove from Collection .

Here I had one issue with a couple of images where one child’s face was in shadow. For this, I used the Adjustment Brush tool at a small size with a large feather radius. I brushed over the areas where her face was in shadow and then adjusted the Brightness and Exposure to lighten to her face. In the same images other faces were overexposed so I added a second Adjustment Brush adjustment with the opposite settings to attempt to deal with this. The final result wouldn’t  stand up to close scrutiny but is just fine for the web and 6 x 4 printing.

Step 9: Export and burn

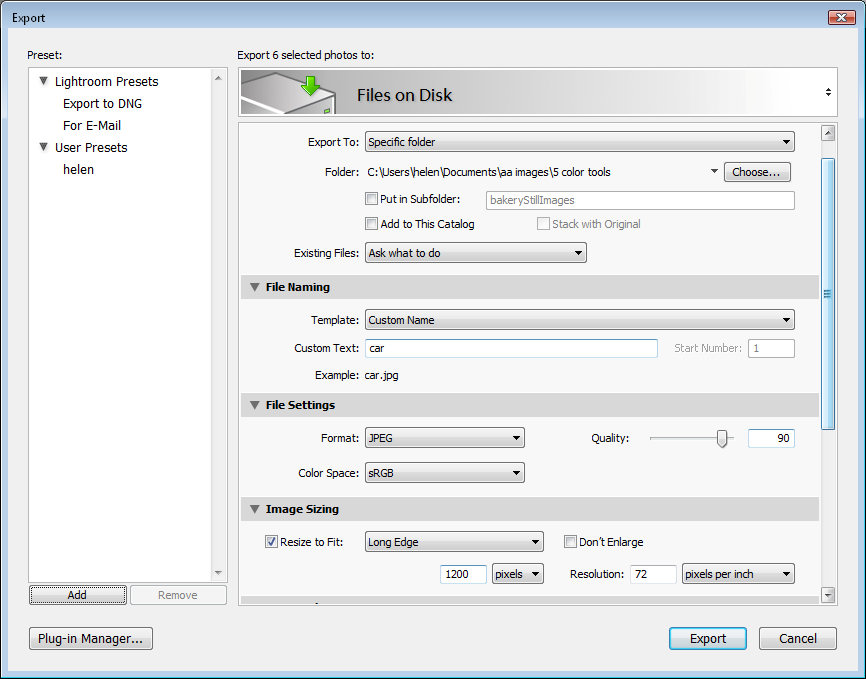
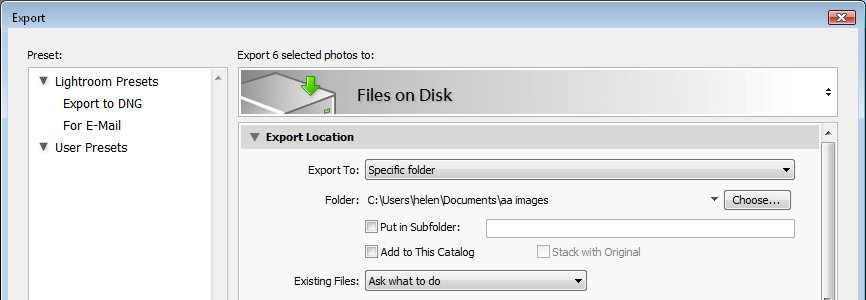
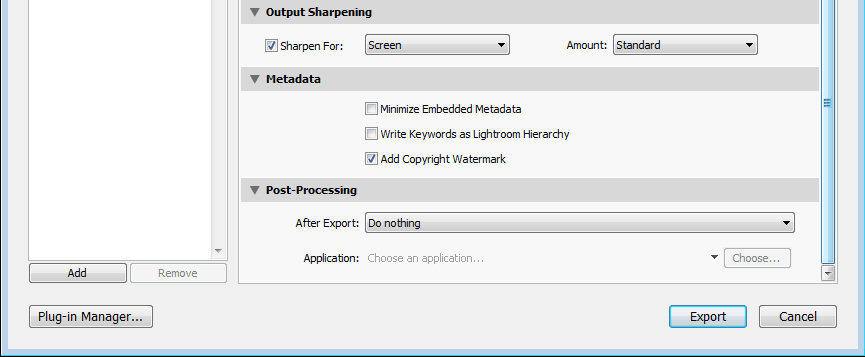
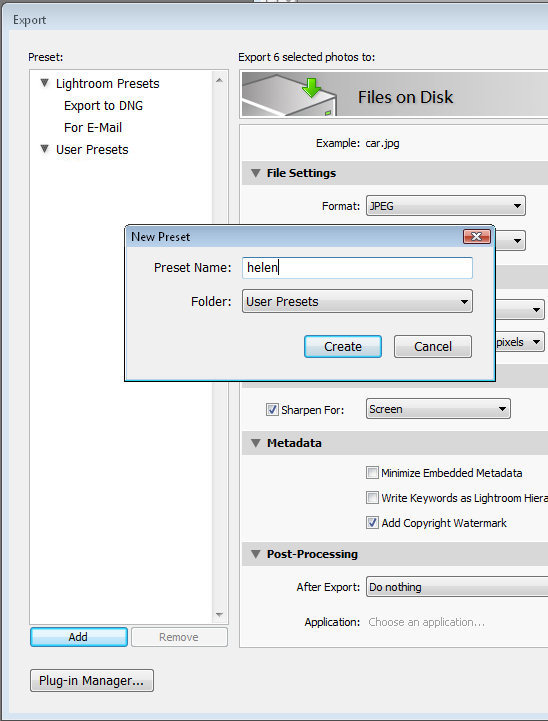
Once this was done it was time to export the images. Because they’re all in a collection, Ctrl + A selects all the images. I chose File > Export and then exported them as JPG images, 80 percent quality at the largest size and I added sharpening to them in the process. I made sure these images all went to a new folder so that they would be isolated from everything else and easy to find.

From there, it was a matter of launching Ashampoo Burning Studio, grabbing all the images and burning them to a DVD.

This workflow is one giant step better than simply burning the images direct to a DVD. It takes only a little more time with Lightroom to sort and apply some basic fixes to the images and it also means that only the best of the images get circulated and those that do have my copyright information embedded in them.

So now it’s over to you. What’s your “happy snap” workflow? Do you capture snapshots in raw? Do you process using Lightroom? And how do you get your images processed quickly so you’re not spending hours on images that are really just family snapshots?

Helen Bradley

Friday, October 2nd, 2009

Resizing images in Lightroom 2


One of the hardest things for a new Lightroom user to work out how to perform is a simple image resizing. Look as hard as you like and there simply isn’t a resize menu command. There is, of course, a way to resize images and it is done as you Export them from Lightroom which makes sense when you know how Lightroom works but if you’re a new user it’s just plain confusing.

So, here’s how to batch resize in Lightroom:


Step 1
Select the Library module and select the images to export. Choose File > Export.


Step 2
The Export dialog gives you a series of choices for the exported images. Start by selecting where the exported images should be stored. Choose either a specific folder or the same folder that the originals are stored in.

To place the images in a subfolder of your chosen folder, select Put in Subfolder and type the name of a new subfolder to create. If you want the exported images to be available in Lightroom, select the Add to This Catalog checkbox. From the Existing Files dropdown list, choose what to do if files of the same name appear already in the selected folder.


Step 3
From the File Naming options select what you want your files to be named.

For example, selecting Filename will give the files the same name as the original images. Custom name – Sequence lets you give the files a custom name and Lightroom will add a sequential number to each file. Type the Custom Name in the Custom Text box.

You can also select Edit from the dropdown list and create your own file naming template.


Step 4
In the File Settings area, select the export format such as JPEG for the web and the Quality – the higher the quality, the larger the file size.

In the Color Space area choose sRGB for the web.


Step 5
In the Image Sizing area set the file size and resolution. So you can, for example set the Resolution to 72 pixels per inch for the Web or 300 ppi for printing.

To size the images, enable the Resize to Fit checkbox. By selecting Dimensions you can set the final dimensions for each image such as 800 x 1200 and the images will be sized as close to this as they can be given their current aspect ratio. They won’t be larger than this and one measurement at least will be 800 or 1200. Lightroom does this regardless of whether the images are in Portrait or Landscape orientation so portrait and landscape images will end up the same sizes.

If you select Width & Height you can set the longest dimensions of each image in each direction. All images will be sized so their Width is no larger than the value you set and their Height is no larger than the value you set – the same width and height values are applied to portrait and landscape images so a Width of 400 and Height of 600 will give a larger portrait image than it will a landscape one because the landscape image can’t be wider than 400, forcing its height to much less than this.

The Long Edge and Short Edge options let you set the maximum length of the long or short edge of a photo – so Portrait and Landscape images are treated alike here.

If you enable the Don’t Enlarge checkbox you could have images much smaller than your selected dimensions if the originals are already under the selected size.


Step 6
You can apply sharpening by selecting the Sharpen For checkbox from the Output Sharpening options and select to sharpen for Screen, for example, and set a Low, Standard or High Value of sharpening.

In the Metadata area, select to add metadata if desired and from the Post-Processing options select what to do with the images afterwards, for example you could open the images direct in Photoshop or in an alternate editor or another application or show them in Windows Explorer.

When you’re done with the selections, click Export and the selected images will be exported.


Step 7
If you’ll use these settings again, save them to use next time by clicking the Add button at the foot of the Preset list, type a name for the preset, select the folder to add the preset to or just leave it set to User Presets and click Create.

In future, you can return to the Export dialog and select these options by clicking the Preset name. You can still make changes to the settings, if desired, and export a new set of images.

Helen Bradley

Friday, September 11th, 2009

Batch Resize


While it’s relatively easy to write an Action to resize a series of images in Photoshop, it’s easier still to get Photoshop to do all the work for you. Photoshop comes with an image processor script that will open, resize and save a series of images for you – very quickly.

Step 1
Choose File > Scripts > Image Processor. The image processor dialog shows a simple four-step process for resizing the images.

Step 2
In Step 1 of the dialog, select to either resize the images already open in Photoshop (if you have them open), or click Select Folder and select a folder of images to resize. Select Include all Subfolders to include all subfolders of the selected folder.

Step 3
In Step 2 of the dialog select where to save the images. If you select Save in Same Location Photoshop creates a subfolder in which to save the images so you don’t have to worry about overwriting them. If a subfolder by the same name already exists with images with the same names in it, Photoshop saves to that folder but adds a sequential number to the file so you still won’t lose your files. Alternatively, you can select a different folder for the resized images.

Step 4
In Step 3 of the dialog select the file type to save in. For the web Save as JPEG is the obvious choice. Set a Quality value in the range 0 to 12 where 12 is the highest quality and 0 the lowest. For better color on the web, select Convert profile to sRGB and ensure that Include ICC Profile at the foot of the dialog is checked so the profile will be saved with the image.

To resize the images, select the Resize to Fit checkbox and then set the desired maximum width and height for the final image. For example, if you type 300 for the width and 300 for the height, the image will be resized so that the longest side of any image, whether it be in portrait or landscape orientation will be 300 pixels. The images are scaled in proportion so they won’t be skewed out of shape.

The Width and Height measurements do not have to be the same so you could, for example, specify a Width of 400 and a Height of 300 and no image will have a width greater than 400 or a height greater than 300.

Step 5
If desired you can save in another format as well by selecting its checkbox so you can save the same image in different formats and at different sizes in the one process. You can also select to run an Action on the images, if desired.

When you’re ready, click Run and the images will be automatically opened (if they are not already open), resized, saved and closed.

To see your resized images, choose File > Open and navigate to the folder that you specified the images to be saved to. If you chose to save as JPEG, the images will be in a subfolder called JPEG, for PSD in a folder called PSD and so on.

So whenever you need to resize a lot of images for uploading to the web, for example, the Photoshop Image Processor script makes the job almost painless.

Helen Bradley