Thursday, November 28th, 2013

Rev Up Your Photo workflow – Part 3 – Organizing, Fixing and Sharing images

In this final part of our workflow series we look at organizing and selecting images, fixing and sharing them.


Organizing and selecting images

Once you’ve imported your images, you’ll need to determine which of those you want to work with and which you will not. For this you will need to use a system that is supported by your software – it needs to be quick and easy to use so you can quickly identify the best of your photos.

If you have already backed up your images, you may determine that your master file of images will contain only the best of the images, so you might give a low rating or mark as reject any images that you don’t want to keep so you can later find and delete them. Whatever the case, you need to determine what your process is going to be and then work within this process to get the task done as quickly as possible.

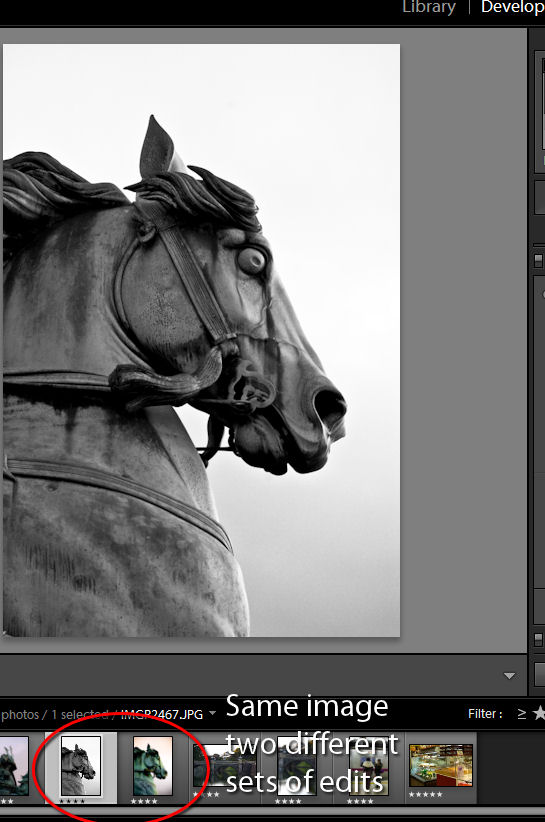
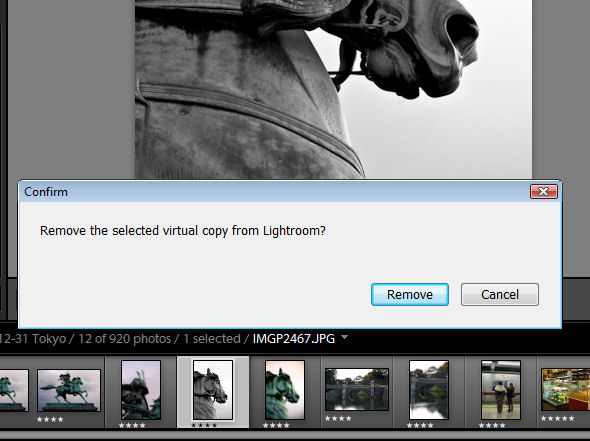
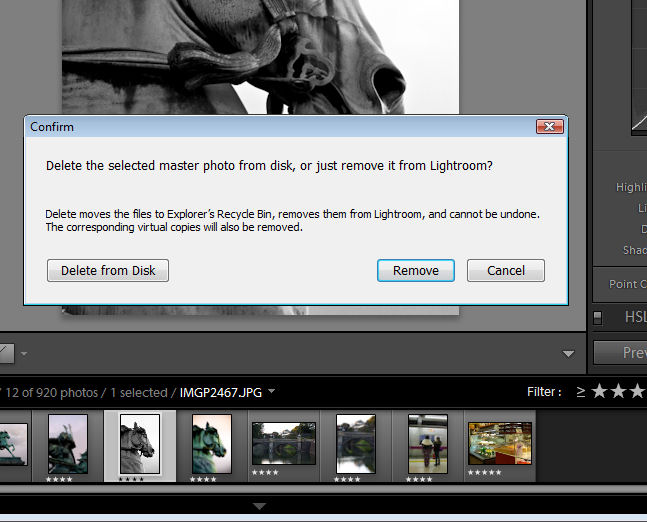
For example, in Lightroom you can use the flag feature to pick or reject images as you move through them – you can do this using the letters P and X. If you use Reject (X) for images you want to delete you can later choose Photo > Delete Rejected Photos to remove them. Then you might work through the picked images and allocate a star rating to them to indicate their relative value.

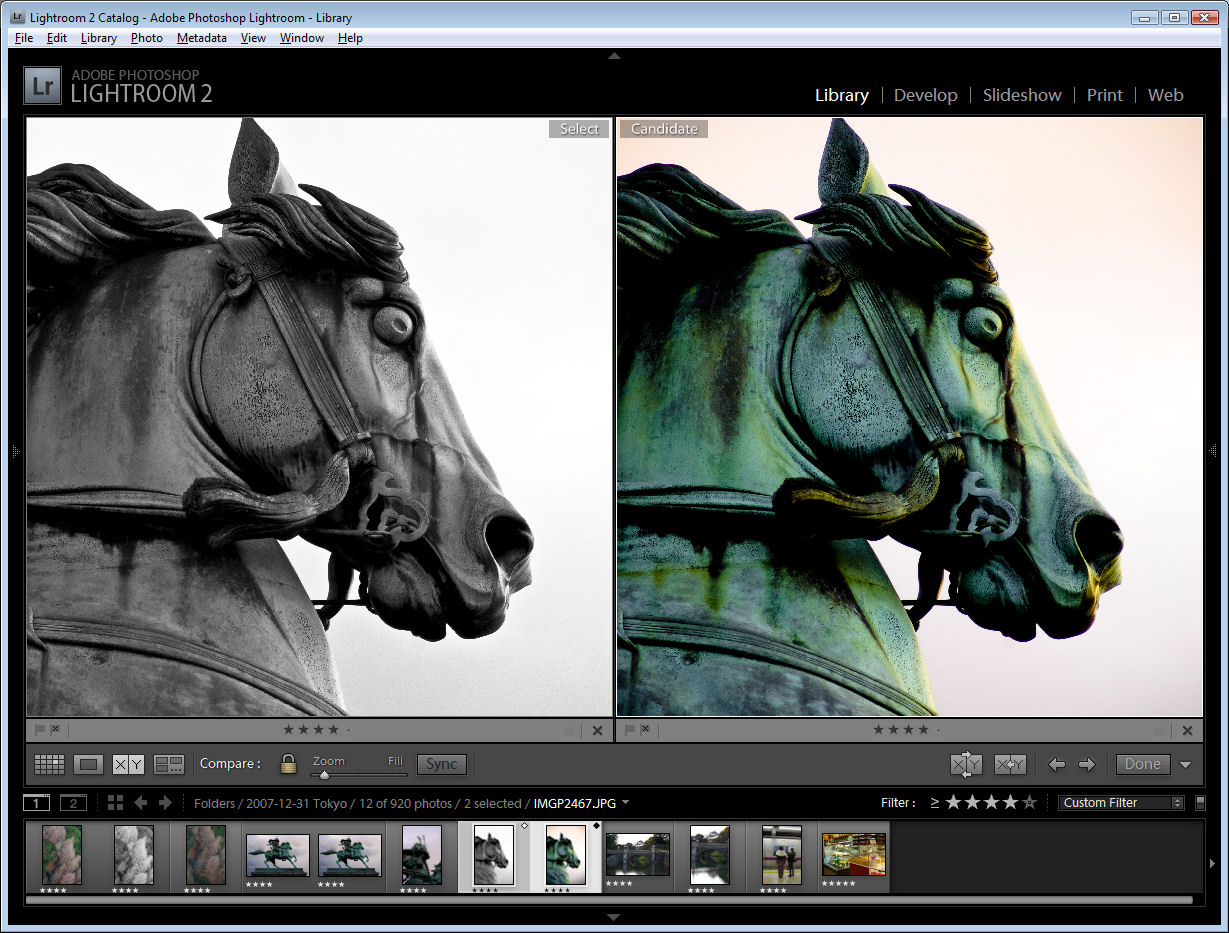
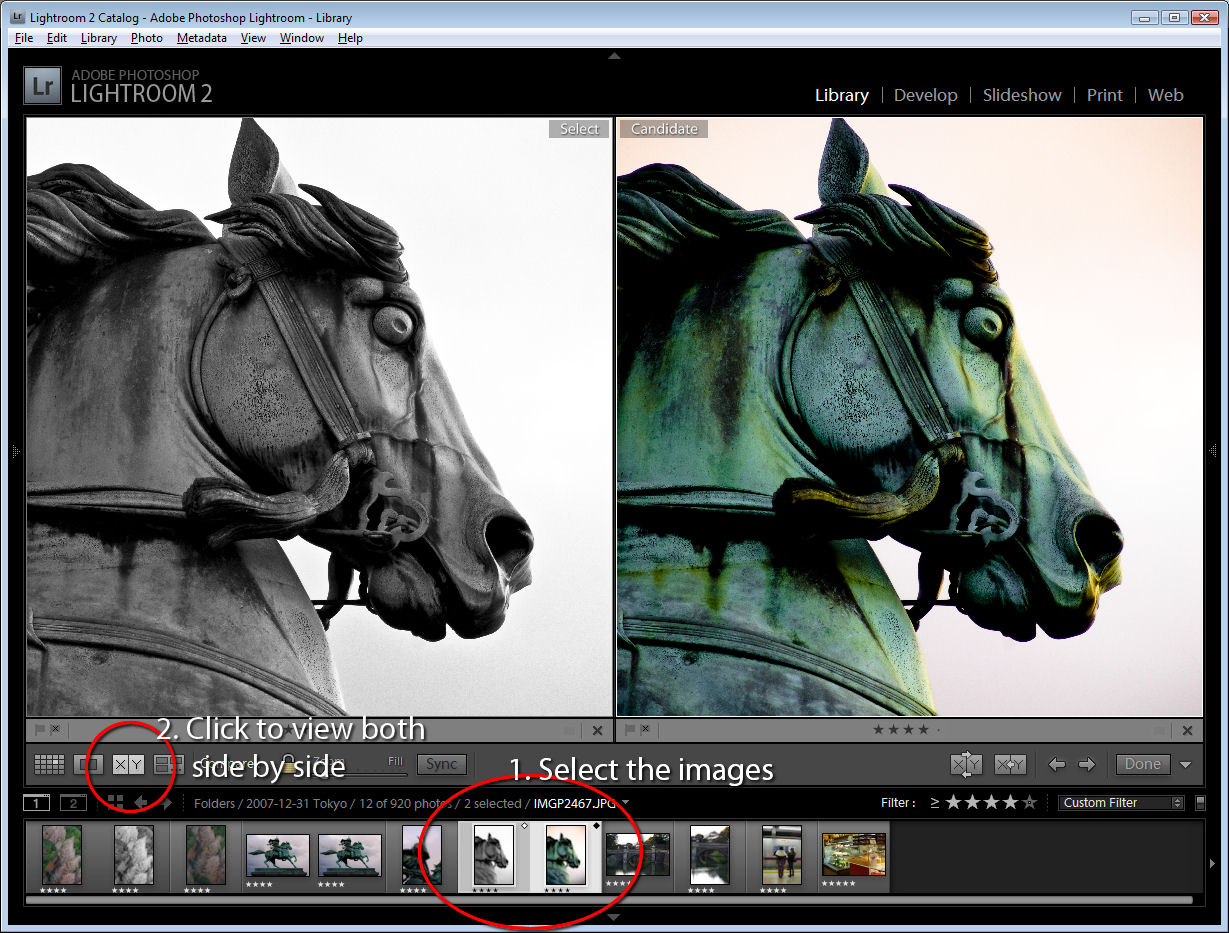
In Bridge you have various options for managing images and one is to select a folder of images and choose View > Review Mode to view the images in review mode. Here you can drag and drop images from the panel to select or reject them. As you rotate around the images only those you haven’t dropped off the screen will be left in this view. This feature allows you to quickly move through your images, previewing them at a good size and determining which you want to keep or reject.

Depending how you are working, when you exit the view the images you had visible will be selected. If they are the worst images you can now delete them. If they are the best, you can, while still in Review Mode click the New Collection button in the bottom right of the screen and create a new collection for them. Back in Bridge you can right click the selected images and chose Label and then add a label or star rating to them.

In other programs such as Photoshop Elements and Picasa, you can apply star ratings to your images – in Photoshop Elements you can use 1-5 stars and in Picasa just a single star. In Picasa, click on an image or select multiple images and click the star button in the middle bottom of the Library window. When you apply a single star to an image in Picasa you can filter out only those starred images later on by clicking the star icon at the top of the program window.


Fixing Images

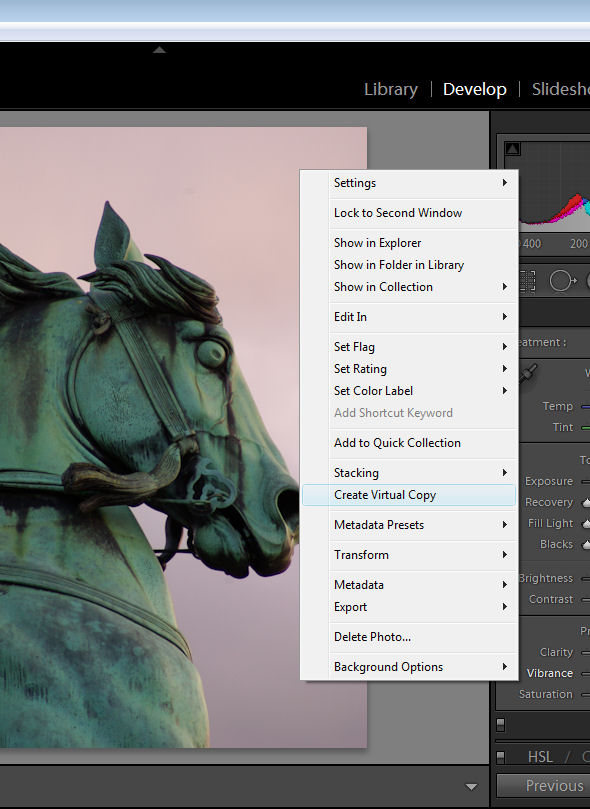
In many programs, you can apply basic fixes to multiple images at a time. For example, in Lightroom’s Library module if you are in Grid view you can select a series of images and apply one of a range of fixes to the images from the options in the Quick Develop panel. The Auto-Tone option, for example, automatically adjusts every image that you have selected with the appropriate fix for that image’s particular needs. You can also adjust the relative Exposure and Brightness and the White Balance.

In Photoshop Elements, you can select multiple images and click the Fix panel. Click Auto Smart Fix and the selected images will all have a basic fix applied to them. Here too you can choose Auto Color, Auto Levels, Auto Contrast or Auto Sharpen.

In Picasa, you can select an image and double click it to move to the edit module. When you have fixed the image you can choose Edit > Copy All Effects and then move back to the Library view. Select one or more images to apply these same changes to and choose Edit > Paste All Effects. The changes that you made to the first image will be pasted onto the other images.

Sharing images

When it comes to sharing your images some programs include built in tools that let you upload images direct to sharing sites from within the program. These integrated tools save you time – you don’t have to export the images and then upload and you can do it all in one step.

Lightroom, for example, is integrated with Facebook, Flickr and SmugMug allowing you to connect direct to your accounts with those services and upload images direct from inside Lightroom. If you are working in Picasa, you can upload direct to your web albums and you can send an image to your blog. In Photoshop Elements, you can share images in a number of ways including Flickr, Facebook and SmugMug.


In some cases, you may need a plug-in to integrate your software with an online site. For example the Picasa2Flickr plug-in for Picasa lets you send images direct from Picasa to Flickr. You’ll find this at http://picasa2flickr.sourceforge.net/index.html.

If you cannot link your software direct with a sharing site, look out for a download from your sharing site that lets you upload bulk images at a time such as one of the Flickr tools. While these aren’t a single step solution they can save time when you have a lot of images to upload and, if you make sure to include captions, titles and keywords in your editing program you can save having to do this when the images have been uploaded.

When it comes to managing your images, in most cases you have a choice of workflows – one that gets things done and one that gets things done efficiently and effectively. If you design a workflow that does things more quickly and more efficiently, you’ll get your shoots processed much faster and you can get back to taking more great photos.


Helen Bradley

Tuesday, May 15th, 2012

A “Happy Snap” Lightroom workflow

At Halloween last year I was asked to photograph some kids I’ve shot from time to time since they were born. Basically their mum likes to have some up to date photos of the kids and Halloween seemed like as good a time as any to get some shots.

When I’m shooting like this, my aim is to get some good shots but nothing formal and I prefer not to use a flash because I get a better response from the kids without one. I captured the images in raw and I chewed through three small size camera cards in about an hour and a half.

My deal with their mum is that I get to use the photos for my work and she gets a disk of pictures. To keep this fun – so it doesn’t feel like work for me – I need a fast and effective processing workflow.  I need to get the images off my camera, sorted, processed, burned to a DVD and delivered to mum in time for her to enjoy them.

Thanks to Lightroom the process was simple and, in all, I reckon I spent less than 2 hours getting the photos from the camera cards to a DVD. Here is what I call my Happy Snap Lightroom workflow – it’s what I do to quickly process casual snapshots:

Step 1: Determine a plan of attack

To begin with I have some criteria I work by. I never give away substandard photos so anything blurry, out of focus or over exposed gets permanently deleted. Then I sort out the best of the images intending to give mum around 50-60 photos of the kids – it’s a nice range of images for her to use to scrapbook and post to Facebook and it doesn’t over burden her with too many photos to choose from.

Step 2: Download the images

To begin, I download all the images from all three cards into a single folder on my hard drive (if there were only one card I would omit this step).

From there I import the images into Lightroom at the same time copying them to their permanent storage on my external photo drive and making a backup to a second drive. Copying rather than adding images to the Lightroom catalog lets me make backups and also add my metadata to the images so, when they popup on Facebook my copyright details are embedded in them.

Importing all the images in one step also means that when I’ve started the import process – which includes rendering standard previews – I can start working through the images and I don’t have to do it multiple times or switch out cards as I work – (the process works for me – your mileage may vary).

Step 3: Eliminating the duds

The first time I run through the images I am looking for images to delete as well as getting a general look at what I shot.

As I work through the images I’ll press X for images to delete and use the right arrow key to move past everything else. I’ll select to delete all out of focus images, anything where someone has their eyes closed or similar, and anything I don’t want to put my name to!

Once I’m done I choose Photo > Delete Rejected Photos to delete the images from my primary external photo drive. There are still copies on the backup drive and my hard disk but not on my main photo drive.

Step 4: Sorting the usable images

On the second run through the images I pick those I want to use. By now I have a rough idea as to what I have and what I might want to give mum. So this time I run through the images pressing P to pick an image and using the right arrow key to move past those she won’t be getting.

Step 5: Create a Collection

Once done, I isolate the picked images by clicking the first of the filter flag icons above the filmstrip. Then with only the picks visible I press Ctrl + A to select all of them and then click New Collection > Create Collection and type a name for it. Because the images are already selected, I leave the Include Selected Photos checkbox enabled and click Create.

Step 6: Apply initial processing to the images

Now I have a collection of the picks and it’s time to process them. I start out by selecting all the images in Grid View in the Library and from the Quick Develop panel I select Auto Tone. This gives me a head start on fixing them but, because of the lighting, pretty much all of them needed a white balance adjustment.

Step 7: Process in the Develop module

Switching to Develop module with the filmstrip visible I selected the White Balance Selector and then made sure that Auto Dismiss was disabled. This allows me to adjust the white balance on one image and then click on the next one in the filmstrip and continue to adjust the white balance from one image to the next without having to reselect anything. Basically all that most of these images needed was some white balance adjustment.

For those that needed cropping, I cropped as I finished with white balance adjustment and then moved on to the next image. This ensured that each image was dealt with only once as I progressed across the filmstrip.

Step 8: Make one off fixes

So, having fixed the worst of the problems I work backwards through the filmstrip to see if any of the images warrant special attention. If so, I make a call to fix them or simply remove them from the collection. To remove the image, right click it and choose Remove from Collection .

Here I had one issue with a couple of images where one child’s face was in shadow. For this, I used the Adjustment Brush tool at a small size with a large feather radius. I brushed over the areas where her face was in shadow and then adjusted the Brightness and Exposure to lighten to her face. In the same images other faces were overexposed so I added a second Adjustment Brush adjustment with the opposite settings to attempt to deal with this. The final result wouldn’t  stand up to close scrutiny but is just fine for the web and 6 x 4 printing.

Step 9: Export and burn

Once this was done it was time to export the images. Because they’re all in a collection, Ctrl + A selects all the images. I chose File > Export and then exported them as JPG images, 80 percent quality at the largest size and I added sharpening to them in the process. I made sure these images all went to a new folder so that they would be isolated from everything else and easy to find.

From there, it was a matter of launching Ashampoo Burning Studio, grabbing all the images and burning them to a DVD.

This workflow is one giant step better than simply burning the images direct to a DVD. It takes only a little more time with Lightroom to sort and apply some basic fixes to the images and it also means that only the best of the images get circulated and those that do have my copyright information embedded in them.

So now it’s over to you. What’s your “happy snap” workflow? Do you capture snapshots in raw? Do you process using Lightroom? And how do you get your images processed quickly so you’re not spending hours on images that are really just family snapshots?

Helen Bradley

Saturday, September 5th, 2009

Working with Virtual copies in Lightroom


The Virtual copy feature of Adobe Photoshop Lightroom lets you experiment with multiple editing options for an image without duplicating the original image. So, for example, if you have an image that you think would look good either with its color enhanced or rendered in black and white you can apply both fixes to the same image to see which you like best using virtual copies. No only will you see both versions in Lightroom, you can export each as a different image and you can work with them independently of each other.

Follow these steps to see virtual copies at work:

Step 1
Inside Lightroom locate the photo to adjust in the film strip, right click it and choose Create Virtual Copy. In the film strip you will see both images and, when you select them, you will see they have the same file name. If you have the Info Overlay displayed it too shows the same data for both images.

Step 2
Once you have created the virtual copy you can edit it independently of the original and compare the results. You can also make additional virtual copies and each behaves independently of the original but is, in reality, the same image.

step 3
To view the two images side by side, return to Library view, select both the image and the Virtual copy and click the XY button above the filmstrip. This shows the two images side by side.

Tip
One problem with virtual copies is determining which is the original and which is the copy. You will need to do this, for example, if you want to delete the virtual copy leaving the original in place.

To delete a virtual copy, right-click the version of the image that you think is the virtual copy and choose Delete Photo. If it is the virtual copy you will see the dialog prompt “Remove the selected virtual copy from Lightroom?” – click Remove to delete it.

If the selected version was not the virtual copy you will see the prompt “Delete the selected master photo from disk, or just remove it from Lightroom?”. This tells you that the selected image is not the virtual copy but the original. Click Cancel if you do not intend removing both the original and the Virtual copy(ies) from Lightroom or from your disk.

If you use Virtual copies a lot you can configure the Info Overlay to show you which image is a copy. To do this, choose View > View Options and click Show Info Overlay. Reconfigure one of the info sets to include not only the File Name but also the Copy Name. The original image will display the filename only and virtual copies will display the filename and Copy 1 (or Copy 2).

Helen Bradley