Friday, December 30th, 2011

Lightroom – help my import dialog just shrunk!


I just got a help! email from a reader who lost her import dialog. It had shrunk to a small size and none of her regular options were available. She is using Lightroom 3 and this shrinking dialog is actually a feature – it’s just she wasn’t seeing it that way – and who can blame her?

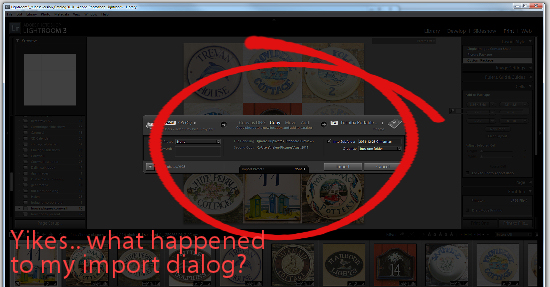
If something happens to change your screen and you don’t know how to undo it all of a sudden a feature becomes a disaster. Here is what her screen looked like:

There is a small button in the bottom left of the Import dialog shown circled here and it switches you into this mode. All you need to do to get back to where you want to be is to click on it again and the import dialog goes back to its regular size.

When you know how, it really is a feature, until then… help! my Lightroom import dialog shrunk.

Helen Bradley

Wednesday, December 28th, 2011

Quickly access Excel 2010 formula requirements


Ok.. so you want to use an Excel formula and you know it is, say, SUMIF that you want to use, but what data does it need and where?

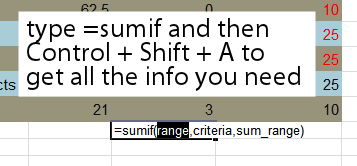
Before you go searching through help or cranking up your browser, let Excel do the work for you. Just type =SUMIF in a cell and press Control + Shift + A and Excel will give you the list of data required. It’s dead simple and it saves heaps of time.


Helen Bradley

Friday, December 16th, 2011

Blow it Up with Alien Skin Blow Up 3

I’ve never used an upsizing or enlarging program before. Instead, when I need to enlarge an image, I perform the age old trick of increasing an image’s size by 110 percent multiple times in Photoshop to enlarge it. It seems to do a reasonable job of the enlarging process.

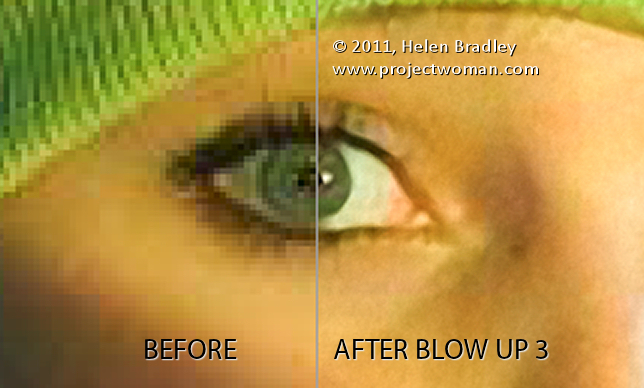
However, recently I was offered Alien Skin’s Blow Up 3 to test – since the folks at Alien Skin make some really cool applications I thought I’d give Blow Up 3 a try. I actually had an image that needed of blowing up for a magazine article. The image I had was a totally cool image but from a very old camera phone so it was a tiny 479 x 640 pixels in size. Not only was it very small but it had some very obvious jpg artifacts so when I enlarged it 300 percent it showed not only those artifacts at an enlarged size (the result was horrible) but the image also showed some distinct pixelization.

This was a perfect image to try out with Blow Up 3 – if I succeeded with the task the image would be acceptable quality for the magazine, if not, I needed to find something else.

Alien Skin Blow Up 3 with Lightroom

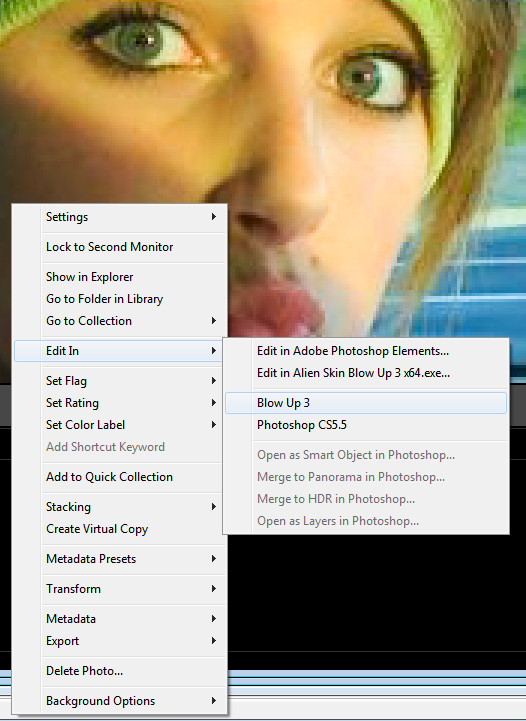
I had already installed Alien Skin Blow Up 3 for Lightroom, so running it is as simple as right clicking the image in Lightroom and choosing and choose Edit In > Blow Up 3. You get a choice of opening the image from Lightroom either as a copy with Lightroom adjustments, you can edit a copy or edit the original. You just select the option to use and click Edit and it opens automatically in Blow Up 3.

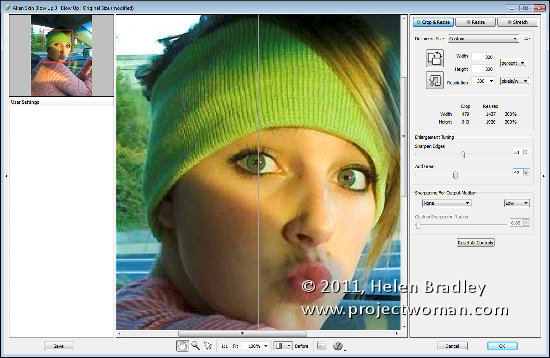
Blow Up 3 really couldn’t be easier to use. In fact I was a little confused at first because I kept looking for more options where there really weren’t any. I selected the Before/After option at the foot of the main screen so I could see the before version on the left and the after version on the right. I wanted to see as I worked just how effective the program would be. I then selected the Crop & Resize option and set it to Percent. I selected 300 percent for width and height and a resolution of 300 pixels per inch.

With the Before/After view on the screen, it was clear that the result would be a significant improvement for this image. The settings you can choose from include grain and sharpening. I checked out the grain slider. For this image, if I didn’t add grain, the jpg artifacts were still very apparent and they really detracted from the image because they were so visible. I opted to add a lot of grain to the image so I set the value to around 30 to soften and blend the artifacts.

I also checked out the Sharpen Edges setting to see how that would affect the image. For this image, I really didn’t want a lot of sharpening so I opted to set it to 40. This gave me some sharpening around the edges such as in her eyes but not really obvious haloing which the higher values produce.

Then, it is as simple as clicking Ok to blow up the image and be taken back to Lightroom where the blownup version appears in the same folder as the original so I found it alongside the original in the filmstrip.

From its original size the image is now nearly 1500 x 1900 pixels in size well suited to being used in a magazine and way more pleasing to look at than it was originally – sans artifacts. If you need to enlarge images significantly this application has the goods.

Helen Bradley

Thursday, December 8th, 2011

Things to know about Lightroom Collections

Collections in Lightroom are a key tool for organizing images. There are some benefits to working with collections and some things that it helps to know about working with them.

Collections: Smart or regular?

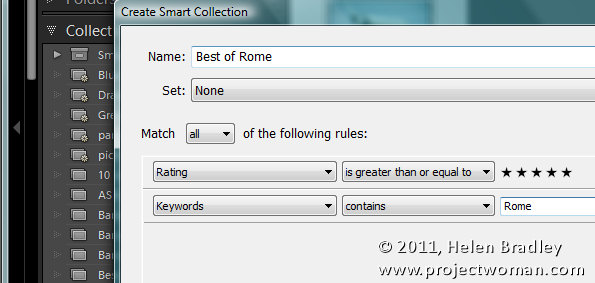
There are two types of collections in Lightroom, Smart Collections which are populated according to a filter which you define to identify images that you want included in that collection. For example, a Smart Collection might be defined as 5 star images which have a keywords that include the word Rome.

Smart Collections are dynamic so if an image no longer matches the filter you have defined for that Smart Collection it will be removed automatically from it. Likewise, newly imported or edited images which fulfill the criteria will be added automatically to that Smart Collection.

Regular Collections are collections that you populate with images that you choose to put in them. Images remain in these collections until you chose to remove them.
Sorting images in collections

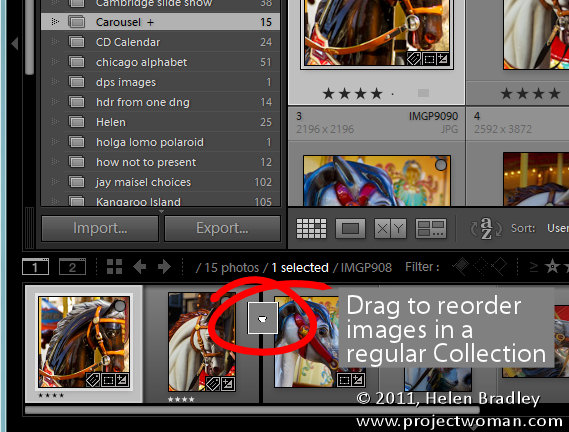
You can sort images in order in a regular collection but you cannot reorder images in a Smart Collection.
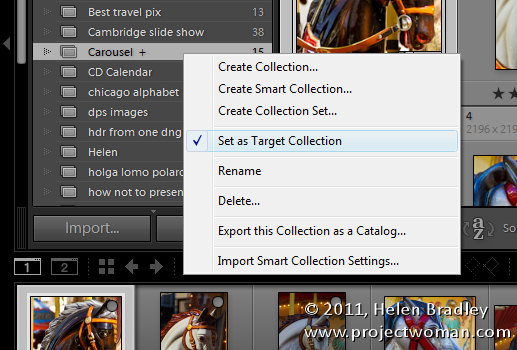
Target Collection

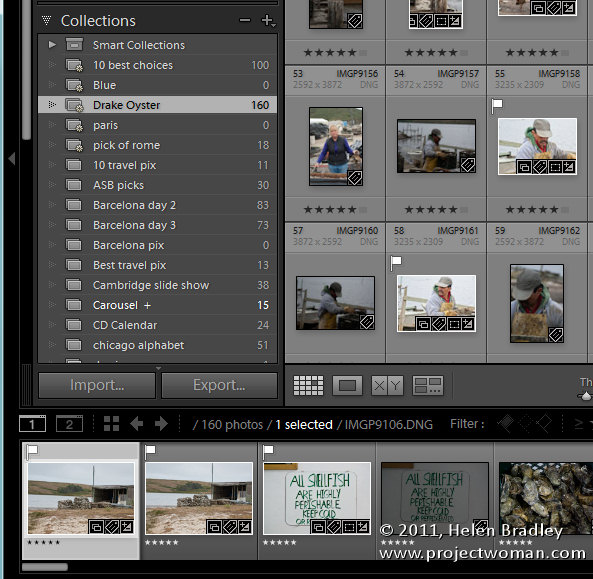
You can set a regular collection – but not a Smart Collection – to be the Target Collection. There can be only one Target collection and to make a collection a target collection, right click on its name and choose Set as Target Collection.

In future, you can add images to the Target Collection by pressing the letter B. Press the letter B again to remove the image from the Target collection.

You can identify which collection is the target collection by the plus (+) symbol which appears after its name.

If you deselect the current Target Collection by right clicking its name and disabling Set as Target Collection then the Quick Collection, by default, becomes the Target Collection.
 

Gather images without duplication

One of the benefits of using collections to organize images is that the images in a collection can come from any location of your choice. You can create a collection of images from a number of different folders or even drives on your computer. Collections are simply a pointer to the original image, not the original image itself, so they require little additional space on your computer to store them. An image can belong to multiple collections and it will still only exist in one physical location on your computer.

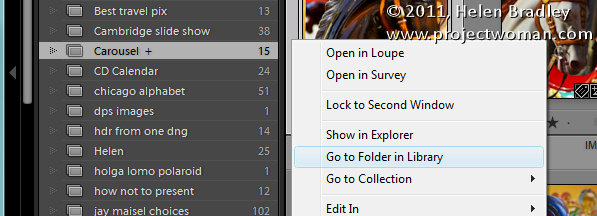
Where is that image?

To find where an image in a collection is stored, right click on the image and choose Show Folder in Library to go to the folder in the Lightroom catalog. Alternately, choose Show in Explorer to see it in Windows Explorer (Show in Finder on the Mac).
 Collections not in the Collections Panel

While most collections are listed in the Collections Panel, there are some collections that are not. In the Catalog panel you will find the All Photographs collection which is a collection of all the images that you have in your Lightroom catalog.
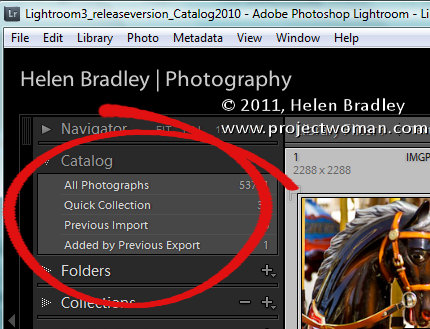
Quick Collection is a temporary collection that you can create as needed.

Previous Import is a collection containing the images in the most recent import – it changes every time you import new images into Lightroom.

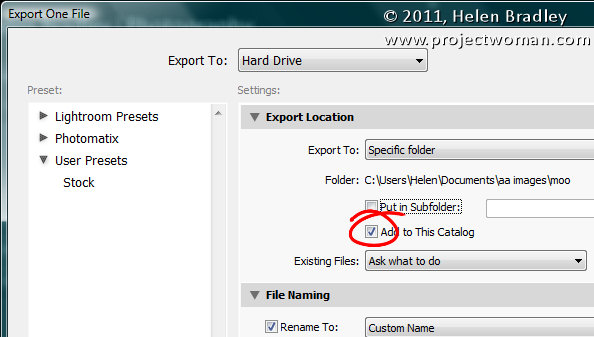
Added by Previous Export is a collection of those images that were most recently added to the Lightroom catalog as they were exported from Lightroom. There is an option in the Export dialog that lets you automatically import exported images back into the catalog.
Three Handy Collections

There are three handy collections that are automatically created by Lightroom and which appear in your Smart Collections set. The Without Keywords smart collection contains every image in your collection that does not have keywords associated with it. It’s a handy reminder of the keywording work you still have to do.
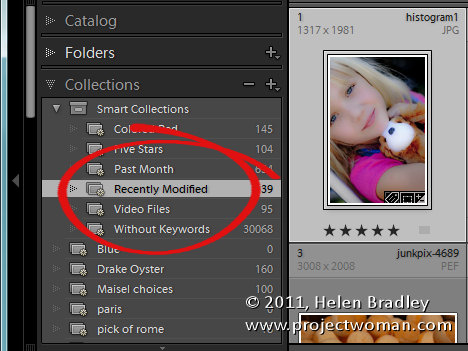
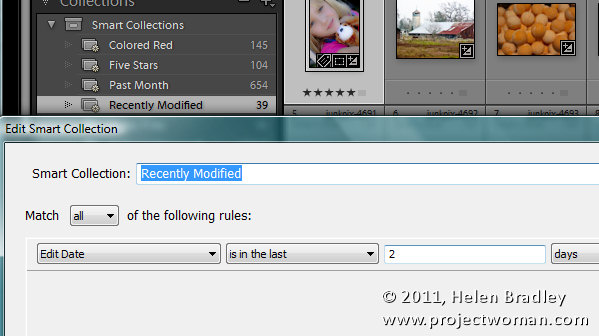
Recently Modified is a collection containing images that have been modified within the last two days. You can alter the date range by right clicking the collection, choose Edit Smart Collection and change the number of days listed. You’ll see that by default it reads Edit Date… is in the last…. 2….days. You can change Days to Hours, Weeks, Months or Years and change the physical number from 2 to any number of your choice.

The Past Month collection is all the images that you have shot in the last month.
Managing temporary collections

If you often make collections that you only want to keep for a day or two to complete a particular job, either create a Collection Set to contain them or add the word “temp” to the collection name. This makes it easy to see collections you can easily delete to remove clutter from your Collections panel.

Helen Bradley
Monday, December 5th, 2011

Work in the Lightroom Quick Develop panel


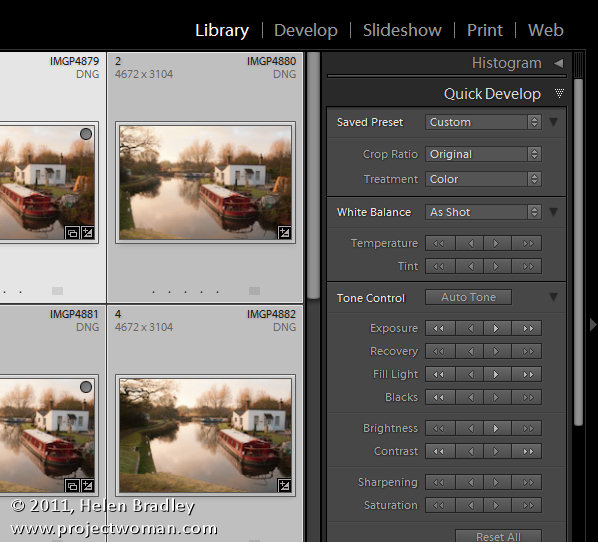
In Lightroom you can fix a series of images all at once using the Quick Develop Panel in the Library Module. While this tool lacks the precise adjustments you can make to an image in the Develop Module, it offers a quick solution for getting started fixing your images.

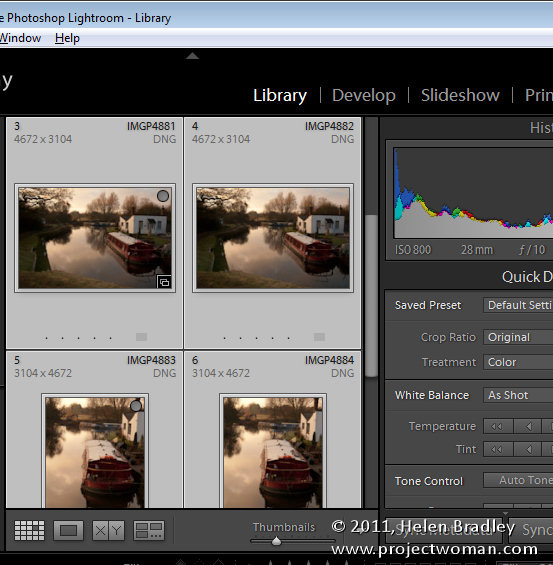
To make use of the Quick Develop panel you should be working in the Library Module, in Grid View. So open the Library module and click G to select Grid view. If you are in Loupe view the changes you make will be applied only to the most selected image regardless of how many images you have selected in the Filmstrip.

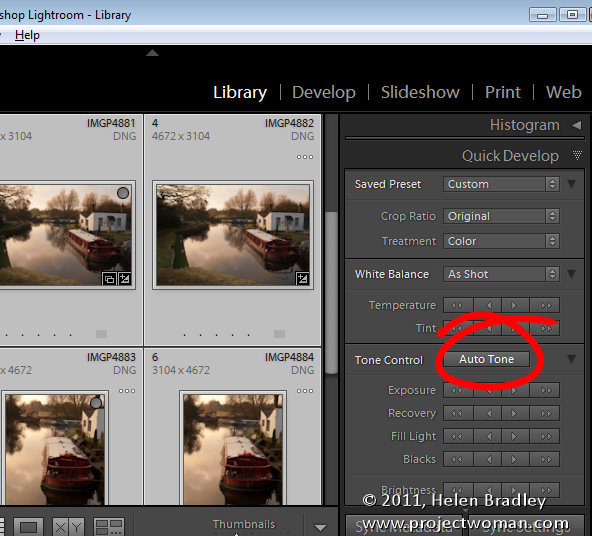
If you typically use the Auto Tone feature in the Develop module to quick start fixing your images, select all the images to fix in grid view and click the Auto Tone button. Every image will be assessed and then adjusted according to its particular needs.

How fixes are applied

In the Quick Develop module, when you choose to adjust, for example, the Exposure on a series of selected image, each image will be adjusted by the same relative amount. So, if you select a series of images and click the single right pointing arrow, you will add +0.33 to the current Exposure value for each image. So, if an image had a starting Exposure setting of 2.00 it will be increased to 2.33. The single left pointing arrow moves Exposure -0.33. If you click the double arrows you will increase or decrease exposure by 1.0 for every image. Each adjustment works in a similar way although the relative values will vary.

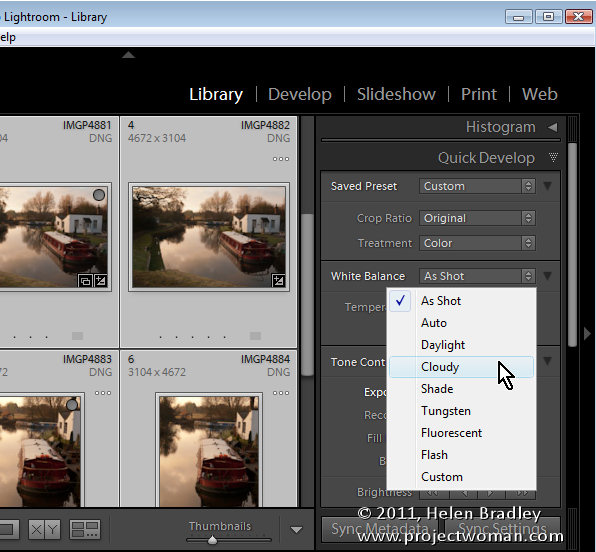
One feature of the Quick Develop module which is useful is the White Balance tool. If you have a series of images all shot in similar light you can select them and adjust the white balance for all of them by choosing a different White Balance setting from the dropdown list or by adjusting the Temperature (Blue/Yellow) and/or Tint (Green/Magenta) sliders.

Hidden Options

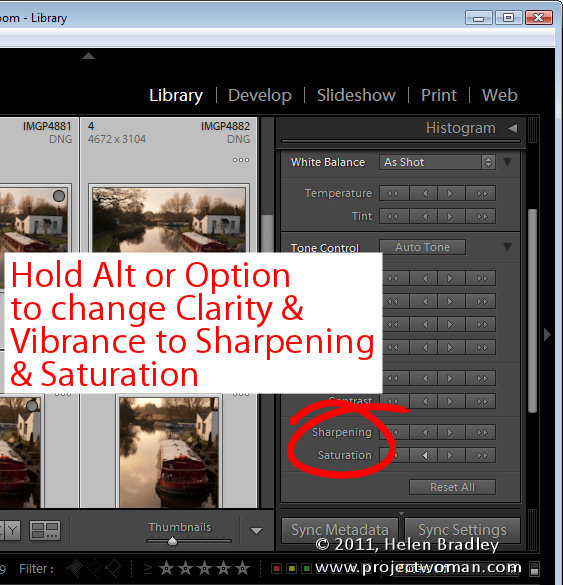
There are some options hidden in the Quick Develop panel. If you hold the Alt key (Option on a Mac) the Clarity and Vibrance adjusters change to allow you to adjust Sharpening and Saturation. Notice that Sharpening is an all in one setting and that it lacks the ability for you to alter the Radius, Detail and Masking which you can do with the Detail panel sliders in the Develop module.

How I use it

I use the Quick Develop panel to make quick edits to a series of images at one time. I’ll assess the images to see if they need a particular adjustment such as increasing the Exposure if they are all a little underexposed. I also like to increase Clarity and Vibrance.

So, I’ll select the images in the Grid, click to increase Exposure and then again increase Vibrance and Clarity.

Using the Quick Develop panel to make fixes to all images saves me a little time later on when I switch to the Develop module and apply additional fixes on an image by image basis.

One Gotcha to be aware of

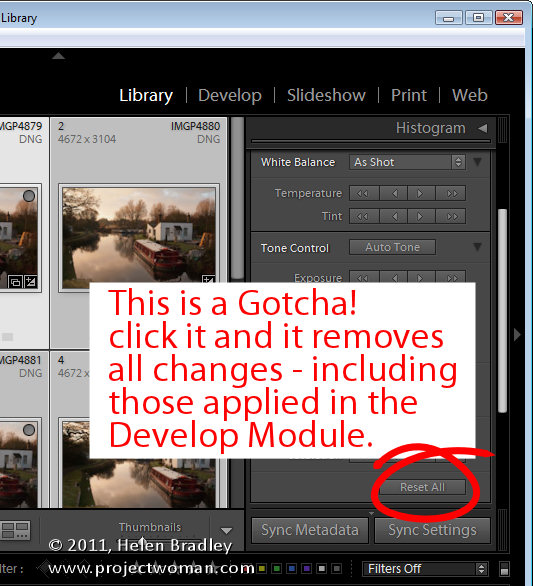
If you want to remove the settings applied to an image you can do so using the Quick Develop panel. Select the image and choose Reset All. However, be aware that when you do this, you will remove not only all settings applied to the image using the Quick Develop panel but also any changes made to it using the tools in the Develop module.


Helen Bradley