Thursday, November 28th, 2013

Rev Up Your Photo workflow – Part 3 – Organizing, Fixing and Sharing images

In this final part of our workflow series we look at organizing and selecting images, fixing and sharing them.


Organizing and selecting images

Once you’ve imported your images, you’ll need to determine which of those you want to work with and which you will not. For this you will need to use a system that is supported by your software – it needs to be quick and easy to use so you can quickly identify the best of your photos.

If you have already backed up your images, you may determine that your master file of images will contain only the best of the images, so you might give a low rating or mark as reject any images that you don’t want to keep so you can later find and delete them. Whatever the case, you need to determine what your process is going to be and then work within this process to get the task done as quickly as possible.

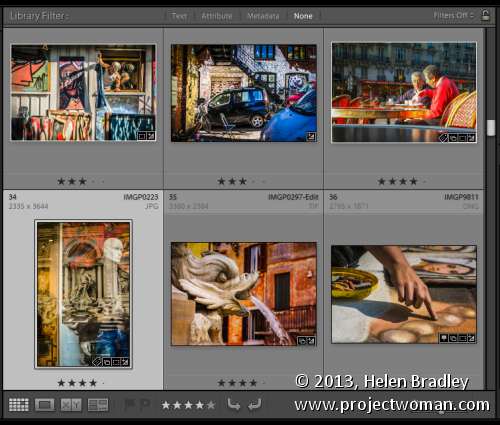
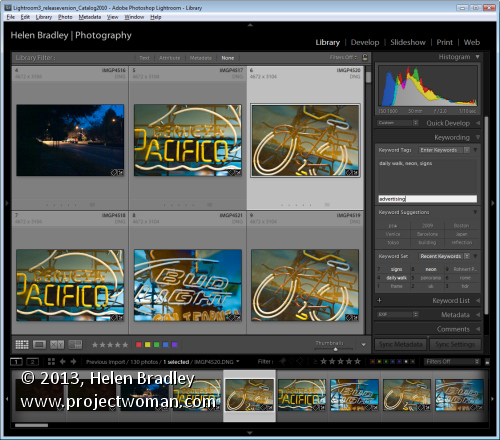
For example, in Lightroom you can use the flag feature to pick or reject images as you move through them – you can do this using the letters P and X. If you use Reject (X) for images you want to delete you can later choose Photo > Delete Rejected Photos to remove them. Then you might work through the picked images and allocate a star rating to them to indicate their relative value.

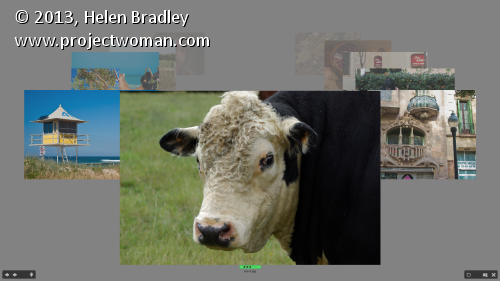
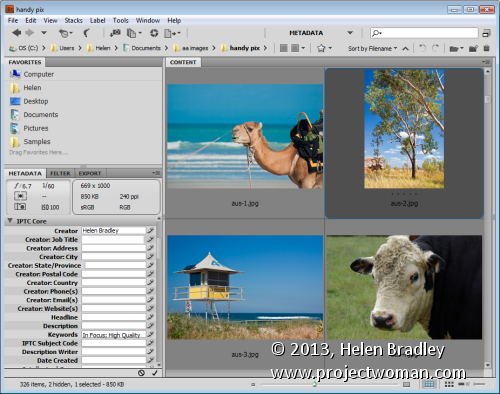
In Bridge you have various options for managing images and one is to select a folder of images and choose View > Review Mode to view the images in review mode. Here you can drag and drop images from the panel to select or reject them. As you rotate around the images only those you haven’t dropped off the screen will be left in this view. This feature allows you to quickly move through your images, previewing them at a good size and determining which you want to keep or reject.

Depending how you are working, when you exit the view the images you had visible will be selected. If they are the worst images you can now delete them. If they are the best, you can, while still in Review Mode click the New Collection button in the bottom right of the screen and create a new collection for them. Back in Bridge you can right click the selected images and chose Label and then add a label or star rating to them.

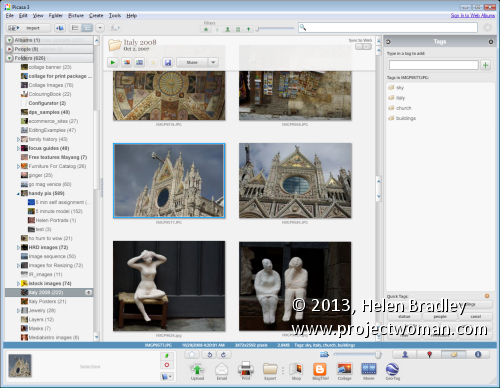
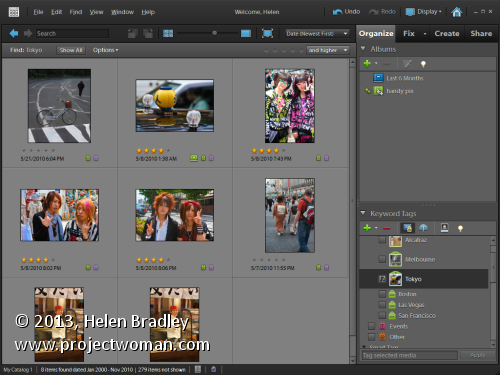
In other programs such as Photoshop Elements and Picasa, you can apply star ratings to your images – in Photoshop Elements you can use 1-5 stars and in Picasa just a single star. In Picasa, click on an image or select multiple images and click the star button in the middle bottom of the Library window. When you apply a single star to an image in Picasa you can filter out only those starred images later on by clicking the star icon at the top of the program window.


Fixing Images

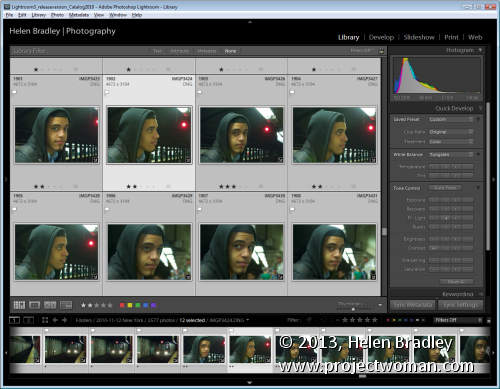
In many programs, you can apply basic fixes to multiple images at a time. For example, in Lightroom’s Library module if you are in Grid view you can select a series of images and apply one of a range of fixes to the images from the options in the Quick Develop panel. The Auto-Tone option, for example, automatically adjusts every image that you have selected with the appropriate fix for that image’s particular needs. You can also adjust the relative Exposure and Brightness and the White Balance.

In Photoshop Elements, you can select multiple images and click the Fix panel. Click Auto Smart Fix and the selected images will all have a basic fix applied to them. Here too you can choose Auto Color, Auto Levels, Auto Contrast or Auto Sharpen.

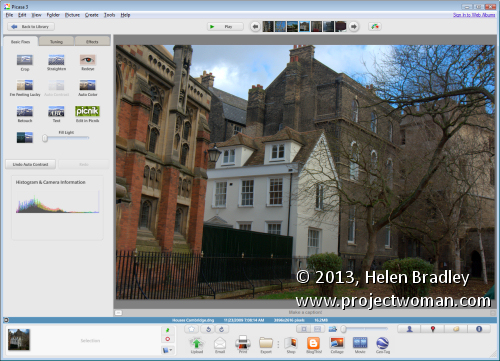
In Picasa, you can select an image and double click it to move to the edit module. When you have fixed the image you can choose Edit > Copy All Effects and then move back to the Library view. Select one or more images to apply these same changes to and choose Edit > Paste All Effects. The changes that you made to the first image will be pasted onto the other images.

Sharing images

When it comes to sharing your images some programs include built in tools that let you upload images direct to sharing sites from within the program. These integrated tools save you time – you don’t have to export the images and then upload and you can do it all in one step.

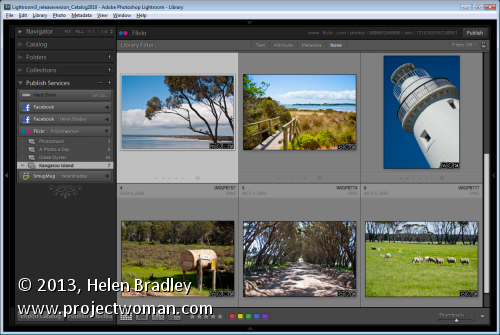
Lightroom, for example, is integrated with Facebook, Flickr and SmugMug allowing you to connect direct to your accounts with those services and upload images direct from inside Lightroom. If you are working in Picasa, you can upload direct to your web albums and you can send an image to your blog. In Photoshop Elements, you can share images in a number of ways including Flickr, Facebook and SmugMug.


In some cases, you may need a plug-in to integrate your software with an online site. For example the Picasa2Flickr plug-in for Picasa lets you send images direct from Picasa to Flickr. You’ll find this at http://picasa2flickr.sourceforge.net/index.html.

If you cannot link your software direct with a sharing site, look out for a download from your sharing site that lets you upload bulk images at a time such as one of the Flickr tools. While these aren’t a single step solution they can save time when you have a lot of images to upload and, if you make sure to include captions, titles and keywords in your editing program you can save having to do this when the images have been uploaded.

When it comes to managing your images, in most cases you have a choice of workflows – one that gets things done and one that gets things done efficiently and effectively. If you design a workflow that does things more quickly and more efficiently, you’ll get your shoots processed much faster and you can get back to taking more great photos.


Helen Bradley

Thursday, November 28th, 2013

Word tables – one click insert

Learn to insert a table in a Word document with a single click

When you need to repeatedly create the same type of table in a Word document you can do so using the new Word Quick Part feature.

This technique works well when you use the same table layout repeatedly. Your inserted table will be the same size, have the same number of columns and rows and contain any preset formatting that it had when you created it as a Quick Part entry. Once created, you can insert it quickly whenever you need it.

To do this:

  1. Create a new table with the number of rows and columns you want all your tables to have.
  2. Include any text in the table that needs to always be in this type of table – if there is none, leave the cells blank.
  3. Format the cells in the way you wan them to be formatted every time – including text formats and cell background colors and borders.
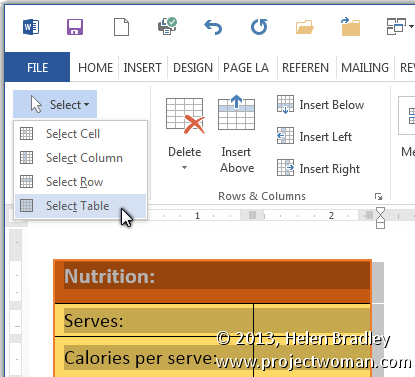
When you are done, select the table by clicking in it and choose Table Tools > Layout > Select > Select Table.

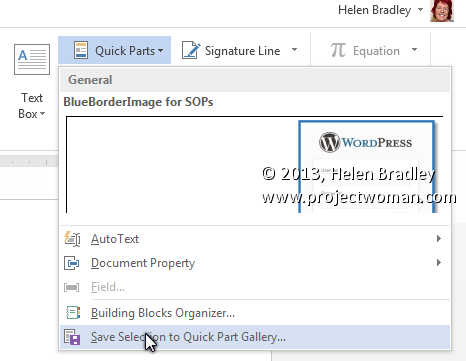
Choose Insert > Quick Parts > AutoText > Save Selection to AutoText Gallery.

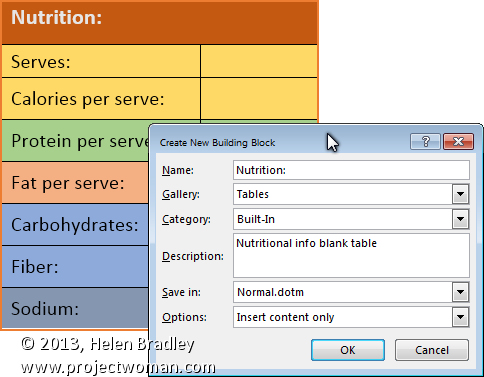
In the Create New Building block dialog set the Gallery to Tables and type a description of the table and click Ok.

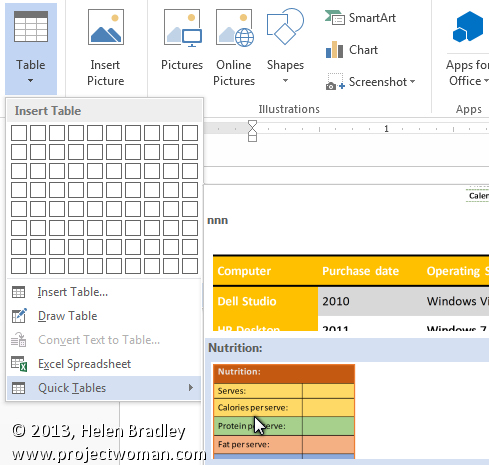
In future, to create a table to these exact specifications choose Insert > Tables > Quick Tables, locate the table in the list and click it to insert it into the document.

This feature is the successor to the AutoText feature in earlier versions of Word. It looks a little more cumbersome but it is more easily discovered so you don’t have to  remember where the table was saved as it appears automatically on the Insert Table menu.

Helen Bradley

Monday, November 25th, 2013

Cometdocs – A smarter file converting tool

Learn how to convert files directly from Dropbox and Google Drive

Needing to converted a document from one file type into another is very common today, which is why online file conversion services have become so popular. One service that has made a name for itself by offering free high-quality file conversion capabilities is Cometdocs. Cometdocs is a document management service that also offers cloud storage and file transfer options, the website is still primarily used by people who need fast and accurate file conversion online.

The service has unveiled a bunch of updates recently, one of them being integration with popular cloud storage services such as Dropbox and Google Drive. Even though Cometdocs offers free storage to its users (2GB worth), there is no denying that there are many much more popular cloud storage competitors out there.

Thanks to this new update, Cometdocs users can convert files directly from their Google Drive or Dropbox accounts in two different ways – via their browser or using Cometdocs’ new desktop app.

Of course, in both instances you need to sign up for a free Cometdocs account first. Once you have signed up and logged in, here’s how to integrate Google Drive and Dropbox with the online service.

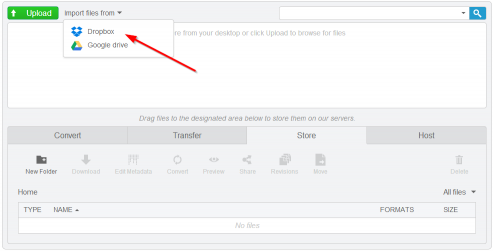
Right at the top of Cometdocs’ online interface, you will see a button that says “Import file from.” Click on that button and choose to synch either Dropbox or Google Drive with Cometdocs.


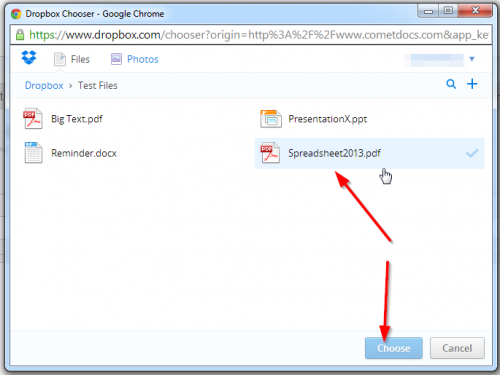
Once the synch has been completed, a window will open up listing all of your Dropbox or Drive files. Click on the file you want converted and then click “Choose.”

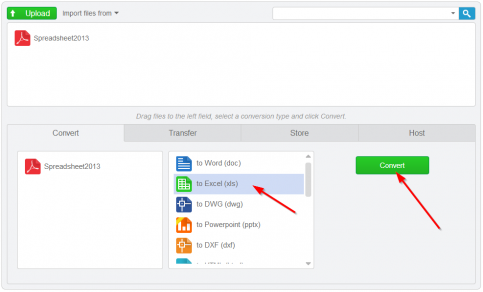
The file is now sent to your Cometdocs clipboard from where you can drag it to the Convert tab and choose your conversion option. Cometdocs allows users to convert PDFs into a large number of different file formats including MS Excel, Word, PowerPoint, HTML, Text, AutoCAD formats and more. You can also convert these files types and more into PDF with Cometdocs. It’s safe to say that the conversion options are plentiful.


Integrating Cometdocs with your favorite cloud storage service is even easier when using the desktop app. Once you have downloaded and installed the app and you have signed in to your Cometdocs account through it, the conversion process can be completed in just one step.

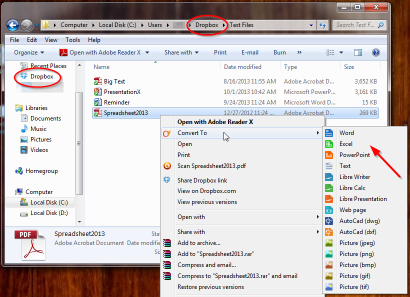
Simple open your cloud storage folder of choice. When using the desktop app, you are no longer limited to Google Drive and Dropbox integration. You can open up the folder of any cloud service you prefer to use.

Now simply right-click on the file that you want to convert. Find the Cometdocs logo in the menu and select your conversion type.

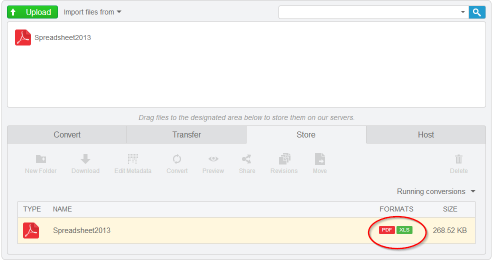
And that’s all there is to it. The app sends the file off to Cometdocs’ server for conversion, and once the process is complete, the newly converted file is downloaded automatically into your cloud storage folder and synched.

If you are looking for a faster and easier way to convert files from within your cloud storage conveniently, Cometdocs’ integration features are hard to beat.

Go to: http://www.cometdocs.com/  or http://www.cometdocs.com/desktopApp


Helen Bradley

Thursday, November 21st, 2013

Another Fractal Tree Creator

Create fractal trees in your browser using this free download

I love Fractal Trees and I love finding new ways to make them. Today I found a handy download for creating some cool trees.

I’ll explain how to find and download it and then how to run and use it.

This program is browser based but you need to download the code for it. You will find that here at Github.com.

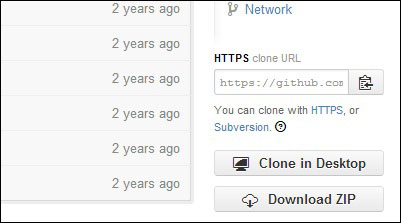
On the bottom right look out for a download Download Zip link – click it and download the zip file. Double click the download and extract the files into a folder.


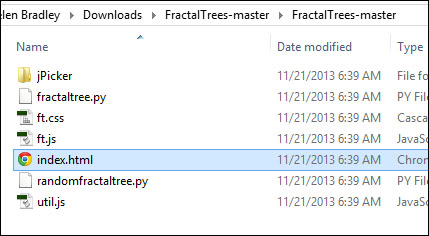
When you do this, look for the Index.html file in the download. Double click it to open it in your browser. This launches the program which runs now in your browser.

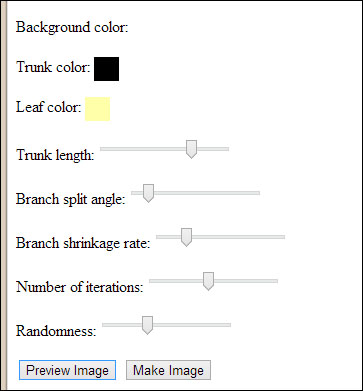
All you need to do is to adjust the sliders and click Preview to preview your tree. You can use the color pickers to set the colors for the trunk, leaves and background.

Experiment with different settings – the Randomness setting will give you some randomness in the tree so each time you click Preview the tree will change even if no other settings are changed.

When you get a tree you like, click Make Image and the tree will open in a new window. You can click the tree, right click and then save it as a .png image – they aren’t transparent though.

Then you can use it anywhere you like – I use mine in collages in Photoshop. They are very small images but they scale up pretty well.

If you are interested in seeing Anna’s images head over to her website to see her page of fractal trees – here is a sampling of what you will find there – awesome!

Helen Bradley

Wednesday, November 20th, 2013

Force Chrome to refresh a page

How to Make Chrome display your new web page content without emptying your cache

I use Dreamweaver for my sites and Chrome as my preferred browser but I came close to throwing Chrome out the window these last few days.

You see, Chrome doesn’t like updating your pages which means that if you’re revamping pages as I have been it is perilously slow in delivering the new content to you. In fact, today I checked out a page I edited 4 days ago and while the text is up to date the images were not.

Trying the regular keyboard shortcuts just didn’t work – any key with F5 such as Shift + F5, Control + F5, the reload button Shift + R etc, etc.. I tried them all and nothing works.

I don’t particularly want to have to empty my cache to see the new content – it’s like throwing out a heap of good stuff just to display a page – it shouldn’t have to be done. This browser should work better!

Turns out it does…

….when you know how!

So here’s 2 ways to force Chrome to refresh a page:

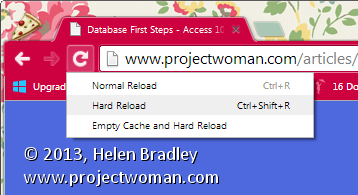
1  Click on the page and press Control + Shift + I to display the Developer Tools.  Now, instead of clicking the button to the left of the address bar – right click it to open the menu. Choose Hard Reload – that should ignore the contents of the cache and reload page content and images from the server. This menu only appears if DevTools are enabled.

If that doesn’t work:-

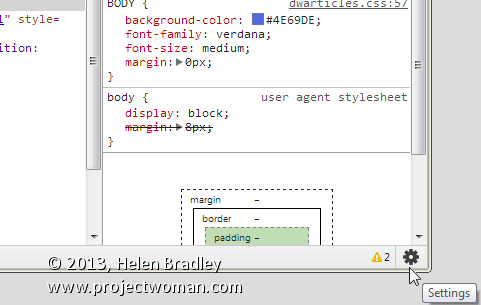
2  Go to the DevTools panel at the foot of the screen and, in the bottom right corner, locate Settings (the gear icon) and click it.

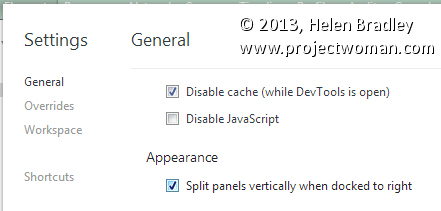
Now check the  Disable Cache (while DevTools is open) checkbox and reload the page – voila! too easy! Yeah… your page appears.


Leave the panel open while you work.

Close it when you’re done.

There… you knew there was a secret to it – and now you’re in on it, but please, don’t keep it to yourself – spread it around, tweet it, share it!


Helen Bradley

Monday, November 18th, 2013

Rev Up Your Photo workflow

Learn some tips and techniques to speed up your photo workflow.

When you return from a shoot or vacation with hundreds, if not thousands, of photos you need a smart workflow in place to process them. The more effective your workflow is, the less time you’ll waste on processing your images and the quicker you can get back to shooting. In this column, I’ll show you some techniques to use to streamline your workflow from downloading your images to adding metadata and keywords and then fixing and sharing the best of them.

Downloading

Before you begin to download any images from your camera you need a plan for storing and working on them. You should have a plan for how you will organize your images and how you will name your folders and whether the images will be renamed or not.

When it comes to structuring a system, be aware that what works best for someone else may not work best for you. You need to develop a system that you understand and that you can work with. Once you have a plan, it will help to write it down so you have a step by step process for working with the images from any shoot at any time. Any software that you use today or in future should be chosen so it supports this workflow.

Start by downloading images from your camera cards. How you do this can impact how easy it is to do other things later on. For example, if you’re using Lightroom and you have multiple cards from a shoot, you might consider downloading all the images from all your cards into one folder on your computer before importing the images into Lightroom. This way you will have all the images in the Current/Previous Import folder in your Catalog panel allowing you to isolate all these images to deal with them as a group.

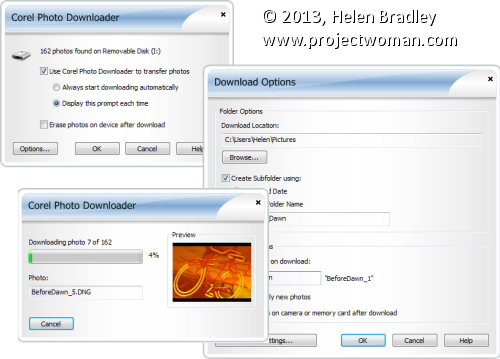
In any application you will need to set the import dialog so that the downloaded images are handled in accordance with your image handling workflow. Programs like Photoshop Elements include a special photo downloader and if you accept its download defaults then your images will be stored subfolders by date. If this isn’t what you want to happen you need to change the settings before downloading so you don’t have to fix the problems later.

So, in Photoshop Elements Photo Downloader dialog, select the source location for your images and the place to store them in. While the default is your My Pictures folder you can change this as necessary. Select a subfolder for the images and then determine how to name this – either by date or a custom name. If your workflow calls for your images to be renamed then you can do so as you import them – there are options in this dialog to name files by date, or to apply a custom name and sequence number.

Taking the time to not only get your images into the right place the first time and to rename them on import will save you hours of work later on.

In addition, in Photoshop Elements for example, if you select the Advanced dialog, you can add creator and copyright metadata to the images as you import them – something that you can’t do later on. This Advanced dialog is the same dialog that you would use if you are importing images via Adobe Bridge but in the case of Bridge it is possible to edit and add metadata  later on.

Whichever program you are using, check the program’s import options carefully to see what features it includes for renaming files, organizing images into folders, applying simple fixes and adding metadata as you import the images. Anything that can be done automatically as you import your images will save time later on.

Making backups

If you store all your images on just one disk there is a risk that you will lose them if your disk crashes or something happens to your computer. As a precaution and as part of your import process, and before you do anything more to your images, you should create at least one backup copy of them.

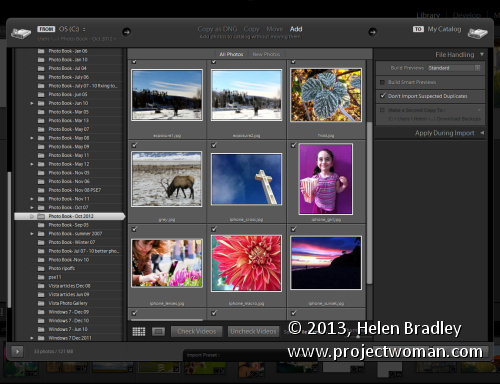
Some programs like Lightroom make this easy to do. In Lightroom’s Import dialog you can chose to backup your images to a second location as part of the import process. This is only the case if you choose Copy, Move or Copy as DNG as the import option, if you choose Add this option is not available. In the File Handling panel is a checkbox you can select to make a second copy of the images to a different location.

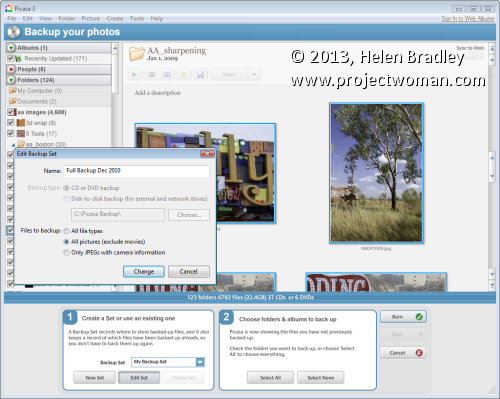
In other programs, you may need to back up the images manually. For example, in Picasa you can select the images to back up and choose Tools > Back Up Pictures. This opens up a set of step-by-step panels from which you will first select a Backup set or create a new one. The you can choose the folders or albums to back up and then click to Burn these to a series of CDs or DVDs or copy to an external or network drive.

A  benefit of using this Picasa backup tool is that it will take note of which files you have backed up so that you won’t have to back them up again. This will reduce the time involved in backing up new downloads in future and will save you unnecessary duplication of effort.

Whatever your program offers, backing up is a task that should be done routinely whenever you download your images so you’ll be protected if your computer crashes or if you make mistakes while editing and need to restore an image from the backed up version.


In the next part of this series: Keywording and Copyright Metadata

Helen Bradley

Friday, November 15th, 2013

Google Drive Spreadsheet Notifications

Google Drive’s spreadsheets are liable to be shared and edited by many people.

This can potentially compromise the integrity of their data, so it’s a good idea to keep track of the changes made. Fortunately, Google provides a notifications service so the spreadsheet’s owner can do just that.

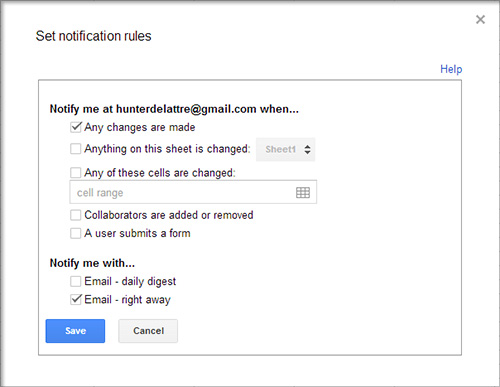
To access the notification rules, open the spreadsheet you want to track and select Tools > Notification Rules…. The resulting dialogue allows you to choose what changes to track. If only some data is critical, you can choose to only track a specific sheet or cell range. If you’ve set up a form to feed its result into your spreadsheet, you can choose to be notified whenever somebody submits the form. Choosing email – daily digest will add the notification to a daily email that contains all of your notifications that have this rule selected. Email right away immediately sends the specific notification to you.

Click Save when you are done. Your new notification rule will be the first on a list of all the notification rules for that spreadsheet. From the list you can add new rules, or edit or delete an existing one.

Helen Bradley

Wednesday, November 13th, 2013

JPEG vs RAW – what’s the difference and what should you use?


Learn the difference between capturing in jpg and raw and when to use each.

One key decision that every photographer needs to make is whether to capture images in jpg or raw formats. With newer and more advanced tools on the market for processing raw images, the incentive to move to capturing in raw is attractive. However, raw images will require additional processing and they are very large so, to help you understand the issues behind the question “jpeg or raw?” I’ll explain the difference between capturing in jpg and raw and why you might choose one over the other and when to do so.

What is in a format?

Before exploring when you might want to capture an image in jpg or raw, it’s worthwhile looking at the differences between these two file formats. The raw file format is a format which is a camera specific so the format of raw images from a Canon camera is different to the format of a raw image from a Nikon camera. The reason for this is that a raw format image contains the data captured by the camera’s sensor and it is unprocessed. Because each camera’s sensor is different, the basic raw format is proprietary to that camera manufacturer and it may even vary from one camera to another within a camera manufacturer’s own range.

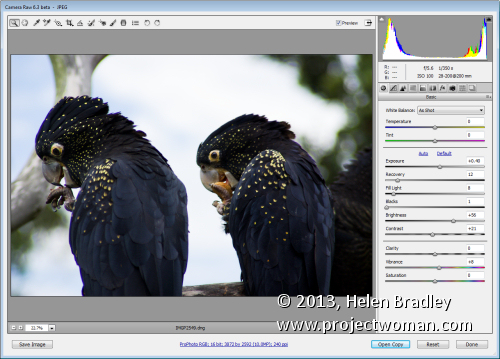
Before you can use a camera raw image in a program such as Photoshop, you need to process it using either your camera manufacturer’s raw processing application or a tool such as Adobe Camera Raw. One downside of  capturing images in the raw format is that you need to do this preprocessing before you can use your images. If you capture in camera raw, you will be reliant on special software to be able to read your raw images in future in, say, 10 or 15 years’ time.

As a move away from the notion of a proprietary raw formats that are created by each camera manufacturer, Adobe recently released the dng or Digital Negative file format. This is an open format which can be used by camera manufacturers as an alternative to their own proprietary raw formats. It frees photographers from being tied to a specific manufacturer’s raw format and offers protection for the future simply because of the sheer number of people who will have images stored in this format. The format’s popularity should ensure that there will be programs available in future for most operating systems that can read and process these files.

Camera raw images, when captured in the camera manufacturer’s own format such as crw, cr2, nef or pef cannot be written to and can only be read from. For this reason, if you make changes to a camera raw image in a program such as Adobe Camera Raw or Lightroom, then the changes that you make to the image cannot be written to the original image file. Instead, they’re written to what is called a sidecar xmp file which stores details of the changes that you’ve made to the image. Camera raw image processing applications read the original camera raw file and the sidecar xmp file and display the image with the changes you have made to it. However you need to be careful that you do not move a raw file to another location and leave its sidecar xmp behind – if you do, you will lose any changes that you’ve made to the image. The Adobe dng file format avoids this problem as it is a file format that can not only be read from but also written to so changes can be stored in the original file.

Differences in data

The advantage of recording all the data captured by your camera’s sensor in a raw file whether it be your camera manufacturer’s own raw format or Adobe dng is that you have a wider range of image data than you would have if the image was saved as a jpg image. When an image is saved as a jpg image by your camera, it is scaled down considerably so that it is no longer a 32-bit image but is now a 8-bit image with only 256 levels of brightness.

Other changes that are made to the image include sharpening the image and the camera will also apply any white balance setting you have selected to the image. If you have other “in camera” settings configured such as variations to the image saturation, contrast and brightness then these adjustments will be made to the image before being saved as a jpg file. In addition because the jpg file format is a lossy and compressed file format you will lose some detail in saving the image even if you opt for saving at the highest quality.

In contrast, a dng or raw image is not adjusted and all the data that was available from the camera’s sensor will be in that file. Situations in which this can save you some grief is where you have under or over exposed the image or configured an incorrect white balance setting. If you capture in a raw format then you have a larger range of exposure adjustments available to be made inside a camera raw processor than you would have with the corresponding jpg image. In addition, because the white balance setting is not applied to a raw image, you can change the white balance setting later on without compromising the image.

The tools in Lightroom make it easy to apply changes to a range of raw images all at once.

File size differences

Because jpg images include only a subset of the data that the camera captured and camera raw images contain it all, there are significant file size differences between images captured in the jpg and the raw format. For the equivalent pixel size image, a raw image might be around 20MB in size where the corresponding jpg image would be around 5Mb in size. The reason is, of course, that the jpg image has less data in it and the data is also compressed.

One drawback to capturing raw images in the past has been the difficulty of processing these images. Many programs simply couldn’t read the wide range of raw image formats in use by the varying camera manufacturers. This meant that you were either limited to using your camera manufacturer’s own software to preprocess raw images or you needed to purchase an expensive application like Adobe Photoshop to do so. These days the dng format and many proprietary raw formats can be read by a number of applications including the free applications: Picasa and IrfanView.

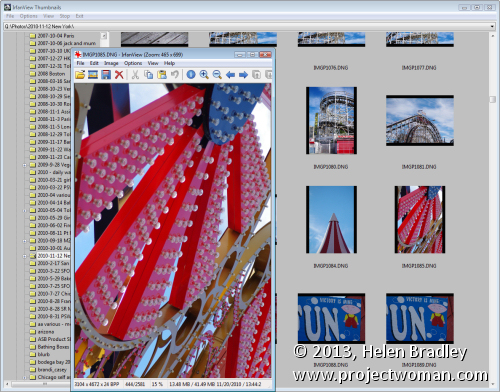
IrfanView is one of the popular free programs that can display and edit dng and some other popular raw format images.


However, operating systems like Windows Vista and Windows 7 still do not include native support for dng or other raw formats so, when viewing a folder full of dng images you will see icons instead of thumbnails. There are some downloadable codecs available from http://labs.adobe.com/wiki/index.php/dng_Codec but they have limited application.

When to use which format

Now that we’ve investigated the difference between capturing in jpg, raw or dng, it’s time to look at when you might opt for one in preference to the other. If you already use a program that includes built-in support for camera raw images such as Picasa, Lightroom, Photoshop, Photoshop Elements or Corel Paintshop Photo Pro then you may opt to always shoot in raw or dng because of the ease at which you can work with your images – this is particularly the case with programs like Lightroom and Picasa.

On the other hand, if you typically shoot images to share online on sites like Facebook or Flickr and you don’t usually do much, if any, processing then jpg may be the best option as the files are smaller and you can quickly download them and then get them uploaded to your sharing site. For example, Flickr will let you upload full size jpg images but you can’t upload raw or dng images.

One advantage of capturing in jpg is that you have the flexibility of being able to determine the pixel dimensions of the image you will be capturing in the camera. Most cameras have varying size options available when capturing in the jpg format and also different compression options. If you’re only shooting snapshots for uploading to the web, then you don’t need very big images and you may find smaller jpg format images work as well.

That said, you need to accept that if you are capturing jpg format images you’re reducing the amount of image data that you have available and, if in the future, you decide that you want to do something special with a particular image, you won’t have the full range of image data there to do anything with..

If you’re shooting to sell images for stock, then you absolutely must capture images using the camera raw file format so that you have all the data in the image available to you. Many stock agencies will not accept images captured as jpg images because of the processing that’s applied to those images by the camera including the image sharpening. Stock agencies prefer unsharpened images so that the purchaser can then determine the amount of sharpening they want to apply in each specific case.

There is a way to “have the best of both worlds” and you can capture in both jpg and raw formats. Most cameras can capture jpg and raw or jpg and dng so you’ll get both files for each image that you shoot. You can then download both formats – use the jpg images for your day to day use and store the raw originals in case you ever need to work with those images in future.

 Picasa supports many raw formats so you can view and work with raw images in the same way as jpg images.

Helen Bradley

Wednesday, November 13th, 2013

Add Spacing to Word Table Cells

Learn to quickly add extra spacing above and below the contents of a Word table cell

When you enter text in a Word 2013 table you may want more space above and below your text than appears by default.

While you can make the table cells larger and vertically centre the text in the cells this is a cumbersome solution and there is better and faster way.

To add extra spacing you can change the table’s cell spacing values.

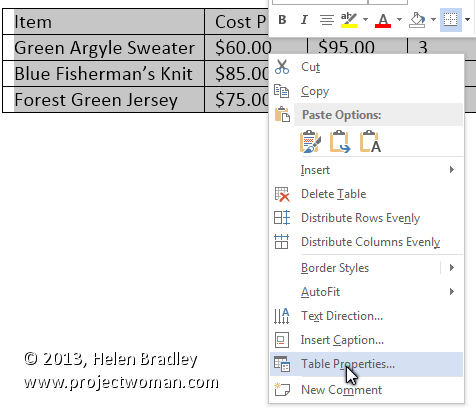
To do this, first select the table, right click choose Table Properties.

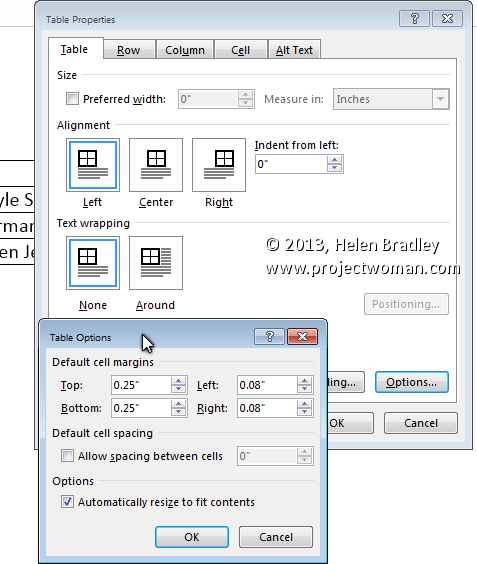
Click the Table tab and click Options.

Here you can set the Top, Bottom, Left and Right cell margins for all cells in the table. Set the Top and Bottom values to 0.25″ to add a little extra space above and below the text in the cells.


Helen Bradley

Page 1 of 212