 Learn some tips and techniques to speed up your photo workflow.
When you return from a shoot or vacation with hundreds, if not thousands, of photos you need a smart workflow in place to process them. The more effective your workflow is, the less time you’ll waste on processing your images and the quicker you can get back to shooting. In this column, I’ll show you some techniques to use to streamline your workflow from downloading your images to adding metadata and keywords and then fixing and sharing the best of them.
Downloading
Before you begin to download any images from your camera you need a plan for storing and working on them. You should have a plan for how you will organize your images and how you will name your folders and whether the images will be renamed or not.
When it comes to structuring a system, be aware that what works best for someone else may not work best for you. You need to develop a system that you understand and that you can work with. Once you have a plan, it will help to write it down so you have a step by step process for working with the images from any shoot at any time. Any software that you use today or in future should be chosen so it supports this workflow.
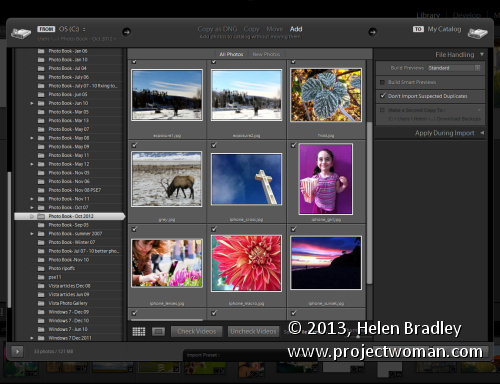
Start by downloading images from your camera cards. How you do this can impact how easy it is to do other things later on. For example, if you’re using Lightroom and you have multiple cards from a shoot, you might consider downloading all the images from all your cards into one folder on your computer before importing the images into Lightroom. This way you will have all the images in the Current/Previous Import folder in your Catalog panel allowing you to isolate all these images to deal with them as a group.
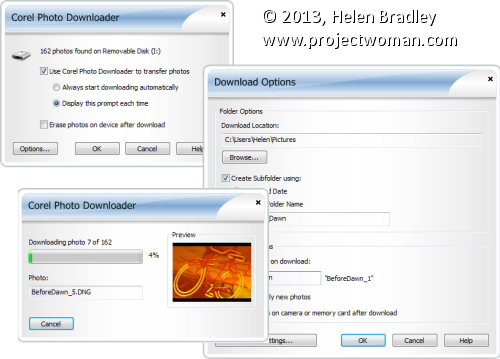
In any application you will need to set the import dialog so that the downloaded images are handled in accordance with your image handling workflow. Programs like Photoshop Elements include a special photo downloader and if you accept its download defaults then your images will be stored subfolders by date. If this isn’t what you want to happen you need to change the settings before downloading so you don’t have to fix the problems later.
So, in Photoshop Elements Photo Downloader dialog, select the source location for your images and the place to store them in. While the default is your My Pictures folder you can change this as necessary. Select a subfolder for the images and then determine how to name this – either by date or a custom name. If your workflow calls for your images to be renamed then you can do so as you import them – there are options in this dialog to name files by date, or to apply a custom name and sequence number.
Taking the time to not only get your images into the right place the first time and to rename them on import will save you hours of work later on.
In addition, in Photoshop Elements for example, if you select the Advanced dialog, you can add creator and copyright metadata to the images as you import them – something that you can’t do later on. This Advanced dialog is the same dialog that you would use if you are importing images via Adobe Bridge but in the case of Bridge it is possible to edit and add metadata later on.
Whichever program you are using, check the program’s import options carefully to see what features it includes for renaming files, organizing images into folders, applying simple fixes and adding metadata as you import the images. Anything that can be done automatically as you import your images will save time later on.
Making backups
If you store all your images on just one disk there is a risk that you will lose them if your disk crashes or something happens to your computer. As a precaution and as part of your import process, and before you do anything more to your images, you should create at least one backup copy of them.
Some programs like Lightroom make this easy to do. In Lightroom’s Import dialog you can chose to backup your images to a second location as part of the import process. This is only the case if you choose Copy, Move or Copy as DNG as the import option, if you choose Add this option is not available. In the File Handling panel is a checkbox you can select to make a second copy of the images to a different location.
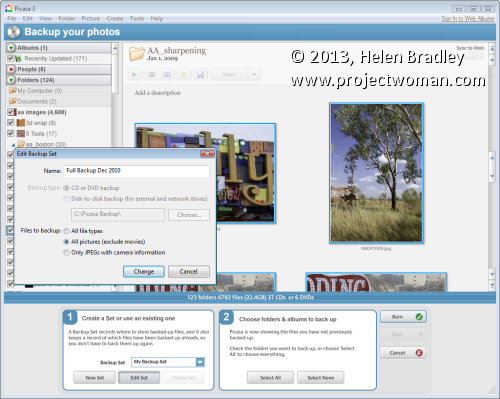
In other programs, you may need to back up the images manually. For example, in Picasa you can select the images to back up and choose Tools > Back Up Pictures. This opens up a set of step-by-step panels from which you will first select a Backup set or create a new one. The you can choose the folders or albums to back up and then click to Burn these to a series of CDs or DVDs or copy to an external or network drive.
A benefit of using this Picasa backup tool is that it will take note of which files you have backed up so that you won’t have to back them up again. This will reduce the time involved in backing up new downloads in future and will save you unnecessary duplication of effort.
Whatever your program offers, backing up is a task that should be done routinely whenever you download your images so you’ll be protected if your computer crashes or if you make mistakes while editing and need to restore an image from the backed up version.
In the next part of this series: Keywording and Copyright Metadata


Post a Comment
Please feel free to add your comment here. Thank you!