Thursday, July 24th, 2014

You can quickly insert text from a file into your document using Word’s Text from File command. This used to be as simple as choosing Insert > File but the command got hidden behind an additional layer of the UI in Word 2007, making it almost entirely invisible to most users.
To insert text from a file in all recent versions of Word, open the Insert tab in the ribbon and, in the Text settings find the Object button. Click the small arrow to the right of the Object button, and choose Text from File…. Choose the file you want and click Insert. The file type selection here defaults to Word documents only, so if you wish to insert a .txt file or other non-Word document, you’ll have to change the file type to your desired type or All Files.

If you insert a Word document it will include all elements of the document such as images and special formatting. If you wish to include the file’s header or footer (if it has one), you should insert the file into a new section of your document. Be careful when inserting multiple files with different formats, since text from one file may take on another file’s format if the inserts aren’t separated properly.
Labels: change, file, insert, multiple, text, Word
Categories:office
posted by Helen Bradley @ 10:00 amNo Comments links to this post
Friday, November 15th, 2013

Google Drive’s spreadsheets are liable to be shared and edited by many people.
This can potentially compromise the integrity of their data, so it’s a good idea to keep track of the changes made. Fortunately, Google provides a notifications service so the spreadsheet’s owner can do just that.
To access the notification rules, open the spreadsheet you want to track and select Tools > Notification Rules…. The resulting dialogue allows you to choose what changes to track. If only some data is critical, you can choose to only track a specific sheet or cell range. If you’ve set up a form to feed its result into your spreadsheet, you can choose to be notified whenever somebody submits the form. Choosing email – daily digest will add the notification to a daily email that contains all of your notifications that have this rule selected. Email – right away immediately sends the specific notification to you.
Click Save when you are done. Your new notification rule will be the first on a list of all the notification rules for that spreadsheet. From the list you can add new rules, or edit or delete an existing one.
Helen Bradley
Labels: change, form, google docs, google drive, notification, shared, spreadsheet
Categories:hunter, office
posted by Hunter Delattre @ 9:00 amNo Comments links to this post
Wednesday, November 13th, 2013

So you’ve decided of your documents is better of in somebody else’s hands. Maybe you prepared the document for a colleague with the intention of handing it off to them later, or maybe you’re just offloading some of your work. Whatever the case, Google makes transferring ownership of your files extremely simple.
To begin, you must first share the file with its new owner. Either click the blue share button in the top right corner of the document, or select File > Share…. When the share menu appears, enter the new owner’s email address and press Share & Save to share the file with them.

Their address should now be listed in the share menu. Click the can edit box next to their name, select is owner, then click Save Changes. The new owner will be notified by email about the ownership change, and you will still have editing privileges as long as the new owner allows it.
Helen Bradley
Labels: change, google drive, owner, share, transfer
Categories:hunter, office
posted by Hunter Delattre @ 9:00 amNo Comments links to this post
Friday, August 23rd, 2013

Keep track of the changes made to your document
Word’s Reviewing tools make it easy to show someone the changes you’ve made to a document.
You can set Word to record the changes before you make them by selecting the Review tab on the ribbon and click Track Changes > Track Changes.

Now, in Word 2007 & 2010, every addition to your document will be underlined and every deletion will be marked with strikeout. Word 2013 defaults to Simple Markup so you will need to choose All Markup to see the changes marked up.

These changes are retained when you save the document.
You can apply the changes permanently at any time by selecting Review > Accept or Reject and choose Accept All Changes (or Reject All Changes).

Word 2013 has a new feature which lets you force Track Changes to be enabled. Choose Review > Track Changes > Lock Tracking to enable this feature. Now if you save the document and send it to someone, any changes they make to the document will be recorded in the document. They cannot disable this feature without having the password to unlock the setting and disable it.
Helen Bradley
Labels: 2010, 2013, Accept All Changes, change, Highlight, Lock Tracking, mark, mark up, markup, Microsoft Office, Microsoft Word, review, tip, track changes, tracked changes, trick, Tutorial, up, Word, Word 2010, Word 2013
Categories:office
posted by Helen Bradley @ 6:23 amNo Comments links to this post
Friday, April 26th, 2013
Learn to find some hidden options in Lightroom by using the Alt (Option) key
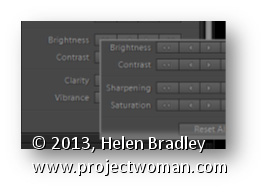
Some buttons and other features in Lightroom change depending on whether the Alt key (Option on the Mac) is pressed. For example in the Quick Develop panel in the Library module the Clarity and Vibrance options change to become Saturation and Sharpening when you hold the Alt (Option) key.
Also in the Library module the Import and Export buttons become Import Catalog and Export Catalog when the Alt (Option) key is selected. As you work in Lightroom, occasionally press the Alt or Option key to see if any useful options become visible when you do so.
Helen Bradley
Labels: Alt, buttons, change, changing, clarity, Clarity/Vibrance Option, hidden, key shortcuts, Keyboard Shortcuts, library module, Lightroom, option, option key, saturation, Saturation/Shapening Option, Sharpening, shortcuts, vibrance
Categories:Lightroom, photoshop
posted by Helen Bradley @ 7:26 amNo Comments links to this post

