Friday, July 31st, 2015

Move to the top or bottom of a Word Document on a Mac
From a file labelled stupid commands comes this one for getting to the top or bottom of a Word document on the Mac. You see simple commands like Page Up and Page Down which work on a PC fail spectacularly on a Mac so most hapless users just use the arrow key (a lot) or scroll bars to get around a Word document.
Smart users know there is a key combination that will do it, but it uses the Left Arrow and Right Arrow keys – I kid you not! How stupid is that? However, since it is useful (albeit stupid), I’ll tell you how. To get to the top of the document use Fn + Command + Left Arrow and to get to the bottom of the document use Fn + Command + Right Arrow.
So, now you know and you can move faster around your documents. Just try explaining that key combination to a friend and hold your tongue as they look at you like you’re nuts.
Labels: end of document, keyboard shortcut, mac, shortcut key, top of document, Word
Categories:Mac, office
posted by Helen Bradley @ 8:32 amNo Comments links to this post
Saturday, January 17th, 2015

If your Recent files list disappears from your Mac, here’s how to put it back
Word on my Mac doesn’t have a recently opened files list but Excel does. Turns out the feature was disabled (or perhaps it was never enabled). Whatever the reason, it wasn’t there and I wanted it to be accessible.
Lucky for me it is just a preference setting. Click the Word button, click Preferences and then General. Look for the Track Recently Opened Documents option and enable it. Set the number of documents to track and click Ok. Yeah! Now you can open a recently opened file like you expect to be able to do.
Labels: mac, mac word, ms word, open recent, recently opened files, Word
Categories:Mac, office
posted by Helen Bradley @ 5:10 pm3 Comments links to this post
Wednesday, August 20th, 2014

Great find! A list of good quality Microsoft Office tutorial resources
I’ve recently discovered an enormous list of Microsoft Office tutorials that may be worth checking out. Each piece of Office software has several listed tutorials ranging from beginner to advanced difficulty and general to specific usage.
Best of all, each tutorial has a brief summary of its contents so you can quickly decide if its new and interesting information. Hopefully every Office user will find something of use. You can visit the page here.
Labels: Excel, mba, Microsoft, ms office, Office, PowerPoint, resource, tips, tutorials, Word
Categories:office
posted by Hunter Delattre @ 8:00 amNo Comments links to this post
Thursday, July 24th, 2014

You can quickly insert text from a file into your document using Word’s Text from File command. This used to be as simple as choosing Insert > File but the command got hidden behind an additional layer of the UI in Word 2007, making it almost entirely invisible to most users.
To insert text from a file in all recent versions of Word, open the Insert tab in the ribbon and, in the Text settings find the Object button. Click the small arrow to the right of the Object button, and choose Text from File…. Choose the file you want and click Insert. The file type selection here defaults to Word documents only, so if you wish to insert a .txt file or other non-Word document, you’ll have to change the file type to your desired type or All Files.

If you insert a Word document it will include all elements of the document such as images and special formatting. If you wish to include the file’s header or footer (if it has one), you should insert the file into a new section of your document. Be careful when inserting multiple files with different formats, since text from one file may take on another file’s format if the inserts aren’t separated properly.
Labels: change, file, insert, multiple, text, Word
Categories:office
posted by Helen Bradley @ 10:00 amNo Comments links to this post
Monday, June 16th, 2014

Yikes! Just how do you resize a photo inside a PowerPoint or Word SmartArt placeholder
I got an email from a reader this morning. He has a PowerPoint slide (but it could as easily be a Word document or an Excel worksheet) and he wants to size a photo inside a placeholder. You see he was making an organization chart and he was dealing with lots of different head shots – all photographed differently. He wanted to make the faces the same relative size inside the placeholders – but to do this he had to get access to the photos inside the placeholders.
You see that’s the problem, every time you right click the placeholder and choose Size and Position you’re affecting the placeholder not the thing inside it! The solution is to use the Crop tool – so click on the placeholder and choose Picture Tools > Format tab and click the Crop tool.

Now you get handles around your photo and you can drag the handles to resize the image and you can move it to change its position inside the placeholder. When you’re done, click Crop again to finish. Easy when you know how.
Labels: Excel, hierarchy, organization chart, placeholder, position photo, PowerPoint, resize image, smart art, SmartArt, Word
Categories:office
posted by Helen Bradley @ 7:13 am4 Comments links to this post
Thursday, April 10th, 2014

If you always start a new page for a particular type of heading – include the page break in the style
When you always start a major heading item on a new page in a Word document you can configure your heading style so it has the page break built into it – saving you having to insert it manually.
To do this, select some text with formatted with the style that is to include the page break and locate the style in the Style gallery. If it does not appear there, display the Styles and Formatting task pane by clicking the dialog launcher in the bottom right of the Styles area in the ribbon.
Right click the Style name, choose Modify and then Format.
Click the Paragraph option and then click the Line and Page Breaks tab.
Enable the Page Break Before checkbox and click Ok twice.
The page break is now part of the style so a new page will be started each time you use that style. The style will also update and effect any text already formatted using that style in the current document.
Helen Bradley
Labels: heading style, Page Break, style, style tips, Tutorial, Word
Categories:office
posted by Helen Bradley @ 3:52 pmNo Comments links to this post
Thursday, January 9th, 2014

It’s actually not missing but it’s not where you expect to find it either.
I use Word on the PC every day and on the Mac only when I am traveling – I love my MacBook Air with its solid state drive – it’s light and an easy traveling companion.
What I don’t like is having to work out all the curly questions you have when things work differently in one operating system to another. Cue today’s issue. I was copying and pasting content from my website into Word on the Mac and I needed to remove the formatting – well I found the Clear Formatting button sort of where I expected it to be on the ribbon.
But when it came to copying a format from one piece of text to another I got stumped. You see the Format Painter isn’t on the ribbon where you expect it to be if you’re used to using Word on the PC. In fact Word on the Mac is a totally different animal.
To find the Format Painter look upwards – up from the ribbon, up from the ribbon tabs and up to what we Windows folk would call the QAT or Quick Access Toolbar. On that toolbar of tools in Word on the Mac is the Format Painter. Click the text to copy the format from, click the Format Painter and then click the text to paint it onto. It’s a simple process BUT you have to find the Format Painter button first!
Hopefully this helps you!
Helen Bradley
Labels: copy formats, format painter, mac, Microsoft Word, missing icon, ms word, osx, Ribbon, Word
Categories:Mac, office
posted by Helen Bradley @ 11:09 am1 Comment links to this post
Wednesday, October 16th, 2013

Sometimes you’ll want to add a comment to a piece of text but not so that it actually appears in the text.
For example you may want to ask someone else who is working on the document with you a question about something mentioned in the text or you may want to remind yourself to check the source of a quote you have used. The best choice for this task is Word’s Comment option. Select the text to attach the comment to and select Review > New Comment. A comment box will open to the side of the document with your initials and a comment number in brackets (eg [HB1]).

If your initials or name are incorrect, alter them by selecting File > Options > General and changing the Username and Initials text boxes.
If you’re viewing a document which contains a number of comments you can move from one to the next quickly by using the Previous and Next. Use the Delete Comment button to delete a comment, leaving the text it’s attached to intact – right clicking a comment and selecting Delete Comment works the same way. You can edit the text in a comment simply by selecting the comment and typing.
You can choose to print with or without comments by selecting the print range dropdown menu under print settings and checking or unchecking Print Markup.

Using comments is particularly useful when you’re working on a document with someone else as they effectively allow you to ‘carry on a conversation’ about the document.
Helen Bradley
Labels: comments, markup, Office, print, review, Word
Categories:office
posted by Helen Bradley @ 9:00 amNo Comments links to this post
Sunday, October 13th, 2013

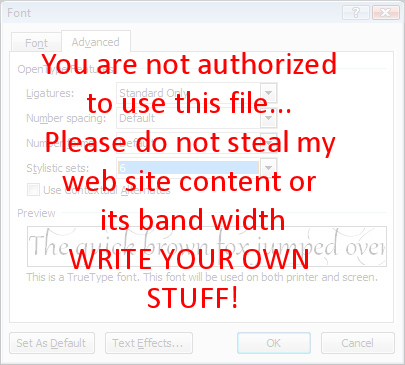
Using OpenType, you can add caps, ligatures, and other styles to your fonts to beautify your text.
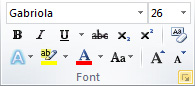
To get started with OpenType in Microsoft Word 2010, and in particular if you have the font Gabriola installed, type some text using the font Gabriola. Include some numbers because Gabriola has a particularly attractive range of numbers.
With the text selected from the Font group click the dialog launcher to open the Font dialog and select the Advanced tab.

From the Ligatures dropdown list, select Standard Only and from the Stylistic Sets dropdown list select style 6 and click Ok to apply it to the text. You will see that the text changes to show some attractive swashes on some letters. If you change to a different Stylistic Set you will see that some characters may change. You may need to increase the line spacing to see the full swashes appear.
This OpenType font feature only works for fonts that actually have these characters in them, which include Gabriola, Calibri, Cambria, Constantia, Corbel, Consolas and Palatino Linotype. You must also be working on a .docx format document and not in compatibility mode in Word. If you don’t have access to these font features, choose File -> Options -> Advanced and scroll to the bottom of the screen and click Layout Options. Ensure that the Disable OpenType Font Formatting Features checkbox is disabled.
In Word, if you set the typeface to Gabriola and then start typing you’ll notice that as you type, the characters may change because the position of the characters in relation to other characters around them has an effect on how individual characters are drawn.
Helen Bradley
Labels: beautify, font, ligature, opentype, Word
Categories:office
posted by Helen Bradley @ 9:00 am1 Comment links to this post
Friday, August 23rd, 2013

Keep track of the changes made to your document
Word’s Reviewing tools make it easy to show someone the changes you’ve made to a document.
You can set Word to record the changes before you make them by selecting the Review tab on the ribbon and click Track Changes > Track Changes.

Now, in Word 2007 & 2010, every addition to your document will be underlined and every deletion will be marked with strikeout. Word 2013 defaults to Simple Markup so you will need to choose All Markup to see the changes marked up.

These changes are retained when you save the document.
You can apply the changes permanently at any time by selecting Review > Accept or Reject and choose Accept All Changes (or Reject All Changes).

Word 2013 has a new feature which lets you force Track Changes to be enabled. Choose Review > Track Changes > Lock Tracking to enable this feature. Now if you save the document and send it to someone, any changes they make to the document will be recorded in the document. They cannot disable this feature without having the password to unlock the setting and disable it.
Helen Bradley
Labels: 2010, 2013, Accept All Changes, change, Highlight, Lock Tracking, mark, mark up, markup, Microsoft Office, Microsoft Word, review, tip, track changes, tracked changes, trick, Tutorial, up, Word, Word 2010, Word 2013
Categories:office
posted by Helen Bradley @ 6:23 amNo Comments links to this post


Wednesday, October 16th, 2013
A Comment on Comments
Sometimes you’ll want to add a comment to a piece of text but not so that it actually appears in the text.
For example you may want to ask someone else who is working on the document with you a question about something mentioned in the text or you may want to remind yourself to check the source of a quote you have used. The best choice for this task is Word’s Comment option. Select the text to attach the comment to and select Review > New Comment. A comment box will open to the side of the document with your initials and a comment number in brackets (eg [HB1]).
If your initials or name are incorrect, alter them by selecting File > Options > General and changing the Username and Initials text boxes.
If you’re viewing a document which contains a number of comments you can move from one to the next quickly by using the Previous and Next. Use the Delete Comment button to delete a comment, leaving the text it’s attached to intact – right clicking a comment and selecting Delete Comment works the same way. You can edit the text in a comment simply by selecting the comment and typing.
You can choose to print with or without comments by selecting the print range dropdown menu under print settings and checking or unchecking Print Markup.
Using comments is particularly useful when you’re working on a document with someone else as they effectively allow you to ‘carry on a conversation’ about the document.
Helen Bradley
Labels: comments, markup, Office, print, review, Word
Categories:office
posted by Helen Bradley @ 9:00 amNo Comments links to this post