Thursday, November 28th, 2013

Word tables – one click insert

Learn to insert a table in a Word document with a single click

When you need to repeatedly create the same type of table in a Word document you can do so using the new Word Quick Part feature.

This technique works well when you use the same table layout repeatedly. Your inserted table will be the same size, have the same number of columns and rows and contain any preset formatting that it had when you created it as a Quick Part entry. Once created, you can insert it quickly whenever you need it.

To do this:

  1. Create a new table with the number of rows and columns you want all your tables to have.
  2. Include any text in the table that needs to always be in this type of table – if there is none, leave the cells blank.
  3. Format the cells in the way you wan them to be formatted every time – including text formats and cell background colors and borders.

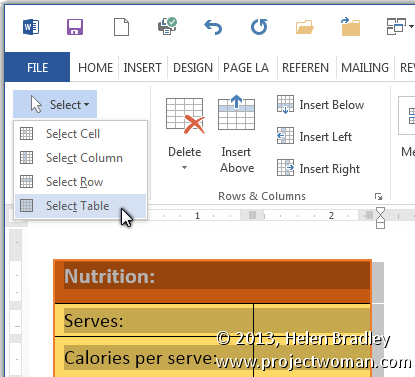
When you are done, select the table by clicking in it and choose Table Tools > Layout > Select > Select Table.

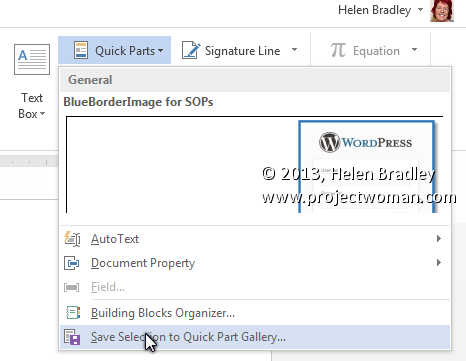
Choose Insert > Quick Parts > AutoText > Save Selection to AutoText Gallery.

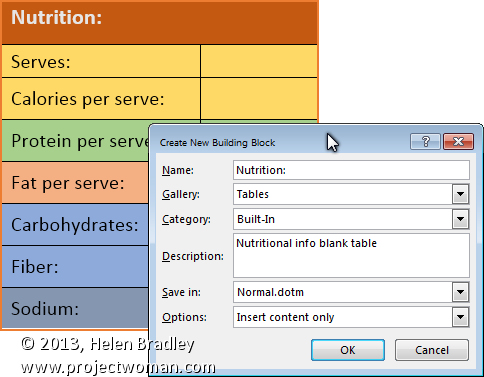
In the Create New Building block dialog set the Gallery to Tables and type a description of the table and click Ok.

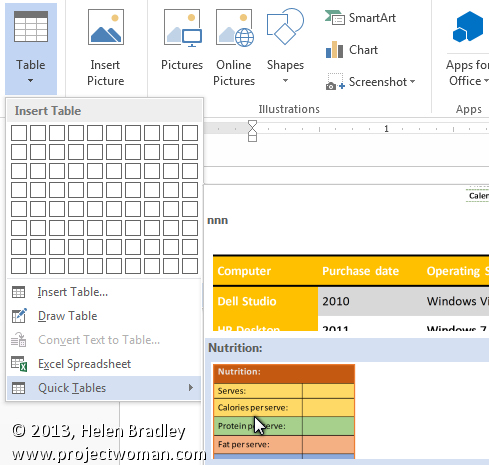
In future, to create a table to these exact specifications choose Insert > Tables > Quick Tables, locate the table in the list and click it to insert it into the document.

This feature is the successor to the AutoText feature in earlier versions of Word. It looks a little more cumbersome but it is more easily discovered so you don’t have to  remember where the table was saved as it appears automatically on the Insert Table menu.

Helen Bradley

Tuesday, November 3rd, 2009

Word 2007 – Boilerplate paragraphs

One typical use for Microsoft Word is in offices where documents and letters are created by assembling a series of standard paragraphs from a range of alternatives.

In the past Microsoft Word included the AutoText and AutoCorrect features and, like many users, you may have adapted AutoCorrect to use in creating boilerplate documents.

Some other users tweaked the AutoText tool so they could use it to insert content, such as graphics and text.

The AutoText tool no longer appears in Word 2007 and it has been replaced by a Quick Parts Gallery which makes saving, organizing and assembling documents from stored paragraphs, aka Building Blocks, much easier to achieve.

Find the Quick Parts tool on the Insert tab and click the down pointing arrow to open the Quick Parts Gallery.

Here you have a number of options including Document Property which lets you insert some of the common document properties into your document by clicking on the one to insert.

The Field option lets you insert fields much as you could in earlier versions of Microsoft Word.

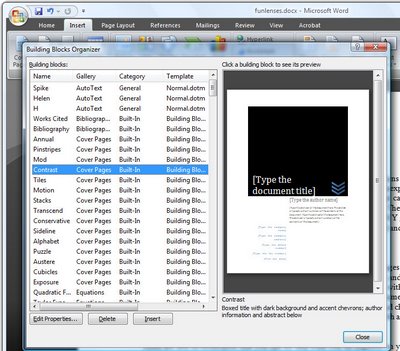
The Building Blocks Organizer is the newest feature and this is a repository of text blocks which you can add to your Word documents. These Building Blocks can be sorted by Name, Gallery or Category. Some of the Building Blocks come built-in to Microsoft Word and others are legacy AutoText entries from earlier installations of Microsoft Word.

You can insert a Building Block into a document by selecting the entry in the list and click Insert.

Helen Bradley

Sunday, October 21st, 2007

Image Autoentry – Word 2003

If there is an image that you typically use in a document such as your company logo you can create it so that it can be automatically inserted into your documents.

To start, first place the image into the document and size it and format it to suit your needs – this will include setting its Text Wrapping properties.

Now select the image and choose Insert > AutoText > New and type a descriptive word to describe the image such as logo. Click Ok.

In future, type the word logo and press F3 and the image will automatically appear in the document. This saves you from having to insert it and format it manually each time you need it. It’s a big time saver.

Helen Bradley

Wednesday, March 7th, 2007

Grouping AutoText entries in Word

Yesterday I explained how to use AutoText entries to speed up entering data. Today, I’ll show you how to organize your AutoText entries into groups on the menu using Styles:

You create or add an entry to AutoText groups on the AutoText menu by saving an AutoText entry formatted using a style with the name you want to be added to the menu. For example, to add an AutoText entry to the Closing group, type the text, select it and format it with a style called closing (or create a style with that name). Then save the text as an AutoText entry.

When an AutoText entry is saved that is formatted with a style a new entry with that style name appears on the AutoText menu or the item is added to the submenu if it already exists. So, to enter something on the closing submenu, format it with a style that you have called Closing before creating it.

Helen Bradley

Tuesday, March 6th, 2007

AutoText in Word

The AutoText tool in Word can help speed up your work by automatically inserting pieces of text and images. Here’s how to use it:

Step 1
To create an AutoText entry, type and then select the text to save and choose Insert > AutoText > New, type the name for the entry and click Ok. You can also do the same thing with images inserted into a document and create an AutoText entry from one.

Step 2
To later use a saved AutoText entry, type the name of the entry. When you have typed sufficient letters to uniquely identify the entry (at least four), Word will prompt you with the AutoText name. Press Enter to insert the AutoText entry. You can also type the name and press F3 or select the entry by choosing Insert, AutoText, AutoText and choose it from the dialog.

tomorrow… how to create your own groups in AutoText to organize entries.

Helen Bradley