Thursday, November 17th, 2011

A reader just asked if they added 50 images to a Word file would that blow out the file size when they send it to their colleagues. Answer: Yep! big time.
Most specially if you use your your beaut iPhone to capture the images, or a good compact camera or if you just insert big pictures. You see, unless you do something those big pictures will be inserted in the file and included in it when you save it – you can end up with a monster Word file (think 5Mb x 50!)
The solution to the problem is to compress the images. To compress all the images in your Word 2010/2007 file so that they take less room, click on any image and choose Picture Tools > Format tab. Locate the Compress Pictures button and deselect Apply only to this Picture so all images will be compressed.
If there is an Options button click it to see the sizing options (this appears in Word 2007 but not in Word 2010). Then choose the Target output – typically Screen or Print are good options as they will view well and print just fine. Check the Delete Cropped Areas of Pictures checkbox so cropped data won’t be saved. Click Ok. Then save the document.
This compression feature will reduce your file to a better size for sharing without compromising the quality of the document. And the changes affect only the images in the document not the originals on your disk.
Helen Bradley
Labels: compress images, Picture, reduce file size, reduce size of files, shrink, squash, Word 2003, Word 2007, Word 2010
Categories:Uncategorized
posted by Helen Bradley @ 9:59 amNo Comments links to this post
Wednesday, June 22nd, 2011

One of my readers – Joe – recently asked for some help regarding removing spaces in Word. He thought that the problem with the text was additional spaces, but when I looked into it, it appears that something else is causing the issue.
Here is a piece of sample text and you can see that it is a series of short lines which my reader wants to make into one continuous paragraph.

To see what is causing him issues click the Show/Hide¶ button on the Home tab of the Word Ribbon.
At the end of each line you will find either a Paragraph Marker or a Manual Line Break – each is different and you need to work out which you have at the end of each line. Also determine if there is a space before each of the markers. If there is not a space you will need to add it yourself. Here is a mix of both markers but no spaces:

To make the lines flow into each other, from the Home tab on the Ribbon click the Replace option. If you need to replace Paragraph Markers, enter ^p into the Find What box. If you need to replace a Manual Line Break then enter ^l (lower case L) into the Find What box.

If you need to add a space, click in the Replace With box and press the Spacebar once – if you don’t need to add a space, then leave the Replace With box empty.
Click Find Next and then click Replace. Check to make sure the replacement is working as expected. If it is, click Replace All and lines will be joined together into a single paragraph of text.
Typically you only have to replace one type of marker and not both, but if you have both, then you will need to find and replace each individually.
When you’re done click Show/Hide¶ again to hide the extra characters from view.
Helen Bradley
Labels: find and replace, remove spaces, Word 2003, Word 2007, Word 2010
Categories:Uncategorized
posted by Helen Bradley @ 7:45 pm5 Comments links to this post
Tuesday, April 26th, 2011

I was at dinner the other night and talking computers with some friends. We were joking about Excel not being a word processor when the subject of images came up. And Lo! and behold someone suggested that Excel was a much better option to use than Word so far as images are concerned.
This has been a particular issue for me for years. You see Word inserts all images, by default as in line with text which is the option you’d probably never want to use.
I promised my friends to show them how to fix Word – permanently – so images get inserted as you’d want them to be – with a square wrap around. It’s a good starting point and my recommended default for Word. You can change the wrapping if you want but 99.9% of the time this is the setting you’ll want to use.
In Word 2003, choose Tools > Options > Edit tab and from the Insert/Paste Pictures as dropdown list choose Square and click Ok.

In Word 2007 choose File > Word Options > Advanced tab and locate the Cut, Copy and Paste group. From the Insert/Paste Pictures as dropdown list choose Square and click Ok.

In Word 2010 choose File > Options > Advanced tab and locate the Cut, Copy and Paste group. From the Insert/Paste Pictures as dropdown list choose Square and click Ok.

Now you know how to fix it … spread the love and tell a friend!
Helen Bradley
Labels: image, insert, square, Word 2003, Word 2007, Word 2010
Categories:Uncategorized
posted by Helen Bradley @ 11:40 am3 Comments links to this post
Monday, January 24th, 2011

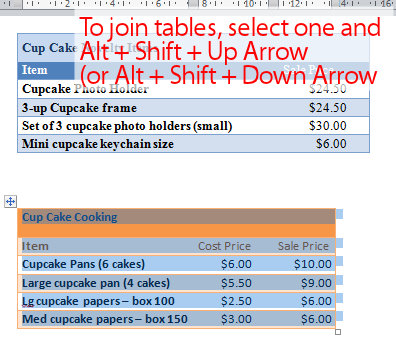
Quite often you’ll find that you have two tables in a Word document and you want to join the two together to make just one table. The solution is simple but way from obvious.
To do this, first select over all the cells in one of the two tables. If the table is underneath the one you want to join it up to, then press Alt + Shift + Up Arrow to move the table up the document so that it joins the bottom of the table before it. Keep pressing the key until the top row that you have selected joins the bottom border of the one above.
If you have selected the topmost table, then press Alt + Shift + Down Arrow until the top table locks onto the table below.
You can also drag one table up or down until it joins but this method is very slick. It also works on a single row so you can take one row from one table and move only it to join up with another table or to become a table all of its own. Experiment with this key combination – I’m sure you will love it.
Once you’ve done this, the tables will be joined to make one single table. If desired, you can then adjust the positioning of the columns so that the columns match between the two tables – this isn’t required but you may want to do it if the columns are supposed to be the same throughout.
Helen Bradley
Labels: join two tables, shortcut keys, Word, Word 2003, Word 2007, Word 2010
Categories:Uncategorized
posted by Helen Bradley @ 9:36 am50 Comments links to this post
Thursday, January 20th, 2011

Sometimes you’ll need to include a table in a document but place it so that it’s placed over a series of columns rather than inside the column itself.
To do this, click where you want the table to appear and insert the table at this point.
Hold your mouse over the table and you’ll see the table selector above the top left corner of the table. Click it to select the table and drag the table into position.
The default text wrap settings for a table in Word is that the text wraps around the table so there’s no special option to set to make this happen.
You can widen the table cells as large as necessary. If desired, the table can be sized so it fits the full width of the page or you can make it any size that you want.
To adjust the wrapping of text around a table, right click the table selector (the little square above its top left edge) and choose Table Properties > Table tab. Here you can select how text flows around the table or you can make it not flow around it if you want the table to push the text completely out of its way.
Here too you can alter the alignment of the table – by choosing Left, Center or Right.
This table behavior is consistent across Word 2007, 2010, 2003 and earlier versions.
Helen Bradley
Labels: columns, table over columns, Word, Word 2003, Word 2007, Word 2010, Wrap text
Categories:Uncategorized
posted by Helen Bradley @ 9:19 am1 Comment links to this post
Tuesday, January 18th, 2011

One of the features of Microsoft Word is the ability to insert a line between columns in a Word document.
In Word 2003 and earlier choose Format > Columns and there is an option for Line Between in the dialog. Select it and click Ok and a line will appear between the columns.
In Word 2007 and 2010 the option is harder to find. You need to select the Page Layout > Columns > More Columns Option. This opens the Columns dialog, which gives you the opportunity to select the Line Between checkbox.
If you want to disable this feature, go back to the columns dialog and disable the checkbox.
Helen Bradley
Labels: line between columns, Word, Word 2003, Word 2007, Word 2010
Categories:Uncategorized
posted by Helen Bradley @ 9:06 am4 Comments links to this post
Saturday, January 15th, 2011

Continuing the short series on working with columns in Word, here’s how to create a column layout in Word.
Create two columns
To turn an entire document into columns in Word 2007 and 2010 click the Page Layout tab and select Columns > Two. This immediately formats all the text in your document into two columns.
In Word 2003 you’ll choose Format > Columns, select Two (or Three etc.,) and click Ok.
Remove two columns
To undo the change and set your document back to one column in effectively undoing the two columns, repeat the process. In Word 2007 or Word 2010, choose Page Layout > Columns > One. The default for any document is one column so all you’re doing is going back to the default. In Word 2003 choose Format > Columns > One.
Make only part of the document into columns
If you want only part of a document to be in columns then select that part of the document first. For example, you may select all the content after the heading, leaving the heading unselected so it will be full width of the page. With that content selected, choose Page Layout > Columns and then select the number of columns.
This will make just the selected text into columns, leaving everything else full width of the page.
Again, if that piece of text ever needs to be returned to a single column just click inside it, choose Page Layout > Columns > One and it will be restore to the way it used to look.
So, that’s how to make text in columns in Word, how to delete columns and how to make only part of a document into columns.
Helen Bradley
Labels: create text in columns, delete columns, Page Layout, Word, Word 2003, Word 2007, Word 2010
Categories:Uncategorized
posted by Helen Bradley @ 9:43 am2 Comments links to this post
Thursday, January 13th, 2011

One of the most difficult things that people find with working with columns in Word is moving between the columns.
The reason is that the process itself is anything but easy.
The Tab key, which will move you between cells in columns in a table, doesn’t work inside newspaper style columns in Word so that key is out.
Instead, to move or jump from one column to the next you’ll press Alt + Page Down to go to the column on the right (the second column) or Alt + Page Up to move to the first column.
When you click Alt + Page Down, if you are in column 1 you’ll go to the very top of column 2. If you keep pressing the key you’ll flip between the top character in each column.
If you’re somewhere in column 2, when you press Alt + Page Up you’ll go to the top of column 1.
These are the only specialist keys for moving or switching between columns – we could use more – like jumping from a line in one column to the same line in the one next to it – but nada! Sorry!
Helen Bradley
Labels: columns, jump, move between columns, shortcut keys, switch, Word, Word 2003, Word 2007, Word 2010
Categories:Uncategorized
posted by Helen Bradley @ 8:03 am6 Comments links to this post
Tuesday, January 11th, 2011

Ok, so you’ve formatted your text to be two columns in Word and you’ve typed something in the first column. You haven’t filled the first column because you don’t want to. Fair enough – it’s your document – your choice.
But you do want to type something in the next or second column but however hard you try – Word won’t play nice. It wants you to fill column one before you get to fill column two – you don’t want to – so you’re at a stalemate.
The solution is to force Word to the top of the second column and you do this by inserting a break. In Word 2002/2003 choose Insert> Break > Column Break.
In Word 2007 & 2010 choose Page Layout tab> Breaks > Column.
Now you can type at the top of the second column. Yeah!
Helen Bradley
Labels: columns, Type in second column, Word, Word 2003, Word 2007, Word 2010
Categories:Uncategorized
posted by Helen Bradley @ 7:40 am14 Comments links to this post
Sunday, January 9th, 2011
 I get a lot of folks at projectwoman.com who come looking for help with columns and Word – anything from Word 2002 through 2003 to 2007 and now 2010. I have to think the reason is that Microsoft doesn’t make it as easy as it thinks to work with columns.
In the next few posts I’ll show you some things to do with columns that I think most folk have trouble with.
First up, how to put a picture in between columns in Word. Start by formatting your text in columns and then add your picture.
Chances are it won’t move and sit between columns. The issue is that Word inserts images as In Line With Text by default which is the setting MOST OF US WOULDN’T USE IN 1,000 YEARS – but Microsoft doesn’t really understand most users and so that’s what we get – images that are stuck – they won’t move where we want them to go and they won’t rotate.
To fix this, in Word 2002/2003 from the Picture toolbar find the Text Wrapping button, click it and choose practically anything except In Line With Text – I choose Square because it is the best all round setting.
In Word 2007/2010 click the Picture and from the Picture Tools > Format tab on the ribbon click the Text Wrapping button and choose Square.
Now your picture does what you expected it to do in the first place – it moves, it can be rotated and when you drag it over the space between two columns it sits where it is put and it pushes the text out of the way around it. Neat huh?
One day… maybe Microsoft will hear our cries of frustration and insert images so they behave like they should without us having to jump through hoops to make them.
Helen Bradley
Labels: columns, pictures over columns., span columns, Word, Word 2003, Word 2007, Word 2010
Categories:Uncategorized
posted by Helen Bradley @ 8:23 pm4 Comments links to this post

